Buick RENDEZVOUS NAVIGATION 2004 Owner's Manual
Navigation system
Hide thumbs
Also See for RENDEZVOUS NAVIGATION 2004:
- Owner's manual (486 pages) ,
- Getting to know manual (20 pages) ,
- Quick start manual (2 pages)
Table of Contents
Advertisement
Quick Links
Download this manual
See also:
Owner's Manual
2004 Buick Rendezvous Navigation System
Overview ........................................................ 1-1
Overview
.................................................. 1-2
Features and Controls ..................................... 2-1
Features and Controls
................................ 2-2
Navigation Audio System ................................ 3-1
Navigation Audio System
Index .................................................................1
M
............................ 3-2
Advertisement
Table of Contents

Subscribe to Our Youtube Channel
Related Manuals for Buick RENDEZVOUS NAVIGATION 2004


Summary of Contents for Buick RENDEZVOUS NAVIGATION 2004
- Page 1 2004 Buick Rendezvous Navigation System Overview ............1-1 Navigation Audio System ........ 3-1 Overview Navigation Audio System ..........1-2 ......3-2 Features and Controls ........2-1 Index ..............1 Features and Controls ........ 2-2...
- Page 2 GENERAL MOTORS, GM and the GM Emblem, BUICK, Please keep this manual with the owner manual in your the BUICK Emblem and the name RENDEZVOUS vehicle, so it will be there if you ever need it while are registered trademarks of General Motors you are on the road.
- Page 3 Section 1 Overview Overview ............1-2 Introduction ...........1-2 Screen Setup ..........1-4...
- Page 4 Overview Introduction...
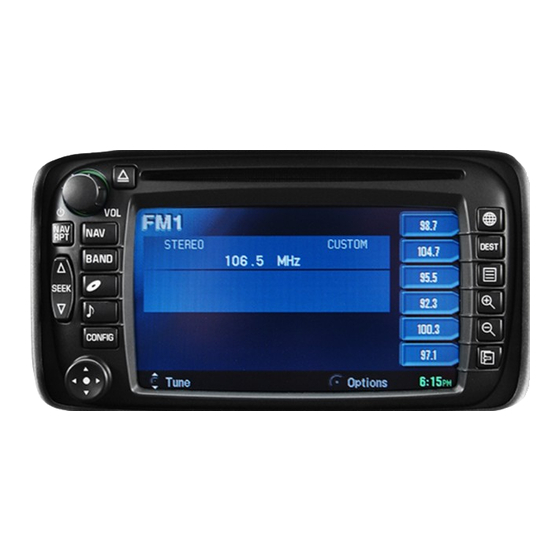
- Page 5 A. Power/Volume Knob. See Navigation System J. DVD/CD Eject Button. See “Playing CDs” under Screen on page 2-4. Navigation Audio System on page 3-2. B. NAV RPT (Navigation Repeat) Key. See Navigation K. DVD/CD Loading Slot System Screen on page 2-4. L.
- Page 6 Screen Setup Before you begin to operate the navigation system, read this manual thoroughly to become familiar with it and to understand how the system works. The navigation system allows you to do the following: • Plan a route with provided turn-by-turn route and map guidance with voice prompts.
-
Page 7: Screen Color
Contrast/Brightness Language To adjust the contrast or brightness of the navigation Your vehicle has been set for the English language, but screen, choose the desired option by selecting it with the you may also select French for all instructional text and joystick. - Page 8 Voice Volume To adjust the volume of the voice prompts you receive from the system, do the following: 1. Press the menu key. 2. Select Voice Volume. 3. Use the joystick to raise or lower the volume. The voice prompt will come on with each adjustment to give you an idea of the volume at each level.
-
Page 9: Adjust Clock
Adjust Clock To change the hours/minutes on the clock, do the following: 1. Using the joystick, highlight the time, and press the joystick to select it. 2. Move the joystick up or down to adjust the hour. 3. Once the desired hour is reached, move the joystick to the right to highlight the minutes. -
Page 10: English/Metric Units
English/Metric Units Daylight Savings: With this feature ON, the navigation system will automatically adjust the time for Daylight This option allows you to select either English or metric Savings. Using the joystick, you may also choose OFF measurements to appear for distances on the map. to turn this feature off. -
Page 11: Table Of Contents
Section 2 Features and Controls Features and Controls ........2-2 Global Positioning System (GPS) ....2-30 Using the Navigation System ......2-2 Vehicle Positioning ........2-30 Navigation System Screen .......2-4 Problems with Route Guidance .......2-31 Maps ............2-4 If the System Needs Service ......2-32 Symbols ............2-6 Ordering Map DVDs ........2-32 Navigation Menu ..........2-7 Database Coverage Explanations ....2-32... -
Page 12: Hard Keys
Features and Controls Hard Keys The following hard keys are located to the left of the navigation screen: Using the Navigation System • (Eject) This section presents basic information you will need to • NAV RPT know to operate the navigation system. •... -
Page 13: Alpha-Numeric Keypad
The alpha keypad will automatically be displayed when (Map): Press the map key to view the map screen the system needs you to input a street or city name. The showing current vehicle position. numeric keypad will automatically be displayed when the DEST (Destination): Press the DEST key to display system needs you to input a phone number or house the Destination menu. -
Page 14: Navigation System Screen
Navigation System Screen If a route has been planned, pressing the NAV key will display the map screen and the following information: The navigation screen is located in the center of the • Number of miles/kilometers between current instrument panel. See the navigatino system overview vehicle position and the destination under Introduction on page 1-2 for more information. -
Page 15: Map Adjustments
Map Adjustments When your vehicle is delivered from the factory, the dealer may have installed the map DVD. If the DVD was The system allows you to adjust the scale of view on not installed in your vehicle when first purchased, do the map. -
Page 16: Symbols
Symbols This symbol indicates the map with North up. The following symbols are the most common that appear on a map screen. Your vehicle is shown as this symbol. It indicates the current position of your vehicle on the map. While in North up mode, North will always be at the top of the map screen, regardless of which direction the vehicle is traveling. -
Page 17: Navigation Menu
Navigation Menu • Voice Volume • DVD (DVD Information) • Edit Route • Route Preview • Nav (Navigation) Setup • Memory Points A detailed description of each item follows in this section. Suspend Guidance When this function is selected, guidance to all current and programmed destinations is suspended, but the current route will be retained in memory. -
Page 18: Map Appearance
Map Appearance Heading up: This feature orients the map with the direction you are driving at the top of the map screen, regardless of which direction is North. 3D view: This feature gives maps a 3-dimensional view, and will remain in the Heading up position. Arrow: This feature continually displays directional turn guidance for your next maneuver. -
Page 19: Dvd Information
Voice Volume To adjust the volume of the voice prompts you receive from the system, do the following: 1. Press the menu key. 2. Select Voice Volume. 3. Use the joystick to raise or lower the volume. The voice prompt will come on with each adjustment to give you an idea of the volume at each level. -
Page 20: Edit Route
Edit Route The Search Condition screen allows you to select your route preference by choosing from Fastest, This function allows you to recalculate a route based Shortest, or Alternative route. By selecting the Fastest on your preferences. You can also add, reorder, or route, you will be routed along main roads and delete destinations, and adjust road preference settings. -
Page 21: Route Preview
Route Preview The Route Preference screen allows you to select your road preferences by setting which types of roads Selecting Route preview from the main navigation you wish to use and avoid. menu displays the map screen with the route highlighted. -
Page 22: Nav (Navigation) Setup
Nav (Navigation) Setup Notify seasonal restrict (restrictions): This feature can route you around seasonal restrictions, such as a closed road. Choose On to have your routes automatically calculated around seasonal restrictions, or Off to turn this feature off. Estimated travel time: This feature displays the estimated time to travel from your current position to the destination. - Page 23 Voice guide in all mode: With this feature On, you will Operation guide on map: This feature allows you to hear navigation voice prompts while in Audio and CD remove the toolbar from the bottom of the display screen modes. Choose Off to turn off the voice prompts in in order to see more of the map.
-
Page 24: Memory Points
Memory Points Choosing to register a Memory Point will take you to the Destination entry screen. The name, location, information, and icon for a Memory Point may be edited. Five preset destinations, as well as one for Home, may be registered or edited. The five preset destinations and Home are the only destination selections available from the Destination entry screen while the vehicle is moving. - Page 25 Destination If you need to see a more detailed search area map with a list of states, or to change the search area, select The Destination screen will give you more ways to Change. Use the joystick to highlight the number for the plan a route by entering destination points.
- Page 26 To enter a destination, choose from one of the following Enter the street name using the alpha keypad. See destination entry methods: “Alpha-Numeric Keypad” under Using the Navigation System on page 2-2 for more information. Do not include Address name extensions such as N., or Drive. For example, the street name N.
- Page 27 Point of Interest (POI) The Point of Interest (POI) destination entry method allows you to choose a destination from the POI list. Selecting POI from the Destination screen brings up the Point of Interest entry menu. The POIs in the database are cross referenced between Name, Category and City Names.
- Page 28 Government Office • Bank • ® • Border Crossing • Grocery Store • Bowling Center • Historical Monument • ® Buick • Hospital • Bus Station • Hotel • Business Facility • Ice Skating Center • ® Cadillac • Library •...
- Page 29 • • ® Movie Theater Saab • • ® Museums Saturn • • Night Club School • • ® Oldsmobile Shopping • • Other Ski Resort • • Park & Ride Sports Complex • • Park/Recreation Area Theatre • • Parking Garage Tourist Attraction •...
- Page 30 Memory Points The Memory points destination entry method allows you to select a destination by choosing from a list of marked points on the map that were previously marked. Memory points include up to 30 saved points and five preset destinations. Selecting marked points from the Destination screen allows you to select any one of the marked points as the active destination.
- Page 31 Preset Destination Previous Destination The Preset destination entry method allows you to select destinations that were registered as presets 1 through 5. Besides the Home preset destination, these are the only presets available for selection while the vehicle is moving. Once your destination entry is complete, a screen with the destination preview menu will be displayed.
- Page 32 Intersection Now begin entering the second street name, and choose the desired street name from the list. After both street names in the intersection have been selected, a list of cities containing the selected intersection will appear. If there are several cities that contain that specific intersection, you must specify a city.
- Page 33 Phone Number The Phone Number destination entry method allows you to search for a point of interest (POI) destination by entering the POI phone number. Use the joystick to enter the POI phone number on the numeric keypad and select OK. The destination location will then be displayed.
- Page 34 Emergency Freeway Entrance/Exit The Emergency destination entry method allows you The Freeway Entrance/Exit destination entry method to select a destination by choosing from a list of allows you to select a destination by entering a freeway emergency facilities. The list will vary by area. Selecting entrance or exit point.
- Page 35 Prev (Previous) Start Point The route will then be calculated, and you will hear a voice prompt directing you to “Proceed to the The Previous start point destination entry method allows highlighted route.” If you do not hear a voice prompt, you to select the last start point as a destination.
- Page 36 Destination Preview Menu Replace: This option will replace a destination to the current route of the displayed destination. Info: This option will display the telephone number for the point of interest (POI) which contains the displayed information in the database. Route preference: This option will display the Route Preference screen.
- Page 37 Map Menu After selecting one of the three routes, the road distance and estimated travel time will be displayed. Once you select a destination and begin your route, The Fastest route means you will be routed along main you can press the center of the joystick to view a menu roads and highways, and does not necessarily mean with additional route options.
- Page 38 Once you choose POI selection, the Show POI To view a list of local POIs, select Local POI List. Icons screen will appear and display the different POI The Local POI List screen will list the closest POIs from categories. Use the joystick to select up to five different the categories you have selected.
-
Page 39: Colors On The Map
• To view POI information, move the joystick so that the Detour for 3 mile?: Select Yes to recalculate your joystick indicator is located on the desired POI icon, and route and detour for three miles around the press the joystick to select it. Once a POI is selected, vehicle’s current position. -
Page 40: Global Positioning System (Gps)
Global Positioning System (GPS) Do not apply aftermarket glass tinting to the vehicle’s windshield. Glass tinting will interfere with the system’s ability to receive GPS signals and may cause the The Navigation System determines the position of your system to malfunction. vehicle by using satellite signals, various vehicle signals and map data. - Page 41 • Problems with Route Guidance The vehicle has just been transferred by a vehicle carrier or a ferry. Inappropriate route guidance may occur under any of • The current position calibration is set incorrectly. the following conditions: • The vehicle is being driven at high speeds. •...
-
Page 42: If The System Needs Service
If the System Needs Service Database Coverage Explanations If you are still experiencing difficulty with your navigation Coverage areas vary with respect to the level of map system after reading this information, see your dealer detail available for any given area. Some areas will for assistance. - Page 43 Section 3 Navigation Audio System Navigation Audio System ........3-2...
-
Page 44: Navigation Audio System
Navigation Audio System Playing the Radio The audio system can be operated using the knobs and The audio system has been designed to operate easily hard keys located on both sides of the navigation screen. and give years of listening pleasure. You will get the most enjoyment out of it if you acquaint yourself with it first. -
Page 45: Finding A Station
Finding a Station Setting Preset Stations The six multi-function keys located to the right of the BAND: Press this key to access the BAND screen and navigation screen, allow you to store your favorite to switch between AM, FM1, FM2, or XM1 and XM2, stations. -
Page 46: Audio Screen
Audio Screen FM2 Source Shown, Other Sources Similar If the radio is on while the navigation system is in use, a FM1 Source Shown, Other Sources Similar smaller audio screen will appear, located on the left If the radio is on while the navigation system is not side of the map screen. - Page 47 desired level. Then, as you drive, SCV automatically increases the volume, as necessary, to overcome noise at any speed. The volume level should always sound the same to you as you drive. EQ (Equalizer): While in the Audio menu, use the keys labeled EQ1 through EQ5 to choose preset bass, midrange, and treble equalization settings.
-
Page 48: Radio Data Systems (Rds)
Radio Data Systems (RDS) RDS Option Menu Your audio system is equipped with a Radio Data System (RDS). Using RDS, the radio can do the following: • Seek only to stations broadcasting the selected type of programming. • Seek to stations with traffic announcements. •... - Page 49 Press the SEEK up or down arrow to look for other To select PTY preferences, do the following: stations with that PTY. If a station with the selected PTY 1. From the RDS Option menu, press the PTY key to is not found, the radio will return to the original station.
-
Page 50: Xm™ Radio Satellite Service
XM™ Radio Satellite Service Traffic: This option allows you to hear traffic announcements. With this feature ON, if a traffic (48 Contiguous US States) announcement is available, it will interrupt what you are currently listening to. When the traffic announcement Your vehicle may be equipped with this feature. -
Page 51: Xm™ Options
XM™ Options This menu allows you to seek or scan for stations When XM™ is active, the channel name and number, based on their category. While in this menu you can song title and artist will be displayed on the screen. use the joystick to scroll through the categories you want to seek to. - Page 52 XM™ Radio Messages Radio Display Condition Action Required Message XL (Explicit Language XL on the radio display, These channels, or any others, can be blocked at a Channels) after the channel name, customer’s request, by calling 1-800-852-XMXM (9696). indicates content with explicit language.
- Page 53 XM™ Radio Messages (cont’d) Radio Display Condition Action Required Message No CAT Info Category Name not No category information is available at this time on this available channel. Your system is working properly. Not Found No channel available for There are no channels available for the category you the chosen category selected.
-
Page 54: Playing A Compact Disc
Playing a Compact Disc Remove the navigation map DVD from the slot and return it to its case. Insert a CD partway into the slot, label side up. The player will pull it in. There will be a 12 to 15 second delay while the CD is read, before it begins to play. - Page 55 Compact Disc Messages (Forward): Press and hold this key to quickly advance within a track. As the CD advances, elapsed CD ERROR: If this message appears on the screen, time will be displayed to help you find the correct the CD is not being read by the system. The CD could passage.
-
Page 56: Rear Seat Entertainment System
Rear Seat Entertainment System RSE Messages CD ERROR: If this message appears on the navigation screen, the DVD or CD is not being read by the system. The DVD or CD could be dirty, scratched, wet, or upside down. You may also be driving on a very rough road. - Page 57 Adjust Clock ............ 1-7 Finding a Station ..........3-3 Alpha-Numeric Keypad ........2-3 Audio Screen ........... 3-4 Audio System ..........3-2 Global Positioning System (GPS) ...... 2-30 Beep .............. 1-5 Hard Keys ............2-2 Colors on the Map .......... 2-29 Contrast/Brightness ...........
- Page 58 Map DVDs (cont.) Map Scales ............. 2-5 Screen Color ........... 1-5 Maps .............. 2-4 Screen Setup ........... 1-4 Memory Points ..........2-14 Setting Preset Stations ........3-3 Menu Suspend Guidance ........... 2-7 Navigation ............ 2-7 Symbols ............2-6 System Screen Navigation ............
Need help?
Do you have a question about the RENDEZVOUS NAVIGATION 2004 and is the answer not in the manual?
Questions and answers