Table of Contents
Advertisement
Advertisement
Table of Contents

Related Manuals for D-Link DHP-307AV


Summary of Contents for D-Link DHP-307AV
-
Page 2: Table Of Contents
Hardware Overview ..................5 LEDs ......................5 Connection ....................6 Hardware Installation ............... 7 Push Button Security ................. 8 Using the Setup Wizard ..............10 Configuration....................11 Security ......................13 Troubleshooting ................15 Technical Specifications ..............16 Contacting Technical Support ............17 Warranty ...................18 Registration....................23 D-Link DHP-307AV User Manual... -
Page 3: Product Overview
Section 1 - Product Overview Product.Overview Package.Contents • Two D-Link DHP-306AV Powerline AV Network Adapters • Two CAT5 Ethernet Cables • CD-ROM with Software and User Manual • Quick Install Guide System.Requirements • Windows® 7, Windows Vista , XP (with Service Pack 2) ®... -
Page 4: Introduction
Introduction D-Link announces a fast, 200Mbps* Powerline AV Network Starter Kit which allows you to connect your home computers, networking devices and gaming devices through the most pervasive medium in your house, the electric powerlines. You may also share Internet connections, printers, transfer files, play games, and more. -
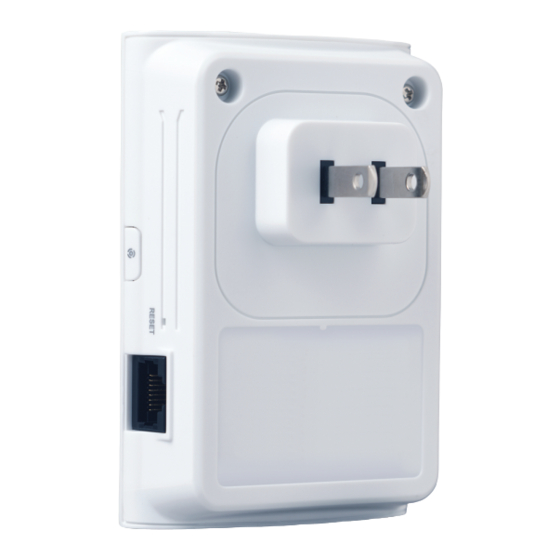
Page 5: Hardware Overview
Red. The Powerline link rate is less than 50 Mbps. • Solid. The Ethernet port is linked but there is no data traffic. Ethernet LED • Blinking. The device is transmitting data. • Off. There is no Ethernet connection. D-Link DHP-307AV User Manual... -
Page 6: Connection
Press to secure your network. Refer to page 8 for more information. Reset Button Press and hold the button for 1 second to reset to factory default. Ethernet Port Connect the CAT5 Ethernet cable to the DHP-307AV Ethernet port. D-Link DHP-307AV User Manual... -
Page 7: Hardware Installation
• Power source is confirmed when the Power LED on the Adapter is illuminated. • D-Link recommends that to ensure optimal performance, the DHP-306AV should be directly plugged into a wall socket. Plugging the device into a power strip may increase the possibility of noise and interference in the network and lead to below optimal performance. -
Page 8: Push Button Security
The adapters will memorize the security settings even if they are unplugged. Note: To change the private encryption key, please reset the adapter back to its default value by pressing the Reset button for 1 second and then follow the security setup procedure above. D-Link DHP-307AV User Manual... - Page 9 Power LED will start blinking after you release the button. Note: Both Security buttons must be pressed within two minutes. After above network security setup steps, your Powerline network will be securely configured with the same network encryption key. D-Link DHP-307AV User Manual...
-
Page 10: Using The Setup Wizard
Using.the.Setup.Wizard Follow the simple steps below to run the Setup Wizard to guide you quickly through the installation process. Insert the D-Link DHP-307 CD into your CD-ROM drive. If the CD Autorun function does not automatically start on your computer, click Start > Run. In the Run command box type “D:\autorun.exe”, where D: represents the drive letter of your CD-ROM. -
Page 11: Configuration
Section 3 - Configuration Configuration After you have completed the D-Link Powerline AV Utility installation wizard, double-click the D-Link Powerline AV Utility icon on your desktop to start the configuration of the DHP-307AV. Double-click the D-Link Powerline AV Utility icon The D-Link Powerline AV Utility provides you the option of setting your own Powerline network and the network information of connected Powerline devices. - Page 12 • One square - Suitable for data and Internet activity connection. Link.Rate: Shows the link rate of the connected device. MAC.Address: Shows the MAC address of the connected device. Firmware. Shows the firmware version of the connected device. Version: D-Link DHP-307AV User Manual...
-
Page 13: Security
3. Select the Powerline devices that you would like to apply the encryption key setting. Then type your private encryption key into the Encryption Key Setting field and click Set Selected Devices. The utility will show a message once the setting been completed. D-Link DHP-307AV User Manual... - Page 14 Then follow the 1 to 3 steps of “Setting your private Encryption Key”. Your Powerline network will securely be configured with a customized encryption key and all devices can communicate with each other after your setting. D-Link DHP-307AV User Manual...
-
Page 15: Troubleshooting
• I’m having a lot of problems configuring my network: If you are having problems configuring the network with two or more Powerline AV Network Starter Kit, please reset all of the Network adapters and start configuring the adapters again. D-Link DHP-307AV User Manual... -
Page 16: Technical Specifications
• 0°C ~ 40°C • CE Class B • C-Tick Storage.Temperature • -10°C ~ 70°C AC.Input • 100 ~ 240VAC 50~60Hz Humidity • Operation: 10% ~ 90% RH Safety • Storage: 5% ~ 90% RH • UL, CE LVD D-Link DHP-307AV User Manual... -
Page 17: Contacting Technical Support
• Hardware Revision (located on the label on the bottom of the product (e.g. rev A1)) • Serial Number (s/n number located on the label on the bottom of the product). You can find software updates and user documentation on the D-Link website as well as frequently asked questions and answers to technical issues. -
Page 18: Warranty
Warranty Period or ninety (90) days, whichever is longer, and is subject to the same limitations and exclusions. If a material defect is incapable of correction, or if D-Link determines that it is not practical to repair or replace the defective Hardware, the actual price paid by the original purchaser for the defective Hardware will be refunded by D-Link upon return to D-Link of the defective Hardware. - Page 19 D-Link further warrants that, during the Software Warranty Period, the magnetic media on which D-Link delivers the Software will be free of physical defects. The customer’s sole and exclusive remedy and the entire liability of D-Link and its suppliers under this Limited Warranty will be, at D-Link’s option, to replace the non-conforming Software (or defective media) with software that substantially conforms to D-Link’s...
- Page 20 D-Link Systems, Inc., 17595 Mt. Herrmann, Fountain Valley, CA 92708. D-Link will not be held responsible for any packages that are lost in transit to D-Link. The repaired or replaced packages will be shipped to the customer via UPS Ground or any common carrier selected by D-Link.
- Page 21 FOR WARRANTY SERVICE) RESULTING FROM THE USE OF THE PRODUCT, RELATING TO WARRANTY SERVICE, OR ARISING OUT OF ANY BREACH OF THIS LIMITED WARRANTY, EVEN IF D-LINK HAS BEEN ADVISED OF THE POSSIBILITY OF SUCH DAMAGES. THE SOLE REMEDY FOR A BREACH OF THE FOREGOING LIMITED WARRANTY IS REPAIR, REPLACEMENT OR REFUND OF THE DEFECTIVE OR NONCONFORMING PRODUCT.
- Page 22 • Connect the equipment into an outlet on a circuit different from that to which the receiver is connected. • Consult the dealer or an experienced radio/TV technician for help. For detailed warranty information applicable to products purchased outside the United States, please contact the corresponding local D-Link office.
-
Page 23: Registration
Appendix F - Registration Registration Product registration is entirely voluntary and failure to complete or return this form will not diminish your warranty rights. Version 1.0 May 31, 2010 D-Link DHP-307AV User Manual...
Need help?
Do you have a question about the DHP-307AV and is the answer not in the manual?
Questions and answers