Samsung UF-130DX User Manual
High resolution digital presenter
Hide thumbs
Also See for UF-130DX:
- Software user's manual (33 pages) ,
- Software user's manual (19 pages) ,
- Reference manual (12 pages)

Related Manuals for Samsung UF-130DX


Summary of Contents for Samsung UF-130DX
- Page 1 HIGH RESOLUTION DIGITAL PRESENTER USER’S MANUAL PRESENTATION STATION Before attempting to operate this product, Please read the instructions carefully. www.samsungpresenter.com...
-
Page 2: Special Features
DSP chipsets deliver highest image quality and resolutions. The UF-130DX camera design now includes a 1.32 megapixel Progressive Scan CCD plus updated DSP chipset to provide the ultimate in image quality at HD resolution 720P at 30FPS (frames per second) plus selectable standard SXGA and XGA outputs. - Page 3 The UF-130DX is network ready allowing users to easily connect to the network for web browsing. And with remote desktop control capability, the UF-130DX can access a PC to easily transfer files for presentation. Wide screen, DVI and dual/single monitor display Not only is the new UF-130DX compatible with HDTV, 16:9 display systems, it’s the first document camera to provide options for Dual...
-
Page 4: Table Of Contents
Contents Product features and structure Safety precautions Uses of digital presenter Supplied accessories Name and function of each part Front side Main control panel Terminals at the back Remote Control Features & Functions Ready to use Setup Connecting to output device PC Monitor,Projector or DVI supporting device Desktop computer Connection Computer... -
Page 5: Safety Precautions
Safety precautions Follow these safety instructions when setting up and using your Digital Presenter: Do not place the presenter on an unstable cart, Never push objects of any kind through cabinet stand, or table. slots. Never spill liquid of any kind into the Do not use the presenter near water or sources of presenter. -
Page 6: Correct Disposal Of Batteries In This Product
Safety precautions Eco RoHS compliant Samsung Techwin cares for the environment at all product manufacturing stages to preserve the environment, and is taking a number of steps to provide customers with more environment-friendly products. The Eco mark represents Samsung Techwin’s will to create environment-friendly products, and indicates that the product satisfies the EU RoHS Directive. -
Page 7: Uses Of Digital Presenter
Uses of digital presenter Conference Education Detailed information in a report, form, table, etc. as well It can be used as an audiovisual tool for printed as a three dimensional object, such as a model, can be materials, such as text books, as well as audiovisual projected on a screen clearly that all the participants materials, educational materials, and especially for can focus on the same topic during a conference. -
Page 8: Supplied Accessories
Supplied accessories When you unpack your Digital Presenter, make sure that you have all these components. User's Manual DVI cable Remote control Adapter Lens cap VGA cable USB cable UF-130DX program Dust cover Carrying bag USB Mouse etc. Option... -
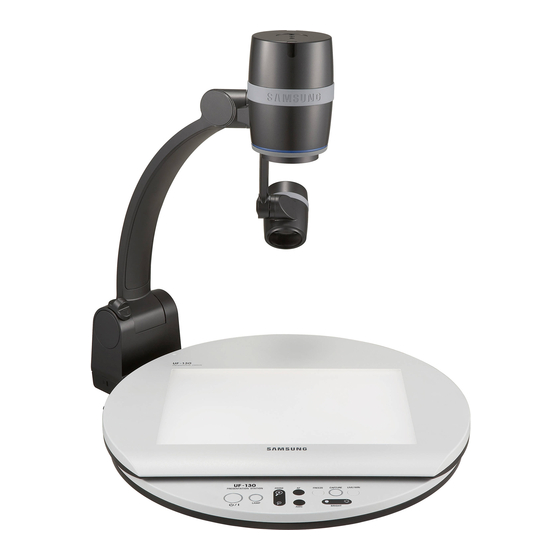
Page 9: Name And Function Of Each Part
Name and function of each part Front side... -
Page 10: Main Control Panel
Lens Can rotate to the front and back. IR Sensor Lamp unit (Upper lamp) Main support Main lock button Press to raise and lower the main support arm. Document Stage A4 document guides (indents) are provided on the stage. (A4 Lightbox is Optional) Main control panel... - Page 11 Name and function of each part Main control panel The buttons on the main control panel can also be found on the remote control. These buttons perform the same functions. POWER FREEZE Press and hold for 3 seconds to turn Press once to Freeze an image, Press again to off power.
-
Page 12: Terminals At The Back
Name and function of each part Terminals at the back POWER INPUT TERMINAL SD CARD SLOT Slot for SD Memory card Use this to connect the power cable. (DC12V) LIGHTBOX POWER OUTPUT DVI OUTPUT TERMINAL Connect this to the monitor or projector by When Lightbox is used you can connect the DVI port. -
Page 13: Remote Control Features & Functions
Name and function of each part Remote Control Features & Functions... - Page 14 POWER SHIFT LIVE VIEWER PANEL Turns power on or off. (UP/DOWN) Adjust Media player volume INT/EXT (Playing Media player / When PIP is off) Allows to choose the signal inputs to be PLAY displayed. Play/stop media player LAMP EXIT Turns the upper lamp on or off. Exit program what run Remote Hotkey FREEZE Keeps the current image on the screen.
-
Page 15: Setup
Setup Press the main lock button and raise Turn the lens area to face the main support. downward. Remove the lens cap. Unfold the lamp unit. Put the plug into the outlet. -
Page 16: Connecting To Output Device
Connect to the VGA input terminal PC monitor, projector, etc Connect to the DVI cable DVI input terminal Monitor, projector, etc Since the UF-130DX supports Dual output displays, both the DVI and VGA outputs can be connected to multiple displays. -
Page 17: Desktop Computer
Connecting to output device Desktop computer Connect a desktop PC and the presenter using USB cable and install the supplied program. You can see the projected image on the PC monitor and control the image using the program. RS-232C connection is available for advanced user. If you connect a PC with RS-232C cable, you should set up your PC and make your own program to control the projected image on PC. -
Page 18: Connection Computer
Connecting to output device Connection Computer If you connect computer through VGA IN port, you can receive video signal from the computer. Connection Connect the cable to the VGA input terminal PC monitor, projector, etc. Connect the cable to VGA IN terminal using the VGA cable from the computer. -
Page 19: Other
Connecting to output device Other SD Memory card Connection The SD memory card slots into the slot for saving and loading files. USB Mouse, Keyboard, and Memory Stick Connecton Connect and use HID USB mouse/keyboard or memory device for saving files and for using desktop. Mouse/Keyboard (Left 2 slots), USB Memory stick (right 1 slot) Network Connection Ethernet Port :... -
Page 20: Using The Presenter
Using the presenter To show the image received from external device Set up your digital presenter properly. (See page 15.) Connect the input device from which you want to receive the image and the output device in which you want to show the image. (See pages 16 through 19) Turn the power off the input and output device on, and the digital presenter on. - Page 21 Using the presenter Choose the video source with the INT/EXT button of the presenter. • Each time you press the button, the display shows EXT OUT, INT OUT • EXT OUT View the image from an external VGA output device through a PC monitor or a projector connected to the digital presenter.
-
Page 22: Adjusting Your Image
Adjusting your image Use the control buttons on the remote control, on the control panel of the presenter or the control panel on the Live Viewer (desktop) to adjust the projected image. Some of the main features are described below : Adjusting image size Press WIDE or TELE button on the remote controller, the control panel on the Live Viewer (desktop) or the control panel on the Live... - Page 23 Adjusting your image Adjusting image color For automatic color adjustment, press AWC button. If you want fine level adjustment, press BLUE+/- or RED +/- button on the remote controller or Live Viewer Panel to increase or decrease blue or red color factor manually. Hint The color level will To obtain the best result, place a sheet of white paper...
- Page 24 Adjusting your image Image rotate control For image rotation, press ROTATE button. To rotate the image by 90˚, 180˚, 270˚, 0˚, press ROTATE button The rotate image status will be displayed. Saving custom user setting After you adjust feature value, you can save the value for next time use. You can save up to 4 different custom user settings.
-
Page 25: Using Functions Of Os
- View live images through the DVI output, and view the Presentation Station's desktop or connected computer through the VGA port. - The Live Viewer button now launches a remote control GUI for the UF-130DX features. - Only Live images are output via the DVI port... - Page 26 Adding Shortcuts to the desktop: The UF-130DX is very similar to a normal PC when making a shortcut. Choose the program icon on the start menu or in my device. Copy that using the right click function on the mouse.
-
Page 27: Using Live Viewer
Using Functions of OS Using Live Viewer You can see Live image output through Samsung Digital Presenter. (For details, see page adjusting your image) Shifting Live Viewer Using drag and drop functions with a mouse, you can shift the Live Viewer panel. -
Page 28: Using Capture Viewer
Using Functions of OS Using Capture Viewer Image List It is the function of display or edit image captured. Through image list, you can see preview of 9 images at one time. You can move to next/prev page, using [Next], [Prev] button. On the list, left-top image is Num.1, right-bottom image is Num.9 and these numers are matched Remote control. - Page 29 Using Functions of OS You can easily edit images or even add text via a keyboard with the drawing function. Color Picker To change colors, Click the color picker icon - You can select two colors for function of drawing tool. (Mouse left and right button have different colors.) - Text function also have color picker.
- Page 30 Using Functions of OS Drawing the square which is painted fully To draw a square which is painted, Click the square icon and then, - Position the cursor at a corner of the area you want to select. - Click and drag the mouse until the selection is the size you want. - Release the mouse button.
-
Page 31: Using Remote Desktop
Using Functions of OS Using Remote Desktop Function of RDC Register IP address what you want to use, you can control that PC. You can modify/delete PC IP address what you want to connect. Register/Modify : Register/Modify Remote Desktop Service. Name : user’s name or PC Remote Computer IP Address : Register IP Address what you want to connect. -
Page 32: Using Remote Hotkey
Using Functions of OS Using Remote Hotkey It is a sort of shortcut for running files what you register. (Office, Media, Internet files). Saving Hotkey Click the 1~9 Number buttons for saving files which will be run. Sorting same format You can sort files as same format for registering hotkey easily. -
Page 33: Using Total File Viewer
Using Functions of OS Using Total File Viewer You can view any TEXT files using Samsung total file Viewer. Double click any TEXT files to view the contents via the Samsung Total file viewer instead of the Windows CE Viewer. -
Page 34: Using System Configuration
JPEG Quality : Adjust the quality of captured image. Display mode at boot up : Choose either PIP or Full Screen Mode at boot up Factory Reset : Resets the UF-130DX back to factory specifications, but retains any files that have been stored internally. - Page 35 (CE viewer or Samsung total viewer) Internet : Configure user's internet connections. Sound : Configure user's sound settings. Font : The Samsung UF-130DX supports English fonts in the same manner as Windows XP. Additional fonts can be uploaded and installed by the user.
-
Page 36: Using Display Setup
Using Functions of OS Using Display Setup You can change both the Display mode and the output resolution(s) of the UF-130DX Setup display mode : Depending on your display environment or needs, you can select Single or Dual Modes. The Single Mode setting provides PIP capabilities with both the VGA and DVI outputs driving the same image. -
Page 37: Using Help & Faq
Using Functions of OS Using Help & FAQ Offer Tips, Help & FAQ about SAMSUNG presentation station. When the firmware is updated on the website, the content of Help & FAQ is also updated. - Page 38 Storage Turn the power off and unplug the Attach the lens cap. power cord. While you push the main lock button Turn the head upside down. toward the front of the presenter, fold the arm shaft completely.
- Page 39 Storage Fold lamp arm opposite lens part. If you plan to store your Samsung UF-130 for a long period of time, protect it with the supplied cover.
-
Page 40: Trouble Shooting
Trouble shooting No image appears - Check if the input selection of the output device is appropriate. - Check if the iris control is adequate. - Check if the VGA cable is connected to the VGA output terminal correctly. - Check if the lens cap is removed. No communication between the PC and USB. -
Page 41: Battery Replacement
Battery replacement Open the battery compartment lid on Insert new batteries. the back of the remote controller. Close the lid. -
Page 42: Specifications
Specifications Note : Specifications are subject to change without notice. Mode UF-130DX Lens F=1.5(Wide) ~ 2.1(Tele) f=4.8 ~ 67.2 Max : 298 x 221mm, Min : 21.7 x 16.4mm Shooting Area Optical Zoom Powered (14x Optical), Digital (3x) System Auto focus / Manual... - Page 43 Memo...
- Page 44 HEAD OFFICE : SAMSUNG TECHWIN CO., LTD 145-3, Sangdaewon 1-dong, Jungwon-gu, Seongnam-si, Gyeonggi-do, 462-703, Korea TEL : 82-31-740-8160 FAX : 82-31-740-8145 U.S.A OFFICE:Samsung Opto Electronics Inc. 1480 Charles Willard St. Carson, CA 90746 Toll Free : 877-213-1222, Ext. 3306, Fax : 310-632-2195 www.samsungpresenter.com...
Need help?
Do you have a question about the UF-130DX and is the answer not in the manual?
Questions and answers