
Related Manuals for Asus M701SER


Summary of Contents for Asus M701SER
- Page 1 ASUS Desktop PC User Guide D701SER / D501SER / D701SERES / D501SERES / D701SERC / D501SERC / M701SER / M501SER / D701SERT S501SER...
- Page 2 Product warranty or service will not be extended if: (1) the product is repaired, modified or altered, unless such repair, modification of alteration is authorized in writing by ASUS; or (2) the serial number of the product is defaced or missing.
- Page 3 Configuring the HDD security setting using the BIOS ............57 Configuring the Keyboard/Mouse using the BIOS (on selected models only) ..58 Chapter 4 Connecting to the Internet Wired connection ...........................59 Chapter 5 Using ASUS Business Manager ASUS Business Manager ......................65 Chapter 6 Troubleshooting Troubleshooting ..........................67...
- Page 4 Appendix Working with Windows® Starting for the first time ......................75 Start menu ............................75 Windows® apps ..........................76 Connecting to wireless networks .....................76 Connecting to wired networks ....................77 Turning your computer off ......................77 Putting your computer to the Off mode with fast startup enabled ......77 Putting your computer to the lowest power mode ............78 Putting your computer to sleep ....................78...
- Page 5 Notices ASUS Recycling/Takeback Services ASUS recycling and takeback programs come from our commitment to the highest standards for protecting our environment. We believe in providing solutions for you to be able to responsibly recycle our products, batteries, other components, as well as the packaging materials. Please go to https://esg.asus.com/en/Takeback.htm for the detailed recycling information in different regions.
- Page 6 The use of shielded cables for connection of the monitor to the graphics card is required to assure compliance with FCC regulations. Changes or modifications to this unit not expressly approved by the party responsible for compliance could void the user’s authority to operate this equipment.
- Page 7 IC: Canadian Compliance Statement Complies with the Canadian ICES-003 Class B specifications. This device complies with RSS 210 of Industry Canada. This Class B device meets all the requirements of the Canadian interference- causing equipment regulations. This device complies with Industry Canada license exempt RSS standard(s). Operation is subject to the following two conditions: this device may not cause interference, and (2) this device must accept any interference, including interference that may cause undesired operation of the device.
- Page 8 VCCI: Japan Compliance Statement VCCI Class B Statement This is a Class B product based on the standard of the VCCI Council. If this is used near a radio or television receiver, it may cause radio interference. Install and use equipment according to the instruction manual.
- Page 9 Exposure to Radio Frequency Energy The radiated output power of the Wi-Fi technology is below the FCC radio frequency exposure limits. Nevertheless, it is advised to use the wireless equipment in such a manner that the potential for human contact during normal operation is minimized. FCC Bluetooth Wireless Compliance The antenna used with this transmitter must not be colocated or operated in conjunction with any other antenna or transmitter subject to the conditions of the FCC Grant.
- Page 10 ASUSTek Computer Inc. hereby declares that this device is in compliance with the essential requirements and other relevant provisions of Directive 2014/53/EU. Full text of EU declaration of conformity is available at https://www.asus.com/support/. The Wi-Fi operating in the band 5150-5350MHz shall be restricted to indoor use for countries listed...
- Page 11 The Radio Equipment Regulations 2017 (S.I. 2017/1206). Full text of UKCA declaration of conformity is available at https://www.asus.com/support/. The Wi-Fi operating in the band 5150-5350MHz shall be restricted to indoor use for the country...
- Page 12 Optical Drive Safety Information Laser Safety Information CD-ROM Drive Safety Warning CLASS 1 LASER PRODUCT WARNING! To prevent exposure to the optical drive’s laser, do not attempt to disassemble or repair the optical drive by yourself. For your safety, contact a professional technician for assistance.
- Page 13 IMPORTANT! To provide electrical insulation and maintain electrical safety, a coating is applied to insulate the device except on the areas where the I/O ports are located. FCC COMPLIANCE INFORMATION Per FCC Part 2 Section 2.1077 Asus Computer International Responsible Party: Address: 48720 Kato Rd., Fremont, CA 94538...
- Page 14 All ASUS products with the ENERGY STAR® logo comply with the ENERGY STAR® standard, and the power management feature is enabled by default. The monitor is automatically set to sleep within 10 minutes of user inactivity;...
- Page 15 Hazardous moving parts. Desktop should be completely shutdown before servicing product. Replacing fan components should only be attempted by qualified service personnel. Hazardous Moving Parts Warning WARNING: Keep fingers and other body parts away from any moving parts. CAUTION: DO NOT loosen the thumb screws to access the internal area of your device. If service or repair is required, return your device to an authorized service center.
- Page 16 Tool-less: D701SER/D501SER is tool-less design. You can disassemble the chassis by removing knurled thumb screws by hand, and replace hard disc drive and optical disc drive easily. After replacement, please assemble D701SER/D501SER back to the original state. For more replacement and assembly information, please refer link as below: https://www.youtube.com/watch?v=1KH_hYfbIOo...
- Page 17 Mouse x1 (Optional) Power cord x1 Support DVD x1 (Optional) Recovery DVD x1 (Optional) ASUS mouse pad x 1 (Optional) Installation Guide x1 Warranty card x1 • If any of the above items is damaged or missing, contact your retailer.
- Page 19 The ASUS Desktop PC provides cutting-edge performance, uncompromised reliability, and user- centric utilities. All these values are encapsulated in a stunningly futuristic and stylish system casing. Read the ASUS Warranty Card before setting up your ASUS Desktop PC. • The Desktop PC does not support Windows 7 operating system.
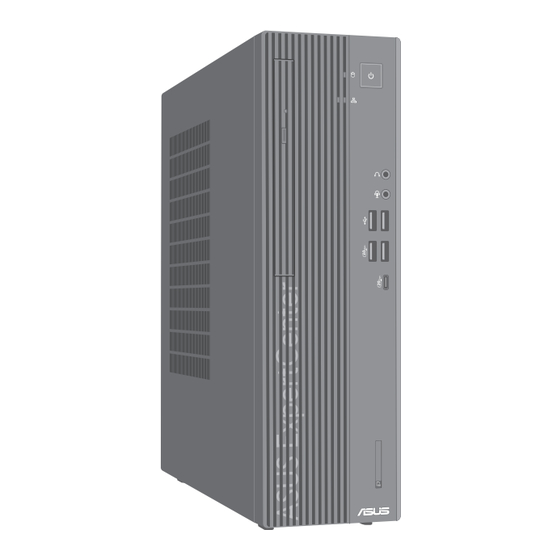
- Page 20 D701SER / D701SERES / D701SERC / M701SER / D701SERT Front panel HDD indicator. The LED lights up or blinks to indicate the status of the HDD. Power button. Press this button to turn on your computer. Headphone port. This port connects to a headphone.
- Page 21 SD card reader (optional). Insert an SD card into the slot. Optical disk drive eject button. Press this button to eject the optical disk drive tray. 5.25-inch optical disk drive bay (optional). There is an optical disk drive in this bay. ASUS Desktop PC...
- Page 22 D701SER / D701SERES / D701SERC / M701SER / D701SERT Rear panel VGA port. This port is for VGA-compatible devices such as a VGA monitor. DisplayPort. This port is for DisplayPort-compatible devices. HDMI™ port. This port is for a High-Definition Multimedia Interface (HDMI™) connector, and is HDCP compliant allowing playback of HD DVD, Blu-ray, and other protected content.
- Page 23 Expansion slot brackets. Remove the expansion slot bracket when installing an expansion card. PCIEX16 • ASUS Graphics Card is available on selected models. The display output ports on the optional ASUS Graphics Card may vary with different models. • Refer to Installing a graphics card in your computer for detailed instructions.
- Page 24 LAN (RJ-45) port. This port allows Gigabit connection to a Local Area Network (LAN) through a network hub. LAN port LED indications ACT/LINK LED SPEED LED Activity/Link LED Speed LED Status Description Status Description No link 10Mbps connection ORANGE Linked ORANGE 100Mbps connection LAN port...
- Page 25 Line In port (light blue). This port connects to a tape, CD, DVD player, or other audio sources. Refer to the audio configuration table below for the function of the audio ports in the 2, 4, 5.1, or 7.1-channel configuration. ASUS Desktop PC...
- Page 26 Expansion slot brackets. Remove the expansion slot bracket when installing an expansion card. PCIEX16 • ASUS Graphics Card is available on selected models. The display output ports on the optional ASUS Graphics Card may vary with different models. • Refer to Installing a graphics card in your computer for detailed instructions.
- Page 27 LAN port LED indications ACT/LINK LED SPEED LED Activity/Link LED Speed LED Status Description Status Description No link 10Mbps connection ORANGE Linked ORANGE 100Mbps connection LAN port BLINKING Data activity GREEN 1Gbps connection ASUS Desktop PC...
- Page 28 D701SER / D701SERES / D701SERC / M701SER / D701SERT Installing memory in your computer This desktop PC comes with four Double Data Rate 5 (DDR5) Dual Inline Memory Module (DIMM) sockets. The figure illustrates the location of the DDR5 DIMM sockets.
- Page 29 Install DIMMs with the same capacity from the same manufacturer in the slots of the same channel. Single memory capacity DIMM_A1 DIMM_A2 DIMM_B1 DIMM_B2 Total memory capacity 16GB 16GB 16GB 16GB 32GB 32GB 32GB 16GB 16GB 32GB 64GB 32GB 32GB 64GB 16GB 16GB 16GB 16GB 128GB 32GB 32GB 32GB 32GB ASUS Desktop PC...
- Page 30 D501SER / D501SERES / D501SERC / M501SER / S501SER Installing memory in your computer This desktop PC comes with two Double Data Rate 5 (DDR5) Dual Inline Memory Module (DIMM) sockets. The figure illustrates the location of the DDR5 DIMM sockets. DIMM_A2 DIMM_B2 Channel...
- Page 31 To install memory in your computer: Turn off your computer. Unplug all cables from your computer. Open your computer case. Remove the graphics card. Locate an empty DIMM socket. Press down and outward on the DIMM ejector(s) to unlock the DIMM socket. ASUS Desktop PC...
- Page 32 Align the notch on the bottom edge of the DIMM with the key of the DIMM socket, and then firmly insert the DIMM into the socket until the ejector(s) snap(s) back into place. Install the graphics card. Close your computer case. The above pictures are for reference only.
- Page 33 Open your computer case and locate PCIEX16 slot. Align the notch on your graphics card with the key of the slot, and then insert the card into the slot. The ejector will snap back into place automatically. ASUS Desktop PC...
- Page 34 Use a screw driver and a screw to lock the graphics card on the chassis. (Optional) Connect a proper power supply plug to the graphics card. Chapter 1: Getting started...
- Page 35 To connect an external monitor using the onboard display output ports: Connect a monitor to a display output port on the rear panel of your computer. Plug the monitor to a power source. D701SER / D701SERES / D701SERC / M701SER / D701SERT ASUS Desktop PC...
- Page 36 D501SER / D501SERES / D501SERC / M501SER / S501SER • If your computer comes with an ASUS Graphics Card, the graphics card is set as the primary display device in the BIOS. Hence, connect your monitor to a display output port on the graphics card.
- Page 37 Connecting a USB keyboard and a USB mouse Connect a USB keyboard and a USB mouse to the USB ports on the rear panel of your computer. D701SER / D701SERES / D701SERC / M701SER / D701SERT D501SER / D501SERES / D501SERC / M501SER / S501SER...
- Page 38 Connect one end of the power cord to the power connector on the rear panel of your computer and the other end to a power source. D701SER / D701SERES / D701SERC / M701SER / D701SERT D501SER / D501SERES / D501SERC / M501SER / S501SER For safety purposes, ONLY connect the power cord to a grounded electrical outlet.
- Page 39 Turning your computer ON To turn your computer ON: Turn your monitor ON. Press the power button on your computer. D701SER / D701SERES / D701SERC / M701SER / D701SERT Power button D501SER / D501SERES / D501SERC / M501SER / S501SER Power button Wait until the operating system loads automatically.
- Page 40 Enabling fast startup You can shut down the computer with fast startup enabled. To enable fast startup in Shutdown settings: Enter Control Panel in the search bar and open it (View by: Category), select Hardware and Sound > Power Options > Choose what the power button does, click Change settings that are currently unavailable, check Turn on fast startup (recommended) and click Save changes.
- Page 41 1 and USB 2.0 ports individually from the BIOS Setup. Refer to the Configuring the USB ports using the BIOS section in Chapter 3 of this user manual for details. Front panel D701SER / D701SERES / D701SERC / M701SER / D701SERT ASUS Desktop PC...
- Page 42 D501SER / D501SERES / D501SERC / M501SER / S501SER Rear panel D701SER / D701SERES / D701SERC / M701SER / D701SERT Chapter 2: Connecting devices to your computer...
- Page 43 D501SER / D501SERES / D501SERC / M501SER / S501SER ASUS Desktop PC...
- Page 44 • When you disconnect the audio device, you need to manually change the audio output to the internal speaker from the Control Panel. Connecting Headphone and Mic D701SER / D701SERES / D701SERC / M701SER / D701SERT Chapter 2: Connecting devices to your computer...
- Page 45 D501SER / D501SERES / D501SERC / M501SER / S501SER ASUS Desktop PC...
- Page 46 Connecting 2-channel Speakers Connecting 4-channel Speakers Connecting 5.1-channel Speakers Chapter 2: Connecting devices to your computer...
- Page 47 Connecting 7.1-channel Speakers D701SER / D701SERES / D701SERC / M701SER / D701SERT D501SER / D501SERES / D501SERC / M501SER / S501SER ASUS Desktop PC...
- Page 48 Changing to the external audio output When you connect an external audio device to your Desktop PC, enable the audio device output to ensure a clear audio quality. To change to the external audio output: Connect an external audio device such as earphone or speaker to the rear Line Out port. The Audio Manager screen automatically pops up.
- Page 49 Connect the two monitors to your computer and connect the power cords to the monitors. Refer to the Setting up your computer section in Chapter 1 for details on how to connect a monitor to your computer. D701SER / D701SERES / D701SERC / M701SER / D701SERT ASUS Desktop PC...
- Page 50 D501SER / D501SERES / D501SERC / M501SER / S501SER Turn on your computer. From the Start menu, click Settings > System > Display. Configure the settings for your displays. For some graphics cards, only the monitor that is set to be the primary display has display during POST.
- Page 51 • To get the best display performance, ensure that your HDMI™ cable is less than 15 meters. D701SER / D701SERES / D701SERC / M701SER / D701SERT D501SER / D501SERES / D501SERC / M501SER / S501SER ASUS Desktop PC...
- Page 52 Chapter 2: Connecting devices to your computer...
- Page 53 • Use your Desktop PC in a comfortably-lit area, and keep it away from sources of glare such as windows and straight sunlight. • Take regular mini-breaks from using your Desktop PC. ASUS Desktop PC...
- Page 54 Never remove cards while or immediately after reading, copying, formatting, or deleting data on the card or else data loss may occur. To prevent data loss, use “Safely Remove Hardware and Eject Media” in the Windows® notification area before removing the memory card. D701SER / D501SER / D701SERES / D501SERES /...
- Page 55 Using the optical drive (on selected models only) D701SER / D501SER / D701SERES / D501SERES / D701SERC / D501SERC / M701SER / M501SER / D701SERT S501SER Inserting an optical disc To insert an optical disc: While your system is on, press the eject button on the drive bay cover to open the tray.
- Page 56 Configuring the USB ports using the BIOS You can enable or disable the front and rear USB 3.2 Gen 2 Type-C®, USB 3.2 Gen 2, USB 3.2 Gen 1, and USB 2.0 ports from the BIOS Setup. To disable or enable the front and rear USB 3.2 Gen 2 Type-C®, USB 3.2 Gen 2, USB 3.2 Gen 1, and USB 2.0 ports: Press <Delete>...
- Page 57 To clear the user password, follow the same steps as in changing a user password, but press <Enter> when prompted to create/confirm the password. After you clear the password, the Set User Password item on top of the screen shows Not Installed. ASUS Desktop PC...
- Page 58 BIOS Setup. To allow a keyboard or mouse to wake up your computer: Restart your computer. When the ASUS logo appears, press <Delete> to enter the BIOS Setup. From the BIOS Setup EZ Mode screen, press <F7> to enter Advanced Mode. From the Advanced Mode screen, click Advanced.
- Page 59 Refer to the documentation that came with your DSL/cable modem. Connect one end of an RJ-45 cable to the LAN (RJ-45) port on the rear panel of your computer and the other end to a DSL/cable modem. D701SER / D701SERES / D701SERC / M701SER / D701SERT Modem RJ-45 cable...
- Page 60 Connect one end of an RJ-45 cable to the LAN (RJ-45) port on the rear panel of your computer and the other end to your LAN. D701SER / D701SERES / D701SERC / M701SER / D701SERT RJ-45 cable Chapter 4: Connecting to the Internet...
- Page 61 > Network & Internet > Ethernet > Network and Sharing Center. From the Open Network and Sharing Center screen, click Change Adapter settings. Right-click on your LAN and select Properties. Click Internet Protocol Version 4(TCP/IPv4) and click Properties. ASUS Desktop PC...
- Page 62 Click Obtain an IP address automatically and click OK. Continue to the next steps if you are using PPPoE connection. Return to the Network and Sharing Center and then click Set up a new connection or network. Select Connect to the Internet and click Next.
- Page 63 Repeat steps 1 to 4 of the previous section. Click Use the following IP address. Enter the IP address, Subnet mask and Gateway from your service provider. If needed, enter the preferred DNS Server address and alternative address. When done, click OK. ASUS Desktop PC...
- Page 64 Chapter 4: Connecting to the Internet...
- Page 65 Chapter 5 Using ASUS Business Manager ASUS Business Manager ASUS Manager provides a set of tools for customizing and maintaining your ASUS computer. For detailed information, please refer to https://www.asus.com/support/FAQ/1042634/. The URL may be changed without notice. ASUS Desktop PC...
- Page 66 Chapter 5: Using ASUS Business Manager...
- Page 67 If the keyboard is not responding, press and hold the Power button on your chassis until the computer shuts down. Then press the Power button to turn it on. I cannot connect to a wireless network using the ASUS WLAN Card (on selected models only)? •...
- Page 68 The arrow keys on the number key pad are not working. Check if the Number Lock LED is off. When the Number Lock LED is on, the keys on the number key pad are used to input numbers only. Press the Number Lock key to turn the LED off if you want to use the arrow keys on the number key pad.
- Page 69 Check if the disc is centered in the tray, especially for the discs with non-standard size or shape. • Check if the disc is scratched or damaged. The DVD drive eject button is not responding. From the Start menu, click File Explorer. , then click Eject from the menu Right-click ASUS Desktop PC...
- Page 70 • Ensure that the power cord is properly Your computer’s power cord connected. is not properly connected. • Use other compatible power cord. PSU (Power supply unit) Contact the ASUS Service Center about problems installing another PSU on your computer. Display Problem Possible Cause Action •...
- Page 71 Ensure the LAN LED is on. If not, try LAN cable problems another LAN cable. If it still does not work, contact the ASUS service center. Your computer is not Cannot access the Ensure that your computer is properly...
- Page 72 • Remove the extra memory modules Memory module problems The system often that you have installed, then try again. hangs or freezes. • Contact the ASUS Service Center for assistance. There is not enough Move your computer to an area with air ventilation for your better air flow.
- Page 73 • Contact the ASUS Service Center for assistance. If the problem still persists, refer to your Desktop PC’s warranty card and contact the ASUS Service Center. Visit the ASUS Support site at https://www.asus.com/support/ for the service center information.
- Page 74 Chapter 6: Troubleshooting...
- Page 75 Launching the Start menu You can launch the Start menu in two ways: • Position your mouse pointer over the Start icon on your desktop then click it. • Press the Windows® logo key on your keyboard. ASUS Desktop PC...
- Page 76 Opening programs from the Start menu One of the most common uses of the Start menu is opening programs installed on your Computer. You can open programs in two ways: • Position your mouse pointer over the program then click to launch it. •...
- Page 77 Shut Down Windows. Select Shut down from the drop- down list then select OK. If your computer is unresponsive, press and hold the power button for at least four (4) seconds until your computer turns off. ASUS Desktop PC...
- Page 78 Putting your computer to the lowest power mode You can put your computer to the lowest power mode in the following way: Enter Control Panel in the search bar and open it (View by: Category), select Hardware and Sound > Power Options > Choose what the power button does, click Change settings that are currently unavailable, uncheck Turn on fast startup (recommended) and click Save changes.
Need help?
Do you have a question about the M701SER and is the answer not in the manual?
Questions and answers