
Related Manuals for VINCENT CD-S6 MK


Summary of Contents for VINCENT CD-S6 MK
- Page 1 Vincent Bedienungsanleitung deutsch Instructions for use english Manuel d‘utilisation français CD-S6MK CD/HDCD-Player mit Hybrid-Ausgangsstufe Hybrid CD/HDCD-Player Lecteur de CD et HDCD hybride...
- Page 2 à la garantie ou pour les réparations après la période de garantie. Dans tous les cas, vos expé- riences avec les produits Vincent l'intéressent, n'hésitez pas à lui en faire part. Nous vous souhaitons beaucoup de plaisir avec notre / votre produit.
-
Page 3: Table Of Contents
Description of the device Remote control Installation Operating the receiver Tips Troubleshooting Technical Specifications Glossary english Consignes de sécurité Informations complémentaires Contenu de la livraison Description de l'appareil Télécommande Installation Commandes de l'appareil Conseils Dépannage Caractéristiques techniques Glossaire français Vincent... -
Page 4: Sicherheitshinweise
Händen an. Verwenden Sie das den werden. Damit Sie sich nicht unbeabsichtigt hoher im Lieferumfang enthaltene oder andere Netzkabel Lautstärke aussetzen, stellen Sie vor dem Wechsel des von Vincent. Eingangskanals stets einen niedrigen Wert ein. Ausschalten Reinigen Schalten Sie das Gerät jedes Mal aus,... -
Page 5: Weitere Hinweise
Vincent ist ein eingetragenes Warenzeichen der das Klangpotential Ihres Systems optimal auszunut- Sintron Vertriebs GmbH, 76473 Iffezheim. zen, empfehlen wir, die Geräte auf Vincent Racks zu Vincent arbeitet ständig an der Verbesserung und Wei- platzieren und nicht aufeinander zu stellen. -
Page 6: Lieferumfang
Audio-Quellgerät stecken Verstärkerschaltungen, Optisch harmoniert das Gerät mit den anderen auch bei diesen kann ein Umstieg auf röhrenba- Audio-Komponenten aus der tubeLine von Vincent. sierte Verstärker den Klang voranbringen. Dieser Zusammen mit dem Tuner und den Verstärker- Ansatz wird heute nur noch von einigen ausge- komponenten dieser Serie ergibt sich ein System, suchten Herstellern verfolgt. - Page 7 An diese 6,3 mm Klinkenbuchse kann ein Kopf- nungsbefehle entgegen. Sie dient nicht als An- hörer mit einer Impedanz von mindestens 32Ω zeigeelement. angeschlossen werden. 6. Anzeige-LED „WARM UP” 14. LEVEL: Lautstärkedrehknopf Anzeige für die Aufwärmphase der Röhren. Hiermit verändern Sie die Lautstärke des Kopfhörers. Vincent...
- Page 8 Das kleine Kunststoff-Gehäuse beinhaltet die sehen ist, kann dieser CD-Player-Signalausgang Gerätesicherung. Beachten Sie dazu die Sicher- durch ein mit Cinch-Steckern ausgestattetes Di- heitshinweise. gitalkabel damit verbunden werden. Es ist nicht notwendig, sowohl analoge als auch den digita- len Signalausgang (15)(16) anzuschließen. Vincent...
-
Page 9: Fernbedienung
Verbrauchte Batterien dargestellt, richtig ein. sind aus Gründen des Umweltschutzes entspre- chend der örtlichen Umweltschutzbestimmungen zu entsorgen und nicht in den Hausmüll zu geben. Verwenden Sie ausschließlich c. Schließen Sie das Batteriefach Mikrozellen der Größe AAA (LR3) der Fernbedienung. Vincent... -
Page 10: Tasten Der Fernbedienung
TASTEN DER FERNBEDIENUNG Vincent... - Page 11 Diese Taste stoppt eine laufende CD-Wiedergabe. Inbetriebnahme des Players auf einen anderen Wert als das Maximum „26“ geändert werden. (Schneller Rücklauf) Mit dieser Taste kann während der Wiedergabe schnell rückwärts gespult werden. (OPEN/CLOSE) Taste zum Öffnen und Schließen des CD-Fachs. Vincent...
-
Page 12: Installation
Ausfälle und Fehlfunktionen verursachen. COLD - Falsch - - Richtig - Signalkabel Um das Klangpotential der Komponenten voll auszuschöpfen, sollten nur hochwertige Lautsprecher- und Verbindungskabel, beispielsweise Vincent Kabel, verwendet werden. Bevorzugen Sie geschirmte Audio-Kabel. Ihr Fachhändler wird Sie gern diesbezüglich beraten. Vincent... - Page 13 XLR-Kabel erforderlich. Verbinden Sie die XLR-Anschlüsse „L“ und „R“ im Feld „AUDIO OUTPUTS“ (15) mit dem linken und rechten Audioeingang des meist mit „CD“, „XLR IN“, BALANCED IN“ oder „FRONT R/L“ beschrifteten XLR-Verstärkereingangs. XLR-Verbindung CD-S6MK Verstärker, Receiver BALANCED IN Vincent...
-
Page 14: Anschluss Des Netzkabels
Prüfen Sie, ob die Stromversorgung Ihres Haushalts für das Gerät geeignet ist. Benötigte Spannung und Frequenz sind auf der Geräterückseite neben der Netzbuchse abzulesen. Wenn die Stromversorgung geeignet ist, drücken Sie den Kaltgerätestecker des mitgelieferten Netzkabels fest in die Netzbuchse an der Geräterückwand. Verbinden Sie das andere Ende des Netzkabels mit einer Netzsteckdose. Vincent... -
Page 15: Bedienung Des Gerätes
Sichtfensters für des Fensters abgeschaltet. Die Schalterposition „1“ bewirkt die geringste die Röhre Intensität, die Einstellung „3“ die maximale Beleuchtungsstärke. Diese Funktion kann nur an der Geräterückseite eingestellt werden. Die Taste „DIMMER“ (20) bewirkt keine Änderung der Sichtfensterbeleuchtung. Vincent Vincent... - Page 16 Reihenfolge angewählt werden. Mit der Taste „PLAY/PAUSE“ (8)(25) kann danach die Wiedergabe gestartet werden; mit der Taste „CANCEL“ (30) wechselt der Player wieder in den „STOP“-Modus. Die Taste findet sich sowohl an der Gerätefront als auch auf der Fernbedienung. Vincent Vincent...
- Page 17 Gerätefront als auch auf der Fernbedienung. Erscheint in der Anzeige (3) der der CD CLOSE Schriftzug „OVER“, so sind mehr als 16 Titel auf der CD enthalten. Einige Titel können damit nicht im Musikkalender der Anzeige dargestellt werden. Vincent Vincent...
- Page 18 Wiedergabe der restlichen Stücke von der aktuellen Position fort. Solange der „Intro Scan“ aktiv ist, wird in der Anzeige (3) der Schriftzug „INTRO“ eingeblendet. Wird die Taste während der Wiedergabe oder der Wiedergabepause betätigt, beginnt der Suchlauf stets beim ersten CD-Titel. Vincent Vincent...
- Page 19 Eine eingelegte HDCD wird automatisch erkannt. Die maximalen Wert „26“ eingestellt ist (Tasten „VOL“ HDCD-LED leuchtet nur, wenn eine HDCD eingelegt (35)(36) ). Nur wenn diese Anzeige leuchtet, wird ist, deren Wiedergabe gestartet wurde und der das HDCD-Signal dekodiert. Ausgangspegel des Analogausgangs auf seinen Vincent Vincent...
-
Page 20: Weitere Tipps
Fernsehers oder in Verbindung mit Personalcom- vom Massepunkt abkoppelt, die Schutzleiter- putern, elektrostatischen Lautsprechern, Subwoo- wirkung bleibt erhalten. fern, Plattenspielern oder Kopfhörerverstärkern Ist dieses Brummgeräusch durch eigene Versuche hervorgerufen, sofern eine Audioverbindung zum nicht zu beseitigen, wird Ihnen Ihr Fachhändler Verstärker besteht. weiterhelfen. Vincent Vincent... -
Page 21: Fehlersuche
Ausgangspegel „VOL“ (35)(36) an der Erhöhen Sie vorsichtig den Ausgangspegel. Fernbedienung zu niedrig eingestellt. Mit der Taste „DIMMER“ (20) ist die Anzeige Betätigen Sie die Taste „DIMMER“ (20) Anzeige an vorher abgeschaltet worden. erneut. der Gerätefront funktioniert nicht Vincent Vincent... -
Page 22: Technische Daten
1x XLR stereo, 1x Cinch stereo, 1x Digital Coaxial 1x 6,3 mm Klinke Kopfhörer Kanaltrennung: > 90 dB Netzanschluss: 230V / 50 Hz Maße (BxHxT): 430 x 125 x 330 mm Gewicht: 9 kg Farbe: schwarz/silber Röhren: 3 x 12AX7, 1 x 12AU7 Vincent Vincent... -
Page 23: Lexikon/Wissenswertes
Verfälschungen darstellt. Nur sehr wenige CD-Titel empfangenden Gerät die auf dem Signalweg sind in diesem erweiterten Format erhältlich. durchs Kabel eingestreuten elektromagnetischen Störungen beseitigt werden können. Des Weiteren wird mit einem höheren Pegel übertragen. Dadurch ist diese Art der Audiosignal-Übertra- gung störsicherer. Vincent Vincent... -
Page 24: Safety Guidelines
Use the power Be careful with the volume setting, therefore, in order cable supplied or another one from Vincent. to prevent damage to hearing. So that you do not expose yourself to high volumes unintentionally, always set to a low level before changing the input channel. -
Page 25: Other Instructions
Iffezheim and may not be copied or distributed part- system’s sound quality, we recommend placing the ly or in full without express, written consent. equipment on Vincent racks and not putting them “HDCD”, “High Definition Compatible Digital” and on top of each other. -
Page 26: Included In Delivery
Today this approach is taken by only Vincent’s tubeLine. In combination with the tuner a few selected manufacturers. and the amplifier components in this design line a system can be assembled whose sound and manu- facturing quality are not common today. -
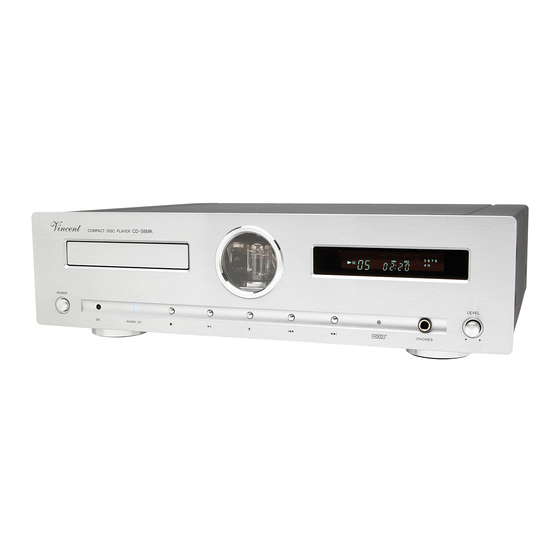
Page 27: Front View
32Ω. 6. WARM UP indicator LED 14. LEVEL: volume knob This LED is illuminated while after switching on the Use this knob to change the volume of the atta- tubes are being warmed up. ched headphone. Vincent... -
Page 28: Security Precautions
CD player signal output may be connec- le wall outlet. ted to this. It is not necessary to connect an ana- logue (15) and a digital signal output (16) at the same time. Vincent... -
Page 29: Remote Control
For environmental reasons, used batteries should be disposed of in accordance with local environ- mental regulations and not put with domestic waste. c) Put the compartment cover back on and close the battery compartment. Only use AAA (LR3) size batteries. Vincent... - Page 30 BUTTONS OF THE REMOTE CONTROL Vincent...
- Page 31 Reduces the output level of the analogue signal out- puts “AUDIO OUTPUTS” (15). Only in few cases the setting “VOL” must be changed after set-up of the player to a volume other than the maximum “26” to suit the device connected to these outputs. Vincent...
-
Page 32: Installation
Prior to the first installation the pro- Note that European and US XLR signal use is diffe- tective plastic caps must be removed rent. This Vincent device uses the European system from all the connections used at the in accordance with Standard AES14-1992 of the OUT PUT rear of the unit. - Page 33 Connect the XLR connectors “L” and “R” in the field “AUDIO OUTPUTS” (15) with the left and right connectors of the XLR amplifier input which is usually labelled “CD,” “XLR IN,” “BALANCED IN” or “FRONT R/L”. XLR connection CD-S6MK preamplifier, receiver integrated amplifier BALANCED IN Vincent...
-
Page 34: Connecting Headphones
If the power supply is appropriate, push the inlet connector of the supplied mains cable firmly into socket for the mains on the back of the device. Connect the other end of the mains cable to a mains socket. Vincent... -
Page 35: Operating The Appliance
“OFF”). Switch position “1” provides the lowest intensity and setting “3” the display window maximum brightness. This function can only be adjusted on the back of the unit. The button “DIMMER” (21) has no effect on the illumination of the tube display window. Vincent... -
Page 36: Playback Functions
Playback can then be started again with the “PLAY/PAUSE” button (8)(26). With the “CANCEL” button (31) the player goes back to “STOP” mode. The button is located both on the front of the device and on the remote control. Vincent... - Page 37 This button is located both on the front of the device and on Insert/Change the CD OPEN/ the remote control. If the text “OVER” appears in the display (3), then the CD CLOSE contains more than 16 tracks. Some of the tracks cannot then be shown in the display's music menu. Vincent...
- Page 38 Intro Mode and continues playing the remaining section from the current position onwards. The text “INTRO” will be shown on the display (3) while the “Intro Scan” is active. If this key is pressed during play or pause, the Intro Mode always starts with the first CD track. Vincent...
- Page 39 The HDCD LED will only light up if an HDCD is The HDCD signal will only be decoded if this dis- inserted, if it has been started and if the output play lights up! level of the analogue outputs has been set to its Vincent...
-
Page 40: Tips
Experience shows that this problem is mainly cau- sed by antenna-connected components (as TV-sets If the problem occurs and cannot be solved by or Tuners), personal computers, electrostatic loud- yourself your audio specialist dealer will help you. Vincent... -
Page 41: Search For Errors
“PHONES” headphones (13). The volume control “LEVEL” (14) has been set Cautiously raise the volume with this dial. too low. CD playback has not yet been started. Start playback with “PLAY/PAUSE” (8)(26). Headphones faulty. Use another set of headphones. Vincent... -
Page 42: Technical Specifications
Channel Separation: > 90 dB AC power connection type: 230V / 50 Hz Dimensions (W x H x D): 430 x 125 x 330 mm Weight: 9 kg Colour: silver / black Tubes: 3 x 12AX7, 1 x 12AU7 Vincent... -
Page 43: Glossary
Only very few CD titles are obtainable it is a more robust less sensitive signal path. in this extended format. Vincent... -
Page 44: Consignes De Sécurité
Ne saisissez pas l'appareil avec les mains mouillés changer de canal d'entrée pour ne pas être exposé ou humides. Utilisez le câble fourni ou un autre sans le vouloir à une plus forte puissance sonore. câble de Vincent. Nettoyage Arrêt Débranchez le connecteur avant de Arrêtez chaque fois l'appareil avant de... -
Page 45: Autres Consignes
HDCD sont des marques déposées nous vous recommandons de placer les appareils de Microsoft Corporation. sur des racks Vincent et de ne pas les poser l'un sur l'autre. Vincent travaille en permanence à l'amélioration et au développement de ses produits. Pour cette rai- Appareils électroniques usagés... -
Page 46: Contenu De La Livraison
à tubes peut améliorer le son. Seuls autres composants audio de la tubeLine de quelques rares fabricants appréciés s’engagent Vincent. Avec le tuner et les composants d’ampli- encore aujourd’hui dans cette démarche. fication de cette série, on obtient un système dont la qualité... - Page 47 Voyant pour la phase de mise en température des 14. LEVEL : tubes. bouton tournant de réglage du volume Sert à régler le volume du casque d’écoute. STOP Arrête la lecture en cours d’un CD ou passe de la pause de la lecture à l’état de base. Vincent...
- Page 48 CD peut y être relié. Il n’est pas nécessai- re de raccorder en même temps, une sortie de signal analogique (15) et le sortie de signal numé- rique (16). Vincent...
-
Page 49: Télécommande
Eliminez les piles usagées conformément aux dis- positions locales de protection de l'environnement c) Remettez le couvercle du compartiment et fermez et ne les jetez pas avec les ordures ménagères. le compartiment des piles. Utilisez exclusivement des piles rondes AAA (LR3). Vincent... - Page 50 TOUCHES DE LA TELECOMMANDE Vincent...
- Page 51 Cette touche arrête la lecture du CD en cours. (Retour rapide) Avec cette touche, on peut procéder à un retour rapide pendant la lecture. (OPEN/CLOSE) Touche pour ouvrir et fermer le tiroir de charge- ment du CD. Vincent...
-
Page 52: Installation
Prises RCA signal est correcte. Cela est toujours le cas, si les Des branchements RCA deux appareils sont de fabrication Vincent. Si deux mécaniquement identiques existent en tant que conn- appareils de norme différente sont raccordés, le exions numériques et analogiques. Veillez à ne pas signal est alors inversé. - Page 53 AUDIO OUTPUTS » (15) à la prise gauche et droite de l’entrée XLR de l’amplificateur, généralement dési- gnées par « CD », « XLR IN », BALANCED IN » ou « FRONT R/L ». Connexion XLR CD-S6MK p.ex. préamplificateur BALANCED IN Vincent...
- Page 54 La tension et la fréquence demandée sont à relever à l’arrière de l’appareil à côté de la prise secteur. Si l’alimentation secteur est conforme, enfoncez entièrement la fiche protégée du cordon d’alimentation fourni, dans la prise secteur à l’arrière de l’appareil. Reliez l’autre extrémité du cordon secteur à une prise secteur. Vincent...
- Page 55 « 1 » du commutateur entraine la moindre intensité, la configuration tube « 3 » le maximum d'éclairement. Cette fonction ne peut être réglée qu'à l'ar- rière de l'appareil. La touche « DIMMER » (20) n'entraîne pas de modifica- tion de l'éclairage de la fenêtre. Vincent...
- Page 56 « PLAY/PAUSE » (8)(26); le lecteur passe de nouveau en mode « STOP » à l’aide de la touche « CANCEL » (31). La touche se trouve aussi bien sur la façade avant de l’appareil que sur la télécommande. Vincent...
- Page 57 Si l’afficheur (3) indique « OVER », cela signifie Changement de CD CLOSE qu’il y a plus de 16 titres sur le CD. Quelques titres ne pourront pas être affi- chés dans le programme musical. Vincent...
- Page 58 à partir de la position actuelle. Aussi longtemps que « Intro Scan » est actif, l’afficheur (3) indique « INTRO ». Quand la touche est actionnée pendant la lecture ou la pause de lecture, la recherche démarre toujours par le premier titre du CD. Vincent...
- Page 59 LED HDCD ne s’allume que, lorsqu’un HDCD est (36)(37)). Le signal HDCD n’est décodé, que si ce chargé, que sa lecture a été lancée et que le voyant est allumé ! niveau de sortie de la sortie analogique a été réglé Vincent...
-
Page 60: Conseils
Si vous ne parvenez pas à éliminer vous-même ce ronflement, votre revendeur vous y aidera. Vincent... - Page 61 Augmentez prudemment le volume sonore à trop bas. l’aide de ce bouton tournant. La lecture du CD n’a pas encore été lancée. Démarrez la lecture avec « PLAY/PAUSE » (8)(26). Le casque d’écoute est défectueux. Utilisez un autre casque d’écoute. Vincent...
-
Page 62: Caracteristiques Techniques
> 90 dB Alimentation : 230V / 50 Hz Dimensions (L x H x P) : 430 x 125 x 330 mm Poids : 9 kg Variante de couleur : noir / argent Tubes : 3 x 12AX7, 1 x 12AU7 Vincent... -
Page 63: Glossaire
être éliminées. Le niveau de transmission lisation HDCD, qui représente ici des altérations est en outre plus élevé, les signaux audio transmis inaudibles. Seuls de très rares titres de CD, sont sont ainsi moins sensibles aux parasites. disponibles dans ce format étendu. Vincent... -
Page 64: Vincent
Vincent Bewahren Sie die Kaufquittung zusammen mit der Bedienungsanleitung auf. Die Kaufquittung dient Ihnen als Nachweis für den Beginn der Garantiezeit. Die Seriennummer befindet sich an der Rückseite des Gerätes. Please keep the receipt, store it together with this manual. The receipt is your proof for the beginning of the warranty period.
Need help?
Do you have a question about the CD-S6 MK and is the answer not in the manual?
Questions and answers