Table of Contents
Advertisement
Quick Links
URBAN RANGE
USER MANUAL
Version 1.3
Contents of manual may be updated without notice.
For the latest version of this manual please refer to our website: www.kalora.com.au
SERIES
Urban LS
(Wood Fire only)
Urban LS
Woodbox Accessory
Urban LS
Pedestal Accessory
Urban PT
(Wood Fire only)
Urban PT
Woodbox Accessory
Urban LS/PT Fan
Assembly
(Freestanding only)
Kalora Pty Ltd
Head Office
58 Access Way
Carrum Downs VIC 3201
Australia
+61 3 8579 5900
info@kalora.com.au
www.kalora.com.au
SG010100006
SG030700337
SG030700333
SG010100016
SG030700345
SG030700628
Advertisement
Table of Contents

Related Manuals for Kalora Urban PT


Summary of Contents for Kalora Urban PT
- Page 1 Kalora Pty Ltd Head Office 58 Access Way Carrum Downs VIC 3201 Australia +61 3 8579 5900 Version 1.3 info@kalora.com.au Contents of manual may be updated without notice. www.kalora.com.au For the latest version of this manual please refer to our website: www.kalora.com.au...
- Page 3 Warranty Registration Card INTRODUCTION Congratulations on purchasing a genuine Kalora wood heater. When cared for properly, these high quality, finely crafted wood heaters will offer many years of reliable performance. This instruction manual has been developed to ensure optimum performance from your Kalora wood heater.
-
Page 4: Wood Heater Safety
WOOD HEATER SAFETY When properly maintained and operated your wood heater should give you many years of service, however there are important safety aspects of these products that you need to be aware of when operating a wood heater. This appliance is not intended for use by persons (including children) with reduced physical, sensory or mental capabilities, or lack of experience and knowledge, unless they have been given supervision or instruction concerning use of the appliance by a person responsible for their safety. -
Page 5: Before Installing Your Wood Heater
BEFORE INSTALLING YOUR WOOD HEATER You need to consider the following to ensure the safe operation of your wood heater: - Provision of adequate air to support efficient combustion of the fuel. - A well sealed flue/chimney system, hereinafter referred to as the “flue system”. - The protection of combustible materials in proximity of the wood heater. -
Page 6: Unit Dimensions
HEATER URBAN LS (FRONT/SIDE) URBAN PT (FRONT/SIDE) HEATER WITH ACCESSORIES URBAN LS WITH STAND URBAN LS WITH WOOD STORAGE URBAN LS WITH PLINTH URBAN PT WITH WOOD STORAGE URBAN PT WITH PLINTH INBUILT HEATER (WITH ZERO CLEARANCE BOX) URBAN LS (FRONT / SIDE) - Page 7 Rear of firebox casing to centre of spigot Floor mount fascia width 1035 Mid mount fascia height Depth overall (including fascia and handle) Firebox casing height Freestanding Heater Urban LS/PT on Plinth 1456 1456 Firebox case height with accessories 1032 Clearance Box Height of clearance box front...
-
Page 8: Firebox Assembly
FIREBOX ASSEMBLY FIREBRICKS URBAN LS - FIRE BRICKS REMOVAL Top Baffle- Qty 2 Remove firebrick retainers Vermiculite Side Liner - Qty 2 Remove rear firebricks Vermiculite Base Liner - Qty 4 Remove side firebricks Vermiculite Rear Liner - Qty 1... -
Page 9: Minimum Installation Clearances
INSTALLATION MINIMUM INSTALLATION CLEARANCES FIGURE 1 Increase flue length as necessary until nothing within 6m of flue top ANY NEARBY STRUCTURE FIGURE 2... -
Page 10: Freestanding Installation
HEARTH REQUIREMENTS FREESTANDING INSTALLATION Urban LS: A minimum 1100mm deep x 1175mm wide x 24mm thick floor protector (compressed board) should be used under and in front of the appliance base when installing the appliance (see joint AS/NZS 2918:2018 3.3.2). The floor protector should extend 600mm in front of the appliance door and be placed centrally in the 1175mm width. - Page 11 Australian/New Zealand standards (AS/NZS 2918:2018) & manufacturers recommendations. Kalora wood heaters are independently tested to Australian Standards using a Forge flue kit, we always recommend using a Forge flue kit when installing a Kalora wood fire.
-
Page 12: Rear Flue Installation
Your heater can also be installed using rear flue installation configuration. At the time this manual was printed relevant information wasn’t available. Please refer to our latest manual on our website to verify the latest installation instructions and clearances to combustibles using rear flue configuration. www.kalora.com.au... - Page 13 1175mm wide x 500mm deep x 50mm thick floor protector must be used in front of the appliance base when installing the appliance. IMPORTANT: URBAN LS: A 50mm air gap must be maintained around the outer triple flue skin in the ceiling of the enclosure. First internal wall stud must be no closer than 125mm to the flue outer casing. VENTILATION PORTS To provide adequate air flow, ventilation ports should be installed into all zero clearance installations.
-
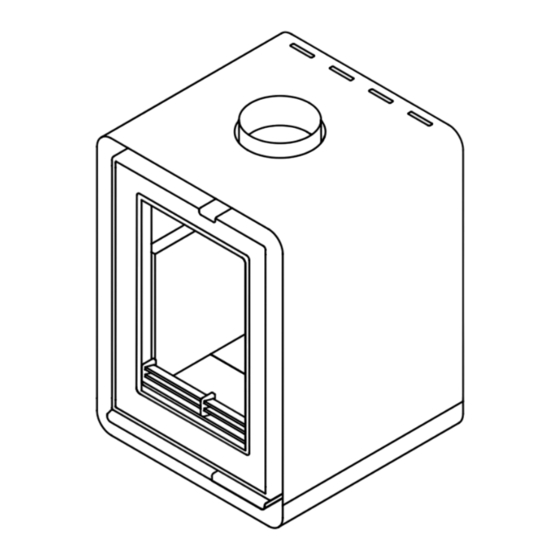
Page 14: Zero Clearance Box Installation
INBUILT INSTALLATION ..continued ZERO CLEARANCE BOX INSTALLATION Lay down bottom panel folded edges Screw inner left, inner right and inner Screw inner top panel in facing upwards and non folded edge to back panels together, returns facing place. the front. outwards. - Page 15 Australian/New Zealand standards (AS/NZS 2918:2018) & manufacturers recommendations. Kalora wood heaters are independently tested to Australian Standards using a Forge flue kit, we always recommend using a Forge flue kit when installing a Kalora wood fire.
- Page 16 INBUILT INSTALLATION ..continued Locate wood fire in it’s proposed position according to manufacturers recommendations. Use a plumb bob to mark the ceiling in line with the centre of the flue collar. Check that the outer casing will clear all combustible materials by 25mm (Unless overwritten by the clearance instructions).
- Page 17 URBAN FREESTANDING ACCESSORIES Both Urban LS and PT appliances have been designed to fit a range of installation options. When fitting the following accessories please ensure clearances to combustibles are maintained and the following instructions are adhered too. URBAN LS AND PT WOODBOX The Woodbox has 2 locating pins to ensure the wood fire is correctly positioned, once the Woodbox is in position fix the 5 countersunk screws.
- Page 18 There are no locating pins used for Plinth installation, position the wood fire ensuring there is no overhanging sides. Once the wood fire is in position then you can install the flue kit. *Urban LS shown, these instructions also apply to the Urban PT URBAN LS AND PT FREESTANDING CONVECTION FAN Ensure there is a GPO close the wood fire.
-
Page 19: Operating Your Wood Heater
OPERATING YOUR WOOD HEATER CONTROLS AND THEIR USE Air Slide to control primary air intake CLOSED OPEN Latch to open door Air Slide (push in and pull out) FUEL Your wood heater is designed to burn dry hardwood only. It is NOT designed to burn the following: •... -
Page 20: Air Controls
AIR CONTROLS Your wood heater needs air to burn the fuel. Kalora wood heaters draw air from multiple areas to maximize efficiency. The air is supplied through an adjustable primary air slide at the front right side of the wood heater and secondary non-adjustable air through the rear of the firebox and air-tube. -
Page 21: Wood Heater Maintenance
WOOD HEATER MAINTENANCE CHECK YOUR WOOD HEATER REGULARLY Initially, we recommend you check your flue system at least once per month. After the first few months you will notice a pattern of soot and creosote build up and you can then determine an inspection interval for checking soot and creosote build up that is suitable for your wood heater installation. -
Page 22: Ash Removal
Only ever clean the glass when the wood heater is cold. For best results select from Kalora’s range of glass cleaning products. When loading fuel into the wood heater, always make sure it is not protruding out through the door opening, as this may break the glass when you close the door. -
Page 23: Troubleshooting
TROUBLESHOOTING Many people under estimate the importance of using a professional installer with experience in wood heating who adheres to Australian Standards to install their wood fire. If you are having issues with your wood fire not working the way you think it should, we implore you to speak to your installer first;... -
Page 24: Smoke In Room
TROUBLESHOOTING ..continued SMOKE IN ROOM If the wood heater is properly installed it should not emit any smoke into your room. Should this happen, check that your room is not air tight. This can easily be checked by opening a door or window. If the smoking stops you need to provide an additional air supply into the room. -
Page 25: Scope Of Warranty
WARRANTY KALORA LIMITED WARRANTY This limited warranty is given by Kalora Pty Ltd (ACN 005 868 093) (Kalora or we) to the original retail purchaser (you) of the wood heater to which this Warranty applies. Our goods come with guarantees that cannot be excluded under the Australian Consumer Law. You are entitled to a replacement or refund for a major failure and for compensation for any other reasonably foreseeable loss or damage. -
Page 26: How To Make A Claim
(including labour costs). Kalora will only be responsible for transport of the wood heater from the original place of purchase to Kalora’s premises (and back), and replacement or repair in accordance with this Warranty. -
Page 27: Spare Parts
SPSTY111 Door Latch on Body Black SPMR512B Kalora Urban LS Ash Lip SG030700496 KA Urban Baffle Plate SG030700911 KA Urban LS Centre Baffle Support SG030700503 KA Urban Door Hinge SG030700500 Kalora Urban Landscape Airslide St/St SG030700640 Kit Fasteners Air Slide... - Page 28 URBAN LS SPARE PARTS ..continued DOOR ASSEMBLY SPARE PARTS LEGEND PART KALORA PART NO. Door Glass 871x410x5 KA URBAN LS SG031000169 Glass Seal 20x 3mm x 2500mm SG030400030 Door Fascia Kalora Urban LS SG030700944 Bottom Glass Retainer Kalora Urban LS...
- Page 29 URBAN PT SPARE PARTS SPARE PARTS LEGEND PART KALORA PART NO. Door Assembly Kalora Urban PT SG031000182 Set Vermiculite Firebricks SG030600040 Brick Retainer Corner SPSTY111 Brick Retainer Rear SPSTY112 Urban PT Ash Deflector SG030700316 Door Latch on Body Black SPMR512B...
- Page 30 URBAN PT SPARE PARTS ..continued DOOR ASSEMBLY SPARE PARTS LEGEND PART KALORA PART NO. Glass 432 X 610 Kalora Urban PT SG031000156 Glass Seal 20 x 3mm x 2000mm SG030400036 Door Fascia Kalora Urban PT SG030701018 Bottom Glass Retainer Kalora Urban PT...
-
Page 31: Warranty Registration Card
INSTALLERS NAME PRINT: INSTALLERS SIGNATURE: REGISTER BY MAIL Please complete this warranty card within 30 days of installation and return to: Kalora Pty Ltd.: 58 Access Way, Carrum Downs, Victoria, Australia, 3201. Please keep your receipt as this will authenticate your warranty. HEAD OFFICE... - Page 32 Kalora Pty Ltd 58 Access Way, Carrum Downs Victoria 3201 Australia...
Need help?
Do you have a question about the Urban PT and is the answer not in the manual?
Questions and answers