
Related Manuals for Aroma ART-718R


Summarization of Contents
Important Safeguards
Read All Instructions
Read all instructions carefully before first use to ensure safe operation.
Avoid Hot Surfaces
Do not touch hot metal surfaces; use handles or knobs.
Electrical Shock Prevention
Do not immerse appliance, power cord, or plug in water or other liquid.
Supervision Near Children
Close supervision is necessary when appliance is used near children.
Unplug and Cool Down
Unplug when not in use and before cleaning; allow to cool.
Damaged Cord/Appliance
Do not operate with a damaged cord or after appliance malfunctions.
Accessory Attachments
Use of non-recommended accessory attachments may cause fire or injury.
Outdoor Use Restriction
Do not use the appliance outdoors.
Cord Placement
Do not let the power cord touch hot surfaces or hang over edges.
Proximity to Heat Sources
Do not place on or near hot gas/electric burners or in heated ovens.
Hot Liquids Caution
Use extreme caution when moving appliances containing hot oil or liquids.
Intended Use Only
Do not use the appliance for anything other than its intended use.
Cleaning Pads
Do not clean with metal scouring pads to avoid electric shock risk.
Surface Requirements
Be sure to use on a dry, level, and heat-resistant surface.
Initial Dial Setting
Ensure temperature control dial is set to MIN before plugging into outlet.
Ventilation Clearance
Keep at least 4 inches away from walls and flammables in a ventilated area.
Storage in Oven
Do not store materials other than recommended accessories in this oven.
Voltage Requirements
Use only with a 120V AC power outlet.
Separate Circuit
Operate on a separate electric circuit to avoid overloading.
Dry Cooking Pan
Always make sure the outside of the enameled cooking pan is dry prior to using.
Cooking Pan Use
To reduce risk of electrical shock, cook only in the removable enameled cooking pan.
Oversized Items
Do not insert oversized foods or metal utensils as they may create fire risk.
Flammable Materials
Fire may occur if oven is covered by or touching flammable materials.
Metal Foil Prohibition
Do not cover any part of the roaster oven with metal foil.
Steam Release Caution
Use extreme caution when opening the lid; hot steam will escape.
Disconnect Procedure
Turn dial to MIN, then remove plug; never pull power cord.
Cooking Pan Requirement
Do not use this roaster oven without the enameled cooking pan.
Handling Hot Items
Use oven mitts when removing the cooking pan, rack, or cooked food.
Cord Wrapping
Do not wrap or tie the power cord around the appliance.
Oven Bags Restriction
Do not use oven bags with this appliance.
Countertop Surface
Use only on a flat, heat-resistant surface.
Non-Food Use Restriction
Do not use this appliance to melt wax or for any non-food use.
Deep Frying Restriction
This appliance is not intended for deep frying food.
Register Your Product
Benefits of Registration
Be notified of new product releases, recipes, sales, and promotions.
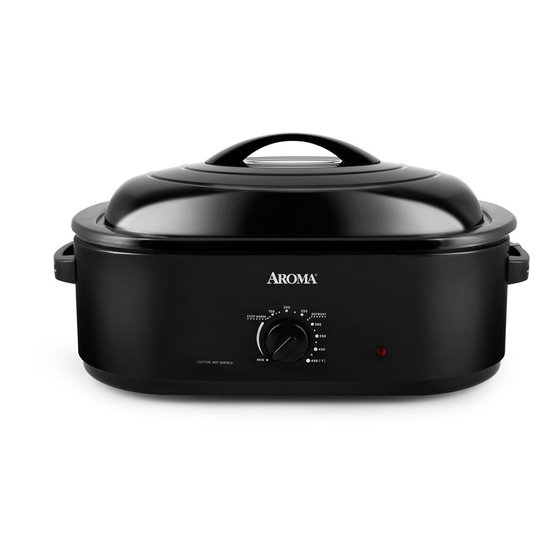
Parts Identification
Lid Handle
Handle for lifting the lid.
Self-Basting Lid
Lid designed to baste food during cooking.
Removable Roasting Rack
Rack for placing food inside the cooking pan.
Enameled Cooking Pan
The primary cooking vessel for the roaster oven.
Lid Holder
Component for holding the lid.
Heat Indicator Light
Indicates when the roaster oven is heating.
Temperature Control Dial
Dial to adjust the cooking temperature.
Steel Body
The external housing of the roaster oven.
Controls and Functions
Temperature Control Dial
Adjusts temperature from MIN up to 450°F; turns unit off at MIN.
Keep Warm Function
Maintains food at optimal serving temperatures.
Defrost Function
Thaws frozen foods at 275°F.
Consumer Safety Information
Intended Use and Limitations
Roaster oven is for household use only, not commercial or for melting wax.
Before First Use
Initial Inspection and Cleaning
Remove packaging, wash parts, and wipe body clean.
Preheating Procedure
Heat oven at 400°F for 30 minutes to dissipate initial odors.
To Clean
General Cleaning Steps
Unplug, cool down, wash removable parts, wipe body, and dry.
Stubborn Stain Removal
Soak pan with hot water for 30 mins for stubborn food stains.
Enamel Care
Avoid cooking acidic foods like tomato or lemon to prevent discoloration.
Roast & Braise Instructions
Preparation and Preheat
Place cooking pan, plug in, set temperature, and preheat.
Adding Ingredients
Place roasting rack, then ingredients, and cover with lid.
Cooking Completion
Remove food, set dial to MIN, and unplug unit.
Keep Warm Instructions
Setting to Keep Warm
Follow Roast & Braise steps 1-6, then set dial to Keep Warm.
After Serving
Turn dial to MIN and remove plug after serving.
Operation Cautions and Notes
Pan Dryness Check
Check cooking pan is dry before placing in roaster to prevent damage.
Handling Hot Components
Lid, pan, and rack become extremely hot; use handles and mitts.
Steam Caution
Open lid with caution due to hot steam which can cause scalding.
Meat Thermometer Use
Use a meat thermometer for accurate cooking results.
Preheating Importance
Always preheat the oven before placing ingredients, unless specified.
Keep Warm Duration
Food should not be left on Keep Warm for more than 12 hours.
Defrost Instructions
Defrost Setup and Preheat
Place pan, plug in, set dial to Defrost, and allow to preheat.
Adding Food for Defrosting
Place roasting rack and food with caution into the preheated oven.
Roasting & Baking Guides
Cooking Time Reference
Guides for roasting meats and baking items, with temperatures and times.
Operation Cautions and Notes (Cont.)
Food-Borne Illness Prevention
Ensure food is cooked thoroughly before serving.
Acidic Food Discoloration
Avoid acidic foods to prevent cooking pan discoloration.
Baking Tips
Place oven-safe bowls or pans on the roasting rack for baking.
Lid Rest Usage
Attach lid to hooks above handles to use the built-in lid rest.
Recipes
Teriyaki Roast Chicken
Recipe for preparing and cooking Teriyaki Roast Chicken.
Vegetable Soup
Recipe for preparing a hearty vegetable soup.
Roast Lamb
Recipe for marinating and roasting lamb.
Beef Ribs
Recipe for seasoning and roasting beef ribs.
Cauliflower and Carrot Casserole
Recipe for a baked cauliflower and carrot casserole.
Low-Fat Blueberry Oat Muffins
Recipe for baking low-fat blueberry oat muffins.
Limited Warranty
Warranty Period and Coverage
One-year warranty against defects in material and workmanship.
Warranty Exclusions
Excludes damage from abuse, improper use, natural calamities, and accessories.
Warranty Void Conditions
Void if used for other than single-family household use or on incorrect voltage.
Proof of Purchase
Proof of purchase is required for all warranty claims.
Service & Support
Contact Information
Contact Aroma customer service toll-free for warranty claims or service.
Need help?
Do you have a question about the ART-718R and is the answer not in the manual?
Questions and answers