
Related Manuals for Thunderbolt M2


Summary of Contents for Thunderbolt M2
- Page 1 Installation Guide Van Kit Lock Models ® Protect your valuables, cargo, and livelihood.
- Page 2 We appreciate your trust in our company and look forward to signifi- cantly improving your van’s security. This booklet is only a guide to installing Thunderbolt® locks and is not a complete or comprehensive manual since every vehicle is different from year to make and model.
-
Page 3: Kit Contents
Van Lock Kit Models Van Lock Model 1 (M1)* Van Lock Model 2 (M2) Factory Key-Fob Controlled Built-In Remote Control *Available with Lock Inhibitor or without. Kit Contents Lock Case (2) Wire Connectors Lock Housings Marker (1) Straight or (1) Angle... - Page 4 Watch the General Installation Video before beginning your installation. You can scan the QR code with your phone or visit our website. We suggest watching the general in- stallation video on our website to get a feel for the process before starting your installation.
- Page 5 Once the location case can get mounted anywhere in the is determined, attach the brackets to door. We always suggest replacing the the Thunderbolt® case using the four self-tapping screws rounded head bracket bolts provided with the rivets once the final loca- on the front of the case.
- Page 6 MANUAL RELEASE LEVER Select an ideal spot for the manual re- lease lever and drill a 3/8” hole for its installation. Unscrew the knob and nut from the manual release cable and guide it through the drilled opening. Now se- cure it with the nut and then screw on the knob.
-
Page 7: Installing The Housing
INSTALLING THE HOUSING Determine if an angle or straight hous- the door, and that the mating door ing will better fit your application. All has nothing to impede the strike plate swing doors use a straight housing, installation. This diagram shows the as do many sliding doors. - Page 8 ATTACH THE HOUSING TO THE CABLE With the cable extending through the hole in the door, re- attach the housing by screwing it back on the cable’s end fitting, and then slide the deadbolt back on the cable. Next, it’s time to adjust the bolt length inside the housing. Note: A backer plate is provided in case your metal is thin.
- Page 9 INSERT THE HOUSING Now that you have the deadbolt secured to the cable inside the housing, it is time to fit the housing into the 7/8” hole. Be sure the deadbolt has been appropriately adjusted to clear the door as it will stick out a bit from the housing while at rest, and we do not want the mating door to hit it when closing.
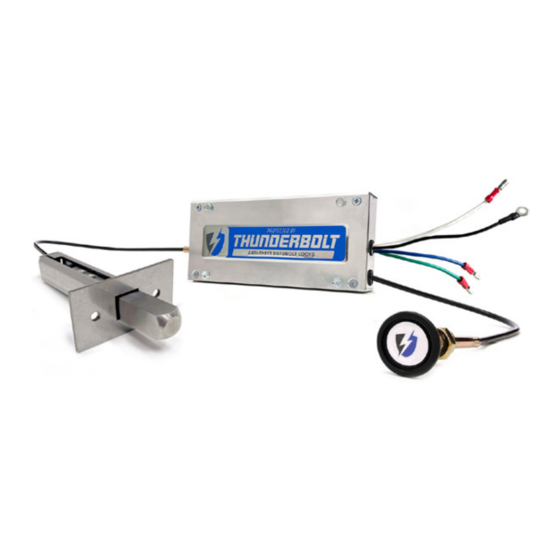
- Page 10 WIRING YOUR THUNDERBOLT® LOCKS Thunderbolt® locks get connected in one of two ways, depending on which model you choose. Model 1 operates in conjunction with your current locks via your key fob. Model 2 operates independently from an included Thunderbolt® remote controller.
- Page 11 The first step is to connect the provided extension wire to the wires on the Thunderbolt® case. Next, run the wires through the factory boot, if there is one, and around the door frame to where the factory lock wires.
- Page 12 Model 2 has a built-in remote control module and will operate the deadbolt locks from the provided Thunderbolt® remote controller. To install this Model 2, you connect the red and black wires to constant power and ground, such as the battery.
-
Page 13: Installation Diagram
Lock Case Sliding Door Lock Case NOTE: A power contact switch will Rear Door be needed for side Lock Case sliding doors. Once the wiring is complete, the locks will all operate from one of the provided Thunderbolt® remote controllers. - Page 14 If a Thunderbolt® is engaged and the door the provided rivets. Rivets will give a more is attempted to be opened, it will remain...
- Page 15 Test your Thunderbolt® locks each time you use your vehicle to ensure they are in proper working order. Instruct any persons in the vehicle exactly how the locks work and how to manually release the locks if needed.
- Page 16 ® Thunderbolt Locks, Inc. • 8700 47th Street • Lyons, Illinois 60534 USA ® 708.579.5181 • www.ThunderboltLocks.com © 2021 Thunderbolt Locks, Inc. • All rights reserved • Patents Pending • 8/22 Edition ®...
Need help?
Do you have a question about the M2 and is the answer not in the manual?
Questions and answers