
Related Manuals for Denver BSS-10600


Summary of Contents for Denver BSS-10600
- Page 1 User guide for installing the Balcony solar system facebook.com/denver.eu Please read this guide before installing the product. Keep the assembly instructions for future reference.
-
Page 2: Safety Information
Please read this guide before beginning the assembly of your Denver solar system with the SMI-601 Inverter and SOP-16600 Solar panels. We cannot assume any liability or guarantee for damages caused by improper handling. Failure to do so can result in serious health consequences, such as electric shocks and other life-threatening injuries. - Page 3 5. Make sure that the existing electrical installation is suitable for using this solar system. It is the responsibility of the end user to check this in advance before use. 6. This product has been created especially for Germany/Austrian market. If this Solar inverter system is installed in other countries, you need to make sure that the product complies with the regulation in this country.
- Page 4 17. Check with your landlord and local authority if setting up a solar panel system is allowed. 18. Avoid touching the inverter under load as the surface is hot and burns can occur. Safety for the solar panels Warning! Dangerous electrical voltage!! Photovoltaic modules produce electrical voltage/current when exposed to light.
- Page 5 2. All plugs are only connected if they are dry and clean! Connectors are not waterproof when unmated. 3. All work on cables and inverters must be carried out with caution! 4. Do not carry out installation work in strong winds. 5.
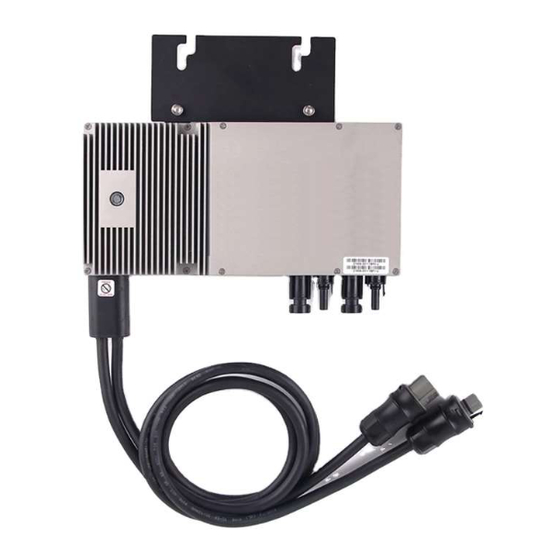
- Page 6 2. The Balcony solar system in overview 1. 2 pcs solar panels 2. Micro inverter 3. This plug connector should not be used 4. This plug connector is be connected to the Schuko power cable 5. Schuko power cable...
-
Page 7: How To Connect The System
3. How to connect the system. Note: Before connecting the system, please follow the mounting bracket installation guide/ manual that comes with the mounting bracket and attach on the solar panels. Warning It is very important that you follow this procedure precisely to avoid any risk. - Page 8 Step 2: Take the micro inverter SMI-601 out of the giftbox. Use the included 2x M8 screws to pass through the mounting holes on the inverter and fix it on the holes of the solar bracket Make sure that the inverter is properly fixed to the bracket. The micro inverter can also be installed on other firm, and light-proof (shade) location as needed.
- Page 9 Step 3 Connect the micro inverter cable with Schuko plug cable. Do not insert Schuko power plug into the Schuko power outlet yet. Step 4 Note: Please make sure that the power is disconnected before plugging or unplugging the panels modules from the inverter. Do not insert Schuko power plug into the Schuko power outlet yet.
- Page 10 Solar panel MC4 plugs Also please notice that the plugs should be inserted in sets/pairs like below. Do not mix one solar panel connectors between set 1 and 2.
- Page 11 4. Setting up WI-FI connection to the Micro inverter. Do not insert Schuko power plug into the Schuko power outlet yet. Step 1 After the cabling has been completed as described in previous chapter the LED light on the micro inverter flashes red every 1 second.
- Page 12 Step 2 Wait one minute. Now you need a computer (you can also use your phone) with Wi-Fi and connect this to the wifi network SSID: NEP-xxxxxxxx. The xxxxxxxx refers to the micro inverters unique ID number sticker which can be found on the micro inverter. Connect to the NEP Wi-Fi device Enter password: 12345678 and press next to connect to the micro inverter.
- Page 13 Now the micro inverter is connected to the PC. Now there is Wi-Fi connection between the micro inverter and you PC via Wi-Fi. But you still haven’t got the micro inverter on you home Wi-Fi network. So, this is the next step.
- Page 14 Open a web browser, enter URL address: http://10.10.100.254 Now you are asked for a username and a password. Enter: admin both places and press OK. You have now access to the Micro Inverters Wi-Fi settings. Press the search button and choose your Wi-Fi network and press OK. Enter your Wi-Fi password key and press OK.
- Page 15 The micro inverter will now restart, and please wait 10 minutes. After restart the Inverter should be connected to the Wi-Fi. Connect the Schuko power plug to the power outlet of the house/apartment and you can turn on the power. Now the solar system should be up and running.
- Page 16 4. Register the micro inverter on NEPViewer To follow the solar panel energy production via the APP then you need to register your solar system. Please wait 10-15 min with this task after inserting the Schuko power plug info the power outlet. https://user.nepviewer.com Visit NEPViewer website: Press Register button and follow the instructions and login.
- Page 17 You now get the User Registration menu. 1. Enter email address 2. Enter password 3. Confirm password 4. Enter Street 5. Enter City 6. Select Country...
- Page 18 7. Select State/Province 8. Enter Zipcode 9. Enter contact person 10. Enter contact number (optional) Press save. Now you enter the main menu:...
- Page 19 Choose the PV Plant menu and press Add site. New menu appears: 1. Enter your email address. 2. Enter your country. 3. Choose you state/province. 4. Enter your city 5. Enter street 6. Choose BDM-WIFI 7. In the Micro Address menu point you enter the Unique inverter barcode you find on the inverter. Do not use below as it is just an example.
- Page 20 1. Enter the name of the plant. You can freely choose. 2. This is automatically filled out. 3. This is automatically filled out. 4. Choose your Timezone.
- Page 21 Press Next and a new menu appears 1. Choose Celsius 2. Enter 0.6 3. Choose Euro 4. Enter Denver or model number. 5. Enter City 6. Upload an image of your solar panel if you like. It is not a must. 7. Leave this empty.
- Page 22 Now you will see this screen and you can follow your energy production from your phone or tablet. Congratulations, you are now producing you own green power.
- Page 23 Additional information is available at the technical department of your city. Hereby, Denver A/S declares that the radio equipment type micro inverter is in compliance with Directive 2014/53/EU. The full text of the EU declaration of conformity is available at the following denver.eu...
- Page 24 SMI-601. Now enter product page, and RED directive is found under downloads/other downloads. Operating Frequency Range: 2401 to 2484 MHz Max Output Power: 19 dBm DENVER A/S Omega 5A, Soeften DK-8382 Hinnerup Denmark www.facebook.com/denver.eu service/support info Denver Germany GmbH Service Max.Emanuel-Str. 4 94036 Passau Support.de@denver.eu Tel: +49 851 379 369 40...
Need help?
Do you have a question about the BSS-10600 and is the answer not in the manual?
Questions and answers