
Related Manuals for HP Q2436A


Summarization of Contents
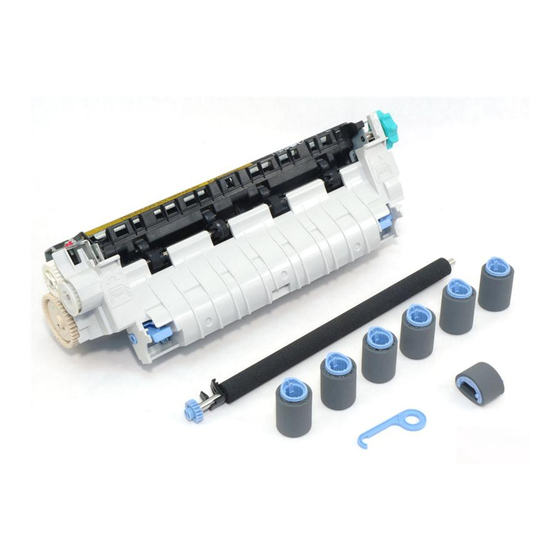
Preliminary Guide and Product Identification
Read First Instructions
Key initial instructions before proceeding with maintenance tasks.
Printer Preparation and Safety
Cooling Fuser Before Maintenance
Turn off printer and allow fuser to cool for 30 minutes before starting.
Transfer Roller Replacement
Disconnect Cables and Prepare Printer
Disconnect cables and remove optional duplexer if installed.
Initiate Transfer Roller Removal
Turn printer to access rear and begin roller removal.
Transfer Roller Installation
Handle and Install New Transfer Roller
Use tool, wear gloves, and install new roller, ensuring alignment.
Pickup Roller Replacement
Reassemble Printer and Replace Tray-1 Pickup Roller
Install print cartridge, close cover, then replace Tray-1 pickup roller.
Replacing Tray-1 Pickup Roller (Part 1)
Instructions for replacing the pickup roller in Tray 1.
Pickup Roller Installation
Locate and Install Tray-1 Pickup Roller
Locate, remove, and install the Tray-1 pickup roller, ensuring it locks.
Feed Roller and Feeder Procedures
Replacing Tray 2 Feed Rollers
Remove Tray 2, open cover, pinch latch, and slide roller off shaft.
Installing Envelope Feeder Components
Insert envelope-entrance cover or optional envelope feeder.
Feed Roller and Feeder Roller Procedures
Installing Feed Rollers and Safety Warning
Install feed rollers, heed printer placement safety warning.
Replacing 1500-Sheet Feeder Roller
Pinch blue latch on feeder roller and slide it off the shaft.
Feed Roller Installation in Trays and Feeders
Completing Feed Roller Installation
Slide and rotate new feed roller until it locks into place.
Replacing 500-Sheet Feeder Rollers
Instructions for replacing feed rollers in an optional 500-sheet feeder.
1500-Sheet Feeder Roller Replacement
Accessing 1500-Sheet Feeder Rollers
Perform steps for 1500-sheet feeder replacement, opening door and small cover.
Feed Roller Removal and Installation
Removing and Installing 1500-Sheet Feeder Rollers
Pinch latch and slide roller off shaft; slide new roller onto shaft, ensuring alignment.
Final Feed Roller Steps and Fuser Preparation
Completing Feed Roller Installation
Slide and rotate new feed roller until it locks into place.
Preparing for Fuser Replacement
Open rear output bin and pull extension outward to begin fuser removal.
Fuser Unit Removal and Preparation
Removing Output Bin and Extension
Bend bin middle down and release hinge pins to remove bin and extension.
Removing the Fuser Unit
Grasp fuser sides, push levers up, pull fuser out. Be aware of heat.
Preparing New Fuser Unit
Remove all packing material from the new fuser unit before installation.
Fuser Installation and Final Connections
Installing the New Fuser
Push new fuser firmly into printer until blue levers click into place.
Reinstalling Output Bin and Connecting Cables
Install rear output bin and connect all printer cables.
Finalizing Installation and Verification
Optional Duplexer Installation
Reinstall the optional duplexer if it was removed.
Completing Installation and Verifying
Finish installation by powering on, holding button, and printing config page.
Post-Maintenance Checks and Notes
Checking Maintenance Counter Reset
Verify 'Pages since last maintenance' is zero; refer to support flyer if not.
Notes on Installation and Exchangeable Kits
Information on potential jams and returning old fuser units for credit.
Need help?
Do you have a question about the Q2436A and is the answer not in the manual?
Questions and answers