Table of Contents
Advertisement
Quick Links
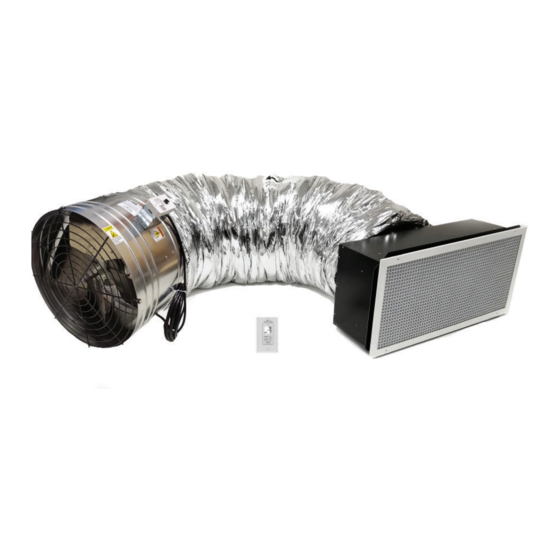
ITEMS INCLUDED:
•
Fan Assembly with steel support straps, hardware and 20 foot power cord
•
Duct Support Straps & hardware
•
Acoustic Flex Duct, 7 foot length with collars
•
Gravity Damper Assembly
•
"Eggcrate" style Inlet Grille (white) with mounting screws
•
Wall Mount WTT Control (ON/OFF, 2 Speed and 12-hour timer), white
decora wall plate and 50 foot cable
This device MUST be installed by a qualifi ed agency in accordance with the manufacturer's installation instructions. The defi nition of
a qualifi ed agency is: any individual, fi rm, corporation or company which either in person or through a representative is engaged
in, and is responsible for, the installation and operation of HVAC appliances, who is experienced in such work, familiar with all the
precautions required, and has complied with all the requirements of the authority having jurisdiction.
Installed By:
INSTALLATION MANUAL
VentCool
WHOLE HOUSE FAN SYSTEMS
MODELS: T2, T3, T4, T5
Please retain these instructions after installation.
Phone:
www.fi eldcontrols.com
®
Tahoe Series
Installation Date:
P/N 780102000 07/20 Rev F
Advertisement
Table of Contents

Related Manuals for VentCool T2


Summary of Contents for VentCool T2
- Page 1 INSTALLATION MANUAL ® VentCool Tahoe Series WHOLE HOUSE FAN SYSTEMS MODELS: T2, T3, T4, T5 ITEMS INCLUDED: • Fan Assembly with steel support straps, hardware and 20 foot power cord • Duct Support Straps & hardware • Acoustic Flex Duct, 7 foot length with collars •...
- Page 2 (THIS PAGE LEFT INTENTIONALLY BLANK) P/N 780102000 07/20 Rev F page 2 of 20...
-
Page 3: Safety Considerations
Thank you for purchasing a VentCool ® ducted Whole House Fan by Field Controls. This fan has been designed to provide many years of natural, quiet, and energy-effi cient cooling. Please take a few minutes to read over this manual and its accompanying documents to make sure you are prepared to install the Whole House Fan system. -
Page 4: Electrical Requirements
ELECTRICAL REQUIREMENTS The VentCool PSC Tahoe Series Whole-House Fan Systems require a 115 volt electrical power supply of mini- mum 15A ampacity and maximum 15 Amp circuit overcurrent protection. We strongly recommend providing a dedicated circuit for this fan system. -
Page 5: Ventilation Requirements
VENTILATION REQUIREMENTS It is very important that the attic be suffi ciently ventilated for the fan system to operate properly. Without adequate ventilation, hot air exhausted from the home cannot easily escape from the attic, which creates back-pressure that will substantially reduce the fan’s performance. Operating this fan in an attic with less net free ventilation area than recommended will decrease its airfl ow and energy effi ciency. - Page 6 This essentially “pre-cools” the home ahead of the rise in temperature the next day, which can reduce or even eliminate the need for air conditioning. This VentCool Whole House Fan has been designed specifi cally for quiet and effi cient operation. As such, we strongly recommend homeowners run this fan through the night to reduce their energy expense.
- Page 7 INSTALLATION: GRAVITY DAMPER GRAVITY DAMPER ORIENTATION NOTE The ideal orientation of unit’s gravity damper is in a level position. If necessary, however, the damper can be in- stalled at a slight angle. TIP: before beginning the installation, make sure that the fan assembly is undamaged, and that the fan blade rotates freely.
- Page 8 4. Make sure that the exact location chosen for the rough opening will allow installation of the eggcrate inlet grille, and will not interfere with any lighting fi xtures, smoke alarms, or other objects installed in the ceiling. 5. Remove any insulation from the area of the exact chosen location, and make sure that no wiring, plumbing, bracing or other building elements will interfere with the...
- Page 9 INSTALLATION: FAN & DUCT NOTES: • The fan assembly must be soundly supported by attachment to structurally sound framing. Provide additional framing with minimum 2-by-4 lumber as needed for fan support. • The fan assembly should be positioned with at least 24” of free space in front of the fan, for air to be freely blown into the attic by the fan.
- Page 10 INSTALLATION: WIRING & CONTROLS The VentCool PSC Tahoe Series Whole-House Fan Systems require a 115 volt electrical power supply of The VentCool PSC Tahoe Series Whole-House Fan Systems require a 115 volt electrical power supply of minimum 15A ampacity and maximum 15 Amp circuit overcurrent protection.
- Page 11 4. Connect the cable to the wall control (WTT). Plug the cable into the “RED” RJ12 Connector on the back side of WTT. Refer to FIGURE 7 and DIAGRAM 1 for cable connections. 5. Attach the wall control (WTT) and cover plate to the plastic retrofi t box (refer to FIGURE 8). FIGURE 8 - ATTACH WALL FIGURE 7 - PLUG CABLE TO WALL CONTROL CONTROL AND COVER PLATE...
- Page 12 DIAGRAM 1: For T2-T5 Models with 2 Speed Wall Control (WTT) and Fan Motor Control (FC3JF) DIAGRAM 2: For T2-T5 Models Fan Motor Wiring page 12 of 20 P/N 780102000 07/20 Rev F...
-
Page 13: Operation
FIGURE 10 : STANDARD WALL CONTROL SYSTEM (SPEED TEMPERATURE OR TIME) OPERATION Before starting this fan for the fi rst time, verify that: Before starting this fan for the fi rst time, verify that: • • All wiring and connection have been made according to this manual and all applicable wiring codes and All wiring and connection have been made according to this manual and all applicable wiring codes and standards. -
Page 14: Temperature Control Mode
Switching wall control between Temperature and Timer Control Modes: Switching wall control between Temperature and Timer Control Modes: 1. Switch wall control to Temperature Control from Timer Control mode: a. Press MODE MODE button on WTT then press DOWN ARROW DOWN ARROW button to select TEMPERATURE CONTROL. -
Page 15: Important Operating Tips
Adjusting the Timer Setting: Adjusting the Timer Setting: Press ARROW UP ARROW UP or ARROW DOWN ARROW DOWN buttons individually to adjust current Timer Interval Timer Interval setting. and hold the Note: If fan is operating, the new Timer Interval imer Interval setting adjustment is temporary. -
Page 16: Specifications
SPECIFICATIONS* Speed Settings: 3 (OFF/LOW/HIGH) - 2 Speed Motors Gravity Damper Rough T2 & T3: 14.3 inches X 22.3 inches Opening Dimensions: T4 & T5: 14.3 inches X 30.3 inches Grille Construction: Aluminum Cube Core, Steel frame with White Powder Coat Fan Diameter: T2, T3: 18.75 inches T4: 20.75 inches... - Page 17 Technical manuals are available on our website at www.fi eldcontrols.com. Optional Upgrade Components for Controlling your Ventcool Summit Series Whole House Fan (Generation 4): Optional Upgrade Components for Controlling your Ventcool Summit Series Whole House Fan (Generation 4): Contact Field Controls Sales team for purchasing any of the following optional Upgrade components.
- Page 18 (THIS PAGE LEFT INTENTIONALLY BLANK) P/N 780102000 07/20 Rev F page 18 of 20...
- Page 19 P/N 780800200, Rev B P/N 780102000 07/20 Rev F page 19 of 20...
-
Page 20: Warranty
This manual may be downloaded and printed from the Field Controls website (www.fi eldcontrols.com) WARRANTY WARRANTY For warranty information about this or any Field Controls product, visit: For warranty information about this or any Field Controls product, visit: www.fi eldcontrols.com/ventCool www.fi eldcontrols.com/ventCool Field Controls Technical Support Field Controls Technical Support 1.800.742.8368 1.800.742.8368...
Need help?
Do you have a question about the T2 and is the answer not in the manual?
Questions and answers