Table of Contents
Advertisement
Advertisement
Table of Contents

Related Manuals for ARC 200


Summary of Contents for ARC 200
- Page 2 ARC Series Quick Instructions (This quick instruction is based on ARC200 model) Warning! Operating the equipment incorrectly can cause serious injury and damage. Do not use the machine until you have read "Safety Rules". ----SMAW welding with basic electrode: E7016 & E7018...
- Page 3 ARC FORCE CURRENT(A) Wo r k piece 6. Turn “Welding Current” knob to 7. Turn “Arc Force” knob to adjust the arc 8. Start welding adjust the welding current according force according the size of electrode, to the size of electrode...
- Page 4 Dear Customer This instruction manual will help you get to know your new machine. Read the manual carefully and you will soon be familiar with all the many great features of your new product. Meanwhile, please remember well safety rules and operate as instruction. If you treat your product carefully, this definitely helps to prolong its enduring quality and reliability–things which are both essential prerequisites for getting outstanding results.
- Page 5 Safety Rules “Danger” indicates an imminently hazardous situation which, if not avoided, will result in death or serious injury. “Warning!” indicates a possible hazardous situation which, if not avoided, could result in death or serious injury. The possible hazards are explained in the text.
- Page 6 • Use protective screens or barriers to protect other nearby personnel with suitable, non-flammable screening and/or warn them not to watch the arc nor expose themselves to the arc rays or to hot spatter or...
- Page 7 • When welding, keep your head out of the fume. If inside, ventilate the area at the arc to keep fumes and gases away from the breathing zone. If ventilation is not good, wear an approved air-supplied respirator.
- Page 8 • Always install cylinders in an upright position by securing to a stationary support or cylinder rack to prevent falling over or tipping. • Keep a safe distance from arc welding or cutting operations and any other source of heat, sparks, or flame.
- Page 9 • Have only qualified persons remove doors, panels, covers, or guards for servicing and maintenance. • Reinstall doors, panels, covers, or guards when servicing and maintenance is finished and before reconnecting input power. Overuse can cause overheating • Use machine follow duty cycle. Reduce current or reduce duty cycle before starting to weld again.
-
Page 10: Table Of Contents
3-BEFORE COMMISSIONING................11 3-1 Utilization for intended purpose only............... 11 3-2 Machine installation rules..................11 3-3 Power source connection..................11 3-4 Welding cables instruction................12 4-ARC series......................13 4-1 System components...................13 4-2 Basic equipments for welding................13 4-3 Control panel....................... 14 4-4 Interface....................... 15 4-5 Installation......................16... -
Page 11: 1-General Remarks
1-GENERAL REMARKS ARC series welding machine is suitable for DC MMA, lift TIG process, which can weld carbon steel, stainless steel, copper etc. Because of the ideal static characteristic and dynamic characteristics, machines highlights are as follows. 1-1 Power source features... -
Page 12: Output Characteristics
1-3 Output characteristics Fig.1-3-1: Output characteristics 1-4 Duty cycle Duty cycle is percentage of 10 minutes that a machine can weld at rated load without overheating. If overheats, thermostat(s) will open, output stops. Wait for fifteen minutes for the machine to cool down. Reduce amperage or duty cycle before welding. Note! Exceeding duty cycle can damage the machine and greatly reduce its lifespan. -
Page 13: Applications
ARC series This series use the MOSFET tube as inverter device, the inverter frequency is as high as 100KHZ. This series welding machines is suitable for STICK and TIG welding. ARC II series can weld cellulose electrodes. -
Page 14: 3-Before Commissioning
3-BEFORE COMMISSIONING Warning! Operating the equipment incorrectly can cause serious injury and damage. Do not use the functions described here until you have read and completely understood “safety rules”. 3-1 Utilization for intended purpose only The power source may only be used for STICK and TIG. Utilization for other purposes, or in any other manner, shall be deemed to be "not in accordance with the intended purpose". -
Page 15: Welding Cables Instruction
Note!Inadequately dimensioned electrical installations can lead to serious damage. The mains lead, and its fuse protection, must be dimensioned in accordance with the local power supply. The technical data shown on the nameplate shall apply. 3-4 Welding cables instruction When welding, please pay attention to the followings: a. -
Page 16: 4-Arc Series
4-ARC series 4-1 System components ARC series welding machine can be equipped with many different accessories and can be used in different special sites with different configurations. Fig. 4-1-1: System components 4-2 Basic equipments for welding Only be equipped with the necessary accessories, can the power source ARC series operate well. -
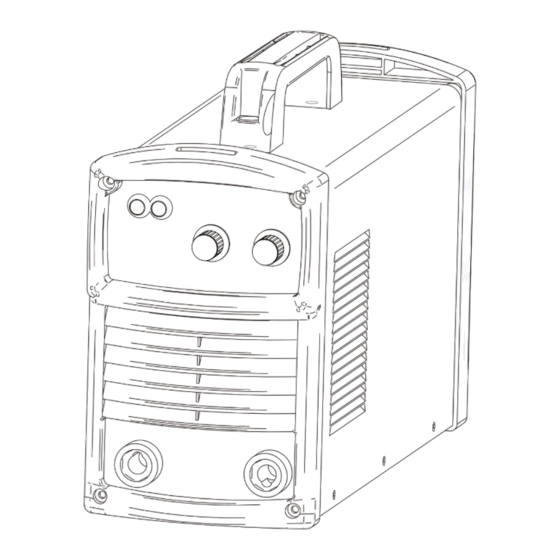
Page 17: Control Panel
4-3 Control panel The functions on the control panels are all arranged in a very logical way. Note! Some described parameters in this manual may be slightly different from the power source, some identification may be slightly different from power source identification, but the manner of working is the same. -
Page 18: Interface
To reduce this problem, when the arc voltage is low, increase the arc force can let the droplet transfer into molten pool as soon as possible, which will reduce the short circuit rate and improve anti-stick function. -
Page 19: Installation
1. Welding cable quick socket (-) On MMA mode, used for connecting the work piece. On TIG mode, used for connecting the torch. On MMA mode,When welding with 6010 electrode,used for connecting the electrode holder. 2.Welding cable quick socket (+) On TIG mode, used for connecting the work piece. - Page 20 Model Power supply 1- phase AC220/230V, 50/60Hz Power grid Electricity grid min. power (KVA) Generator Fuse Input protection(A) Circuit breaker Power cord Welding cable Cable size (mm²) Protective GND wire Table.4-5-1:Power supply and cable requirement Note! Welding machine must be taken special design if it is powered by generator, Please contact with manufacturer if you have such needs.
-
Page 21: Welding Process Installation
4-6 welding process installation Warning! Operating the equipment incorrectly can cause serious injury and damage. This part is about operating. Do not use the functions until you have read and completely understood content of this manual. ● MMA(STICK) welding process installation: Fig. -
Page 22: Technical Data
43.5 Rated duty cycle (%) (@40℃) Rated open circuit voltage (V) Range of welding current (A) 20~160 20~200 20~250 Range of arc force current (A) 50 ~ 100 Hot start current (A) Protection class IP21 Insulation class Efficiency (%) ≥80... -
Page 23: Dimension
4-8 Dimension Item Unit(mm) Unit(inches) length 15.3 Width Height 11.8 Fig. 4-8-1: Dimension Table. 4-8-1: Dimension 4-9 Disassembly and reassembly 4-9-1 Disassembly and reassembly of unit Fig. 4-9-1: Disassemble and reassembly of unit... - Page 24 Item Stock no.of 200 Remarks Plastic shell front panel 262005-00275 Crossbeam 1 766007-00109 Upper board assembly 220425-00008 Drive board assembly 210310-00014 Upper isolation board 775007-00203 Plastic shell rear panel 262011-00140 Fan protective cover 746001-00040 Plastic vertical beam(long) 776025-00002 Plastic vertical beam(short) 776025-00001 Crossbeam 2 766007-00110...
- Page 25 Item Stock no.of 200II Stock no.of 250II Remarks Plastic shell front panel 262005-00275 262005-00275 Crossbeam 1 766007-00109 766007-00109 Upper board assembly 220425-00002 220425-00074 Drive board assembly 210310-00087 210310-00087 Upper isolation board 775007-00203 775007-00203 Plastic shell rear panel 262011-00140 262011-00140 Fan protective cover 746001-00040 746001-00040 Plastic vertical beam(long)
- Page 26 Fig. 4-9-2: Disassemble and reassembly of radiator Stock no.of Stock no.of Item 160/200 200/250II Rack base board 262059-00003 262059-00125 Negative output terminal copper plate 766001-00089 766001-00088 Positive output terminal copper plate 766001-00150 766001-00148 779003-00020 779003-00020 746001-00040 746001-00057 Flat washer 779007-00017...
-
Page 27: 5-Trouble Shooting
5-TROUBLE SHOOTING Warning! An electric shock can be fatal. Before doing any work on the machine: -Switch it off and unplug it from the mains -Put up a clearly legible and easy-to-understand warning sign to stop anybody inadvertently switching it on again. -Check to make sure the electrically charged components (e.g.capacitors) have been discharged. -
Page 28: 6-Care And Maintenance
damaged Welding current is not 1.Welding current adjustment Check and replace stable potentiometer is damaged 2.Main control board is damaged 3.Bad connection in the welding machine Welding current is not 1.Welding current adjustment Check and replace adjustable potentiometer is damaged 2.Main control board is damaged Table.5-1: Trouble shooting... - Page 29 - If a lot of dust has accumulated, clean the cooling-air ducts. Daily maintenance Fig.6-1: Daily maintenance Ver. 20210611...
Need help?
Do you have a question about the 200 and is the answer not in the manual?
Questions and answers