Bernina Activa 210 User Manual
User guide
Hide thumbs
Also See for Activa 210:
- Brochure (4 pages) ,
- At-a-glance reference manual (84 pages) ,
- Service manual (59 pages)
Table of Contents
Advertisement
"Welcome to
the BERNINA
family"
H.P. Ueltschi
Owner
In choosing BERNINA, you are assured of years of rewarding sewing. For over 100 years my family
has concentrated on providing complete satisfaction to our customers. And it is my personal wish to
continue this tradition of offering you Swiss precision engineering combined with state of the art
technology and an after sales service second to none.
The new BERNINA activa 210 are characterized by a youthful appeal which is combined with a range
of added value features to give you, dear Customer, more sewing pleasure than ever before. Enjoy
modern, creative sewing with BERNINA: our wide range of accessories as well as our sewing publica-
tions brimming with imaginative ideas and practical tips all add to the joy of sewing BERNINA style.
Any questions you have will be dealt with courteously and efficiently by our highly trained BERNINA
dealers, who will also be glad to service your sewing computer for you.
www.bernina.com
BERNINA International AG
CH-8266 Steckborn/Switzerland
•
032622.50.04_0701_a210_EN
Advertisement
Table of Contents

Related Manuals for Bernina Activa 210


Summary of Contents for Bernina Activa 210
- Page 1 BERNINA technology and an after sales service second to none. The new BERNINA activa 210 are characterized by a youthful appeal which is combined with a range family” of added value features to give you, dear Customer, more sewing pleasure than ever before. Enjoy modern, creative sewing with BERNINA: our wide range of accessories as well as our sewing publica- tions brimming with imaginative ideas and practical tips all add to the joy of sewing BERNINA style.
-
Page 2: Important Safety Instructions
Keep fingers away from all moving parts. Special care is required around the sewing needle. To reduce the risk of burns, fire, electric shock or injury Always use the BERNINA original needle plate. The wrong plate to persons: can cause the needle to break. - Page 3 17. This sewing computer is provided with double insulation. BERNINA is committed to the protection of the environment. We Use only identical replacement parts. See instructions for strive to minimize the environmental impact of our products by Servicing of double-insulated machines.
-
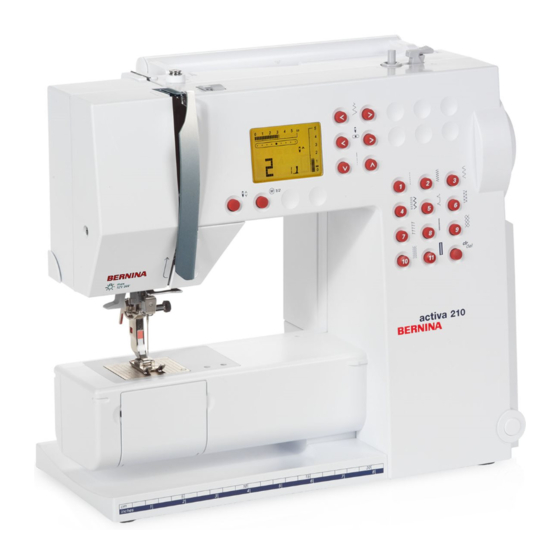
Page 4: Details Of The Sewing Computer
Details of the sewing computer Details of the sewing computer Front view Right end 032622.50.04_0701_a210_EN... - Page 5 Details of the sewing computer Bobbin cover 20 Stitch length button Stitch plate 21 clr/del-button Attachment base for 22 Stitch selection buttons special accessories 23 Handwheel Sewing table socket 24 Balance adjustment Presser foot shaft 25 Power switch on/off Needle clamp with fixation 26 Power plug socket screw 27 Drop feed-dog...
-
Page 6: Standard Accessories
3 spool discs Important! (USA/Canada only) • Foam pad Use only foot controller type • Oiler SR-1 with sewing computer • activa 210. Instruction manual • Foot control • Power cable Self storing cord *may vary from country to country •... -
Page 7: Feet Selection
Feet selection Standard snap-on soles Optional presser feet selection Presser foot Darning foot Edgestitch shaft Reverse pat- foot for snap-on tern sole soles for practical and decorative stitches Open Patchwork Buttonhole Zipper sole embroidery foot sole for sewing in foot 1/4’’... -
Page 8: Optional Accessories
Optional accessories Accessory box Storing accessories Attaching the accessory box to The box is equipped with one the sewing computer small and one large drawer as close the doors • well as compartments for bob- push feet back into position •... -
Page 9: Cfl Sewing Light
Optional accessories Lens Set Foot Control We recommend the use of the Sewing speed BERNINA Lens Set for more control the sewing speed by • comfort when sewing. depressing the foot control raise or lower the needle by • tapping on the foot control... -
Page 10: Setting Up The Sewing Computer
Setting up the sewing computer Winding the bobbin Winding the bobbin Thread cutter turn power switch on following the direction of the arrow take thread through the rear cut the thread on the thread • • • place empty bobbin on guide and round the pre-tension stud cutter •... -
Page 11: Bobbin Case
Setting up the sewing computer Bobbin case To remove the bobbin case To insert the bobbin case Bobbin thread cutter Please refer to the raise the needle hold the bobbin case latch insert the bobbin case safety instruction! • • •... -
Page 12: Inserting The Bobbin
Setting up the sewing computer Inserting the bobbin Insert the bobbin Insert the bobbin so that the Pull the thread counter clock- Pull the thread to the left ... it lies in the T-shaped slit at thread runs clockwise. wise into the slot. under the spring until ... - Page 13 Setting up the sewing computer Changing the presser foot sole Changing the presser foot Attaching the presser foot sole sole Please refer to the raise the needle and the place the presser foot sole lower the presser foot lifter safety instruction! •...
-
Page 14: Threading The Upper Thread
Setting up the sewing computer Threading the upper thread Attaching the thread spool raise the needle and the presser foot • switch the power off • attach the foam pad • place spool on pin (thread unwinds clockwise) • attach the appropriate spool disc - diameter of spool disc is disc •... -
Page 15: Needle Threader
Setting up the sewing computer Needle Threader Thread in hook Lever down Thread in front of needle raise the needle press lever A down and put the thread from the front • • • lower the presser foot simultaneously guide the into the guide until it catches •... -
Page 16: Stitch Plate
Setting up the sewing computer Stitch plate Stitch plate markings the stitch plates are marked with seam guide lines in mm or • inches they are very useful guide lines for precise seaming • the millimetre markings are at the front •... -
Page 17: Operating Instructions
Operating instructions Thread tension The basic setting The tension is factory set for the best results. is indicated when the red line on the tension Metrosene 100/2 (Arova Mettler, Switzerland) • adjustment wheel is in line with the marking A is used to set both the upper and lower thread the tension does not need adjusting for normal tension. - Page 18 Operating instructions Balance Your sewing computer has Different fabrics, threads and This can be remedied with been tested and factory set stabilizers can naturally affect Balance to suit the fabric and using a double layer of creton- the stitch balance so that they produce perfect results.
-
Page 19: Lcd Display
Operating instructions LCD Display The LCD display shows Altered Stitch Memory 1 stitch width, basic setting blinks constantly any stitch length or width alterations will • 2 stitch length, basic setting blinks constantly be saved automatically 3 needle position (9 positions) For example: 4 needle stop up/down sew altered stitch, e.g. - Page 20 Operating instructions Functions Functions are ... activated when the symbol appears on the LCD display. deactivated when the symbol no longer appears on the LCD display. Reverse sewing Needle stop quick reverse: basic setting needle stop up • press button press button •...
-
Page 21: Stitch Overview
Stitch overview Stitch overview 1 Straight stitch 2 Zig-zag stitch 3 Running stitch All non-stretch fabrics. All Most fabric types; all simple Most types of fabric. Mending, Stitch work zig-zag such as oversewing fine patching, reinforcing seams fabrics. Sewing on elastic and lace 4 Triple straight and triple 5 Blind stitch... -
Page 22: Selected Practical Stitches
Selected practical stitches Straight stitch No. 1 Zig-zag stitch No. 2 A Fabric edges finished with zig-zag stitch B Zig-zag stitch with altered stitch length C Zig-zag stitch with altered stitch width Use reverse pattern sole No. 1 or Use reverse pattern sole No. 1 blindstitch sole No. -
Page 23: Triple Straight Stitch No
Selected practical stitches Running stitch No. 3 Triple straight stitch No. 4 Use reverse pattern sole No. 1 Use reverse pattern sole No. 1 Wide Elastic Open Seam for edges on sportswear and lingerie durable seam for firm and densely woven fabrics •... - Page 24 Selected practical stitches Blind stitch No. 5 Double overlock stitch No. 6 Use blind stitch sole No. 5 Use reverse pattern sole No. 1 or overlock sole No. 2 (optional accessory) For «invisible» hems in medium to heavy cotton, wool and Closed seam blended fabrics.
- Page 25 Selected practical stitches Stretch overlock stitch No. 7 Super stretch stitch No. 8 Use reverse pattern sole No. 1 Use reverse pattern sole No. 1 Closed Seam Open Seam overlock seam in coarse or loose knits very elastic seam for knit fabrics •...
- Page 26 Selected practical stitches Honeycomb stitch No. 9 Zippers with Straight stitch No. 1 Use reverse pattern sole No. 1 Use zipper sole No. 4 Ribbing with visible seam Preparation: for all cotton, wool, synthetic and mixed fiber jersey baste in zipper •...
- Page 27 Selected practical stitches Darning program, stitch No. 10 Buttonhole, stitch No. 11 Use reverse pattern sole No. 1 Use buttonhole sole No. 3 Darning with Reverse pattern sole No. 1 (auto stitch Preparation counter) select buttonhole • insert needle in top left of damaged area the LCD display shows the buttonhole number, presser •...
- Page 28 Selected practical stitches Sewing a manual standard buttonhole Both beads are sewn in the same direction. The individual steps blink on the LCD display. 1 sew the first bead forward, stop the sewing computer press the reverse button • 2 sew reverse straight stitch, stop the sewing computer at the first stitch (buttonhole begin) press the reverse button •...
-
Page 29: Sewing Needles
Sewing needles Important facts about sewing needles Your BERNINA uses needle system 130/705H. Needle 110 –120 • • Needle and thread Darning thread The most commonly sold needles are nos. 70 –120. • • The finer the needle, the lower the number. The table Mercerised shows which needle is suitable for which threads. - Page 30 Sewing needles Special materials are easier to sew if the appropriate needle is used. Special needles are available at your BERNINA dealer. Type of needle Model Suitable for Needle size Universal For nearly all natural and synthetic fabrics (woven and knitted) 60–100...
-
Page 31: Maintenance
Maintenance Cleaning If the sewing computer is stored in a cold room, it should be CAUTION brought to a warm room about one hour before use. Disconnect plug Clean the sewing computer after every use from the socket turn power switch to «0» (off) and pull out before cleaning •... -
Page 32: Sewing Light
Maintenance Sewing light CAUTION Disconnect plug from the socket before cleaning and servicing Note: Use bulb type 12 V 5 W. W 2.1 x 9.5 d. Replacing the bulb turn power switch to «0» remove the cover by lifting it remove the bulb Light bulbs get hot. -
Page 33: Trouble Shooting
Bobbin winder still switched • • damaged. Take your sewing Poor quality thread, unevenly • computer to your BERNINA wound or knotted. dealer. See pages 29 and 30 for • information about needles. 032622.50.04_0701_a210_EN... - Page 34 Index Index Accessories 6–9 Fabric feed Optional accessories 7, 8, 9 Thread cutter 10, 11, 15 Accessory bag Feed-dog Thread tension Accessory box Foot control 6, 9 Threading Altered stitch memory Power cable Threads Presser feet Triple straight stitch 21, 23 Honeycomb stitch 21, 26 Trouble shooting...
-
Page 35: Table Of Contents
Standard Accessories Feet selection Optional Accessories Setting up the sewing computer Operating instructions Stitch overview Selected practical stitches Sewing Needles Maintenance Troubleshooting Index Impressum Typesetting, Layout, DTP: Silvia Bartholdi Graphics: Müller-Melzer ID, Kreuzlingen © copyright 2007 BERNINA International AG, Steckborn 032622.50.04_0701_a210_EN... - Page 36 032622.50.04_0701_a210_EN...
Need help?
Do you have a question about the Activa 210 and is the answer not in the manual?
Questions and answers