
Related Manuals for Hunter Minimus 51432


Summary of Contents for Hunter Minimus 51432
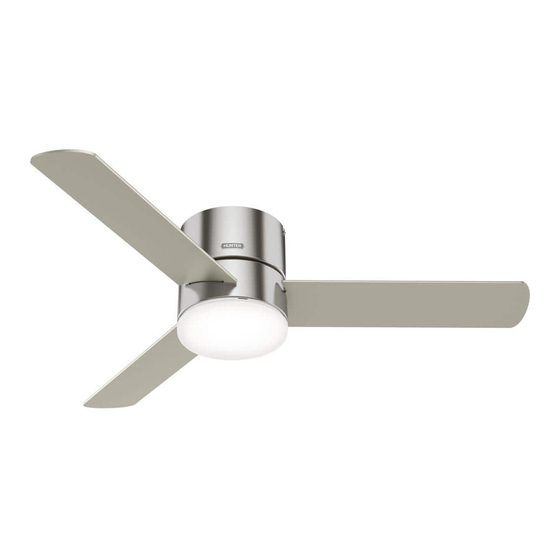
- Page 1 Minimus Installation Manual Model: 51431 Brushed Nickel 51432 Matte Black 51433 Fresh White Fan weight ±2 lbs: 18.7 lbs (8.5 kg) ©2021 Hunter Fan Co. PG4004 r052721...
- Page 2 - All wiring must be in accordance with national and local electrical codes ANSI/NFPA 70. If you are unfamiliar with wiring, use a qualified electrician. c.2 - Use only Hunter replacement parts. This equipment has been tested and found to comply with the limits for a Class B digital device, pursuant to part 15 of the FCC Rules. These limits are designed to provide reasonable protection against harmful interference in a residential installation.
- Page 3 We recommend that you pull everything out of the box and lay it out. We have grouped the drawn components below with the hardware you’ll need for those Hunter Pro Tip: parts. The screws below are drawn to scale to make it easier to identify what piece of hardware is needed to install each component.
-
Page 4: Choosing The Right Installation Location
Drill 9/64” fan-rated outlet box. Make Hunter Pro Tip: pilot holes in support structure sure it is securely installed to aid in securing ceiling bracket and is acceptable for fan... -
Page 5: Wiring The Fan
Follow these steps to get your fan wired quickly and safely. Follow the route below that best matches your wall switch setup. If you are unfamiliar with wiring or uncomfortable doing it yourself, please contact a quali ed electrician. Hunter Pro Tip: Here is how to connect the wires:... -
Page 6: Installing The Motor Housing
1886 Installing the Motor Housing 2 of 4 2 of 4 Canopy Screw Canopy Screw Align the hanging slots on both sides of the fan body with the two partially installed canopy screws. Slide the two slots on both sides of Install the remaining two the fan body between the head of Partially install two of the canopy screws into... -
Page 7: Installing The Glass
1886 Assembling the Light Kit 1 of 7 2 of 7 Light Kit Screw Light Kit Screw Partially install two light kit assembly screws, found in the Align the keyhole slots in the top of the light kit hardware bag, halfway into assembly with the partially installed assembly the motor housing as shown. -
Page 8: Preparing The Remote
1886 Preparing the Remote The remote control is To close the battery already paired for use. For compartment, secure Key Press Function your convenience, a remote the battery door to the + Quick Press Light On/Off transmitter assembly with function card is packed in the small Phillips head screw. -
Page 9: Troubleshooting
Hunter instructions, accidental damage caused by the fan owner or related parties, Please do not ship your fan or any fan parts to Hunter. Delivery will be refused. modifications to the fan, improper or incorrectly performed maintenance or repair,...
Need help?
Do you have a question about the Minimus 51432 and is the answer not in the manual?
Questions and answers