Table of Contents
Advertisement
Advertisement
Table of Contents

Related Manuals for Anviz A300

Summarization of Contents
Safety Precautions
General Safety Guidelines
Read carefully, avoid direct light, humid, dusty, dirty environments, magnetic fields, and heating devices. Keep clean and dry. Do not break, press two keys simultaneously, or tamper without authorization. Keep away from children. Use only for fingerprint verification. Contact distributor if in doubt.
Glossary
Administrator Definition
A special user with authorizations for system settings and user information, capable of adding/deleting users and changing terminal settings.
1:1 Identification Mode
User inputs ID first, then verifies fingerprint or password. The sensor identifies the fingerprint against the one for the special user ID.
1:N Identification Mode
User places fingerprint on sensor without entering ID. Terminal identifies fingerprint against all registered users in the database.
Fingerprint Enrollment Process
The process of capturing fingerprint image features from the sensor and saving them into the terminal's memory.
Fingerprint Placement Guide
Correct Finger Placement
Straighten finger and place it flatly on the sensor, ensuring maximum coverage. Place finger centrally and smoothly.
Incorrect Finger Placement Methods
Avoid moving finger before sensor is off, placing away from center, tilting, using fingertip, or sliding finger during verification.
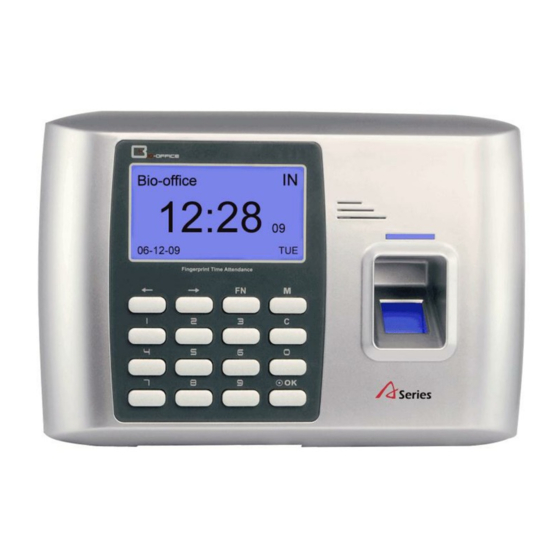
Device Appearance - Front
Front Panel Components
Details components like State Keys, LCD, Fingerprint Sensor, Menu Key, Speaker, etc. on the front of the device.
Device Appearance - Back
Back Panel Connections
Identifies the USB/5 Volt Power Connection, Network connection, and Flash Disk Port on the back of the device.
Administrator Basic Functions
Employee Information Management
Manage employee information by registering users, deleting users, and adding/deleting administrators.
System Menu Navigation
Entering System Management Menu
Press [M] from the initial state to access the system management menu. Setting an admin is recommended.
Admin Verification Methods
Two methods for admin verification: fingerprint or password.
System Menu Structure and Operation
System Menu Categories
Outlines main categories: User, Setup, and System Info.
Submenu Navigation
Use navigation keys and [OK] to select and confirm submenus and options.
Setup Saving and Canceling
Press [C] to save submenu, [OK] to save changes, or [C] to cancel.
System Menu Exit
Exiting System Management Menu
Press [C] to exit the system management menu. Auto-exit on inactivity.
User Enrollment - Fingerprint
Starting Fingerprint Enrollment
Enter System Management Menu, select [User]-[Enroll], then enter employee ID and press [OK] to register.
Correct Finger Placement for Enrollment
Place finger correctly on the sensor, enrolling twice as prompted. Handle "Please try again" or "Fingerprint repeated" prompts.
Continuous Enrollment
Employees can be enrolled sequentially. Press [C] to exit the enrollment process.
User Enrollment - Password
Starting Password Enrollment
Access [User]-[Enroll], input employee ID, select [Password], and press [OK] to enroll.
Setting and Confirming Password
Enter password (1-6 digits), confirm it, and press [OK] to save.
Exiting Password Enrollment
Press [C] to return to the [Enroll] interface or the default interface.
User Enrollment - Card
Starting Card Enrollment
Access [User]-[Enroll], input employee ID, select [Card], and press [OK] to enroll.
Swiping Card and Saving
Swipe the employee's card to capture the card number. Press [OK] to save the card information.
Exiting Card Enrollment
Press [C] to return to the [Enroll] interface or the default interface.
User Deletion
Initiating User Deletion
In the management menu, select [User]-[Delete] and press [OK] to begin deleting employee information.
Confirming Deletion
Enter employee ID, confirm deletion prompt by pressing [OK] twice.
Deletion Warning and Recovery
Caution: All deleted data (fingerprints, passwords, records) is unrecoverable. Backup data before deletion to enable recovery.
User Verification Mode
Accessing Verify Mode Settings
Navigate to [User]-[Verify Mode] in the management menu to access settings.
Setting Verification Modes
Select verification modes: [ANY], [PW+FP], or [ID+FP] using navigation keys and save with [OK].
Administrator Setup
Assigning Administrator Role
Select [User]-[Admin Setup], enter user ID, confirm to set as admin, or press [C] to cancel.
Admin Verification Requirement
After setting an admin, system management menu access requires admin verification.
Administrator Clear
Removing Administrator
Select [User]-[Admin Clear], choose admin ID, confirm deletion by pressing [OK] twice.
Direct Admin ID Deletion
In admin delete interface, press [OK] to directly enter user ID for admin deletion.
Administrator Advanced Functions
System Setting
Configure system parameters such as time, language, network, and verification precision.
Record Setting
Manage log setup, including alarm thresholds and re-verification periods.
Hardware Test
Perform tests on device components like keypad, LCD, voice, sensor, and flash memory.
Setup System Settings
Device Serial Number
Displays the terminal's unique serial number (Dev ID).
System Time Configuration
Set system time and time format (YY-MM-DD H:M). Adjust date and time by pressing [OK].
Language Selection
Select the desired system language using navigation keys and confirm.
Fingerprint Precision Adjustment
Adjust fingerprint comparison precision to [Low], [Normal], or [High] levels.
Setup System Settings - Volume and Auto Options
Terminal Volume Control
Adjust terminal voice volume from mute (0) to maximum (5).
Auto Dormancy Setting
Configure the time duration for the terminal to enter dormant state after last operation.
Auto Update Configuration
Enable/disable auto-update of fingerprint templates to the latest higher quality version.
Network Settings
IP Address Configuration
Configure the device's IP address for network connectivity.
Subnet Mask Configuration
Set the subnet mask to define the network segment.
MAC Address Display
Displays the unique Media Access Control (MAC) address of the device.
Gateway IP Configuration
Configure the gateway IP address for external network access.
Log Setup
Log Alert Configuration
Set the threshold for log alert when memory capacity is low. Can be set to [NO] or a value up to 5,000.
Re-Verify Period Setting
Define a period during which only the first successful record is saved, not repeated ones (up to 250 min).
Hardware Testing - Basic Components
Keypad Test
Test keypad functionality by pressing keys; check if the LCD displays correctly.
LCD Test
Test the Liquid Crystal Display (LCD) by initiating a test.
Voice Test
Test the terminal's voice output, which automatically runs through 1-17 voices.
Sensor Luminance Test
Test the sensor's luminance, which may vary with environmental conditions.
Hardware Testing - Flash Memory
Flash Memory Test
Test the terminal's flash memory. This operation deletes all data and then checks it; backup is recommended beforehand.
USB Flash Record Backup
Backup New Records
Download new Time & Attendance (T&A) records to a USB drive. The file is saved as BAK.KQ.
Backup All Records
Download all T&A records to a USB drive. Recommended to save new records locally first if backing up new records.
USB Flash User Backup and Recovery
User Data Backup
Download employee records to a USB drive. Backup files are BAK.YG and BAK.ZW.
User Data Recovery
Recover employee information from a USB drive to the terminal. Copy files to root directory and start recovery.
System Information
Registered User Count
Displays the total number of registered users, with a maximum capacity of 2,000.
Registered Fingerprint Count
Shows the number of registered fingerprints, with a maximum capacity of 2,000.
Time Attendance Log Count
Displays the count of time attendance logs, with a maximum capacity of 50,000 records.
Firmware Version
Displays the current firmware version of the terminal.
Need help?
Do you have a question about the A300 and is the answer not in the manual?
Questions and answers