
Related Manuals for Tellur Dash Patrol DC2


Summary of Contents for Tellur Dash Patrol DC2
- Page 1 Dash Patrol DC1 &DC2 FullHD Dash Cam User manual TLL711001/TLL711002 This manual is available in more languages on www.tellur.com/manuals...
- Page 2 Thank you for choosing Tellur! Please read this user manual carefully before using the product and keep it safe for future references. Please note! Any damage caused by misuse of the product will void the product’s warranty. Safety instructions By using this recorder, you confirm that you have read and agree to our terms of use.
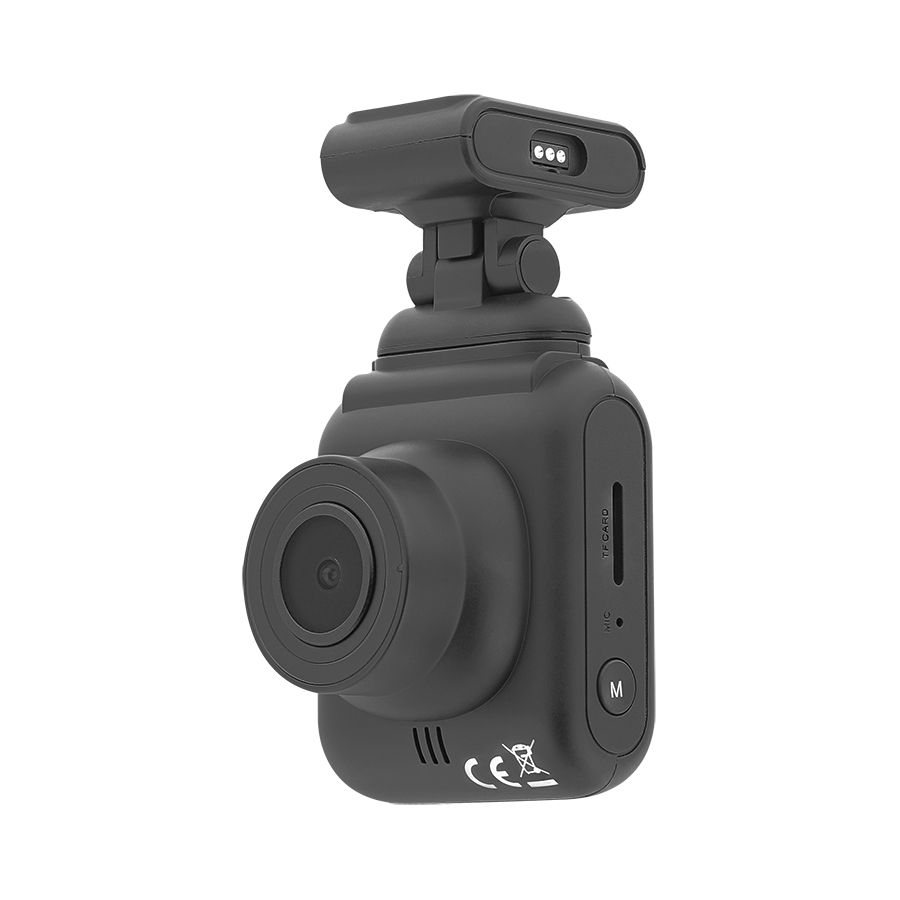
- Page 3 Product diagram 1. 3M adhesive for bracket; 2. GPS module (only for DC2) 3. Lens; 4. Speaker; 5. GPS data upgrade interface (only for DC2); 6. Bracket rotating shaft; 7. Memory card slot; 8. Microphone; 9. Mode button; 10. GPS module speaker (only for DC2); 11.
- Page 4 Before use 1.How to insert the memory card - please insert the memory card in the correct position as indicated by the memory card gap on the device. Press the memory card until the card is fully inserted and you hear a click. Note: Please use a high-speed memory card (CLASS10 or above) since the recorder's video storage runs faster on the card.
-
Page 5: Camera Installation
Camera installation 1. Clean the front windshield with a cloth (figure 1). 2. Tear the 3M adhesive protective tape on the bracket (as shown in figure 2). 3. Connect the car charger to the cigarette lighting port (as shown in figure 3). 4. - Page 6 Warning: While driving, for your safety and your passengers’ safety, please keep your eyes on the road, not on the display of the recorder. Display status and information The section time icon of loop video recording indicates that the cyclic video recording time is 1 minute. You can choose between: 1min, 3mins, 5mins.
- Page 7 After inserting the memory card, the current video duration will be displayed in red font while in recording mode. The icon is displayed when the video locks. When g-sen- sor activates it or you manually press the lock key, the key icon will be displayed on the screen, indicating the current video is locked.
- Page 8 Icon of battery power and status. Displays the current state - connected to car charger. Displays current battery. GPS status icon (only available for DC2). After inserting the GPS module into the recorder, the speed will be displayed after searching the signal. 13.
- Page 9 Video/photo playback In the recording state, press [OK] power button to stop recording. Press [M] key twice to switch to playback mode, and the playback icon will be displayed in the upper left corner of the screen. Move thru files on the memory card by pressing keys.
- Page 10 2. Parking monitoring function After the parking monitoring is activated, when the vehicle is turned off and the recorder automatically enters the shut- down program, if it detects a vibration generated by external forces, the dash cam will automatically start up and record, then automatically shuts down after 20 seconds.
- Page 11 5. Battery instructions Battery power indicator, please refer to the drawing : Full charged Low battery Needs to be charged After the camera is connected to the power supply, the red charging indicator will light up during the charging process. The whole charging time is about 180 minutes.
- Page 12 8. GPS player (available for DC2 only): Please download HIT GPS player from the link below https://pcgps.ce2ce.com/hit/hitplayer.html (available for Windows operating systems) 9. WiFi connection (available for DC2 only) : Download GoPlus Cam APP from Google Play or Apple store or by scan- ning the Qr code below.
- Page 13 Settings Settings Details Options Resolution Setting the resolution of videos 1080FHD, 720P Loop recording Setting the video length 1min, 3mins, 5mins, or o (When o is set then it will not overwrite when microSD card is full) ON/OFF (on is recommended) Wide dynamic automatic adjustment of light Exposure Underexposed, the picture is dim and needs...
-
Page 14: Technical Specification
Technical specification Usage: Automotive Video resolution: 1920 x 1080p , 1280 x 720p Lens type: 4 Glass 2.24 Chipset & sensor: GP5168 & F37 Field of view: 140° Display: 1.5" Color Frame rate: Max 30fps Sensor resolution: 2 Mega Pixels Photo resolution: 12 Mega Pixels Video compression: H.264 Video file type: MOV... - Page 15 Disposal and recycling information The crossed-out wheeled-bin symbol on your product, battery, literature or packaging reminds you that all electronic products and batteries must be taken to separate waste collection points at the end of their work- ing lives; they must not be disposed of in the normal waste stream with household garbage.
Need help?
Do you have a question about the Dash Patrol DC2 and is the answer not in the manual?
Questions and answers