
Related Manuals for ATX XDS-PRO4S


Summarization of Contents
IMPORTANT NOTICES
Document Revision History
Details the revision history of the document.
INTRODUCTION
1.1 Important Information
Explains icons used for important information, warnings, and cautions.
1.2 Hardware Upgradeability
Information on over-the-air software and audio decoder algorithm upgrades.
1.3 Hardware Versatility
Describes the audio output capabilities for different receiver models.
1.4 Network Management System
Overview of the XDS Network Management System (NMS) for receiver control.
GETTING STARTED
2.1 Unpacking the Receiver
Instructions for unpacking the receiver and checking package contents.
2.2 Safety Precautions
Essential safety guidelines to prevent equipment damage and ensure safe operation.
2.3 Physical Installation of the Receiver
Guidance on the physical installation of the XDS-PRO receiver.
2.4 Connecting the Receiver to a Satellite Dish
Instructions for connecting the receiver to a satellite dish.
2.5 Connecting to the Ethernet Network
Details on connecting the receiver to an Ethernet network for data and updates.
2.6 Connecting the Audio Ports
Information on connecting analog and digital audio output ports.
2.7 Connecting the Relay Ports
Details on connecting relay ports for cue signals and events.
2.8 Connecting the Program Associated Data (PAD) Port
Information on connecting the PAD port for receiving data.
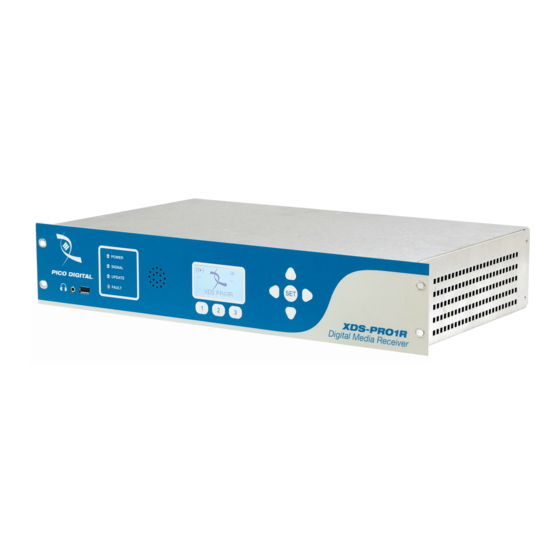
FRONT PANEL OPERATIONS
3.1 Status LEDs
Explanation of the four status LEDs indicating receiver power, signal, update, and fault.
3.2 LCD Display and User Interface
Guide on using the 128x64 pixel LCD and front panel buttons for navigation.
3.3 Front Panel Flow
Diagram illustrating the front panel menu navigation structure.
RECEIVER WEB INTERFACE
4.1 General Menu
Overview of the receiver's web interface, including available tabs.
4.1.1 Status Tab
Displays receiver's current output, surroundings, errors, and power levels.
4.1.2 Tuner Tab
Provides detailed tuner-related data and settings for the receiver.
4.1.3 Setup Tab
Allows modification of specific receiver settings like networking and firmware.
4.1.4 Digital Audio Tab
Options for configuring Audio over IP (AoIP) for AES67 or Livewire output.
4.1.5 Relays Tab
User interface for viewing and managing cue-to-relay mappings.
4.1.6 Opto Inputs Tab
Setup and programming options for Opto input modes (Coded/Uncoded).
4.1.7 Logs Tab
Presents receiver activity logs, allowing display, download, and purging.
4.1.8 Console Tab
Provides a command interface for issuing commands via RS-232 or TELNET.
4.2 Programming Menu
View and manage programmed programs and recordings stored on the receiver.
4.3 Content Menu
Lists all files stored on the receiver's internal storage, including audio and other types.
4.4 XDS-AMR Menu (Optional)
Redirects to the optional internally installed Audio Monitoring Receiver (AMR) website.
SPECIFICATIONS
7.1 Receiver Monitor & Control and Interface Specification
Details on M&C interface features, protocol settings, and connector pin-outs.
7.2 Ethernet Port
Specifications for the receiver's Ethernet port, including connection rate and number of ports.
7.3 RF Input Parameters
Parameters related to receiving DVS-S modulated satellite signals.
7.4 LBR Module (Optional) RF Input Parameters
RF input specifications for the optional LBR module.
7.5 Mechanical and Electrical
Receiver chassis specifications including dimensions, mounting, weight, and power.
7.6 Environmental
Environmental operating parameters such as temperature, humidity, and altitude.
GETTING STARTED
2.2.5 Reliable Earthing
Guidance on proper mains earth grounding for electronic rack systems and equipment.
2.2.6 Circuit Overloading
Warning about the receiver's current draw and potential circuit overloading.
2.2.7 Foreign Objects
Warning against inserting foreign objects into the receiver's ventilation holes.
2.3.1 Rack Mounting the Receiver
Instructions for mounting the receiver in an EIA standard 19-inch equipment rack.
2.3.2 Uneven Loading of Rack
Caution regarding rack stability and proper weight distribution during installation.
2.4.1 Outdoor Antenna Grounding
Procedures for grounding the antenna and cable system for surge and static protection.
GETTING STARTED
2.5.1 Connecting the Cables
Instructions on how to connect Ethernet cables to the receiver's Ethernet port.
2.5.2 Using DHCP or Static IP Addresses
Explanation of DHCP and static IP assignment for the receiver's network configuration.
2.5.3 Assigning a TCP/IP Address
How to specify the receiver's unique network identification number (IP address).
2.5.4 Assigning a Subnet Mask
How to define the subnet mask for network communication and addressing.
2.5.5 Assigning a Default Gateway
How to specify the default gateway (router) for internet access.
2.5.6 Proxy Server Configuration
Instructions for configuring proxy server settings for network access.
2.5.7 DNS Server Configuration
Instructions for configuring DNS server settings for name resolution.
2.5.8 Setting Up “IP Only Mode"
Steps to enable the receiver to operate solely via its Ethernet port.
2.6.1 Analog Audio Ports
Details on the analog audio output ports and their connections.
2.6.2 Digital Audio Port
Information on the digital audio output port and its specifications.
GETTING STARTED
2.7 Connecting the Relay Ports
Details on connecting relay ports for receiving cue signals and firing relays.
2.7.1 Physical Ports
Description of the physical relay ports on the receiver.
2.7.2 Cues
Explanation of associated and non-associated cues for relay triggering.
2.8 Connecting the Program Associated Data (PAD) Port
Information on connecting the PAD port for receiving program data.
2.8.1 In-Band Ancillary Data
Description of in-band ancillary data embedded within audio streams.
2.8.2 Out-of-Band Ancillary Data
Description of out-of-band ancillary data carried outside audio streams.
FRONT PANEL OPERATIONS
3.2 LCD Display and User Interface
Guide on using the 128x64 pixel LCD and front panel buttons for navigation.
3.3 Front Panel Flow
Diagram illustrating the front panel menu navigation structure.
FRONT PANEL OPERATIONS
3.3.1 Main Menu Options
Details the main menu options accessible from the front panel.
3.3.2 Status Sub-Menus
Describes the sub-menus available within the Status menu.
3.3.3 Setup Sub-Menus
Details the various sub-menus available under the Setup option.
3.3.4 Audio Ports Sub-Menus
Explains the sub-menus for configuring audio ports.
FRONT PANEL OPERATIONS
3.3.3.1 SETUP: NETWORK Sub-Menus
Configuration options for the receiver's network settings.
3.3.4.1 AUDIO PORTS: SETUP Sub-Menus
Setup options for individual audio ports, including station, program, and spot settings.
RECEIVER WEB INTERFACE
4.1 General Menu
Overview of the receiver's web interface, listing available menu tabs and default view.
4.1.1 Status Tab
Displays receiver's current output, surroundings, errors, and power levels.
4.1.2 Tuner Tab
Provides detailed tuner-related data and settings for the receiver.
4.1.3 Setup Tab
Allows modification of specific receiver settings like networking and firmware.
4.1.4 Digital Audio Tab
Options for configuring Audio over IP (AoIP) for AES67 or Livewire output.
4.1.5 Relays Tab
User interface for viewing and managing cue-to-relay mappings.
4.1.6 Opto Inputs Tab
Setup and programming options for Opto input modes (Coded/Uncoded).
4.1.7 Logs Tab
Presents receiver activity logs, allowing display, download, and purging.
4.1.8 Console Tab
Provides a command interface for issuing commands via RS-232 or TELNET.
RECEIVER WEB INTERFACE
4.1.2 Tuner Tab (Continuation)
Provides detailed tuner-related data and settings for the receiver.
4.1.3 Setup Tab (Continuation)
Allows modification of specific receiver settings like networking and firmware.
RECEIVER WEB INTERFACE
4.1.3 Setup Tab (Continuation)
Allows modification of specific receiver settings like networking and firmware.
4.1.4 Digital Audio Tab
Options for configuring Audio over IP (AoIP) for AES67 or Livewire output.
RECEIVER WEB INTERFACE
4.1.4 Digital Audio Tab (Continuation)
Options for configuring Audio over IP (AoIP) for AES67 or Livewire output.
4.1.5 Relays Tab
User interface for viewing and managing cue-to-relay mappings.
RECEIVER WEB INTERFACE
4.1.5 Relays Tab (Continuation)
User interface for viewing and managing cue-to-relay mappings.
4.1.6 Opto Inputs Tab
Setup and programming options for Opto input modes (Coded/Uncoded).
RECEIVER WEB INTERFACE
4.1.6 Opto Inputs Tab (Continuation)
Setup and programming options for Opto input modes (Coded/Uncoded).
4.1.6.3 Programming Opto Inputs
How to program Opto input triggers and assign functions to them.
4.1.7 Logs Tab
Presents receiver activity logs, allowing display, download, and purging.
RECEIVER WEB INTERFACE
4.1.7 Logs Tab (Continuation)
Presents receiver activity logs, allowing display, download, and purging.
4.1.8 Console Tab
Provides a command interface for issuing commands via RS-232 or TELNET.
4.2 Programming Menu
View and manage programmed programs and recordings stored on the receiver.
RECEIVER WEB INTERFACE
4.2.1 Programs Tab
Lists programs authorized for the receiver, including ID, code, and PID.
4.2.2 Recordings Tab
Lists recorded programs stored on the receiver, with download links and dates.
4.3.1 Audio Tab
Displays stored audio files with their name, ISCI code, and received date.
4.3.2 All Tab
Displays all stored files on the receiver.
4.4 XDS-AMR Menu (Optional)
Redirects to the optional internally installed Audio Monitoring Receiver (AMR) website.
AFFILIATE WEB INTERFACE
5.1 Accessing and Logging In
Steps to access and log into the Affiliate Website using receiver credentials.
5.2 Play Scheduling
How to create and manage play schedules for the receiver through the NMS.
5.3 Changing the Relay Mappings
How to specify relay mappings for radio broadcast events.
5.4 Checking Receiver Health
How to view the receiver's current health status, including uptime and signal quality.
5.5 Documentation Repository
Access to user guides, command tables, and network data sheets.
5.6 Changing the Receiver's Time Zone
How to configure the receiver's time zone and daylight savings settings.
MONITOR AND CONTROL INTERFACE
6.1 Setting up a Console Connection
Steps for establishing a console connection to the receiver via serial cable.
6.2 Console Commands
Overview of commands used for controlling and monitoring the receiver through the console.
6.2.1 Tech Account Commands
Commands available exclusively to the tech account for diagnostics.
SPECIFICATIONS
7.1 Receiver Monitor & Control and Interface Specification
Details on M&C interface features, protocol settings, and connector pin-outs.
7.2 Ethernet Port
Specifications for the receiver's Ethernet port, including connection rate and number of ports.
7.3 RF Input Parameters
Parameters related to receiving DVS-S modulated satellite signals.
7.4 LBR Module (Optional) RF Input Parameters
RF input specifications for the optional LBR module.
7.5 Mechanical and Electrical
Receiver chassis specifications including dimensions, mounting, weight, and power.
7.6 Environmental
Environmental operating parameters such as temperature, humidity, and altitude.
REGULATORY COMPLIANCE
8. Regulatory Compliance
Compliance information with FCC and European standards, including EMC and safety directives.
North America Emissions
FCC Part 15 compliance statements regarding harmful interference.
North America Safety
Safety standards applicable to North American operations (UL, CSA).
Europe Emissions
EMC and Low Voltage Directive compliance for CE marking.
Europe Safety
Safety standards applicable to European operations (EN).
SERVICE & SUPPORT
9. Service & Support
Information on contacting ATX Networks for technical support and sales assistance.
9.1 Contact ATX Networks
Detailed contact information for ATX Technical Support, Sales Assistance, and Order inquiries.
Need help?
Do you have a question about the XDS-PRO4S and is the answer not in the manual?
Questions and answers