Table of Contents
Advertisement
Advertisement
Table of Contents

Related Manuals for MetroPWR FX775


Summary of Contents for MetroPWR FX775
- Page 1 USER MANUAL METROPWR FX773/5 https://www.metropwr.com Ver 11.60...
-
Page 2: Table Of Contents
INTERNAL MAIN MENU,WATTMETER ….…..……..………………………………….……………………………………..7 MENU SMETER, dBMETER, SWITCH ....………….……..…………………………………………………………..8 MENU FREQMTR,CLOCK,RL/SWR,dBm/PWR, SETUP .………....……………………………..………………9 CALIBRATION MENU .………………………………….….………………………………...………………………………………..…10 FIRMWARE UPDATE ……………………………………………….….………………………………...………………………………11 NOTE…………………………….……………………………..…………………………………………………………………………………12 ACCESSORIES & OPTIONAL ……………………...……………………………………………………………………….………..…13 TECHNICAL FEATURES ..…………………………...………………………………………………………………………………14 Attention the technical characteristics and the menus can change without notice. METROPWR FX773/5... -
Page 3: Safety Use
It could be damaged if dropped, incinerated, punctured or broken or if it comes into contact with liquids. Do not use Metropwr if it has been damaged, for example if the screen is broken, as it may cause injury. -
Page 4: Introduction
This feature makes it unique and guarantees excellent flexibility in use. It is designed for Amateur Radio use and has functions for the most demanding om. FX773/5 is a complete tool and offers the possibility of multiple measurement types all in a fast and precise way. Through the USB port it is possible to update the firmware and increase its functions and internal menus. -
Page 5: Coupler Connection Fx3/Fx5
SMA PORT ( V ) Firmware Upgrade The cable must be at least class 6 and internally shielded. DO NOT CONNECT PC OR OTHER DEVICES TO OUT 1/2 IS NOT A LAN PORT. Attention no LAN port don’t connect PC,SWITCH METROPWR FX773/5... -
Page 6: Connections And Interfacing Accessories
FX3/5 connection: basic connection for HF/50MHz band (use SMA cables). Connection FX3: connection scheme to manage HF/50MHz. Through the SMA cables it is possible to interface the Coupler FX3 / 5 and through the EXP bus the two other options can be connected in series. METROPWR FX773/5... -
Page 7: Switch Antenna Connection Fx4
Dual Antenna FX4 Switch Connection: You can interface up to two FX4 antenna switches to switch 4 radios and 4 antennas simultaneously. Through the corresponding menu on the FX773/5 wattmeter it is possible to manage them simultaneously. The FX4s must be connected in series through the IN / OUT port of the switches and the wattmeter side ends on the rear RJ45 port. -
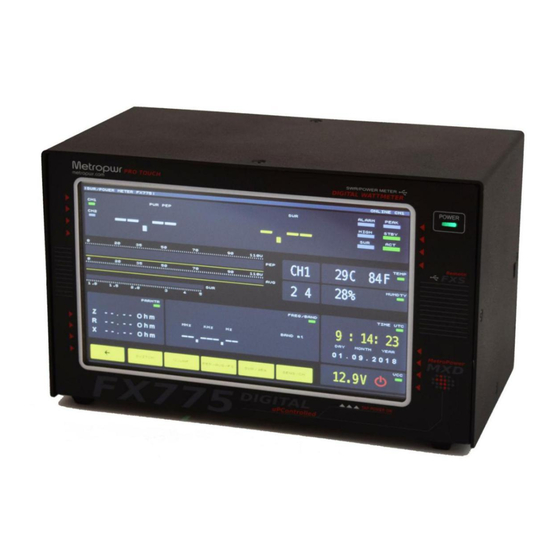
Page 8: Internal Main Menu,Wattmeter
OFF switch can be positioned in the low OFF position. By tapping the lower right icon you can place the instrument in standby. In this case FX773/5 will always be powered but the display will be turned off and the instrument will be in low absorption. In the case of an operator, the instrument will return online and the backlight will be reactivated. -
Page 9: Menu Smeter, Dbmeter, Switch
If there is no FX7 antenna switch this menu will not show any virtual keys. Activate the FX7 switches first from the SETUP menu. Attention, the FX4 antenna switch is not compatible with the FX773/5 wattmeter. METROPWR FX773/5... -
Page 10: Menu Freqmtr,Clock,Rl/Swr,Dbm/Pwr, Setup
MENU MENU FREQMTR: FX773/5 has a digital frequency inside this menu and you can view the operating frequency sampled by the sensor. MENU CLOCK: The instrument has a chip dedicated to the system clock and perpetual calendar. It is possible to set the time through the SET submenu. -
Page 11: Calibration Menu
FX3 / 5 coupler and through the +/- ++ / - keys to match the power read by the FX773/5 Wattmeter with that external reference wattmeter. After saving with SAVE, repeat operation for all 11 bands. -
Page 12: Firmware Update
FIRMWARE UPDATE It is possible to update the FX773/5 Wattmeter through a firmware upgrade. The update is very simple. The first step is to position the rear switch in the lower position. Then just connect the instrument to the PC, install the relevant driver, detect through the windows control panel the serial port created, example COM10, run the utility on the PC. -
Page 13: Note
NOTE: METROPWR FX773/5... -
Page 14: Accessories & Optional
Directivity 30dB Flatness 0.1 dB Connector so259 + SMA FX5 HF/50MHz Coupler Coverage 1.8/55 MHz 160/6mt Power 500mW/5kW PeP Directivity 30dB Flatness 0.1 dB Connector so259 + SMA PC APPLICATION METROPWR FX773/5... -
Page 15: Technical Features
TECHNICAL FEATURES - METROPWR FX773/5 Coverage 1.8/55 MHz 160/6mt HF/55MHz Measure Power AVG, PeP, dBm, R, Z, |X| , SWR, Frequency Wide Autoranging Power range 500mW/5kW HF/50MHz Optional Couplers 500mW /3kW (FX3) – 500mW/5kW (FX5) Accuracy SWR <5% ...
Need help?
Do you have a question about the FX775 and is the answer not in the manual?
Questions and answers