Table of Contents
Advertisement
Quick Links
Instruction
Manual
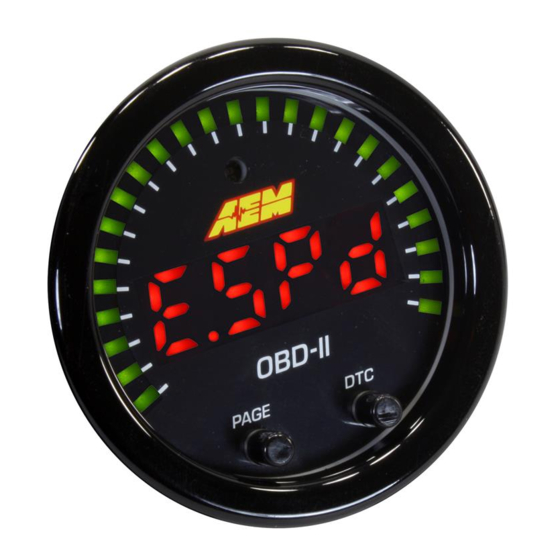
· 2-1/16" / 52mm outer diameter mounting
· Only model year 2008 and newer vehicles (CAN bus
based OBD) supported
· 41 OBD-II parameters (PIDs) supported
· Read and clear Diagnostic Trouble Codes (DTCs)
· US or Metric / SI display modes
· Black bezel / faceplate supplied; Silver/white available
as optional purchase
· Locking connectors
· Auto-dimming
· Supports vehicle/system voltages up to 16V
P/N 30-0311
X-SERIES GAUGE
STOP! - READ THIS BEFORE INSTALL OR USE!
WARNING:
THIS INSTALLATION MAY REQUIRE WELDING OR INTEGRATION INTO A VEHICLE'S ELECTRICAL SYSTEM. DAMAGE
TO SENSITIVE ELECTRONICS, FIRE, OR EXPLOSION MAY OCCUR IF PROPER PRECAUTION IS NOT TAKEN. IF THERE
IS ANY DOUBT, DO NOT ATTEMPT THE INSTALLATION AND CONSULT A PROFESSIONAL.
NOTE: IT IS THE RESPONSIBILITY OF THE ENGINE TUNER TO ULTIMATELY CONFIRM THE CALIBRATION USE FOR
ANY PARTICULAR ENGINE IS SAFE FOR ITS INTENDED USE. AEM HOLDS NO RESPONSIBILITY FOR ANY ENGINE
DAMAGE THAT RESULTS FROM THE MISUSE OF THIS PRODUCT.
Features
OBD-II
PN
10-0311
35-0311
35-8618
35-8614
35-8617
35-3458
CABLE, X-SERIES GAUGE PWR/IO OBD2 V2
PN
30-0311-
ACC
KIT CONTENTS
Description
INST, X-SERIES OBD2 GAUGE
GAUGE ASSY, X-SERIES OBD2 GAUGE
NUT, KNURLED, M4x0.7 (2)
BRACKET, X-SERIES GAUGE
RUBBER BAND, X-SERIES GAUGE
*OPTIONAL* ACCESSORIES
Description
BEZEL, X-SERIES SILVER
FACEPLATE, X-SERIES OBD2, WHITE
Advertisement
Table of Contents

Related Manuals for AEM 30-0311


Summarization of Contents
Important Safety and Installation Notice
Pre-Installation Warnings and Precautions
Crucial safety warnings and precautions before installing or using the OBD-II gauge.
Product Features Overview
Key X-Series Gauge Capabilities
Details the primary features of the X-Series OBD-II gauge, including connectivity and display.
Wiring Installation Diagram and Connection
OBD-II Port Installation Steps
Explains the simple wiring process using the OBD-II port for gauge installation.
Power Supply and Sleep Mode Behavior
Details 12V power supply from the OBD-II port and the gauge's sleep mode behavior.
Gauge Operation and Controls
Navigating Parameter IDs (PIDs)
How to scroll through and view available OBD-II PIDs/parameters on the gauge.
Managing Diagnostic Trouble Codes (DTCs)
Instructions for viewing and clearing Diagnostic Trouble Codes (DTCs).
Switching Display Units (US/Metric)
Procedure to switch between US customary and SI metric display units.
Faceplate and Bezel Customization
Component Identification for Changes
Identifies gauge components and explains disassembly for faceplate/bezel changes.
Gauge Disassembly Procedure
Step-by-Step Disassembly Guide
Detailed steps for disassembling the gauge to access internal components.
Gauge Assembly Procedure
Step-by-Step Assembly Guide
Detailed steps for reassembling the gauge after component changes or repairs.
Vehicle Installation Guide
Mounting Options and Methods
Explains how to install the gauge using the provided bracket or rubber band.
Water Resistance and Warranty Notice
Important note regarding the gauge's water resistance and warranty implications.
Troubleshooting and FAQ
Resolving Gauge Display Problems
Troubleshooting common issues like dashes or intermittent display shutdown.
Handling Unsupported PIDs
Addresses why a supported PID might not appear when scrolling through the list.
Interpreting DTC Codes
Guidance on how to find the meaning of displayed Diagnostic Trouble Codes.
Troubleshooting DTC Clearing
Resolving problems where DTCs are not cleared or the check engine light remains on.
Need help?
Do you have a question about the 30-0311 and is the answer not in the manual?
Questions and answers