Table of Contents
Advertisement
Pachmate
Equipment Manufactured By
DGH TECHNOLOGY , INC.
DGH TECHNOLOGY , INC.
DGH TECHNOLOGY , INC.
110 SUMMIT DRIVE
110 SUMMIT DR IVE
110 SUMMIT DR IVE
SUITE B
SUITE B
SUITE B
EXTO N, PA 1934 1
EXTO N, PA 1934 1
EXTO N, PA 1934 1
USA (6 10) 594 -9100
USA (6 10) 594 -9100
USA (6 10) 594 -9100
DGH 55B (PACHMATE 2)
ULTRASONIC PACHYMETER
DGH 55B
OPERATOR'S MANUAL
For Use with Firmware v3.0.x
And DGH Connect Software v1.1.x
Page 1 of 87
2
Authorized Representative
EMERGO EUROPE
EMERGO EUROPE
EMERGO EUROPE
Molenstraat 15
Molenstraat 15
Molenstraat 15
Prinsessegracht 20
REP
2513 BH, The H ag ue
2513 BH, The H ag ue
EC
EC
REP
REP
2513 BH, The H ag ue
EC
2514 AP, The Hague
The Netherlands
The Netherlands
The Netherlands
The Netherlands
Phone: +31.70.345.8570
Phone: +31.70.345.8570
Phone: +31.70.345.8570
DGH 55B-INS-OMENG Rev: 3
0120
Advertisement
Table of Contents

Related Manuals for DGH PACHMATE


Summary of Contents for DGH PACHMATE
- Page 1 DGH 55B (PACHMATE 2) ULTRASONIC PACHYMETER Pachmate DGH 55B OPERATOR’S MANUAL For Use with Firmware v3.0.x And DGH Connect Software v1.1.x Equipment Manufactured By Authorized Representative DGH TECHNOLOGY , INC. DGH TECHNOLOGY , INC. EMERGO EUROPE EMERGO EUROPE DGH TECHNOLOGY , INC.
- Page 2 This page intentionally left blank. Page 2 of 87 DGH 55B-INS-OMENG Rev: 3...
-
Page 3: Table Of Contents
RROR ESSAGE ‘PQF F ’ E ........................21 AILED RROR ESSAGE VERIFYING PACHMATE 2 CALIBRATION .................... 22 ....................22 ROCEDURE ERIFYING ALIBRATION POWER MODES ............................. 24 ........................... 24 EASUREMENT ............................24 TANDBY Page 3 of 87 DGH 55B-INS-OMENG Rev: 3... - Page 4 ................. 61 LEARING INGLE AIRED LUETOOTH EVICE ® 14.9 ..................62 LEARING AIRED LUETOOTH EVICES DGH CONNECT SOFTWARE ........................63 15.1 ........................63 OFTWARE EQUIREMENTS 15.2 ........................64 NSTALLING THE SOFTWARE 15.3 ........................65 ONFIGURING THE OFTWARE 15.4 ............................. 67 DDING A DEVICE 15.5...
- Page 5 UPPORT 19.2 ....................79 IEWING ODEL AND ERIAL UMBER 19.3 ............................... 80 ARRANTY MANUFACTURED BY DGH TECHNOLOGY, INC................. 80 AUTHORIZED EUROPEAN REPRESENTATIVE ..................81 REGULATORY COMPLIANCE ........................81 22.1 EMI/EMC C ........................... 81 OMPLIANCE 22.2 ................83 IRELESS ADIO...
-
Page 6: Introduction
Cornea thickness measurements are used in the preoperative evaluation of laser vision correction procedures, and for the evaluation of glaucoma. The DGH 55B is also used as a diagnostic tool in a variety of clinical situations including the general assessment of corneal health related to pathologies and in evaluating corneal swelling following surgery or injury. -
Page 7: Description Of Symbols
0120 93/42/EEC Annex II (excluding section 4) for ultrasonic pachymeters. This symbol located on the DGH 55B indicates that the equipment consists of electronic assemblies and other components that may be subject to Directives 2002/96/EC, 2003/108/EC, and 2002/95/EC of the European parliament, which advises that electrical and electronic devices must not be disposed of as normal domestic refuse. -
Page 8: General Cautions And Warnings, Prescription Device Statement And Operator Qualifications
WARNING: ELECTRICAL SHOCK HAZARD. Do not open the unit. Refer servicing to qualified service personnel. 3.2 Prescription Device Statement WARNING: The DGH 55B (Pachmate 2) is a prescription device and is only to be used by, or under the supervision of, a licensed physician. 3.3 Operator Qualifications This DGH 55B is intended to be used by trained medical professionals. -
Page 9: Use Of Ultrasound In Ophthalmic Measurement
The DGH 55B transducer emits ultrasound pulses and detects ultrasound signals that have been reflected back. The time delay between the echoes is used to calculate distances between surfaces in the eye. -
Page 10: Ultrasonic Measurement
Second, the thickness is calculated based on the travel time and the speed of sound through the eye: distance = velocity × time All thickness measurements are based on a corneal velocity of 1640 m/sec. Page 10 of 87 DGH 55B-INS-OMENG Rev: 3... -
Page 11: Proper Applanation For Takinga Measurement
WARNING: Moving or realigning the probe tip while it is in contact with the cornea or applying pressure while measuring the cornea may cause damage to the cornea. When changing position or alignment of the probe, it is necessary to disengage contact, reorient and then gently re-applanate. Page 11 of 87 DGH 55B-INS-OMENG Rev: 3... -
Page 12: Ultrasonic Exposure And Intensities
Thus, the values below are the values to be expected for a typical transducer. Since the DGH 55B Pachmate 2 is not capable of exceeding either a TI of 1.0 or an MI of 1.0 in any operating mode, the output of the system is reported as shown in the Table below. -
Page 13: Biometric Measurement Capabilities
The tissue calculations above were done with the measured frequency of the transducer used for the tests. 5.3 Biometric Measurement Capabilities The following table shows the measurement range for the DGH 55B Ultrasonic Pachymeter (Pachmate 2) Measurement Option: Standard Unit 200 –... -
Page 14: Physical Description
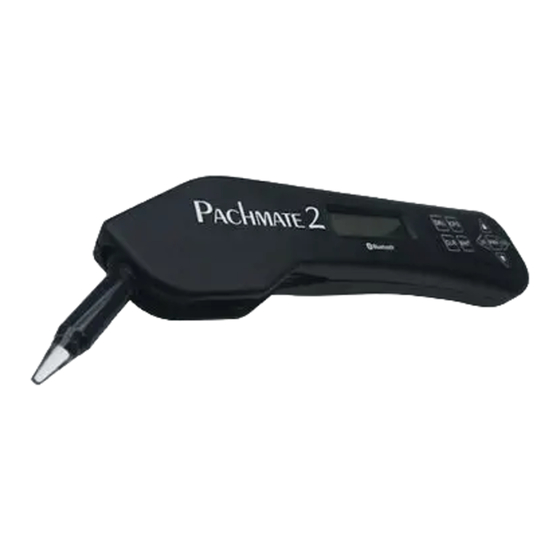
6. Physical Description 6.1 Front View Pachmate 2 PWR OD Fig 6.1.1 The DGH 55B (Pachmate 2) Front View Detachable Probe Probe can be easily removed for cleaning or replacement. LCD Display 16 x 2 character display used to present measurement data and/or configuration parameters to the operator. - Page 15 Pressing this key turns the Pachmate 2 on. When the Pachmate 2 is on, pressing and holding this key turns the Pachmate 2 off. Also used in conjunction with the DEL key to enter the CalBox mode. 12 Lanyard Loop Allows a point of attachment for a lanyard. Page 15 of 87 DGH 55B-INS-OMENG Rev: 3...
-
Page 16: Back View
Pachymeter Exton PA USA 0120 Fig 6.2.1 The DGH 55B (Pachmate 2) Back View 1 Battery Compartment A label in the battery compartment will show proper battery alignment. The unit model number and serial number are also located on the label inside the battery compartment. -
Page 17: Probe
6.3 Probe Fig 6.3.1 The DGH 55B (Pachmate 2) probe Probe Tip The portion of the probe energized when taking a measurement Transducer Housing Contains the transducer and is engraved with a probe serial number. Probe Connector The probe connector plugs into the Pachmate 2 unit. See section 7.1 for instructions on proper connection and disconnection of probe. -
Page 18: Calibration Verification Box (Calbox)
Instructions for using the CalBox are given in section 4 and they are also printed on the CalBox label. WARNING: Calibration verification should be performed daily before using the device. Fig 6.4.1 The DGH 55B (Pachmate 2) Electronic CalBox Page 18 of 87 DGH 55B-INS-OMENG Rev: 3... -
Page 19: Probe Use And Indicators
7.1.1 The probe connector is designed to rotate, allowing the user to rotate the probe out of the body of the device or position the probe at a comfortable angle for measurement. Page 19 of 87 DGH 55B-INS-OMENG Rev: 3... -
Page 20: Holding The Device
While handling the device, try to avoid contact with the probe tip (clear plastic cone) so as to avoid contamination. Touching the probe tip with ungloved hands may leave a residue that will cause the device to return an error message when self-testing (See section 7.3). Page 20 of 87 DGH 55B-INS-OMENG Rev: 3... -
Page 21: Check Probe' Error Message
7.5 ‘PQF Failed’ Error Message This message usually indicates a hardware failure occurred within the unit and the unit must be returned for repair. See section 19.1 for service information. FAILED Page 21 of 87 DGH 55B-INS-OMENG Rev: 3... -
Page 22: Verifying Pachmate 2 Calibration
‘Poor Applanation’ message is displayed, the CalBox 9v alkaline battery needs to be replaced. • If no measurements are taken within 2 ½ minutes after the CalBox START button has been pressed, the CalBox will automatically turn off. Page 22 of 87 DGH 55B-INS-OMENG Rev: 3... - Page 23 Measurement 9: 1000 µm pulse WARNING: If ANY of the calibration measurements are outside of the acceptable result tolerance, contact DGH Technology, Inc. 8.1.6 When all measurements are complete, exit CalBox Mode by pressing the CLR key on the Pachmate 2.
-
Page 24: Power Modes
To exit Standby Mode press the PWR key, this will put the unit back into Measurement Mode. The 1 minute delay can be adjusted from 0.5 to 9.5 minutes by accessing the configuration menu as described in section 13.4.1. Page 24 of 87 DGH 55B-INS-OMENG Rev: 3... -
Page 25: Sleep Mode
9.5 Checking Battery Power Battery power will be displayed every time the device is Battery OK powered on. Battery power can also be checked at any time by quickly pressing the ENT key. Page 25 of 87 DGH 55B-INS-OMENG Rev: 3... -
Page 26: Patient Modes
NOTE: In Single Patient Mode the device can take either Continuous Averaging or Mapping measurements. However, if the Measurement Mode is changed it will clear the measurements for all patients stored in memory. Page 26 of 87 DGH 55B-INS-OMENG Rev: 3... - Page 27 Fig 10.1.1 Single Patient Mode Page 27 of 87 DGH 55B-INS-OMENG Rev: 3...
-
Page 28: Multi-Patient Mode
P20) and takes measurements for the right and left eye. When measurement is complete, the user presses the CFG key and all results are recorded and can be retrieved at a later time. The user can also use the DGH Connect Software (See section 11) to enter patient identification information before taking measurements. - Page 29 Fig 10.2.1 Multi-Patient Mode Page 29 of 87 DGH 55B-INS-OMENG Rev: 3...
-
Page 30: Changing Patient Modes
ID) the device will show the patient name. By pressing the OD or OS key while the patient’s SELECT PATIENT name is displayed, other identifying information will be displayed. P03 Mar-03-1973 SELECT PATIENT P03 #30453 SELECT PATIENT P03 Male Page 30 of 87 DGH 55B-INS-OMENG Rev: 3... -
Page 31: Adding Patient Identification Information
Patient ID information is entered by connecting the Pachmate 2 to a computer ® using the optional Bluetooth connection and utilizing the DGH Connect Software. ® See section 14 regarding Bluetooth connectivity, and section 15 regarding the use of DGH Connect Software. -
Page 32: Clearing Patient Information
Selecting ‘All Patients’ clears all identifying information and all ® measurements for all patients. (Bluetooth option only) o Selecting ‘Paired Devices’ clears all paired devices from the device ® memory. (Bluetooth option only) Page 32 of 87 DGH 55B-INS-OMENG Rev: 3... -
Page 33: Measurement Modes
Mode the screen will display which eye is being measured, the measurements and standard deviation. See section 13.2 for information on configuring Continuous Averaging parameters. See section 12.2 for information on taking measurements in Continuous Averaging Measurement Mode. Page 33 of 87 DGH 55B-INS-OMENG Rev: 3... -
Page 34: Mapping Measurement Mode
This can be achieved with the help of corneal thickness charts, which are available upon request from DGH Technology, Inc. See section 13.3 for information on configuring Mapping parameters. -
Page 35: Changing Measurement Modes
• If there is no data to clear, the device will Saving New display the ‘Saving New Config’ message. Config… • After the message is displayed, the device will show the screen for the appropriate Measurement Mode. Page 35 of 87 DGH 55B-INS-OMENG Rev: 3... -
Page 36: Taking Measurements
The device is packaged with (2) AAA batteries pre-installed and the probe installed and rotated into the protective cavity. WARNING: In order to reduce the risk of infection, the DGH 55B must be cleaned and disinfected prior to each biometry procedure. Refer to section 17 for details. -
Page 37: Measurement In Continuous Averaging Mode
The selected eye will be displayed in the upper left-hand corner. By default, the device is prepared Avg 0: 0 to measure the RIGHT eye. Std Dv: 0.0 12.2.9 Have the patient visualize a fixation point. Page 37 of 87 DGH 55B-INS-OMENG Rev: 3... - Page 38 • To scroll through each measurement, press the Mea 2: 539 key. The device will list the result of Std Dv: 0.3 each measurement taken while showing the Standard Deviation on the bottom line. Page 38 of 87 DGH 55B-INS-OMENG Rev: 3...
- Page 39 Selecting ‘All Patients’ clears all identifying information and all ® measurements for all patients. (Bluetooth option only) o Selecting ‘Paired Devices’ clears all paired devices from the device ® memory. (Bluetooth option only) Page 39 of 87 DGH 55B-INS-OMENG Rev: 3...
-
Page 40: Measurement In Mapping Mode
If changes have been made, the Pachmate 2 will prompt for confirmation of the configuration change. key to select ‘Yes’ and save the configuration. The Pachmate 2 will return 12.3.7 Press the to Measurement Mode. Page 40 of 87 DGH 55B-INS-OMENG Rev: 3... - Page 41 • If the ‘Poor Applanation’ message is displayed, attempt to reposition the probe tip for proper applanation. Once the probe tip is in proper alignment, the device will continue measurement. Page 41 of 87 DGH 55B-INS-OMENG Rev: 3...
- Page 42 • The operator can take new measurements to replace those that were deleted or choose to accept the remaining measurements. 12.3.17 If the device is operating in Multi-Patient Mode the measurements will be automatically saved to memory. Page 42 of 87 DGH 55B-INS-OMENG Rev: 3...
-
Page 43: Viewing Date And Time
• The user can configure how the date will be displayed. See section 13.4.5. ® 12.4.3 If the user is using a Bluetooth enabled device to receive patient reports, the Time and Date will be recorded with the measurements. Page 43 of 87 DGH 55B-INS-OMENG Rev: 3... -
Page 44: Configuring The Pachmate 2
13.1.4 After all necessary changes have been made, press the CFG key again. 13.1.5 If changes have been made, the ‘Save New Save New Config? Config?’ message will appear. Select ‘Yes’ or ‘No’ ↑=Yes ↓=No as appropriate. Page 44 of 87 DGH 55B-INS-OMENG Rev: 3... - Page 45 Press ↑ or ↓ key to Only available if in Numb of Posn Selects the number of positions to be measured 1 to 33 Mapping Mode [33] change the value for each eye. One measurement per position. Page 45 of 87 DGH 55B-INS-OMENG Rev: 3...
- Page 46 Use the OD or OS keys to move the cursor left or right. Use the ↑ or ↓ key to change the values. This will set the date and time for the device. Date and time must be reset after batteries are changed. Page 46 of 87 DGH 55B-INS-OMENG Rev: 3...
-
Page 47: Parameters For Continuous Averaging Measurement Mode
Continuous Averaging Measurement Mode. It can be adjusted from <50 msec to 950msec. Press the key to change the value. Page 47 of 87 DGH 55B-INS-OMENG Rev: 3... -
Page 48: Parameters For Mapping Measurement Mode
1.0 sec the next mapping point after a measurement is taken. It can be adjusted from 1.0 sec to 9.5 sec. Press the key to change the value. Page 48 of 87 DGH 55B-INS-OMENG Rev: 3... -
Page 49: General Device Parameters
13.4.3 Contrast (default 7 bars) determines the contrast of CONTRAST the screen. Press the key to change the value. 13.4.4 Volume (default 7 bars) determines the volume of VOLUME audible signals/alarms. Press the key to change the value. Page 49 of 87 DGH 55B-INS-OMENG Rev: 3... - Page 50 While in this sub-menu there will be a Date MMM-dd-yyy blinking black cursor. Use the OD and OS keys to move the cursor left and right. Press the key to change the value in each field. Page 50 of 87 DGH 55B-INS-OMENG Rev: 3...
-
Page 51: Bluetooth Parameters
13.5.3 When Add PC/Printer is displayed, the device is ADD PC/PRINTER ® in Bluetooth discoverable mode. This is a Scan→ ® necessary mode for pairing Bluetooth devices. See section 14 for information on device pairing. Page 51 of 87 DGH 55B-INS-OMENG Rev: 3... - Page 52 • Add All Meas (default No) determines if each PRINTER CONFIG measurement taken during Continuous Add All Meas N→ Averaging Mode is printed, or only the average and standard deviation. Press the OD key to switch between Yes and No. Page 52 of 87 DGH 55B-INS-OMENG Rev: 3...
-
Page 53: Configuring Bluetooth Connections
14.2.2 Turn on the Pachmate 2 and enter the Configuration Menu by pressing the CFG key. 14.2.3 Press the ENT key one time to navigate to the ‘Bluetooth’ parameter. Confirm that it is turned ‘On’. If not, press the key to enable Bluetooth. (See Section 14.1) Page 53 of 87 DGH 55B-INS-OMENG Rev: 3... - Page 54 Use the keys to change the value. • The necessary Pin Code is provided with the printer. Typically the manufacturer will include the Pin Code in the user documentation. Page 54 of 87 DGH 55B-INS-OMENG Rev: 3...
-
Page 55: Sending Measurements To A Bluetooth ® Enabled Wireless Printer
13.5.4 for detailed instructions regarding printed fields. 14.3.3 Exit the Configuration Menu by pressing the CFG Save New Config? key. If changes have been made, the Pachmate 2 ↑=Yes ↓=No will prompt for confirmation of the configuration change. Page 55 of 87 DGH 55B-INS-OMENG Rev: 3... -
Page 56: Pairing With A Bluetooth Enabled Pc
This can be via integrated Bluetooth modules or USB adapters/dongles. Once the Pachmate 2 is properly paired with the PC, the operator can use the DGH Connect Software to input patient information and retrieve measurement reports. 14.4.1 Navigate to the Windows Control Panel by going to the Start menu and type ‘Control Panel’... - Page 57 With the PC Add→ you wish to pair with displayed, select ‘Add’. • If the PC to be paired is not listed, press the OS key to re-scan. Page 57 of 87 DGH 55B-INS-OMENG Rev: 3...
- Page 58 Older versions of Windows may require the user to manually configure COM Ports (see section 14.5) Pairing 14.4.12 Press the CFG key on the Pachmate 2 to exit the Completed! configuration menu. Page 58 of 87 DGH 55B-INS-OMENG Rev: 3...
-
Page 59: Adding Com Ports
COM Port, Communications Port or Serial Port settings. Select this tab. 14.5.4 The DGH Connect software needs an ‘Inbound’ and ‘Outbound’ port to operate. If either is missing, add the appropriate port. • Adding ports menu will vary depending on the software installed. -
Page 60: Sending And Receiving Information Via Bluetooth Connection To A Pc
14.5.5 After the COM Ports have been set, start the DGH Connect software. If the software has not yet been installed, install it (section 15) and then complete the final steps. 14.5.6 In the DGH Connect software, navigate to Settings → COM Settings. -
Page 61: Recalling Paired Device Configuration
14.8.1 Enter the Configuration Menu by pressing the CFG key. 14.8.2 Press the ENT key one time to navigate to the ‘Bluetooth’ parameter. Confirm that it is turned ‘On’. If not, press the key to enable Bluetooth. (See Section 13.5.1) Page 61 of 87 DGH 55B-INS-OMENG Rev: 3... -
Page 62: Clearing All Paired Bluetooth Devices
The Pachmate 2 will clear all Bluetooth LIST CLEARED devices pairing information from memory and display the ‘Paired Devices List Cleared’ message. 14.9.3 The Pachmate 2 will return to Measurement Mode. Page 62 of 87 DGH 55B-INS-OMENG Rev: 3... -
Page 63: Dgh Connect Software
PC to communicate with DGH devices. This software will interact with Pachette 4 and Pachmate 2 devices. To utilize DGH Connect, the PC must first be paired with the Pachmate 2. For information on pairing refer to section 14.4. 15.1 Software Requirements 15.1.1 System Requirements... -
Page 64: Installing The Software
• Microsoft Report Viewer 2012 Runtime 15.2.7 Click the ‘Install’ button and the software will complete installation. 15.2.8 Once installation is complete, click the icon created on the desktop to start the program. Page 64 of 87 DGH 55B-INS-OMENG Rev: 3... -
Page 65: Configuring The Software
Once the software has been installed, and the Pachmate 2 has been paired with the PC (See section 14.4) the DGH Connect software is ready to use. The operator determines how the patient records are imported. Below is a screenshot that shows the DGH Connect Software, with no patients added. - Page 66 15.3.5 Date Format (default MMM-DD-YYYY) determines how the date will be displayed. • If the date format is changed in the DGH Connect Software, the Pachmate 2 will set to match it the next time records are sent from the PC to the Pachmate 2.
-
Page 67: Adding A Device
PC and Pachmate 2. 15.4 Adding a device After the device has been paired with the PC, it can be selected for use from within the DGH Connect software. NOTE: The Pachmate 2 must be paired with the PC and COM Ports must be created before it can communicate with the DGH Connect Software (See section 14.4 and 14.5). -
Page 68: Exporting Patient Information To The Pachmate 2
‘Name’ field. This is to assist the user in distinguishing between units. 15.5 Exporting Patient Information to the Pachmate 2 The DGH Connect Software is designed to allow the user to quickly input patient identification information into the Pachmate 2. The following steps explain how to send patient identification information to the Pachmate 2. - Page 69 • Pressing the OD or OS key while a patient’s SELECT PATIENT name is displayed will show additional P01 #10231 identifying information for that patient. SELECT PATIENT P01 Jan-01-1971 SELECT PATIENT P01 Male Page 69 of 87 DGH 55B-INS-OMENG Rev: 3...
-
Page 70: Initiating Measurement Transfer Using The Pc Software
15.6.4 Once connected, the Pachmate 2 will display Bluetooth ‘Bluetooth Connected’ and will transfer Connected measurements to the PC automatically. 15.6.5 Once all files are transferred, the device will Bluetooth automatically disconnect and show the ‘Bluetooth Disconnected Disconnected’ message. Page 70 of 87 DGH 55B-INS-OMENG Rev: 3... - Page 71 15.6.9 The report will show all measurement and patient information. .PDF reports cannot be edited. .DOC reports can be edited using a word processing program. Page 71 of 87 DGH 55B-INS-OMENG Rev: 3...
-
Page 72: Initiating Measurement Transfer Using The Pachmate 2
Send → indicates that pressing the OD key will cause the Pachmate 2 to transmit measurements to the currently displayed device. 15.7.4 With the desired device displayed, press the OD key to select ‘Send’. Page 72 of 87 DGH 55B-INS-OMENG Rev: 3... - Page 73 15.7.6c If this error occurs again, select another COM Port and attempt another import. 15.7.7 Once all files are transferred, the device will Bluetooth automatically disconnect and show the ‘Bluetooth Disconnected Disconnected’ message. Page 73 of 87 DGH 55B-INS-OMENG Rev: 3...
- Page 74 15.7.9 The patient reports will be stored in the ‘Report Import Location’ that is listed in the DGH Connect Software. • If ‘Auto Open’ is enabled, the software will open each patient record in its own window.
-
Page 75: Changing Batteries
↑=ALK ↓=RCH used. Select the appropriate type. • You will receive a message indicating that the TIME AND DATE time and date must be reset. (See section 13.4.5) MUST BE RESET Page 75 of 87 DGH 55B-INS-OMENG Rev: 3... -
Page 76: Care And Maintenance
2% (w/w) Sodium Hypochlorite * The concentrations listed in this table are the specific concentrations that were tested by DGH to ensure compatibility with the probe tip material. DGH does not endorse or recommend the concentrations listed in the table above. -
Page 77: Cleaning The Unit
• A relative humidity range of 10% to 100%, including condensation. • An atmospheric pressure range of 500 hPa to 1060 hPa. 17.4 Operating Conditions The Pachmate 2 should be operated between temperatures of +18C (64.4F) to +40C (104F). Page 77 of 87 DGH 55B-INS-OMENG Rev: 3... -
Page 78: Troubleshooting Guide
Cannot find correct device on the Pairing not established Clear all pairing and re-pair Pachmate 2 when trying to with preferred device. See section 14.9 regarding clearing export/print measurements See section 14.3 and 14.4 regarding pairing Page 78 of 87 DGH 55B-INS-OMENG Rev: 3... -
Page 79: Service
(610) 594-0390 Web: www.dghkoi.com • When contacting DGH Technology, Inc. please make note of the model and serial number for the unit and probe (See section 19.2). Service personnel use this to track the status of service calls. 19.2 Viewing Model and Serial Number The model number and serial number are located on the back of the unit’s plastic housing and... -
Page 80: Warranty
This warranty is strictly limited to replacement or repair of the part that is found to be defective in material and workmanship. At the option of DGH, said part shall be replaced or repaired free of charge, F.O.B. our factory by DGH. -
Page 81: Authorized European Representative
22. Regulatory Compliance 22.1 EMI/EMC Compliance The Electro Magnetic Interference and Compatibility testing of the DGH 55B Ultrasonic Pachymeter (Pachmate 2) was performed to determine compliance with emissions and immunity requirements set forth by the European Community under the requirements of the EMC Directive (2004/108/EC). - Page 82 Guidance and Manufacturer’s Declaration – Electromagnetic Emissions The DGH 55B Pachmate 2 is intended for use in the electromagnetic environment specified below. The customer or the user of the DGH 55B Pachmate 2 should assure that it is used in such an environment.
-
Page 83: Wireless Radio Module Regulatory Compliance
22.2 Wireless Radio Module Regulatory Compliance Image from Panasonic Corporation PAN1322-SPP User Manual Rev 1.3 Page 83 of 87 DGH 55B-INS-OMENG Rev: 3... - Page 84 Image from Panasonic Corporation PAN1322-SPP User Manual Rev 1.3 Page 84 of 87 DGH 55B-INS-OMENG Rev: 3...
- Page 85 Image from Panasonic Corporation PAN1322-SPP User Manual Rev 1.3 Page 85 of 87 DGH 55B-INS-OMENG Rev: 3...
- Page 86 Image from Panasonic Corporation PAN1322-SPP User Manual Rev 1.3 Page 86 of 87 DGH 55B-INS-OMENG Rev: 3...
- Page 87 Image from Panasonic Corporation PAN1322-SPP User Manual Rev 1.3 Page 87 of 87 DGH 55B-INS-OMENG Rev: 3...
Need help?
Do you have a question about the PACHMATE and is the answer not in the manual?
Questions and answers