Table of Contents
Advertisement
Pachette
Equipment Manufactured By
DGH TECHNOLOGY , INC.
DGH TECHNOLOGY , INC.
DGH TECHNOLOGY , INC.
110 SUMMIT DR IVE
110 SUMMIT DRIVE
110 SUMMIT DR IVE
SUITE B
SUITE B
SUITE B
EXTO N, PA 1934 1
EXTO N, PA 1934 1
EXTO N, PA 1934 1
USA (6 10) 594 -9100
USA (6 10) 594 -9100
USA (6 10) 594 -9100
DGH 555B (PACHETTE 4)
ULTRASONIC PACHYMETER
DGH 555B
OPERATOR'S MANUAL
For Use with Firmware v3.0.x
And DGH Connect Software v1.1.x
Page 1 of 92
4
Authorized Representative
EMERGO EUROPE
EMERGO EUROPE
EMERGO EUROPE
Molenstraat 15
Molenstraat 15
Molenstraat 15
Prinsessegracht 20
EC
REP
2513 BH, The H ag ue
2513 BH, The H ag ue
EC
EC
REP
REP
2513 BH, The H ag ue
2514 AP, The Hague
The Netherlands
The Netherlands
The Netherlands
The Netherlands
Phone: +31.70.345.8570
Phone: +31.70.345.8570
Phone: +31.70.345.8570
DGH 555B-INS-OMENG Rev: 3
0120
Advertisement
Table of Contents

Related Manuals for DGH PACHETTE 4


Summary of Contents for DGH PACHETTE 4
- Page 1 DGH 555B (PACHETTE 4) ULTRASONIC PACHYMETER Pachette DGH 555B OPERATOR’S MANUAL For Use with Firmware v3.0.x And DGH Connect Software v1.1.x Equipment Manufactured By Authorized Representative DGH TECHNOLOGY , INC. DGH TECHNOLOGY , INC. EMERGO EUROPE EMERGO EUROPE DGH TECHNOLOGY , INC.
-
Page 2: Table Of Contents
’ E ....................... 22 ROBE RROR ESSAGE ‘PQF F ’ E ........................22 AILED RROR ESSAGE VERIFYING PACHETTE 4 CALIBRATION ..................... 23 ....................23 ROCEDURE ERIFYING ALIBRATION POWER MODES ............................. 26 ........................... 26 EASUREMENT ............................26 TANDBY Page 2 of 92... - Page 3 ................40 EASUREMENT IN ONTINUOUS VERAGING 12.3 ......................43 EASUREMENT IN APPING 12.4 ......................... 46 IEWING ATE AND CONFIGURING THE PACHETTE 4 ......................47 13.1 ............... 47 NTERING AND AVIGATING THE ONFIGURATION 13.2 ............50 ARAMETERS FOR ONTINUOUS VERAGING EASUREMENT 13.3...
- Page 4 UPPORT 19.2 ....................84 IEWING ODEL AND ERIAL UMBER 19.3 ............................... 85 ARRANTY MANUFACTURED BY DGH TECHNOLOGY, INC................. 85 AUTHORIZED EUROPEAN REPRESENTATIVE ..................86 REGULATORY COMPLIANCE ........................86 22.1 EMI/EMC C ........................... 86 OMPLIANCE 22.2 ................88 IRELESS ADIO...
-
Page 5: Introduction, Classification And Indications For Use
Cornea thickness measurements are used in the preoperative evaluation of laser vision correction procedures, and for the evaluation of glaucoma. The DGH 555B is also used as a diagnostic tool in a variety of clinical situations including the general assessment of corneal health related to pathologies and in evaluating corneal swelling following surgery or injury. -
Page 6: Description Of Symbols
This symbol instructs the operator to read the operating manual. This symbol indicates that DGH Technology, Inc. is the manufacturer of the DGH 555B Pachette 4 device. The YYYY under the symbol indicates the year the device was yyyy manufactured. -
Page 7: General Cautions And Warnings, Prescription Device Statement And Operator Qualifications
WARNING: ELECTRICAL SHOCK HAZARD. Do not open the unit. Refer servicing to qualified service personnel. 3.2 Prescription Device Statement WARNING: The DGH 555B (Pachette 4) is a prescription device and is only to be used by, or under the supervision of, a licensed physician. 3.3 Operator Qualifications This DGH 555B is intended to be used by trained medical professionals. -
Page 8: Use Of Ultrasound In Ophthalmic Measurement
The DGH 555B transducer emits ultrasound pulses and detects ultrasound signals that have been reflected back. The time delay between the echoes is used to calculate distances between surfaces in the eye. -
Page 9: Ultrasonic Measurement
Second, the thickness is calculated based on the travel time and the speed of sound through the eye: distance = velocity × time All thickness measurements are based on a corneal velocity of 1640 m/sec. Page 9 of 92 DGH 555B-INS-OMENG Rev: 3... -
Page 10: Proper Applanation For Takinga Measurement
3 and 4: INCORRECT: The probe IS NOT perpendicular to the corneal surface. Fig 4.4.1 Correct and Incorrect Applanation While in Measurement Mode, the Pachette 4 will automatically take a measurement whenever the tip of the probe is properly applanated to the cornea. -
Page 11: Ultrasonic Exposure And Intensities
Thus, the values below are the values to be expected for a typical transducer. Since the DGH 555B Pachette 4 is not capable of exceeding either a TI of 1.0 or an MI of 1.0 in any operating mode, the output of the system is reported as shown in the Table below. -
Page 12: Biometric Measurement Capabilities
The tissue calculations above were done with the measured frequency of the transducer used for the tests. 5.3 Biometric Measurement Capabilities The following table shows the measurement range for the DGH 555B Ultrasonic Pachymeter (Pachette 4) Measurement Option: Standard Unit 200 –... -
Page 13: Physical Description
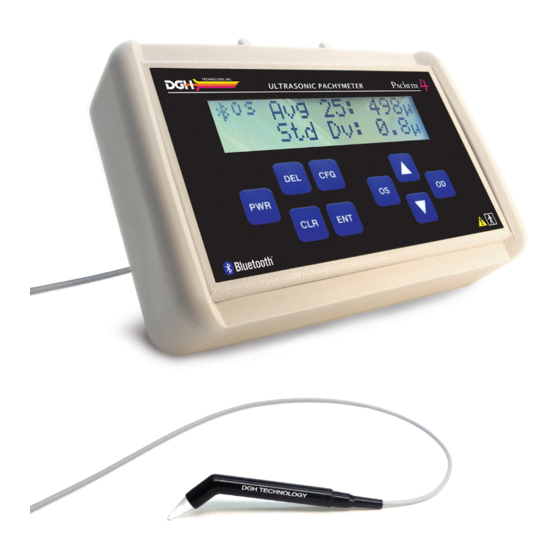
6. Physical Description 6.1 Front View Fig 6.1.1 The DGH 555B (Pachette 4) Front View LCD Display 16 x 2 character display used to present measurement data and/or configuration parameters to the operator. Probe Clips Two clips molded into the protective case to place probe between patients. - Page 14 4 PWR Key Pressing this key turns the Pachette 4 on. When the Pachette 4 is on, pressing and holding this key turns the Pachette 4 off. Also used in conjunction with the DEL key to enter the CalBox mode.
-
Page 15: Back View
6.2 Back View Fig 6.2.1 The DGH 555B (Pachette 4) Back View 1 Probe Holder Used to hold or store probe when not in use or during transport. 2 Probe Connector Holder Used to hold or store probe connector when not in use or during transport. -
Page 16: Side View
6.3 Side View Fig 6.3.1 The DGH 555B (Pachette 4) Side View 1 Probe Clips Two clips molded into the protective case to place the probe between patients. 2 Probe Cord Wrap Place to wrap the probe cord when not in use or during transport. -
Page 17: Back Of Unit (Protective Holster Removed)
6.4 Back Of Unit (Protective Holster Removed) Fig 6.4.1 The DGH 555B (Pachette 4) Back View with protective holster removed Unit Identification Label This label contains the model number and serial number for the unit. It also provides contact information for DGH Technology, Inc. -
Page 18: Probe
Transducer Housing Contains the transducer and is held by the operator during measurement. Probe Connector The probe connector plugs into the Pachette 4 unit. See section 7.1 for instructions on proper connection and disconnection of probe. Page 18 of 92... -
Page 19: Calibration Verification Box (Calbox)
6.6 Calibration Verification Box (CalBox) To check Pachette 4 calibration, an electronic Calibration Verification Box “CalBox” is used to simulate the thickness of the cornea. Instructions for using the Cal-Box are given in section 4 and they are also printed on the CalBox label. -
Page 20: Probe Use And Indicators
WARNING: Twisting the probe connector while it is being inserted/removed from the Pachette 4 can damage both the probe and Pachette 4. 7.1.1 Align the probe connector prong to fit into the Pachette 4. The prong is a half-circle with a small hole in it. -
Page 21: Holding The Probe
While handling the probe, try to avoid contact with the probe tip (clear plastic cone) so as to avoid contamination. Touching the probe tip with ungloved hands may leave a residue that will cause the device to return an error message when self-testing (See section 7.3). Page 21 of 92 DGH 555B-INS-OMENG Rev: 3... -
Page 22: Check Probe' Error Message
7.5 ‘PQF Failed’ Error Message This message usually indicates a hardware failure occurred within the unit and the unit must be returned for repair. See section 19.1 for service information. FAILED Page 22 of 92 DGH 555B-INS-OMENG Rev: 3... -
Page 23: Verifying Pachette 4 Calibration
8.1.2 Connect the CalBox to the Pachette 4 by inserting the CalBox lead into the probe connector. 8.1.3 Enter the CalBox mode by pressing and holding the Pachette 4’s DEL key and then press the PWR key. 8.1.4 Press and hold the CalBox START key until the green LED on the CalBox lights up, and the Pachette 4 will begin taking measurements. - Page 24 200µm through 1000µm, in steps of 100µm. • If the Pachette 4 is a Flap Option Unit, refer to Table 8.1.5b. The device will show calibration measurements of 100 µm through 1000 µm, in steps of 100 µm.
- Page 25 CalBox mode. Press the 8.1.8 Disconnect the CalBox by pulling the lead straight out. 8.1.9 Reconnect the probe. The Pachette 4 is now ready to take measurements. WARNING: You must exit CalBox Mode before attempting corneal measurements. Page 25 of 92...
-
Page 26: Power Modes
9. Power Modes During use, the Pachette 4 is designed to automatically enter power-saving modes to conserve battery life. The user should be familiar with all modes before using the device. 9.1 Measurement Mode Measurement Mode is when the device is at full power. In Measurement Mode the device is energizing the probe. -
Page 27: Sleep Mode
*==============* been no key presses. When entering Sleep Mode the Pachette 4 will display a ‘Powering Down’ message: After the ‘Powering Down’ message, the display will go blank and the unit will appear to be off, but all the measurements that were taken can still be retrieved. -
Page 28: Patient Modes
10. Patient Modes 10.1 Single Patient Mode NOTE: Single Patient Mode is available on all Pachette 4 devices; however exporting ® measurements from the device is only available with Bluetooth module option installed. By default, every time the Pachette 4 is turned on, it is in Avg 0: 0... - Page 29 Fig 10.1.1 Single Patient Mode Page 29 of 92 DGH 555B-INS-OMENG Rev: 3...
-
Page 30: Multi-Patient Mode
P20) and takes measurements for the right and left eye. When measurement is complete, the user presses the CFG key and all results are recorded and can be retrieved at a later time. The user can also use the DGH Connect Software (See section 15) to enter patient identification information before taking measurements. - Page 31 Fig 10.2.1 Multi-Patient Mode Page 31 of 92 DGH 555B-INS-OMENG Rev: 3...
-
Page 32: Changing Patient Modes
10.3 Changing Patient Modes 10.3.1 By default, the Pachette 4 is in Single Patient SELECT PATIENT Mode upon power up. To confirm that the device -- Single -- is in Single Patient Mode, press the CFG key and the device will display the ‘Select Patient’ screen with ‘-- Single --‘... -
Page 33: Adding Patient Identification Information
‘Select Patient’ menu. Press the CFG key again to make the selection. 10.4 Adding Patient Identification Information The Pachette 4 will store a single patient’s name, ID number, date of birth and gender in each patient location. Patient ID information is entered by connecting the Pachette 4 to a computer ®... -
Page 34: Clearing Patient Information
Selecting ‘All Patients’ clears all identifying information and all ® measurements for all patients. (Bluetooth option only) o Selecting ‘Paired Devices’ clears all paired devices from the device ® memory. (Bluetooth option only) Page 34 of 92 DGH 555B-INS-OMENG Rev: 3... -
Page 35: Measurement Modes
11. Measurement Modes The Pachette 4 allows the user to select the preferred Measurement Mode. The device will either use Continuous Averaging or Mapping configuration when reporting measurements. It is important to note that switching between Continuous Averaging or Mapping will clear ALL measurements;... -
Page 36: Mapping Measurement Mode
Biased : 0 measurement and the calculated biased measurement. With Mapping Measurement Mode enabled, the Pachette 4 can be programmed to record from 1 to 33 unique measurement positions. The illustration below shows 33 potential measurement points. -
Page 37: Changing Measurement Modes
Measurement Mode is changed. Check that all required data has been recorded outside of the device before changing the Measurement Mode. 11.3.1 Upon power-up the Pachette 4’s Measurement Mode will be set to the last setting used (factory default is Continuous Averaging). -
Page 38: Taking Measurements
WARNING: In order to reduce the risk of infection, the DGH 555B must be cleaned and disinfected prior to each biometry procedure. Refer to section 17 for details. - Page 39 The factory default is Continuous Averaging Measurement Mode. 12.1.10 The Pachette 4 is now ready to take corneal measurements. If any default parameters need to be modified, refer to section 13. Otherwise, refer to sections 12.2 and 12.3 for detailed descriptions of the proper methods for obtaining measurements.
-
Page 40: Measurement In Continuous Averaging Mode
If changes have been made, the Pachette 4 will ↑=Yes ↓=No prompt for confirmation of the configuration change. key to select ‘Yes’ and save the configuration. The Pachette 4 will return to 12.2.7 Press the Measurement Mode. Avg 0: 0... - Page 41 12.2.11 Gently position the probe tip on the cornea as described in section 4.4. The Pachette 4 will automatically begin the measurement cycle when the probe is properly applanated. • The device will emit a quick ‘beep’ for each successful measurement.
- Page 42 Selecting ‘All Patients’ clears all identifying information and all ® measurements for all patients. (Bluetooth option only) o Selecting ‘Paired Devices’ clears all paired devices from the device ® memory. (Bluetooth option only) Page 42 of 92 DGH 555B-INS-OMENG Rev: 3...
-
Page 43: Measurement In Mapping Mode
↑=Yes ↓=No If changes have been made, the Pachette 4 will prompt for confirmation of the configuration change. key to select ‘Yes’ and save the configuration. The Pachette 4 will return to 12.3.7 Press the Measurement Mode. Page 43 of 92... - Page 44 12.3.10 Confirm that the device is in Measurement Mode. (The blinking black cursor is not shown in the upper left-hand corner). 12.3.11 Gently position the probe tip on the cornea as described in section 4.4. The Pachette 4 will automatically take a single measurement when the probe is properly applanated.
- Page 45 • The operator can take new measurements to replace those that were deleted or choose to accept the remaining measurements. 12.3.17 If the device is operating in Multi-Patient Mode the measurements will be automatically saved to memory. Page 45 of 92 DGH 555B-INS-OMENG Rev: 3...
-
Page 46: Viewing Date And Time
12.4 Viewing Date and Time The Pachette 4 can display the time and date on the screen to assist the operator in recording when measurements are taken. 12.4.1 Press and hold the CLR key until the Time / Date Time HH:MM:SS AM/PM screen is displayed. -
Page 47: Configuring The Pachette 4
13. Configuring the Pachette 4 When shipped from the factory, the Pachette 4 is ready to take corneal measurements. No additional setup or configuration is necessary. However, the Pachette 4 has been designed to allow the operator to modify certain parameters to tailor the instrument to meet one’s needs. - Page 48 Press ↑ or ↓ key to Only available if in Numb of Posn Selects the number of positions to be measured 1 to 33 Mapping Mode [33] change the value for each eye. One measurement per position. Page 48 of 92 DGH 555B-INS-OMENG Rev: 3...
- Page 49 Use the OD or OS keys to move the cursor left or right. Use the ↑ or ↓ key to change the values. This will set the date and time for the device. Date and time must be reset after batteries are changed. Page 49 of 92 DGH 555B-INS-OMENG Rev: 3...
-
Page 50: Parameters For Continuous Averaging Measurement Mode
Continuous Averaging Measurement Mode. It can be adjusted from <50 msec to 950msec. Press the key to change the value. Page 50 of 92 DGH 555B-INS-OMENG Rev: 3... -
Page 51: Parameters For Mapping Measurement Mode
1.0 sec the next mapping point after a measurement is taken. It can be adjusted from 1.0 sec to 9.5 sec. Press the key to change the value. Page 51 of 92 DGH 555B-INS-OMENG Rev: 3... -
Page 52: General Device Parameters
On, always Off, or Off in Standby mode. Press the key to change the value. 13.4.4 Brightness (default 7 bars) determines the BRIGHTNESS brightness of the backlight. Press the to change the value. Page 52 of 92 DGH 555B-INS-OMENG Rev: 3... - Page 53 While in this sub-menu there will be a Date MMM-dd-yyy blinking black cursor. Use the OD and OS keys to move the cursor left and right. Press the key to change the value in each field. Page 53 of 92 DGH 555B-INS-OMENG Rev: 3...
-
Page 54: Bluetooth Parameters
Pachette 4. Up to 5 devices can be paired at a time. o Send → indicates that pressing the OD key will cause the Pachette 4 to transmit measurements to the currently displayed device. - Page 55 • Add All Meas (default No) determines if each PRINTER CONFIG measurement taken during Continuous Add All Meas N→ Averaging Mode is printed, or only the average and standard deviation. Press the OD key to switch between Yes and No. Page 55 of 92 DGH 555B-INS-OMENG Rev: 3...
-
Page 56: Configuring Bluetooth Connections
® features. 14.2.2 Turn on the Pachette 4 and enter the Configuration Menu by pressing the CFG key. 14.2.3 Press the ENT key one time to navigate to the ‘Bluetooth’ parameter. Confirm that it is turned ‘On’. If not, press the key to enable Bluetooth. - Page 57 ←ReScan indicates that pressing the OS key will cause the Pachette 4 to re-scan for devices. o Add → indicates that pressing the OD key will cause the Pachette 4 to attempt to pair with the displayed device. 14.2.6 With the desired device displayed, select ‘Add’ by pressing the OD key.
-
Page 58: Sending Measurements To A Bluetooth ® Enabled Wireless Printer
Press the CFG key to exit the ↑=Yes ↓=No Configuration Menu. The Pachette 4 will prompt for confirmation of the configuration change. key to select ‘Yes’ and save the configuration. The Pachette 4 will return to 14.2.13 Press the Measurement Mode. ®... -
Page 59: Pairing With A Bluetooth Enabled Pc
Memory will be printed. The measurements will be retained until cleared by the user or until the Measurement Mode is changed. 14.3.6 The Pachette 4 will store the printer configuration. This allows the user to print from this device directly at any time by pressing and holding the ENT key. - Page 60 14.4.3 Click the ‘Apply’ button then the ‘OK’ button. 14.4.4 Turn on the Pachette 4 and enter the Configuration Menu by pressing the CFG key. 14.4.5 Press the ENT key one time to navigate to the ‘Bluetooth’ parameter. Confirm that it is turned ‘On’.
- Page 61 Older versions of Windows may require the user to manually configure COM Ports (see section 14.5) Pairing 14.4.12 Press the CFG key on the Pachette 4 to exit the Completed! configuration menu. Page 61 of 92 DGH 555B-INS-OMENG Rev: 3...
-
Page 62: Adding Com Ports
COM Port, Communications Port or Serial Port settings. Select this tab. 14.5.4 The DGH Connect software needs an ‘Inbound’ and ‘Outbound’ port to operate. If either is missing, add the appropriate port. • Adding ports menu will vary depending on the software installed. -
Page 63: Sending And Receiving Information Via Bluetooth Connection To A Pc
14.5.5 After the COM Ports have been set, start the DGH Connect software. If the software has not yet been installed, install it (section 15) and then complete the final steps. 14.5.6 In the DGH Connect software, navigate to Settings → COM Settings. -
Page 64: Recalling Paired Device Configuration
14.7 Recalling paired device configuration The Pachette 4 will store pairing configurations for up to 5 devices. This allows for quick pairing at a later time. To recall a paired device: 14.7.1 Enter the Configuration Menu by pressing the CFG key. -
Page 65: Clearing All Paired Bluetooth Devices
14.8.3 Press the ENT two more times to navigate to ‘Add ADD PC/PRINTER PC/Printer’ parameter. Press the OD key to initiate Scan→ a scan. 14.8.4 The Pachette 4 will populate a list of all discovered ##NAME## ® Bluetooth devices. Use the keys to ←ReScan... -
Page 66: Dgh Connect Software
PC to communicate with DGH devices. This software will interact with Pachette 4 and Pachmate 2 devices. To utilize DGH Connect, the PC must first be paired with the Pachette 4. For information on pairing refer to section 14.4. 15.1 Software Requirements 15.1.1 System Requirements... -
Page 67: Installing The Software
• Microsoft Report Viewer 2012 Runtime 15.2.7 Click the ‘Install’ button and the software will complete installation. 15.2.8 Once installation is complete, click the icon created on the desktop to start the program. Page 67 of 92 DGH 555B-INS-OMENG Rev: 3... -
Page 68: Configuring The Software
Below is a screenshot that shows the DGH Connect Software, with no patients added. NOTE: The Pachette 4 must be paired with the PC and COM Ports must be created before it can communicate with the DGH Connect Software (See section 14.4 and 14.5). - Page 69 • If the date format is changed in the DGH Connect Software, the Pachette 4 will set to match it the next time records are sent from the PC to the Pachette 4. Page 69 of 92...
-
Page 70: Adding A Device
PC and Pachette 4. 15.4 Adding a device After the device has been paired with the PC, it can be selected for use from within the DGH Connect software. NOTE: The Pachette 4 must be paired with the PC and COM Ports must be created before it can communicate with the DGH Connect Software (See section 14.4 and 14.5). -
Page 71: Exporting Patient Information To The Pachette 4
‘Name’ field. This is to assist the user in distinguishing between units. 15.5 Exporting Patient Information to the Pachette 4 The DGH Connect Software is designed to allow the user to quickly input patient identification information into the Pachette 4. The following steps explain how to send patient identification information to the Pachette 4. - Page 72 ‘Export Patients’ button located at the lower right-hand corner of the table. 15.5.4 The Pachette 4 will briefly display a message ‘Bluetooth Connected’ and beep when it has started receiving files. It will display ‘Bluetooth Disconnected’ and beep when all files have been received.
-
Page 73: Initiating Measurement Transfer Using The Pc Software
15.6 Initiating measurement transfer using the PC software. 15.6.1 Check that the Pachette 4 is placed in the correct Patient Mode: • If in Single Patient Mode, only the single patient measurements will be retrieved by the computer. • If in Multi Patient Mode, all measurements in the patient memory locations will be retrieved by the computer. - Page 74 15.6.6 The Pachette 4 will display the message ‘Erase Erase Patients Patients Sent?’ Selecting ‘Yes’ will clear all ↑=Y ↓=N Sent? information of the patient(s) that was exported. 15.6.7 The software will automatically import patient records and save them to the directory indicated in the Report Import Location box.
-
Page 75: Initiating Measurement Transfer Using The Pachette 4
The Pachette 4 will attempt to send measurements. (Go to 15.7.5) • If you are unsure if the device is pre-configured, check that the Pachette 4 is sending the records to the proper device. To do this, press the CFG key to enter the Configuration Menu and repeatedly press the ENT key to navigate to the ‘Send Meas... - Page 76 ‘Connecting To BT Device’. BT Device NOTE: If there are no measurements stored in the device, the Pachette 4 will not attempt to connect. It will display the message ‘No Measurements To Transfer!’ 15.7.6 Once connected, the Pachette 4 will display Bluetooth ‘Bluetooth Connected’...
- Page 77 15.7.8 The Pachette 4 will display the message ‘Erase Erase Patients Patients Sent?’ Selecting ‘Yes’ will clear all ↑=Y ↓=N Sent? information of the patient(s) that was exported. 15.7.9 The patient reports will be stored in the ‘Report Import Location’ that is listed in the DGH Connect Software.
-
Page 78: Changing Batteries
CONNECTOR. Place the probe in a safe place, being careful to avoid any surface that could scratch or damage the probe tip. 16.1.2 Place the Pachette 4 face down on a clean, flat surface. Page 78 of 92 DGH 555B-INS-OMENG Rev: 3... -
Page 79: Changing The Batteries
WARNING: Use only Alkaline or NiMH rechargeable batteries. 16.2.1 Slide open the battery door to gain access to the batteries. 16.2.2 Remove the discharged batteries and install new batteries following the orientation shown in the battery compartment. Page 79 of 92 DGH 555B-INS-OMENG Rev: 3... - Page 80 16.2.3 Re-insert the device into the holster by placing the left side of the Pachette 4 into the holster first, and then pressing the right side down into the holster. 16.2.4 Verify that the round opening is aligned with the probe connector of the Pachette 4.
-
Page 81: Care And Maintenance
2% (w/w) Sodium Hypochlorite * The concentrations listed in this table are the specific concentrations that were tested by DGH to ensure compatibility with the probe tip material. DGH does not endorse or recommend the concentrations listed in the table above. -
Page 82: Cleaning The Unit
The unit’s plastic housing and protective holster can be cleaned using a mild soap and water. 17.3 Transport and Storage Conditions The Pachette 4 is capable, while packed for transport or storage, of being exposed for a period not exceeding 15 weeks to environmental conditions not outside the following ranges: •... -
Page 83: Troubleshooting Guide
See section 14.4 and 15.4 measurements to the software Cannot find correct device on the Pairing not established Clear all pairing and re-pair Pachette 4 when trying to with preferred device. See section 14.9 regarding clearing export/print measurements See section 14.3 and 14.4... -
Page 84: Service
(610) 594-0390 Web: www.dghkoi.com • When contacting DGH Technology, Inc. please make note of the model and serial number for the unit and probe (See section 19.2). Service personnel use this to track the status of service calls. 19.2 Viewing Model and Serial Number The model number and serial number are located on the back of the unit’s plastic housing and... -
Page 85: Warranty
This warranty is strictly limited to replacement or repair of the part that is found to be defective in material and workmanship. At the option of DGH, said part shall be replaced or repaired free of charge, F.O.B. our factory by DGH. -
Page 86: Authorized European Representative
22.1 EMI/EMC Compliance The Electro Magnetic Interference and Compatibility testing of the DGH 555B Ultrasonic Pachymeter (Pachette 4) was performed to determine compliance with emissions and immunity requirements set forth by the European Community under the requirements of the EMC Directive (2004/108/EC). - Page 87 Guidance and Manufacturer’s Declaration – Electromagnetic Emissions The DGH 555B Pachette 4 is intended for use in the electromagnetic environment specified below. The customer or the user of the DGH 555B Pachette 4 should assure that it is used in such an environment.
-
Page 88: Wireless Radio Module Regulatory Compliance
22.2 Wireless Radio Module Regulatory Compliance Image from Panasonic Corporation PAN1322-SPP User Manual Rev 1.3 Page 88 of 92 DGH 555B-INS-OMENG Rev: 3... - Page 89 Image from Panasonic Corporation PAN1322-SPP User Manual Rev 1.3 Page 89 of 92 DGH 555B-INS-OMENG Rev: 3...
- Page 90 Image from Panasonic Corporation PAN1322-SPP User Manual Rev 1.3 Page 90 of 92 DGH 555B-INS-OMENG Rev: 3...
- Page 91 Image from Panasonic Corporation PAN1322-SPP User Manual Rev 1.3 Page 91 of 92 DGH 555B-INS-OMENG Rev: 3...
- Page 92 Image from Panasonic Corporation PAN1322-SPP User Manual Rev 1.3 Page 92 of 92 DGH 555B-INS-OMENG Rev: 3...
Need help?
Do you have a question about the PACHETTE 4 and is the answer not in the manual?
Questions and answers