Table of Contents
Advertisement
QQ
3 7 63 1515 0
CD RECEIVER
DEH-P700BT
DEH-P7000BT
DEH-P7050BT
TE
L 13942296513
This service manual should be used together with the following manual(s):
Model No.
CX-3240
CRT4050
www
For details, refer to "Important Check Points for Good Servicing".
.
PIONEER CORPORATION
PIONEER ELECTRONICS (USA) INC. P.O. Box 1760, Long Beach, CA 90801-1760, U.S.A.
PIONEER EUROPE NV Haven 1087, Keetberglaan 1, 9120 Melsele, Belgium
PIONEER ELECTRONICS ASIACENTRE PTE. LTD. 253 Alexandra Road, #04-01, Singapore 159936
PIONEER CORPORATION 2008
http://www.xiaoyu163.com
Order No.
Mech.Module
S10.5COMP2-
iPod-C2
x
ao
y
i
4-1, Meguro 1-chome, Meguro-ku, Tokyo 153-8654, Japan
http://www.xiaoyu163.com
8
DEH-P700BT/XN/UC
/XN/UC
/XN/ES
Q Q
3
6 7
1 3
CD Mech. Module : Circuit Descriptions, Mech. Descriptions, Disassembly
u163
.
2 9
9 4
2 8
1 5
0 5
8
2 9
9 4
Remarks
m
co
K-ZZY FEB. 2008 Printed in Japan
9 9
ORDER NO.
CRT4114
/XN/UC
2 8
9 9
Advertisement
Table of Contents

Related Manuals for Pioneer DEH-P7050BT ES


Summarization of Contents
Pioneer Service Manual
CD Receiver Models
Lists the CD Receiver models covered by this service manual, including DEH-P700BT, DEH-P7000BT, and DEH-P7050BT.
Safety Information
General Cautions for Service
Highlights cautions for qualified technicians, emphasizing proper tools, training, and avoiding unqualified repairs.
Chemical Warning (California Proposition 65)
Warns about lead in solder and chemicals in electrical parts that may cause cancer or birth defects.
Laser Diode Safety Precautions
Advises caution when checking or adjusting the laser diode emitting power, including minimum distances.
Battery Replacement Caution
Warns about explosion danger if battery is replaced incorrectly and advises using specified types and proper disposal.
Important Check Points for Good Servicing
Product Safety Checks
Details essential checks for product safety, including using specified parts, no modifications, proper soldering, and secure connections.
Adjustments and Confirmations
Ensuring original performance through optimum adjustments and characteristic confirmation as per manual instructions.
Lubricants, Glues, and Replacement Parts
Use of specified lubricants and adhesives, ensuring proper application amount.
Cleaning Procedures Before Shipping
Details cleaning tools and portions to be cleaned, such as CD pickup lenses and fans, before shipping the product.
Shipping Mode and Screws
Instructions for setting shipping mode or installing shipping screws before shipment to protect the product.
Service Precautions
General Service Precautions
Conforming to regulations, turning off power before disassembly, protecting pickup unit from ESD, and handling ICs carefully.
CD Mechanism Mis-installation Display
Describes the error display when the S10.5COMP2-USB mechanism is installed by mistake.
Notes on Soldering
Information on using lead-free solder for environmental protection and specifications for lead-free soldering irons.
Specifications
General and Audio Specifications
Details power source, current consumption, dimensions, maximum power output, continuous power output, and equalizer settings.
CD Player Specifications
Covers system, usable discs, signal-to-noise ratio, channels, MP3/WMA/AAC/WAV decoding formats.
USB Specifications
Details USB specification, supply current, memory amount, file system, and decoding formats for MP3/WMA/AAC/WAV.
FM Tuner Specifications
Frequency range, usable sensitivity, and signal-to-noise ratio for FM tuning.
AM Tuner Specifications
Frequency range, usable sensitivity, and signal-to-noise ratio for AM tuning.
Bluetooth Specifications
Bluetooth version information.
Specifications (Continued)
Infrared Remote Control Specifications
Details wavelength and output power for the infrared remote control.
Specifications and Design Note
States that specifications and design are subject to modification without notice due to improvements.
Disc and Content Format
Bluetooth Trademark Information
Information about ownership of the Bluetooth word mark and logos by Bluetooth SIG, Inc.
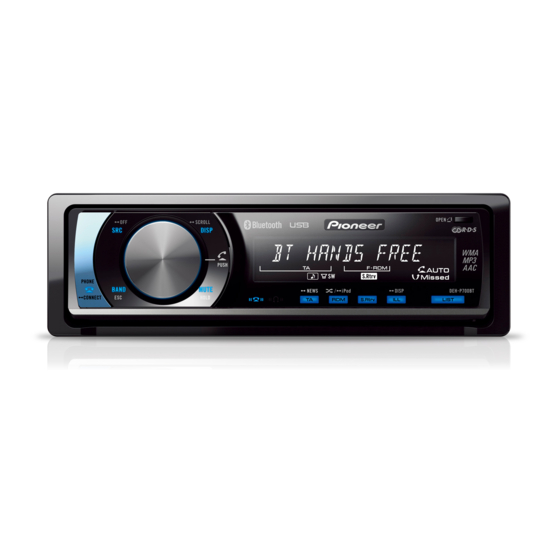
Panel Facilities Overview
Head Unit Controls
Describes the function of each button on the head unit, including SRC/OFF, DISP/SCROLL, OPEN, LIST, S.Rtrv/SAT MODE, RDM/iPod, CLOCK/DISP OFF.
Indicator Lights
Explains the function of the Bluetooth audio player indicator ('Ω') and the cellular phone indicator ('☎').
Panel Facilities (Continued)
Head Unit Buttons and Functions
Details the functions of the VOLUME, FUNCTION, Thumb pad, DIRECT, CLEAR, 0-9 buttons, and phone control buttons.
Remote Control Operation
States that remote control operation is the same as the head unit buttons.
Display Indications
Main Display Section
Explains what the main display shows, including band, frequency, elapsed time for tuner and media playback.
Specific Display Indicators (Part 1)
Details indicators like LOC, stereo, shuffle, F-RPT, F-RDM, call indicators, auto answer, and folder indicators.
Specific Display Indicators (Part 2)
Explains indicators for artist, disc, song, subwoofer, loudness, Sound Retriever, iPod, phone book, and missed calls.
Panel Facilities (Continued)
Head Unit Controls (Part 2)
Describes the functions of the MUTE/HOLD button and the MULTI-CONTROL for seek tuning and volume adjustment.
Panel Facilities (Continued)
Head Unit Controls (Part 3)
Explains the BAND/ESC button for selecting tuner bands and the PHONE/CONNECT button for phone source and Bluetooth connection.
Fastening the Front Panel
Front Panel Fastening Procedure
Step-by-step instructions for attaching holders, replacing the front panel, flipping holders, and fixing the front panel with screws.
Connection Diagram
Subwoofer Connection Note
Provides a note regarding speaker connections when a rear speaker lead is not connected to the subwoofer.
Overall Connection Diagram
Illustrates the overall connections for the unit, including power, speakers, audio inputs, and accessories.
Connection Diagram (Continued)
Connection Diagram for DEH-P7050BT/XN/ES
Shows the connection diagram specifically for the DEH-P7050BT/XN/ES model, detailing component hookups.
Basic Items for Service
Check Points After Servicing
Lists procedures and items to confirm after servicing to ensure product quality, including customer complaint resolution and operation checks.
PCB Locations
Identifies the locations of various PCBs within the unit, such as Tuner Amp, CD Core, Bluetooth, Antenna, and Keyboard units.
Jigs and Grease List
Jigs List for Servicing
Lists specific jigs used for servicing, such as Test Disc and L.P.F., with their jig numbers and remarks.
Grease List for CD Mechanism
Specifies greases used for the CD Mechanism Module, including grease numbers and remarks.
Cleaning Procedures Before Shipping
Details cleaning tools and portions to be cleaned, such as CD pickup lenses and fans, before shipping the product.
Block Diagram
Tuner Amp Unit Block Diagram
Shows the block diagram of the Tuner Amp Unit, illustrating signal flow and component interconnections.
Pickup Unit Block Diagram
Illustrates the block diagram for the Pickup Unit (P10.5), detailing its internal components and signal paths.
CD Core Unit Block Diagram
Presents the block diagram for the CD Core Unit (S10.5COMP2-iPod-C2), showing its functional blocks.
Block Diagram (Continued)
System Controller Block Diagram
Diagram of the System Controller IC601, showing its interconnections and functions within the unit.
Panel Unit Block Diagram
Shows the block diagram of the Panel Unit, illustrating its components and signal flow.
Keyboard Unit Block Diagram
Illustrates the block diagram for the Keyboard Unit, detailing its interface and control signals.
Bluetooth Unit Block Diagram
Bluetooth Module Details
Shows the internal structure and connections of the Bluetooth module, including DAC, LPF, and CODEC components.
Antenna Unit Details
Diagram showing the Antenna Unit (ANT1101, ANT1102) and its connection points.
FM/AM Tuner Unit Schematic
FM/AM Tuner Unit Pinout Description
Detailed explanation of each pin's function (Symbol, I/O, Explain) for the FM/AM Tuner Unit.
LCD Panel Diagram
LCD Segment and Common Pin Connections
Illustrates the connections for LCD segments and common pins, showing how characters are formed.
Diagnosis
Operational Flowchart
Diagram showing the sequence of operations during power-on, including voltage checks and communication steps.
Error Code List
Error Message Interpretation
Explains how error codes are displayed and intended use for trouble analysis and repair.
Specific Error Codes and Causes
Lists error codes (10, 11, 12, 17, 30, 44, 50, A0) with their class, displayed code, description, and potential causes.
Bluetooth/Telephone Error Codes
Details error messages (ERROR-10, ERROR-80) related to Bluetooth unit and FLASH ROM, including causes and factors.
iPod Error Codes and Actions
iPod Error Messages and Resolutions
Lists iPod errors (NO SONGS, STOP, ERROR-19, ERROR-18, ERROR-16, CHECK USB) with causes and recommended actions.
USB Error Codes and Actions
Details USB errors (NO AUDIO, TRK SKIPPED, PROTECT, N/A USB, CHK USB, ERROR-19, ERROR-23) with causes and resolutions.
Connector Function Descriptions
Connector Layout and Identification
Illustrates the location of various connectors (USB, REAR OUTPUT, FRONT OUTPUT, ANTENNA, SUBWOOFER, AUX INPUT, IP-BUS, WIRED REMOTE) on the unit.
IP-BUS Input Connector Pinout
Describes the function of each pin for the IP-BUS INPUT connector (BUS1-BUS12).
Subwoofer Output Connector Pinout
Details the pin functions for the SUBWOOFER OUTPUT connector (BUP, GND, NC, REM, ACC, FR, FL, RR, FR).
Service Mode Functions
Display Test Mode
Explains how to enter and use the display test mode, including system version display and all lighting test.
System Version Display Details
Shows how to interpret the system version display, including PD number, microcomputer version, and CWW number.
CD Test Mode
CD Test Mode Flowchart
Visual representation of the sequence of operations and key presses to access different CD test modes.
CD Test Mode Key Operations
Explains the function of each key (BAND, >, <, 1-6) in selecting test modes, adjustments, and settings.
CD Test Mode Important Notes
Provides critical notes regarding key presses during ejection, focus search, TR jump modes, and power cycling.
Bluetooth Test Mode
Bluetooth Memory Clear
Explains which items are initialized when resetting the microprocessor and recommends clearing data before transferring the unit.
Microprocessor Reset Procedure
Details the conditions and steps for resetting the microprocessor, including using the RESET button.
Bluetooth Module Reset Procedure
Provides steps to delete Bluetooth telephone and audio data, including selecting BT RESET:MEMORY and confirming the action.
Bluetooth Test Mode (Mobile Phone)
BT Mobile Phone Specifications
Lists requirements for BT mobile phones, including HFP, OPP, and desirable model characteristics for verification.
Mobile Phone Connection Cautions
Advises on cautions when connecting mobile phones at the service site, including leaving telephone information and overwriting registered numbers.
Bluetooth Function Confirmation
Specifies items to confirm for simple BT action check: Bluetooth connection and BT antenna sensitivity.
Bluetooth Test Mode Configuration Diagram
Shows the configuration diagram for testing Bluetooth functionality, including the DEH-P700BT unit and a mobile phone.
Starting Bluetooth Test Mode
Details the operation method to start the test mode by pressing MUTE+CLOCK keys and selecting PHONE.
Bluetooth Test Mode (Spectrum Analyzer)
Spectrum Analyzer Cautions
Advises on required peripheral facilities, direct antenna connection, and careful handling of U.FL connector and cables.
Bluetooth Output Level Confirmation
Specifies confirming the output level of the Bluetooth unit using a 2.4 GHz-compliant spectrum analyzer.
Spectrum Analyzer Test Configuration
Illustrates the setup for testing Bluetooth output level using a spectrum analyzer, including conversion adapters and cables.
Starting Bluetooth Test Mode (Spectrum Analyzer)
Bluetooth Test Mode Operation
Details the operation method to start test mode via LIST+RDM keys and PHONE key, and selecting LOCAL TX NM.
Frequency Selection for Test Mode
Explains how to determine and select frequencies using Center, Up, and Down keys, with initial values provided.
Final Test Mode Setup
Describes the final step of displaying LOCAL TX NM Setup Defined, indicating the end of product setup.
Output Level Measurement and Standard
Details how to measure output level using a spectrum analyzer and the acceptable range (-6 dBm to 4 dBm).
Disassembly Procedures
Removing the Keyboard Unit
Instructions for removing the knob unit, screws, cover, and then the keyboard unit.
Removing Holder, Panel, and Case
Steps to remove the pick, slide the holder, remove the panel, and then remove the case.
Removing the CD Mechanism Module
Details how to remove the four screws and disconnect the cable to remove the CD Mechanism Module.
Disassembly Procedures (Continued)
Removing the Cord Assy
Instructions for unplugging the cord Assy using jig GGF1539, hooking the point, and drawing it out vertically.
Attaching the Cord Assy
Guidance on adjusting and inserting the cord Assy correctly, advising against extreme slant to prevent connector damage.
Removing the Panel Assy
Steps to disconnect the cord Assy, remove two screws, and then remove the Panel Assy.
Disassembly Procedures (Continued)
Removing Panel and Antenna Units
Steps to remove screws, holder, panel unit, cord Assy, arm Assy, and then the antenna unit.
Removing Tuner Amp and Bluetooth Units
Instructions for removing screws, straightening tabs, and detaching the Tuner Amp Unit and Bluetooth Unit.
Removing Front Plate Button
Front Plate Button Removal Procedure
Details on removing the front plate button by releasing six hooks, advising gentle removal to avoid breakage.
Handling the Mechanism Unit
Mechanism Unit Handling Guidelines
Instructions on how to hold the mechanism unit, specifically advising against gripping the front portion of the upper frame.
Removing Upper and Lower Frames
Steps for removing springs and screws, then using a pivot to remove the upper frame and carriage mechanism.
Removing the CD Core Unit
CD Core Unit Removal Steps
Instructions include applying shorting solder, unsoldering leads, loosening screws, and removing the CD Core Unit carefully.
CD Core Unit Assembly Caution
Advises assembling the CD Core Unit with the SW in a clamped state to prevent damage.
Removing the Pickup Unit
Details removing the Pickup Unit by moving to carriage mechanism mode, removing CD Core Unit, poly washer, and feed screw.
Pickup Unit Assembly Caution
Instructs to move the Planet Gear to load/eject position and avoid loose leads when assembling the pickup unit.
Settings and Adjustments
CD Adjustment Procedures
Provides cautions and steps for CD adjustment, including using the correct voltage, avoiding shorts, and using test mode.
Adjustment Cautions
Highlights important points like using correct voltage, floating instruments, and avoiding REFO1 to GND shorts.
Test Mode for CD Adjustment
Explains how to enter and exit the test mode used for CD mechanism module adjustments.
CD Adjustment Notes
Provides important notes regarding software protections, mechanical/electrical shocks, signal oscillation, and eject operation.
Checking Grating After Pickup Unit Change
Grating Adjustment Note
States that grating angle is pre-adjusted and changing the PU unit should be a last resort, requiring grating check.
Purpose of Grating Check
To verify that the grating is within an acceptable range after the PU unit has been changed.
Symptoms of Grating Mal-adjustment
Describes symptoms like inability to close tracking, perform track search, or long track searching times.
Grating Check Method
Lists the required equipment (Oscilloscope, L.P.F.), measuring points, disc, and mode for checking the grating.
Grating Check Procedure
Step-by-step guide to check grating by monitoring LPF outputs on an oscilloscope and verifying phase difference.
Grating Waveform Wobble Note
Explains that disc eccentricity or misalignment can cause grating waveform wobble, and the specified angle is the average.
Hint for Reducing Waveform Wobble
Suggests reloading the disc might change clamp position and decrease waveform wobble.
Grating Waveform Examples
Grating Waveform Visuals
Displays sample grating waveforms at 0, 30, 45, 60, 75, and 90 degrees for reference.
PCL Output Confirmation
PCL Output Verification
Explains how to confirm PCL output and clock signal frequency (625.0 kHz), and what to do if the clock signal is out of range.
Exploded Views and Parts List
Parts List Notes
Provides notes regarding generally unavailable parts, safety factors, screw usage for disassembly, and lubricant/glue application.
Packing Section Parts List
Lists parts included in the packing section, such as cord assys, accessory assy, holders, and unit boxes.
Parts List (Continued)
Parts List (Continued)
Lists remaining parts such as protector, CD-ROM manual, microphone assembly, remote control unit, and polyethylene bags.
Model Contrast Table
Compares parts for DEH-P700BT/XN/UC, DEH-P7000BT/XN/UC, and DEH-P7050BT/XN/ES, highlighting differences.
Language Support for Manuals
Lists supported languages for the Quick Start Guide and Owner's Manual Assy based on model and part number.
CD-ROM Operation Manual Contents
Details the contents of the Operation Manual on CD-ROM, including supported languages for different models.
Language Support for Installation Manual
Lists supported languages for the Installation Manual, indicating part numbers and language availability.
Exterior Parts (View 1)
Exterior Parts Exploded View (1)
Diagram showing an exploded view of exterior components, numbered for parts list reference.
Exterior Parts List (View 1)
Exterior Parts List (View 1)
Lists exterior parts with their mark numbers, descriptions, and part numbers.
Exterior Parts (View 2)
Exterior Parts Exploded View (2)
Diagram showing an exploded view of additional exterior components, numbered for parts list reference.
Exterior Parts List (View 2)
Exterior Parts List (View 2)
Lists exterior parts with their mark numbers, descriptions, and part numbers.
CD Mechanism Module Exploded View
CD Mechanism Module Exploded Diagram
Diagram showing an exploded view of the CD mechanism module components, numbered for parts list reference.
CD Mechanism Module Parts List
CD Mechanism Module Parts List
Lists all parts for the CD Mechanism Module, including CD Core Unit, connectors, screws, springs, gears, and motors.
Schematic Diagrams
Overall Connection Diagram
Shows the overall connection diagram of the unit, including major sections like MECHA, TUNER, USB, IP-BUS, and SYSTEM MICRO.
Schematic Diagrams (Continued)
Tuner Amp Unit Schematic
Detailed schematic of the Tuner Amp Unit, showing component interconnections and signal paths.
Schematic Diagram Notes
Explains symbols used in schematics, such as resistors, capacitors, and their differentiation.
Schematic Diagrams (Continued)
Tuner Amp Unit Schematic Section A-b
Detailed schematic view of a specific section (A-b) of the Tuner Amp Unit.
Tuner Amp Unit Schematic Section A-a
Detailed schematic view of a specific section (A-a) of the Tuner Amp Unit.
Schematic Diagrams (Continued)
Tuner Amp Unit Schematic
Detailed schematic of the Tuner Amp Unit, showing component interconnections and signal paths.
Panel Unit Schematic
Schematic diagram of the Panel Unit, showing its circuitry and connections.
IP-BUS Section Schematic
Diagram illustrating the IP-BUS interface connections and related components.
MECHA Section Schematic
Detailed schematic of the MECHA section, showing its components and interconnections.
Schematic Diagrams (Continued)
Tuner Amp Unit Schematic Section A-f
Detailed schematic view of a specific section (A-f) of the Tuner Amp Unit.
Keyboard Unit Schematic
Keyboard Unit to LCD Driver Connections
Diagram showing the detailed connections between the keyboard unit components and the LCD driver IC.
Keyboard Unit Schematic (Continued)
Keyboard Unit Control Circuitry
Schematic showing connections for MULTI-CONTROL, phone, band, display, and other button functions.
CD Mechanism Module Schematic
Pickup Unit Schematic (Service)
Schematic diagram of the Pickup Unit (P10.5) in service mode, detailing its connections and components.
Hologram Unit Schematic
Illustrates the schematic for the Hologram Unit, showing its circuitry.
Motor Driver Logic Table
Table detailing the logic states for LOAD, EJ, PLAY, OFF functions of the motor drivers.
Motor Driver Schematics
Schematics for the Loading/Carriage Motor and Spindle Motor drivers, including their logic and connections.
CD Core Unit Schematic
CD Core Unit Schematic Details
Detailed schematic of the CD Core Unit, showing connections to various ICs, modules, and power sources.
iPod Authentication Coprocessor Schematic
Schematic illustrating the iPod Authentication Coprocessor, detailing its connections and function.
CD Core Unit Schematic (Continued)
CD Core Unit Schematic Details (Continued)
Further details of the CD Core Unit schematic, showing connections to IC201, USB, tuner, and various signal lines.
CD Core Unit Schematic (Continued)
CD Core Unit Schematic Details (Continued)
Continued schematic details of the CD Core Unit, showing connections to IC201, power supplies, and various interface signals.
Pickup Unit Schematic (Service)
Pickup Unit Schematic (Service) Details
Detailed schematic of the Pickup Unit in service mode, including connections to IC201, motors, and switches.
CD Core Unit Switches
CD Core Unit Switch Descriptions
Lists switches on the CD Core Unit (S901, S903, S904, S905) and their ON-OFF states, indicating underlined switch positions.
Motor Driver Logic Table
Table detailing the logic states for LOAD, EJ, PLAY, OFF functions of the motor drivers.
GND Connection Notes
Explains GND, PGND, and AGND connections and their non-interconnection on PCB, with PGND connected via screw.
Bluetooth and Antenna Unit Schematics
Bluetooth Unit Schematic
Detailed schematic of the Bluetooth Unit, showing connections to IC21, IC36, IC51, IC56, and CN552.
Antenna Unit Schematic
Diagram showing the Antenna Unit (ANT1101, ANT1102) and its connections.
Bluetooth Unit Schematic (Continued)
Bluetooth Unit Schematic Details
Continued schematic details of the Bluetooth Unit, including DAC, LPF, CODEC, and ALC circuits.
Bluetooth Unit Schematic (Continued)
Bluetooth Unit Schematic Details (Continued)
Further schematic details of the Bluetooth Unit, showing connections to CN76, CODEC, and various signal lines.
Bluetooth Unit Schematic (Continued)
Bluetooth Unit Schematic Details (Continued)
Continued schematic details of the Bluetooth Unit, showing ALC, LPF, and DAC circuits with component values.
Bluetooth Unit Schematic (Continued)
Bluetooth Unit Schematic Section D-a/D-b
Detailed schematic views of sections D-a and D-b of the Bluetooth Unit, showing crystal oscillators and connections.
Bluetooth Unit Schematic (Continued)
Bluetooth Unit Schematic Details (Continued)
Continued schematic details of the Bluetooth Unit, showing connections to CN1, ANT1102, and RF components.
Antenna Unit Schematic
Schematic of the Antenna Unit, showing connections for ANT1101 and ANT1102.
Waveforms
CD Core Unit Waveforms (Part 1)
Illustrates waveforms for DSCSNS, BSNS, LOEJ, CLCONT, CIN, SIN, FIN, and TE signals during CD operations.
CD-DA Play Waveforms
Shows waveforms related to CD-DA play operation, including setup, source on, and spindle waveforms.
Waveforms (Continued)
Waveforms for Jump and Operation Modes
Illustrates waveforms for tracks jump operations, search operations, and analog audio signals.
Waveforms for Eject and USB Operations
Shows waveforms for CD eject operations and USB play/connecting operations.
Waveforms (Continued)
Waveforms for DP, DM, CPRST, SDA, SCL
Illustrates waveforms for DP, DM, CPRST, SDA, and SCL signals during ACC off and iPod authentication operations.
PCB Connection Diagrams
Tuner Amp Unit PCB Connection Diagram
Shows the PCB connection diagram for the Tuner Amp Unit, detailing component placement and connector locations.
PCB Connection Diagrams (Continued)
FM/AM Tuner Unit PCB Connection Diagram
Illustrates the PCB layout and component connections for the FM/AM Tuner Unit.
Tuner Amp Unit PCB Connection Diagram (Continued)
Tuner Amp Unit PCB Layout
Shows the PCB layout for the Tuner Amp Unit, indicating component positions and connections.
Tuner Amp Unit PCB Connection Diagram (Side B)
Tuner Amp Unit PCB Layout (Side B)
Illustrates the PCB layout for Side B of the Tuner Amp Unit, showing component placement and connections.
Keyboard Unit PCB Connection Diagram
Keyboard Unit PCB Layout (Side A)
Shows the PCB layout for the Keyboard Unit (Side A), indicating component positions and connections to buttons and LCD.
Keyboard Unit PCB Connection Diagram (Side B)
Keyboard Unit PCB Layout (Side B)
Illustrates the PCB layout for the Keyboard Unit (Side B), showing component placement and connections.
CD Core Unit PCB Connection Diagram
CD Core Unit PCB Layout (Side A)
Shows the PCB layout for the CD Core Unit (Side A), indicating component positions and connector locations.
CD Core Unit PCB Connection Diagram (Side B)
CD Core Unit PCB Layout (Side B)
Illustrates the PCB layout for the CD Core Unit (Side B), showing component placement and connections.
Bluetooth Unit PCB Connection Diagram
Bluetooth Unit PCB Layout (Side A)
Shows the PCB layout for the Bluetooth Unit (Side A), indicating component positions and connector locations.
Bluetooth Unit PCB Connection Diagram (Side B)
Bluetooth Unit PCB Layout (Side B)
Illustrates the PCB layout for the Bluetooth Unit (Side B), showing component placement and connections.
Antenna Unit PCB Connection Diagrams
Antenna Unit PCB Layout (Side A)
Shows the PCB layout for the Antenna Unit (Side A), indicating connections for ANT1102.
Antenna Unit PCB Layout (Side B)
Illustrates the PCB layout for the Antenna Unit (Side B), showing connections for BT ANTENNA (ANT1101).
Panel Unit PCB Connection Diagrams
Panel Unit PCB Layout (Side A)
Shows the PCB layout for the Panel Unit (Side A), indicating component positions and connector locations.
Panel Unit PCB Layout (Side B)
Illustrates the PCB layout for the Panel Unit (Side B), showing component placement and connections.
Electrical Parts List
Electrical Parts List Notes
Provides notes on unavailable parts, chip components, safety factors, and figure meaning (coordinates).
Electrical Parts List (ICs and Transistors)
Lists electrical components like ICs and Transistors with their circuit symbols, numbers, and part numbers.
Electrical Parts List (Miscellaneous)
Lists miscellaneous electrical components such as varistors, switches, and chip coils.
Electrical Parts List (Continued)
Electrical Parts List (Resistors)
Lists resistors with their circuit symbols, numbers, and part numbers.
Electrical Parts List (Continued)
Electrical Parts List (Resistors Continued)
Lists resistors with their circuit symbols, numbers, and part numbers.
Electrical Parts List (Continued)
Electrical Parts List (Resistors Continued)
Lists resistors with their circuit symbols, numbers, and part numbers.
Electrical Parts List (Capacitors)
Lists capacitors with their circuit symbols, numbers, and part numbers.
Electrical Parts List (Continued)
Electrical Parts List (Capacitors Continued)
Lists capacitors with their circuit symbols, numbers, and part numbers.
Electrical Parts List (ICs and Transistors)
Lists ICs and transistors with their circuit symbols, numbers, and part numbers.
Electrical Parts List (Miscellaneous)
Lists miscellaneous components like varistors, switches, and oscillators.
Electrical Parts List (Continued)
Electrical Parts List (Capacitors Continued)
Lists capacitors with their circuit symbols, numbers, and part numbers.
Electrical Parts List (Resistors Continued)
Lists resistors with their circuit symbols, numbers, and part numbers.
Electrical Parts List (Continued)
Electrical Parts List (Resistors Continued)
Lists resistors with their circuit symbols, numbers, and part numbers.
Electrical Parts List (Capacitors Continued)
Lists capacitors with their circuit symbols, numbers, and part numbers.
Electrical Parts List (Continued)
Electrical Parts List (Capacitors Continued)
Lists capacitors with their circuit symbols, numbers, and part numbers.
Electrical Parts List (Diodes)
Lists diodes with their circuit symbols, numbers, and part numbers.
Electrical Parts List (Resistors Continued)
Lists resistors with their circuit symbols, numbers, and part numbers.
Miscellaneous Parts List
Lists miscellaneous parts like Pickup Unit, Motor Units, Fuse, and Fan Motor.
Need help?
Do you have a question about the DEH-P7050BT ES and is the answer not in the manual?
Questions and answers