
Related Manuals for Novexx ALX 926


Summary of Contents for Novexx ALX 926
- Page 1 USER MANUAL ALX 92x Print & Apply System Edition 4 - 9/2016 - A106807 - Translation of original version...
-
Page 3: Table Of Contents
ALX 92x User Manual Content Please note General notes Validity of this manual and required compliance How information is represented For your safety Intended use Information and qualification Operating safety of the machine Every time before starting production Warning notes on the machine Product description Overview Designs... - Page 4 ALX 92x User Manual Operating modes Overview Online mode Offline mode Standalone mode Parameter menu Overview of parameter menu Information about the parameter description PRINT PARAMETERS menu SYSTEM PARAMETER menu SPECIAL FUNCTION menu SERVICE FUNCTIONS menu Startup and Operation Electrical connections Connecting to the mains power supply Connecting to a data host Connecting sensors...
- Page 5 ALX 92x User Manual Cleaning & Maintenance Cleaning instructions Safety Cleaning agents Cleaning interval General cleaning Printhead General notes Cleaning the printhead Replacing printheads Testing the printhead Rubber rollers Deviator rollers Backing paper deviator roller Sensor Cleaning the punch sensor Cleaning the material end sensor Cleaning the ribbon path Replacing the filter liner...
- Page 6 ALX 92x User Manual 09/2016 Content...
-
Page 7: Please Note
User Manual Please note GENERAL NOTES Validity of this manual and required compliance Contents The complete operating manual for the ALX 924, ALX925 and ALX 926 print & apply systems con- sists of the following parts: Manual Target group Medium... -
Page 8: How Information Is Represented
ALX 92x User Manual Manufacturer Novexx Solutions GmbH Ohmstrasse 3 D-85386 Eching, Germany Tel.: +49-8165-925-0 Fax: +49-8165-925-231 www.novexx.com How information is represented Explanation of symbols To enhance readability and make information easier to find, different types of information are iden- tified: ... - Page 9 ALX 92x User Manual Key symbols Keys in the control panel are represented as text, for example "Press the ONLINE key". Parameters Parameters in the parameter menu are represented in the format MENU NAME > Parameter name grey type. 09/2016 | 01 Please note...
-
Page 10: For Your Safety
Any other type of or more extensive application will be considered non-intended use. NOVEXX Solutions shall assume no liability for damage resulting from non-intended use of the ma- chine. - Page 11 ALX 92x User Manual Tasks System integrator Operator Service technician Mount the machine Connect Make settings Switch on/off Insert/change material/ribbon Application-related settings Rectify minor operating faults Clean the machine Rectify major operating faults Settings to the electronics/ mechanics Repairs Manual: Service manual, Service manual, Operating Manual...
-
Page 12: Operating Safety Of The Machine
ALX 92x User Manual Operating safety of the machine Intended use The machine must only be used in accordance with the specifications in section Intended use auf Seite 10. Warning of injuries due to electrical shock WARNING! This unit operates at mains voltage! Contacting electrically live components can cause lethal electrical shocks and burns. - Page 13 ALX 92x User Manual Warning of injury hazards from mechanical components WARNING! Danger of injury due to moving and rapidly rotating parts! Maintain a safety clearance from the machine when it is in operation. Never reach into a machine that is running. ...
-
Page 14: Every Time Before Starting Production
ALX 92x User Manual Every time before starting production Due diligence of the operator and service personnel Ensure that the following requirements are met in accordance with details specified in the ser- vice manual: • The machine must be set up and configured to meet applicable requirements. •... -
Page 15: Warning Notes On The Machine
ALX 92x User Manual Warning notes on the machine CAUTION! Warning notes on the machine provide important information for the operating personnel. Do not remove warning notes. Replace missing or illegible warning notes. [1] Warning notes on the ALX 92x 09/2016 | 00 Please note... - Page 16 ALX 92x User Manual [2] Warning notes on the ALX 92x Warning note Meaning Article no. The ´Pinch point´ warning note warns you of the danger posed by the machine´s rotating A5346 parts; they can trap items and draw them in. The "Hot surface"...
-
Page 17: Product Description
OVERVIEW Designs ALX 734/735 The ALX 92x is available in versions ALX 924, ALX 925 and ALX 926. These two versions differ in the width of the printhead: • ALX 924: 4" print width (106 mm) • ALX 925: 5" print width (127 mm) •... -
Page 18: Functionality
ALX 92x User Manual Functionality The main function of the ALX 92x is printing, dispensing and applying self-adhesive labels. The printing is done using the thermal or thermal transfer process. „Dispensing“ means completely or partially separating the label from the backing paper. The backing paper is afterwards wound up by the machine. -
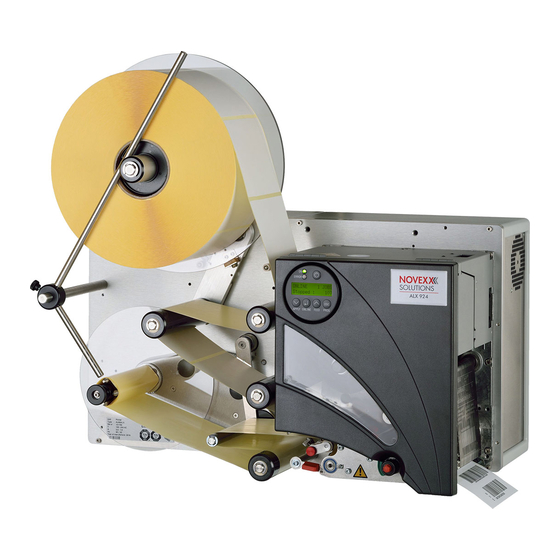
Page 19: Operating Components
ALX 92x User Manual Operating components [5] Operating components of the ALX 92x RH. A Material unwinder The unwinding mandrel receives the material roll (fitting the core diameter with removable adapter rings). B Guiding rod Holds the rolls on material unwinder and backing paper rewinder. C Material web dancer lever Holds the label material evenly under tension. - Page 20 ALX 92x User Manual [6] Operating components of the print module in an ALX 92x RH. A Control panel Displays the device operating status; for defining settings in the parameter menu. B Front cover Held open by gas pressure spring. Inside: Insert diagram showing the path of the labelling ma- terial and ribbon.
-
Page 21: Control Panel
ALX 92x User Manual Control panel Different languages are available for texts that appear on screen. Instructions for selecting the lan- guage: See chapter Settings in parameter menu on page 65. ERROR APPLY ONLINE FEED PROG [7] Control panel. A On/Off switch Switches the printer on and off. -
Page 22: Connections
ALX 92x User Manual Connections WARNING! Danger of electrocution. Only connect the printer to devices that fulfil the SELV (safety extra-low voltage) circuit requi- rements in accordance with EN 60950. CAUTION! Danger of damage to the machine due to faulty accessories. ... -
Page 23: Technical Data
ALX 92x User Manual TECHNICAL DATA Dimensions Dimensions Dimensioned drawings of the ALX 92x in DXF format (Autocad) can be found on the Documenta- tion-CD in directory „\Dimensional Drawings“. 380,5 (4/5”) 412,7 (6”) 309,60 205,8 (4/5”) 238,0 (6”) 162,70 103,50 206 (4/5”) 153,50 260 (6”) -
Page 24: Connection, Device Data
ALX 92x User Manual Weight Machine Weight ALX 924/925 35kg ALX 926 39kg [Tab. 4] Weights of the ALX 92x. Connection, device data Protection category Mains voltage 100-240V (AC) Mains frequency 60/50 Hz Power consumption 450W Input current 3.5 -1.5 A... -
Page 25: Performance Data
ALX 92x User Manual Machine Material width Label length ALX 924/925 16-130 5-1000 ALX 926 16-184 [Tab. 5] Label measures in mm. Material roll • Max. outer-Ø 300 mm • Inner-Ø: 38.1 / 76.2 / 101.6 mm (1.5 / 3 / 4“) •... - Page 26 Speed control: Fixed setting or automatic speed adaption via a rotary encoder (connector = option). Label sensor Self-initializing light-transmission sensor for punched label material. Setting range [12c]: • ALX 924/925: 2-80 mm • ALX 926: 2-100 mm Recommended punch dimensions see chapter Punch measures ...
- Page 27 ALX 92x User Manual Character sets • 17 character sets with fixed size (fixedfonts) including OCR-A and OCR-B • 3 Scalable character set (speedo fonts) • TrueType character sets are supported (in Unicode as well) • TrueType, speedo and fixed size fonts can be optionally stored on a memory card Character modification Scaling in X/Y direction up to factor 16 Rotation:...
-
Page 28: Automatic Ribbon Economy
ALX 92x User Manual Code 39 UPC E Code 39 extended Code 93 Code 39 ratio 2,5:1 Code 39 ratio 3:1 All bar codes scalable in 30 different width and in the height. 2-dimensional bar codes Data Matrix Code (code according to ECC200) Maxi Code PDF 417 Codablock F... - Page 29 ALX 92x User Manual The effect of ribbon saving depends on the print speed. The reason for this is the up and down movement of the print head as well as the acceleration and slowing-down of the ribbon. Generally said: With a high print speed, less ribbon is saved as with a low print speed (Tab. 9). Cutting or dispensing applications can additionally deteriorate the effect of ribbon saving.
-
Page 30: Thermal Transfer Ribbon
Width 20 -140 mm [Tab. 12] Dimensions of usable ribbon rolls. Corresponds to 1000 m standard ribbon type NOVEXX 10297- 1000-xxx with a ribbon core of 40.2 mm. With ribbon core adapter (accessory) As a general rule, the thermal transfer ribbon must overlap the label being printed on both sides by 2 mm. -
Page 31: Ambient Conditions
• Inside buildings • Protected from wind and spray water • Dry • Not in areas with potentially explosive atmosphere Operating temperature • ALX 924/925: +5 bis +35°C • ALX 926: +5 bis +30°C Storage temperature -20 to 70°C Air humidity... -
Page 32: Electronic Equipment
ALX 92x User Manual Interface Details Applicator Interface AI Optional (AI board): Control signals for applicators Connection for external RS 485; Mini-DIN-6 operation panel APSF-sensor Single-phase/two-phase, PNP/P-P, 24 V, max. 20 kHz (rotary encoder) [Tab. 13] Data interfaces on the ALX 92x. I/O board and Centronics board are mutually exclusive. -
Page 33: Options
ALX 92x User Manual OPTIONS To find the article numbers of the options, refer to the sales documents - ask your NOVEXX Solutions re- seller. External control panel In addition to the permanently installed control panel, an external control panel can be connected. -
Page 34: Signal Interface (Usi)
ALX 92x User Manual Signal interface (USI) Accessory board [18A]; processes general control sig- nals. [18] Signal interface (A) ant an ALX 92x RH. RS232/422/485 interface Accessory board [19A] providing an additional serial in- terface (RS232 or RS485 or RS422). [19] Additional serial interface (A) at an ALX 92x RH. -
Page 35: Pressure Roller
ALX 92x User Manual Pressure roller The pressure roller attaches the labels onto the product. It is required in „direct dispensing“ mode. [21] Pressure roller at an ALX 92x. Blow-on applicator LA-BO The LA-BO applies labels to products without touching them. -
Page 36: Tamp-On Applicator La-To
ALX 92x User Manual Tamp-on applicator LA-TO The LA-TO applies labels by means of a movable pres- sure plate, which is driven pneumatically. Pressure plates are available in different sizes. The stroke length can be limited by time or by sensor. [24] Applicator LA-TO. -
Page 37: Operating Modes
ALX 92x User Manual OPERATING MODES Overview • Online mode – Print jobs are received and processed immediately – Active operating mode after switching on – Print contrast setting • Offline mode – Print jobs are received but are not processed –... -
Page 38: Online Mode
ALX 92x User Manual Online mode ERROR ONLINE 0: JOBS APPLY ONLINE FEED PROG [28] Control panel of the ALX 92x in online mode. A Interpreter activity B Data transfer Activate online mode Activate from offline mode: Press the ONLINE key. Screen: ONLINE 0 JOBS... - Page 39 ALX 92x User Manual Screen showing the progress of printing Screen during printing: • Number of received print jobs (13) • Number of remaining labels to be printed in the current job (25) ONLINE 13 JOBS Restcount: 25 ONLINE 13 JOBS Restcount: Endless ...
-
Page 40: Offline Mode
ALX 92x User Manual Offline mode Activate offline mode Normally activated automatically after switching on. To activate from online mode (when the print job is stopped): Press the ONLINE key. OFFLINE 0 JOBS (There are no pending print jobs for processing). OFFLINE X JOBS Stopped : yy... - Page 41 ALX 92x User Manual Opening the parameter menu In the parameter menu the user has access to a number of menus in which various parameters can be called in a defined order. The dispenser can be set so that some menus and/or parameters are not visible. Figure [29] shows the key functions for switching between different menus and for exiting the pa- rameter menu.
- Page 42 ALX 92x User Manual Setting parameters SYSTEM PARAMETER SYSTEM PARAMETER Speed unit Language English SYSTEM PARAMETER Language Language German SYSTEM PARAMETER Sprache [30] Key function when setting the SYSTEM PARAMETER > Language parameter. A Key for "Accept change" B Key for "Reject change" Each menu contains parameters that can be used to make settings on the machine control unit.
-
Page 43: Standalone Mode
Initial operating mode: online or offline. 5. Press the ONLINE + PROG keys. Screen: Select file Novexx.for Filename of the print job. If there are several print jobs: fi- lename of the first print job in alphabetical order. Screen if no file was found:... -
Page 44: Parameter Menu
WACTR Bedienungsanleitung PARAMETER MENU Overview of parameter menu PRINT INFO PRINT PARAMETERS INTERFACE PARA SYSTEM PARAMETER (DP INTERFACE) … Print speed … … … Feed speed Label sens. type Materialtype … Materiallength Ribbon autoecon. Materialwidth Ribb. eco. limit Print direction …... -
Page 45: Print Parameters Menu
WACTR Bedienungsanleitung PRINT PARAMETERS menu Print speed Print speed The print speed (material feed) can be adapted to the combination of ribbon and material in use to optimise the contrast intensity and the degree of blackening of the print image. Setting range: [2…16] inch/s;... - Page 46 WACTR Bedienungsanleitung Print direction [31] Alignment of the print image "Foot first" (A) or "Head first" (B). Settings: [„Foot first“, „Head first“] • "Foot first": Alignment of the print image as shown in [31A]. • "Head first": Alignment of the print image as shown in [31B]. Note the following: ...
-
Page 47: System Parameter Menu
WACTR Bedienungsanleitung SYSTEM PARAMETER menu Label sens. type Sensor type Select the sensor type or the type of mark for beginning of the label (reflex marking or punch). Settings: ["Reflex", "Punched"] • Reflex: Reflex sensor (detects reflex markings) • Punched: Transmission sensor (detects reflex punches) Ribbon autoecon. -
Page 48: Special Function Menu
Application: Service Pre-set filename: SETUPALL.FOR Store diagnosis Saves diagnostic data to memory card. Pre-set filename: Diagnose ALX 924 RH A662105104002453.log where… • "ALX 924 RH": Printer type SERVICE • "A662105104002453": Serial number of the CPU board; corresponds to the entry in DATA >CPU BOARD DATA >... -
Page 49: Service Functions Menu
WACTR Bedienungsanleitung SERVICE FUNCTIONS menu Head dot test Checks the printhead for faulty dots. The check ends with a status report [32] containing a list of faulty dots. This printout is generated even if no faulty dots were found. CAUTION! Danger of damage to the printhead. -
Page 50: Startup And Operation
ALX 92x User Manual Startup and Operation ELECTRICAL CONNECTIONS WARNING! This unit operates at mains voltage! Contacting electrically live components can cause lethal electrical shocks and burns. Make sure that the device is switched off before connecting the power cable. Only operate the unit at the mains voltage given on the type plate. -
Page 51: Connecting To A Data Host
ALX 92x User Manual Connecting to a data host According to the factory settings, the ALX 92x is set for data transfer via USB interface. Print data can also be transferred via serial interface or Ethernet interface. Alternatively to transmitting via data line, the printjobs can be stored on a memory card and be started from there, see Transferring a print job ... -
Page 52: Connecting Sensors
ALX 92x User Manual Connecting sensors WARNING! This unit operates at mains voltage! Contacting electrically live components can cause lethal electrical shocks and burns. The machine must only be connected with other machines if they meet the requirements of a SELV circuit (Safety Extra-Low Voltage circuit) in accordance with EN 60950. -
Page 53: Inserting Label Material
ALX 92x User Manual INSERTING LABEL MATERIAL WARNING! Danger of injury due to moving and rapid- ly rotating parts! When working on the device, do not wear loose jewellery, long sleeves, long hair, and similar Before inserting the label roll ensure that the machine is in offline mode. -
Page 54: Threading In The Label Web
ALX 92x User Manual Threading in the label web Threading diagram The following illustration shows the flow of material and ribbon through the ALX 92x as right-hand and left-hand version. Follow this basic scheme when inserting/changing ma- terial and ribbon. ... - Page 55 ALX 92x User Manual Threading the label web into the printer 1. Open the printer cover [38]. Hold the cover on the bottom right [38A]. [38] Open the cover. 2. Adjust the material guide to the width of the label web.
- Page 56 Retighten the thumb screws. 10. Tighten the backing paper backwards and close the lever. [42] Pressure roller at the ALX 924 (some parts hidden for better visibility). [43] Pressure rollers at the ALX 925/926 (some parts hidden for better visibility).
- Page 57 ALX 92x User Manual Thread the label web onto the rewinder 1. Guide the backing paper around the dancer lever [44A] and the deflection roller [44B]. 2. Insert the end of the backing paper into the rewind- er [45]. 3. Turn the rewinder manually, until the backing paper is tightened.
-
Page 58: Replacing A Label Roll
ALX 92x User Manual Replacing a label roll Detecting end of roll To keep downtimes during production as short as pos- sible, the roll should be changed as quickly as possible. Threading the label material through the entire machine is relatively time consuming. Threading in can be avoid- ed by connecting the beginning of the new material roll to the end of the old material roll (= splicing). -
Page 59: Inserting/Replacing Ribbon
ALX 92x User Manual INSERTING/REPLACING RIBBON WARNING! Rotating parts can entrap objects and body parts and draw them in! Never wear loose long hair, loose je- wellery, long sleeves or similar items when working with the machine. Always close the printer cover before printing. -
Page 60: Changing Ribbon
ALX 92x User Manual Changing ribbon With roll diameter monitoring We recommend switching on roll diameter monitoring, see section Ribbon reserve on page 66. As soon as the critical diameter is reached, the mes- sage appears: FOILØ X JOBS Follow these steps: 1. -
Page 61: Mechanical Settings
The printer is equipped with a transmission sensor. By moving the red thumb wheel [50B], you can adjust the sensor within a range of 80 mm ALX 924/5) or 100 mm (ALX 926) perpendicular to the material. The dial shows the currently set value [50A]. -
Page 62: Setting The Ribbon Tension
ALX 92x User Manual Setting the ribbon tension For optimum printing results, the ribbon must run with- out creases. This can be achieved by correctly setting the torque on the rewinding mandrel and the braking torque on the unwinding mandrel. The factory settings cover a wide range of different rib- bon widths. -
Page 63: Setting The Printhead Pressure
ALX 92x User Manual Setting the printhead pressure CAUTION! Shortened service life of printhead. Always set the weakest printhead pressure that will produce acceptable printing results. Different material widths and thicknesses affect the contact pressure of the printhead on the print roller. The contact pressure can be set with an adjusting knob [53A] in 3 stages: •... -
Page 64: Switching On/Off
ALX 92x User Manual SWITCHING ON/OFF WARNING! Only by disconnecting the plug from the mains supply is the machine fully dis- connected from the supply. Therefore: Keep mains connection freely acces- sible. In case of danger switch off the ma- chine and unplug the power cable. -
Page 65: Setting And Monitoring The Machine
ALX 92x User Manual SETTING AND MONITORING THE MACHINE Settings in parameter menu The settings described below are generally included in the print job, in which case they do not need to be made. Manual settings that were made before a print job was transferred will be over- written by the settings in the print job. -
Page 66: Monitoring Functions
ALX 92x User Manual Print process Direct thermal: SYSTEM PARAMETER > Ribbon autoecon. = „Thermal printing“. Thermal transfer: SYSTEM PARAMETER > Ribbon autoecon. = „Disabled“. Reducing use of the printhead Use of the printhead can be reduced in the thermal direct print process by raising it for extended sections with no printing. - Page 67 ALX 92x User Manual • With OD sensor (connected to USI) Requirements: – OD sensor is installed DP INTERFACE > Material signal – = „On“ Depending on the machine setting, a warning signal or an error message appears: A) Warning signal With the setting DP INTERFACE >...
-
Page 68: Printing
• The database interface must be set accordingly in the printer's parameter menu To use layout software: 1. Select a suitable database interface in the layout program. 2. Start printing. www.nicelabel.com www.novexx.com 09/2016 | 01 Startup and Operation... - Page 69 ALX 92x User Manual Sending a command file directly: To open a Windows command line: START > PROGRAM FILES > ACCESSORIES > PROMPT. To send via serial interface (COM1): copy testjob.txt com1 . To send via USB or Ethernet interface: ...
-
Page 70: Status Messages
ALX 92x User Manual STATUS MESSAGES Error messages When a fault occurs, the printer shows an error message on the control panel. Error messages are based on the following outline: Print status 5144 Rewinder init Depending on the cause of the error, "Print Status" or "Queue Status" appears here. "Print Status" = message from the printer controller;... - Page 71 ALX 92x User Manual The sensitivity of the label sensor is set too low. Materials with weak contrast between the ma- terial and backing paper or between the reflex marking and the material require increased sensor sensitivity. Increase the sensitivity. ...
- Page 72 ALX 92x User Manual Material end unw 5072 Regards the internal OD sensor. The message appears, if no rotation of the material roll has been registered during at least 600 mm of material feeding. Check the material feeding; if necessary, replenish the material roll. Foil low 5110 SYSTEM PARAMETER >...
-
Page 73: Cleaning & Maintenance
ALX 92x User Manual Cleaning & Maintenance CLEANING INSTRUCTIONS Safety WARNING! Dangerous situations may arise during maintenance and cleaning work. Accidents may occur due to mechanical or electrical effects if the relevant safety instructions are not observed! Switch off the device before cleaning or maintenance and pull out the mains power connec- ting line! ... -
Page 74: General Cleaning
ALX 92x User Manual GENERAL CLEANING Dust particles are especially likely to accumulate in the area of the print mechanics. Remove dust particles with a soft brush or a vacuum cleaner. Clean the housing with a cloth and a standard com- mercial neutral cleaner. -
Page 75: Printhead
ALX 92x User Manual PRINTHEAD General notes The thermal head [59A] and its holder [59C] are re- ferred to together as the printhead [58]. CAUTION! Danger of irreversible adjustment of the printhead position. Never loosen the screws [58A] on the printhead. -
Page 76: Cleaning The Printhead
ALX 92x User Manual Cleaning the printhead WARNING! Burn hazard! The printhead can become hot during operation. Be careful whenever touching the printer. Paper dust and coloured particles from the thermal transfer ribbon may collect on the printhead during printing. - Page 77 ALX 92x User Manual Cleaning with a cleaning stylus Run the stylus many times back and forth across the thermal strip [62A] of the printhead. [62] Clean the printhead with the cleaning stylus. A Thermal strip Using a cleaning strip ...
-
Page 78: Replacing Printheads
ALX 92x User Manual Replacing printheads The printhead can only be replaced as a complete unit as shown in [67A]. WARNING! Burn hazard! The printhead can become hot during operation. Be careful whenever touching the printer. 1. Switch off the machine. 2. -
Page 79: Testing The Printhead
ALX 92x User Manual Testing the printhead The printer is equipped with a test function that checks the functionality of each single dot. Dot check with status report SERVICE FUNCTIONS > Head dot test. Open A status report is generated after the dot check to pro- vide information about the number and position of any dots that may be faulty. -
Page 80: Rubber Rollers
ALX 92x User Manual RUBBER ROLLERS The rubber rollers on the ALX 92x can be cleaned from the bottom of the machine without any additional as- sembly work. The ribbon roller is freely accessible while the cover is open and the ribbon is removed [68]. Cleaning the rollers: 1. -
Page 81: Deviator Rollers
ALX 92x User Manual DEVIATOR ROLLERS Glue from the label material may adhere to the deviator rollers. Moisten a clean cloth with cleaning solvent and wipe off the dirty deviator rollers [69] with it. [69] Rubber rollers (dark grey) and deviator rollers (light grey) on the ALX 92x. -
Page 82: Sensor
ALX 92x User Manual SENSOR Clean the sensors regularly to remove any material res- idue and dust. The cleaning intervals depend on the materials in use. Cleaning the punch sensor To access the punch sensor, first remove the guiding section: 1. -
Page 83: Cleaning The Material End Sensor
ALX 92x User Manual Cleaning the material end sensor The material end sensor [75A] is located inside the ma- terial guide. The sensor must be cleaned of material and dust residue regularly. The cleaning intervals de- pend on the material in use. ... -
Page 84: Cleaning The Ribbon Path
ALX 92x User Manual CLEANING THE RIBBON PATH All parts which come into contact with the ribbon [76] must be cleaned on a regular basis. The following min- imum distances apply: • Once per week • Every 5000 m of ribbon [76] Parts where ribbon residue gathers: A Ribbon roller B Deflector roller + stress relief... -
Page 85: Replacing The Filter Liner
ALX 92x User Manual REPLACING THE FILTER LINER CAUTION! A clogged dust filter can result in overheating, thereby causing a ma- chine failure. Replace the filter liner on the fan regularly. The dust filter is an accessory. The replacement interval for the filter liner must be de- fined according to the specific circumstances. -
Page 86: Eu Declaration Of Conformity
ALX 924 / ALX 925 / ALX 926 Models Label print &... -
Page 87: Eu Declaration Of Incorporation
The designated partly completed machine must not be placed in operation until it has been determined that the machine in which the partly completed machine has been installed is in compliance with the provisions of direc- tive 2006/42/EG. ALX 924 / ALX 925 / ALX 926 Models Label print & apply system... - Page 88 ALX 92x User Manual APPENDIX REGARDING THE DECLARATION OF INCO- RPORATION List of the essential health and safety requirements applied and fulfilled for the product named in the declaration of incorporation, relating to the design and construction of machinery. Number Not appli- Designation Fulfilled...
- Page 89 ALX 92x User Manual Number Not appli- Designation Fulfilled Remark Annex I cable 1.5.4. Errors of fitting 1.5.5. Extreme temperatures 1.5.6. Fire 1.5.7. Explosion 1.5.8. Noise 1.5.9. Vibrations 1.5.10. Radiation 1.5.11. External radiation 1.5.12. Laser radiation 1.5.13. Emissions of hazardous materials and substances 1.5.14.
- Page 91 Novexx Solutions GmbH Ohmstraße 3 85386 Eching Germany +49-8165-925-0 www.novexx.com...
Need help?
Do you have a question about the ALX 926 and is the answer not in the manual?
Questions and answers