Honeywell HW5500 - 5500 Portable Generator Owner's Manual
Owners manual
Hide thumbs
Also See for HW5500 - 5500 Portable Generator:
- Service manual (56 pages) ,
- Parts manual (7 pages) ,
- Specification sheet (1 page)
Table of Contents

Related Manuals for Honeywell HW5500 - 5500 Portable Generator


Summary of Contents for Honeywell HW5500 - 5500 Portable Generator
-
Page 1: Electric Start
HW5500/HW5500E Portable Generator Owner’s Manual Portable Gasoline Generator Electric Start Read and Save These Instructions For product inquiries or support, please visit www.honeywellgenerators.com or call toll-free at 1-888-494-3571. - Page 2 © 2008 Northshore Power Systems LLC Northshore Power Systems, LLC 4425 N. Port Washington Rd., Suite 105 Milwaukee, WI 53212-1082 USA The Honeywell Trademark is used under license from TEL 1-888-494-3571 Honeywell International Inc. honeywellgenerators.com Honeywell International Inc. makes no representations or...
-
Page 3: Product Registration
PRODUCT REGISTRATION To register your product, please complete the information below and mail to the mailing address at the end of form, or register online at www.honeywellgenerators.com 1 – PERSONAL INFORMATION FIRST NAME INITIAL LAST NAME CHECK HERE TO RECEIVE PRODUCT REMINDERS AND OFFERS VIA EMAIL CHECK HERE TO RECEIVE INFORMATION FROM OTHER COMPANIES VIA EMAIL, UNDERSTANDING YOUR EMAIL ADDRESS MAY BE SHARED OR COMBINED WITH INFORMATION FROM OTHER SOURCES 2 –... - Page 4 3 – DEMOGRAPHIC INFORMATION GENDER: HOUSEHOLD INCOME MALE LESS THAN $15,000 $100,000 - $124,999 FEMALE $15,000 - $29,999 $125,000 - $149,000 $30,000 - $49,999 $150,000 – $174,999 MARITAL STATUS: $50,000 - $79,999 $175,000 – $199,999 MARRIED $80,000 - $99,999 $200,000 OR OVER SINGLE PRIMARY METHOD OF PURCHASING HOUSEHOLD DATE OF BIRTH:...
-
Page 5: Table Of Contents
CONTENTS IMPORTANT SAFETY RULES.................... 1 Safety Messages ............................1 Location of Important Labels ..........................3 GETTING STARTED ......................5 Unpacking Guidelines .............................5 Record Generator Information ........................6 Assembly ................................7 Grounding the Generator ..........................11 Using Generator for Backup Power ......................12 COMPONENTS ........................13 OPERATION ........................15 Preparing for Operation ..........................15 Generator Location ............................15 Starting Generator ............................15... - Page 6 THIS PAGE INTENTIONALLY LEFT BLANK www.honeywellgenerators.com HW5500/5500E Portable Generator Owner’s Manual...
-
Page 7: Important Safety Rules
SAVE THESE INSTRUCTIONS IMPORTANT SAFETY RULES ANYONE using or servicing generator must read, understand, and follow all safety and operation instructions pro- vided in product manual. Failure to closely follow these instructions can result in circumstances leading to death, seri- ous injury, and property damage. - Page 8 Safety Messages Electric Shock Hazards Generator Damage Hazards Improper treatment or misuse of generator can cause per- Generator produces powerful voltage that can cause manent damage. death or great physical harm. • NEVER tamper with governed speed. Generator sup- • When using generator for backup power, notify utility plies correct rated frequency and voltage when running company.
-
Page 9: Location Of Important Labels
Location of Important Labels Location of Important Labels Your generator is packaged with several labels which provide important safety and maintenance information. Samples of these labels are provided below. Should any of these labels become illegible or damaged, contact Customer Hotline at 1-888-494- 3571 to request replacements. - Page 10 THIS PAGE INTENTIONALLY LEFT BLANK HW5500/5500E Portable Generator Owner’s Manual www.honeywellgenerators.com...
-
Page 11: Getting Started
GETTING STARTED Use the information in this section to get your generator ready for operation. ANYONE using the generator must read, understand, and follow all safety and operation instructions provided in the product manual. Failure to closely follow these instructions can result in circumstances leading to death, serious injury, and property damage. -
Page 12: Record Generator Information
Record Generator Information Record Generator Information It is recommended that you take a moment to write down the identification information specific to your generator in the spaces provided on the inside cover of this Owner’s Manual. You can find this information on generator’s name plate, located on rear side of generator (see illustration below). -
Page 13: Assembly
Assembly Assembly Generator must be empty of engine oil and fuel. Drain engine oil and fuel, if necessary. Generator is heavy! Lifting generator can cause back or other bodily injury. NEVER lift generator without assistance. Wheel Kit FIGURE 2: Wheel Assembly Components NOTE: Illustration above shows battery, which is available only with HW5500E models. - Page 14 Assembly Attach a rubber stopper to bottom of each support leg Step 1: Install Support Legs using a 25 mm full-thread hex bolt and 13 mm flange To install support legs, you will need: serrated nut; tighten until securely seated. 25 mm full-thread hex bolts (2) 5/16"...
- Page 15 Assembly Slide second 9/16" washer onto axle. Step 2: Install Wheel Axle and Wheels Slide cotter pin into pre-drilled hole until fully seated. To install wheel assembly, you will need: Using needlenose pliers, bend each end of cotter pin Socket wrench with 10 mm socket in opposing directions to secure wheel to axle.
- Page 16 Assembly Once properly installed, the handles can be collapsed, if Step 3: Install Handle Assembly desired. To install handle assembly, you will need: Handle Brackets (2) Hands and fingers can be pinched from collapsible Handle Bars (2) handles. Rubber Handle Grips (2) •...
-
Page 17: Grounding The Generator
Grounding the Generator strap. Carefully cut cable strap to disengage battery Grounding the Generator lead. Generator must be grounded to prevent electrical shock from faulty appliances. • Before using generator, consult a qualified electrician, electrical inspector, or local agency having jurisdiction for local codes or ordinances that apply to the intended use of generator. -
Page 18: Using Generator For Backup Power
Using Generator for Backup Power Using Generator for Backup Power Before connecting to building’s electrical system, consult your local utility company or a qualified electrician. Improper connections to a building's electrical system can be deadly. Electrical current from generator to feedback into util- ity lines. -
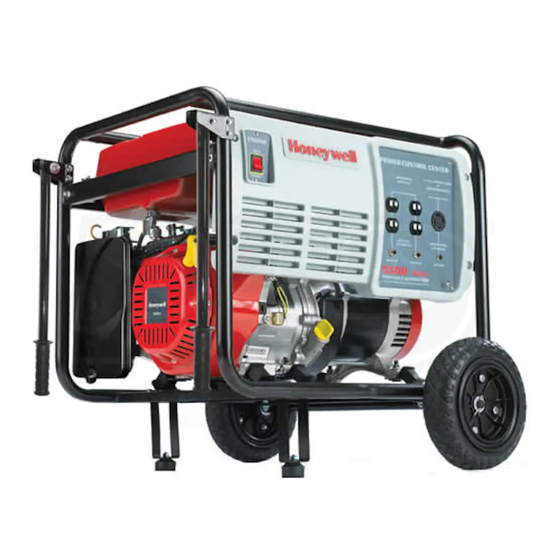
Page 19: Components
COMPONENTS Use information provided in this section to become familiar with your generator’s components. Information below is provided for reference only. Refer to Operation section (page 15) for instructions on operat- ing generator. FIGURE 14: HW5500/5500E Portable Generator (Illustration shows battery, which is available only with HW5500E models) A—Power Control Center E—Engine Control Switch Control used to run and stop the engine. - Page 20 THIS PAGE INTENTIONALLY LEFT BLANK HW5500/5500E Portable Generator Owner’s Manual www.honeywellgenerators.com...
-
Page 21: Operation
OPERATION Preparing for Operation Generator Location When deciding on the location to place your generator, keep in mind the following safety rules: Using a generator indoors CAN KILL YOU IN MINUTES. Generator exhaust contains carbon monoxide. This is a poi- son you cannot see or smell. - Page 22 Starting Generator Turn fuel valve to ON position. When engine starts, the engine control switch gradu- ally settles at RUN (center) position. NOTE: While engine is running, a small “trickle” charge is applied to starting battery.This keeps an adequate battery charge.
-
Page 23: Stopping Generator
Stopping Generator exceed rated output of generator. Power rating infor- Stopping Generator mation can usually be found on an appliance’s prod- In an emergency: uct label, or stamped inside or on back of appliance. Press and hold engine control switch to STOP position See Table 1 for a listing of average appliance wattage until engine stops. - Page 24 Powering Appliances Appliance Typical Running Watts Starting appliances that have motors requires more power. 1200-2400 (using drying feature Examples of motorized appliances include refrigerators, Dishwasher* greatly increases energy con- water pumps, and furnace blowers. Be sure that power rat- sumption) ing of appliance does not exceed that of generator.
-
Page 25: Maintenance
MAINTENANCE Maintenance Schedule Periodic maintenance and adjustment is necessary to keep generator in good operating condition. Perform service and inspec- tion at intervals shown in Generator Maintenance Schedule (Table 2). Using a generator indoors CAN KILL YOU IN MINUTES. Accidental starting of generator can cause severe injury or Generator exhaust contains carbon monoxide. -
Page 26: Engine Oil
Engine Oil Oil level should be at “H” or somewhere between the Engine Oil “L” and “H”. Engine oil is a major factor affecting engine performance and service life. Non-detergent and 2-stroke engine oils will damage engine and are not recommended. •... - Page 27 Engine Oil Using a socket wrench with 12 mm socket, loosen Changing Engine Oil drain plug bolt; remove drain bolt and sealing washer. Frequent or prolonged contact with engine oil may cause skin cancer. • Immediately after handling engine oil, thoroughly wash hands and any areas of skin exposed to engine oil, with soap and water.
-
Page 28: Adding Fuel
Adding Fuel Reinstall oil fill cap and tighten until fully seated. • Try to confirm contents of fuel. Some states (and provinces in Canada) require this infor- NOTE: mation to be posted on the fuel pump. If you notice unde- Dispose of used motor oil according to guidelines estab- sirable operating symptoms, switch to a conventional lished by your local or state government. -
Page 29: Air Filter Maintenance
Air Filter Maintenance Slowly pour gasoline into fuel tank. Be careful not to Remove air cleaner cover. overfill. FIGURE 29: Fuel Level Reinstall fuel tank cap and fully tighten. FIGURE 30: Air Cleaner Cover NOTE: Occasional, light spark knock, "pinging", or rattling noise Turn thumbscrew counterclock wise to loosen and is normal while operating under heavy loads. -
Page 30: Cleaning Fuel Sediment Cup
Cleaning Fuel Sediment Cup Soak air filter in clean engine oil and squeeze out excess oil. Frequent or prolonged contact with engine oil may cause skin cancer. • Thoroughly wash hands and any areas of skin exposed to used oil with soap and water. NOTE: FIGURE 34: Fuel Sediment Cup Assembly Pieces Engine will smoke during initial start-up if too much oil is... -
Page 31: Cleaning Spark Arrestor Screen
Cleaning Spark Arrestor Screen Remove spark plug cap. Inspect spark plug washer and verify it is in good con- dition. Reinstall spark plug by hand to prevent cross-thread- ing. After spark plug is seated, tighten with spark plug wrench to compress washer. If installing a new spark plug, tighten l/2 turn after the spark plug seats to compress the washer. -
Page 32: Transporting Generator
Transporting Generator Pull off enclosure panel. Storing Generator Follow service procedures for preparing generator for stor- age. Inadequate or improper care of generator can result in damage to generator components and will void limited war- ranty. Before storing generator for extended period of time: •... - Page 33 Storing Generator Draining Fuel Turn fuel lever to OFF position. Run engine until it stops due to lack of fuel. Place suitable container underneath drain hole to catch fuel. Loosen bolt (underneath fuel sediment cup). FIGURE 40: Loosen Bolt to Drain Fuel Turn fuel lever to ON position.
- Page 34 THIS PAGE INTENTIONALLY LEFT BLANK HW5500/5500E Portable Generator Owner’s Manual www.honeywellgenerators.com...
-
Page 35: Troubleshooting
TROUBLESHOOTING ANYONE using or servicing generator must read, understand, and follow all safety and operation instructions pro- vided in the product manual. Failure to closely follow these instructions can result in circumstances leading to death, serious injury, and property damage. Using a generator indoors CAN KILL YOU IN MINUTES. - Page 36 THIS PAGE INTENTIONALLY LEFT BLANK HW5500/5500E Portable Generator Owner’s Manual www.honeywellgenerators.com...
-
Page 37: Specifications
SPECIFICATIONS HW5500 HW5500E GENERATOR Dimensions Length 27 inches (685.8 mm) 27 inches (685.8 mm) Width 21.5 inches (546.1 mm) 21.5 inches (546.1 mm) Height 21.5 inches (546.1 mm) 21.5 inches (546.1 mm) Dry Weight 185 lb (83.9 kg) 195 lb (88.4 kg) AC Output Continuous (Rated) Power 5500 Watts... - Page 38 THIS PAGE INTENTIONALLY LEFT BLANK HW5500/5500E Portable Generator Owner’s Manual www.honeywellgenerators.com...
-
Page 39: Warranties
You may be denied warranty coverage if a part work is performed at an authorized NSP Honeywell gen- has failed due to abuse, neglect, improper maintenance or erator dealer. - Page 40 NORTHSHORE POWER SYSTEMS EMISSIONS CONTROL WARRANTY QUESTIONS If you have questions regarding your emissions warranty rights and responsibilities, you should contact the Warranty and Service department at NSP. By phone: (414) 332-2375 Via web: www.honeywellgenerators.com By US mail: Northshore Power Systems, LLC Attention: Product Warranty and Service Dept.
-
Page 41: Northshore Power Systems Limited Warranty
Warranty is also available by keeping and showing your origi- DISCLAIMERS, LIMITATIONS OF REMEDIES & nal receipt from date of purchase to an authorized Honeywell EXCLUSIONS Generator Dealer. This warranty gives you specific legal rights, and you may also have other rights which vary from state to state. - Page 42 THIS PAGE INTENTIONALLY LEFT BLANK www.honeywellgenerators.com HW5500/5500E Portable Generator Owner’s Manual...
-
Page 43: Index
INDEX INDEX stopping 17 storing 26 Air Filter transporting 26 maintenance 23 unpacking guidelines 5 Appliances warranty 35 powering 17 Ground 11 rules for powering 17 special requirements 11 wattage information 17 terminal 13 Assembly battery 10 handle 10 wheels 9 Handles installing 10 High Altitude... - Page 44 INDEX Unpacking guidelines 5 Warranty emissions control 33 limited product 35 Wattage typical appliance 17 Wheels installing 9 www.honeywellgenerators.com HW5500/5500E Portable Generator Owner’s Manual...
-
Page 45: Hw5500/5500E Maintenance Parts
HW5500/5500E MAINTENANCE PARTS To order maintenance parts, visit www.honeywellgenerators.com or call Customer Hotline at 1-888-494-3571. Part Name Part Number Air Cleaner Assembly 100832A Air Filter 100833A Fuel Cap 100834A Fuel Shut-Off Valve 100835A Fuel Strainer 100836A Ignition Coil 100838A Recoil Assembly 100839A Recoil Rope and Handle 100840A... - Page 46 ...
- Page 47 Northshore Power Systems, LLC March 2008 4425 N. Port Washington Rd., Suite 105 © 2008 Northshore Power Systems, LLC Milwaukee, WI 53212-1082 USA The Honeywell Trademark is used under license TEL 1-888-494-3571 from Honeywell International Inc. Honeywell International Inc. makes no representation www.honeywellgenerators.com...
Need help?
Do you have a question about the HW5500 - 5500 Portable Generator and is the answer not in the manual?
Questions and answers