Table of Contents
Advertisement
Advertisement
Table of Contents

Related Manuals for Everdure DWF125WE


Summary of Contents for Everdure DWF125WE
-
Page 2: Table Of Contents
1)Technical information........1 2) Safety Information ..........2 3) Operating Instructions........3 Read this Manual Control Panel............3 Dishwasher Features.........3 4) Installation instruction........4 Dear Customer, Installation preparation........4 Please read this User Information carefully and keep it Levelling the Appliance ........4 to refer to at a later date. Drain pipe connection.... -
Page 3: Technical Information
1. Technical Information Height : 850mm Width : 600mm Depth : 580mm Voltage connected Load : see rating label Water pressure: 0.04-1.0MPa Hot water connection : max 60 ° Power supply: see rating label Capacity: 12 Place settings... -
Page 4: Safety Information
2.IMPORTANT SAFETY INFORMATION READ ALL INSTRUCTIONS BEFORE USING WARNING! When using your dishwasher, follow the below basic precautions including the following: WARNING! HYDROGEN GAS IS EXPLOSIVE Under certain conditions, Hydrogen gas may be produced in a hot-water system that has not been used for two weeks or more. -
Page 5: Operating Instructions
3.Operation Instruction IMPORTANT! To get the best performance from your dishwasher, read all operating instructions before using it for the first time. Control Panel INTENSIVE HEAVY NORMAL RAPID SOAK Pre-wash light: To come on when pre-wash. Start / Reset Button: Press this button to start or pause the dishwasher, the light will come on when starting. -
Page 6: Installation Instruction
4.Installation instruction Warning Attention Electrical Shock Hazard The installation of the pipes Disconnect electrical power before installing dishwasher. and electrical equipment should be performed by a Failure to do so can result in death professional. or electrical shock. Installation preparation The installation position of the dishwasher should be near the existing inlet, drain hose and power cord. -
Page 7: Electricity
Electricity CAUTION, for personal safety: DO NOT USE EXTENSION LEAD OR AN ADAPTOR PLUG WITH THIS APPLIANCE. DO NOT, UNDER ANY CIRCUMSTANCES, CUT OR REMOVE THE THIRD GROUNDING PRONG FROM THE POWER CORD. Electrical Requirements Please see the rating label to identify the rating voltage and connect the dishwasher to appropriate power supply, Please use the required fuse 12 amp. -
Page 8: Start Of Dishwasher
How to Drain Excess Water From Hoses If the sink is 1000mm above the floor, the excess water in hoses cannot be drained directly into the sink. It will be necessary to drain excess water from hoses into a bowl or suitable container that is held outside and lower than the sink. -
Page 9: Prior Using For The First Time
Prior using for the first time A. Fill the Rinse Aid Dispenser Function of Rinse Aid Rinse aid is automatically added in the final rinse, ensuring thorough rinsing, and spot and streak free drying. Attention! Only use branded rinse aid for the dishwasher. Never fill the rinse aid dispenser with any other substances (e.g. -
Page 10: Adjusting Rinse Aid Dispenser
Adjusting Rinse Aid Dispenser The rinse aid dispenser has six settings. Always start with the dispenser set on “2". If spots and poor drying are problems, increase the amount of rinse aid dispensed by removing the dispenser lid and rotating the dial to “3". If the dishes still are not drying properly or are spotted, adjust the dial to the next higher number until your dishes are spot-free. -
Page 11: Fill In Detergent
NOTE: If the lid is closed: press release button. The lid will spring open. Always add the detergent just before starting each wash cycle. Only use branded detergent for dishwasher. WARNING! Dishwasher detergent is corrosive! Take care to keep it out of reach of children. Proper Use of Detergent Use only detergent specifically made for use in dishwashers. -
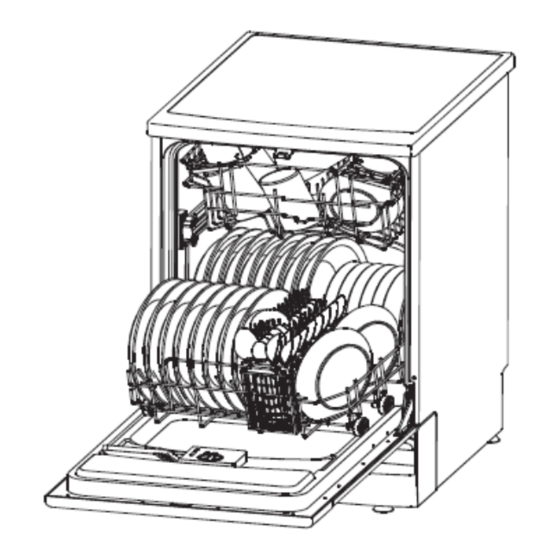
Page 12: Loading The Dishwasher Rack
6.Loading the Dishwasher Racks Fo r best performance of the dishwasher please follow these loading guidelines. Features and appearance of racks and silverware baskets may vary with your model. Attention before or after Loading the Dishwasher Racks Sc rape off any large amounts of leftover food. It is not necessary to rinse the dishes under running water. Place dishes in the dishwasher in following manner... -
Page 13: Loading The Lower Rack
Loading the Lower Rack We recommend that you place large items which are most difficult to clean into the lower rack: pots, pans, lids, serving dishes and bowls, as shown in the figure below. It is preferable to place serving dishes and lids on the side of the racks in order to avoid blocking the rotation of the top spray arm. -
Page 14: Silverware Basket
Silverware Basket Silverware should be placed in the silverware basket with handles at the bottom: If the rack has side baskets, spoons should be loaded individually into the appropriate slots and especially long utensils should be placed in the horizontal position at the front of the upper rack. -
Page 15: Attention
Attention!! shes and items of cutlery must not lie inside one another, or cover each other avoid damage to glasses, they must not touch Load large items which are most difficult to clean into the lower rack he upper rack is designed to hold more delicate and lighter dishware such as glasses, coffee and tea cups Damage to glassware and other dishes Possible causes:... -
Page 16: Starting A Washing Programme
7.Starting a washing programme WASH CYCLE TABLE Description Detergent Running Energy Cycle Selection Water Rinse Program Cycle (Kwh) time(min) of Cycle pre/main Information -wash(45¡ For the heaviest soiled loads, Wash (65 ¡) such as pots,pans,casserole Rinse 5/25 g 1.55 Intensive dishes and dishes that have 17.7 Rinse (65 ¡) -
Page 17: Turning On The Appliance
TURNING ON THE APPLIANCE Change the Programme Starting a wash cycle. . . Premise Draw out the lower and upper rack, load the dishes and : A cycle that is underway can only be modified if push them back in. It is recommended to load the lower it has been running for a short time. -
Page 18: Maintenance And Cleaning
8.Maintenance and Cleaning Filtering System The filters prevents larger remnants of food or other objects from getting into the pump. This residue can occasionally clog up the filters. The filter system consists of a coarse filter ,a flat (Main) filter, and a microfilter (Fine filter). -
Page 19: Filter Assembly
Filter assembly For the best performance and results, the filter assembly must be cleaned. The filter efficiently removes food particles from the wash water, allowing it to be recirculated during the cycle. For this reason, it is a good idea to remove the larger food particles trapped in the filter after each wash cycle by rinsing the semicircular filter and cup under running water. -
Page 20: Cleaning The Door
Cleaning the Door To clean the edge around the door, you should use only a soft damp cloth. To prevent penetration of water into the door lock and electrical components, do not use a spray cleaner of any kind. Also, never use abrasive cleaners or scouring pads on the outer surfaces because they will scratch the finish. -
Page 21: Troubleshooting Tips
9.Troubleshooting Tips Before Calling for Service Review the charts on the following pages may make you be free of calling for service. Problem Possible Causes What To Do Dishwasher doesn t Replace fuse or reset circuit breaker. Remove any other Fuse blown, or the appliances sharing the same circuit with the dishwasher circuit breaker tripped... -
Page 22: Before Calling For Service
Before calling for service . . . Problem Possible Causes What To Do Cloudiness on Combination of soft Use less detergent if you have soft water and select water and too much shortest cycle to wash the glassware and to get them glassware detergent clean.
Need help?
Do you have a question about the DWF125WE and is the answer not in the manual?
Questions and answers