Advertisement
- 1 FEATURES
- 2 CONTROLS AND CONNECTIONS
- 3 CONNECTION SCENARIOS
- 4 FUNCTIONAL DESCRIPTION
- 5 SETTINGS
- 6 USAGE SCENARIOS
- 7 MOOER STUDIO FOR GL100
- 8 DRUM MACHINE RHYTHM LIST
- 9 SPECIFICATIONS
- 10 PRECAUTIONS
- 11 Documents / Resources
FEATURES
- Dual footswitch Stereo Phrase Looper with Drum Machine
- 100 storage positions for a total of 300 minutes of memory time
- Built-in alignment feature for perfect synchronization of the drum machine with the phrase loops
- Drum Match function allows you to match the rhythm pattern and the tempo of the drum machine to the content of the phrase
- Round, 1.3 inch touch screen for status display and convenient function control
- Dedicated PC software for importing and exporting audio files, data management and firmware updates
- Flexible input/output mode selection
- Time stretch function
- Tap tempo BPM adjustment
- Auto-record function eliminates sync problems and allows you to record on the fly
- Headphone connection for silent practice
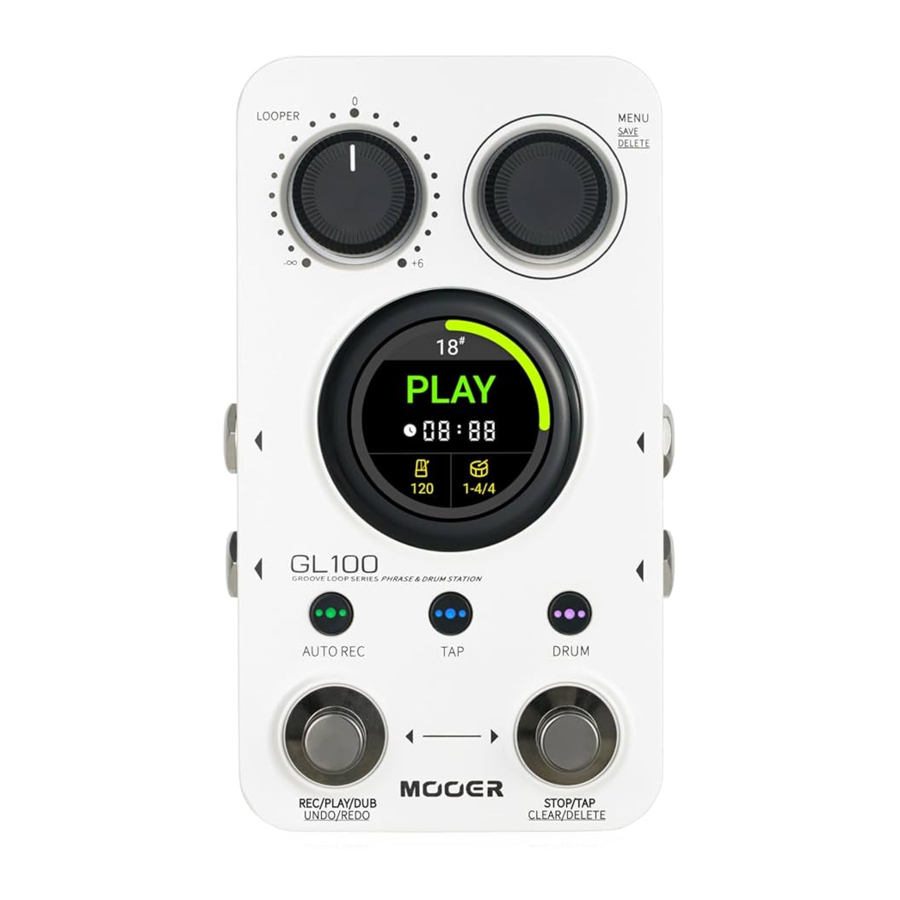
CONTROLS AND CONNECTIONS

- LOOPER: Adjusts the LOOPER playback volume from -
![]() (playback mute) to +6 dB, for easy adjustment relative to the straight-through signal
(playback mute) to +6 dB, for easy adjustment relative to the straight-through signal - MENU: Encoder for screen menu navigation, value adjustment, etc.
- rotate to select a storage position
- long press to store a phrase loop
- in menus: press to select/unselect items, rotate to navigate between items /change values
- 1.3 inch round touch screen: Displays status screens and menu interfaces to adjust functional settings.
- click the center of the screen to switch between two main views: main interface or Looper interface
- click the metronome icon to open the BPM screen
- click the drum icon to open the DRUM screen
- click the back icon to return to the previous screen
- AUTO REC: Button with LED to activate the automatic signal detection for the recording function. The LED in the button indicates the ON/Off Status of the auto-record function.
Hold this button down while you rotate the MENU knob to adjust the auto-record detection threshold. - TAP: Press this button repeatedly (3 or more times) to set the tempo. The BPM value is shown at the bottom of the display.
The LED in the button flashes to indicate the current BPM. The LED flashes red at the first stroke of each beat and blue for the remaining strokes of the beat (see Drum Machine Operation).
Hold the button down for 2 seconds to open the BPM screen where you can use the MENU knob to fine-tune the BPM value. - DRUM: Short press this button to activate the standby-mode for the drum machine.
The LED in the button flashes rapidly in purple to indicate standby.
If you start a loop recording with the Drum Machine in standby mode, the loop will be synchronized with drum machine (see Drum Machine and Phrase Looper at the same time). With the loop running: short press the DRUM button to toggle the Drum Computer on/off. The LED will be continuously lit when the drum machine is running.
Long press the button to open the Drum Machine menu where you can use the MENU knob to adjust drum machine parameters such as GENRE, TIME SIGNATURE, LEVEL and BPM.
Hold the button down and rotate the MENU knob to adjust the volume level for the Drum Machine. - Left footswitch: In Phrase Loop mode:
short press to record, play and overdub,
long press to cancel, undo and redo. - Right footswitch:
With an empty storage position: press several times on the right footswitch to start the Drum Machine and to enter the Tap Tempo at the same time. Press the right footswitch again to stop the Drum Machine after it has been running for some time.
With a recorded loop: Long press on the right footswitch to clear temporary data in STOP state. Long press on the right footswitch and the MENU knob simultaneously to delete the entire recording.
Right and left footswitch at the same time: Opens the storage position selection mode (display is flashing). Then use the left footswitch to browse down and the right footswitch to browse up between the storage positions. The selection mode will be automatically cancelled when none of the footswitches is operated for a few seconds. - Left input: 6.35 mm (1/4") mono (TS) jack, use as single input for mono scenarios, left input for stereo scenarios
- Right input: 6.35 mm (1/4") mono (TS) jack, right input for stereo scenarios
- Left output: 6.35 mm (1/4") mono (TS) jack, use as single output for mono scenarios, left output for stereo scenarios
- Right output: 6.35 mm (1/4") mono (TS) jack, right output for stereo scenarios
- USB Type C interface: Connection to a computer for data import and export, firmware updates
- Power supply: Connection for 9 VDC power supply, center negative barrel jack, delivering at least 300 mA. We recommend using the included power supply on and independent outlet to prevent crosstalk noise from or to other devices.
- PHONES: 3.5 mm (1/8") TRS stereo headset output jack
 (playback mute) to +6 dB, for easy adjustment relative to the straight-through signal
CONNECTION SCENARIOS
Mono connection

Note: In a single input scenario, if you want to avoid a situation where only one output (or one side of the headphone) gets the pass-through signal from the input, open the MENU screen and change "Input Setting" to "Mixed". See chapter Input Setting.

Stereo/dual-channel connection


Note: For stereo/dual channel connection scenarios, you need to make sure that the "Input Setting" option in the MENU is set to "Stereo". See chapter Input Setting.

Independent drum machine and instrument output
Also see chapter Drum Machine output.

Notes:
- This connection scenario allows the guitar and the drum machine signals to be routed to different PA platforms. To accomplish this, open the MENU, navigate to "Drum Out" and change the setting to "Split Out".
- In this configuration, the guitar signal (pass-through + playback of the recorded track) will be output from the left output, and the drum machine signal will be output from the right output.
![]()

FUNCTIONAL DESCRIPTION
Basic Looper operation
Selecting a storage location
In the two main views, the current storage position is indicated as a number with a # symbol (either large in the center of the screen or smaller at the top of the screen). There are two ways to select a storage location:
- Rotate the MENU knob:

- Use the footswitches:
Press both footswitches simultaneously to open the Position Selection Mode.
Then use the left footswitch to scroll down and the right footswitch to scroll up to the next position.

The selection mode will be automatically cancelled after a few seconds without input.


Recording a loop
The following symbols are used in the explanations of the different states of the Phrase Looper below:

The operation sequence of "Rec - Play - Dub" can be changed to "Rec - Dub - Play" in the "Play Mode" MENU settings.

The "Rec - Dub - Play" mode makes it easier to start the second layer of overlay recording directly after finishing the first layer, without having to wait for the playback loop.
The Stop operation can be achieved immediately or using a fade-out feature. See Stop Mode in the "Settings" chapter for a more detailed explanation.

When recording or overdubbing, you can cancel unwanted content and re-start recording/overdubbing immediately by long-pressing the left footswitch.

Undo, Redo
After recording more than one layer, you can temporarily erase the content of the last layer by using the UNDO function and then restore the last layer by using the REDO function. UNDO and REDO are initiated by long pressing the left footswitch during playback.

Saving
Files can be saved in two ways in the GL100: automatically and manually.
Automatic saving:
The GL100 will automatically save the recorded track layer's current storage location without the need to interrupt the performance to save data. This means that you don't have to worry about losing the recorded data if you don't perform a save, as it will automatically save all of your recordings. Automatically saved recordings can even be recalled after you have separated the power supply.
Automatically saved data are marked "Temporary" or with a clock symbol on the screen and include individual layers. This means you can still perform UNDO and REDO operations on these tracks (see above).
Manual saving:
Manual saving merges the recorded track layers into a new audio file, making sure all data is saved. Manually saved data are marked with a disk symbol on the screen and all layers are merged into a single track. This means you can no longer perform UNDO and REDO operations (see above), but you can use this track to overdub new layers on it. You can also export a manually saved track via a PC connection (see MOOER STUDIO FOR GL100).
Manual saving is performed as follows:

The "temporary save" icon changes to the "saved" icon after a manual save.

The following list explains the differences between manual saving and automatic temporary saving:
| # |  Automatically saved Automatically saved |  Manually saved Manually saved |
| 1 | Clear by long-pressing the right footswitch. | Long-press the right footswitch + long-press the MENU button to delete all data in the storage position. |
| 2 | UNDO and REDO can be used on the last recorded layer after overdubbing. | Track layers merged into a new track - this process is irreversible. |
| 3 | TimeStretch cannot be overdubbed directly after the original speed change. | TimeStretch can be saved manually to continue overdubbing after shifting the speed of the original track. |
| 4 | Auto-saved content cannot be listened to or exported via computer software. | Manually saved recordings can be listened to and exported using computer software. |
| 5 | Two layers of auto-saving will take up more storage space. | Manual saving merges two layers of data into one track, saving space. |
Basic Drum Machine Operation
Drum Machine interface

Click the drum icon in the LOOPER interface or long press the DRUM button on the panel to open the Drum Machine menu.
The interface provides selection possibilities from 11 Drum Machine genres with 20 patterns/time signatures for each style. You can also adjust the playback volume for the Drum Machine and the BPM tempo.
Tap the touch screen to select an item and then rotate the MENU knob to change the value.
Drum machine Play/Stop
The following methods can be used to play/stop the Drum Machine:
Method 1: Footswitch operation
In an empty position, step several times on the right footswitch to set the tempo and start the Drum Machine at the same time. After the Drum Machine has been running for a few seconds, press the right footswitch once to stop the Drum Machine and once again to re-start it.

Method 2: Screen operation
Long press the DRUM button to open the Drum Machine menu. Touch the screen and click the play/stop icon.

Note: With the DRUM menu open, single steps on the right footswitch will also perform the play/stop action for the Drum Machine.
Method 3: Button operation
If the current position holds a recorded track and the tempo value is available, the Drum Machine can be switched on/off by pressing the "DRUM" button on the pedal.

Quick Adjustment of the drum machine volume
If you need to quickly adjust the playback volume of the Drum Machine, you can hold the DRUM button and turn the MENU knob at the same time.

Note: For quick and easy adjustment of the balance between the individual volumes, Drum Machine volume and Looper volume are global parameters and are not saved with the storage location.
Recording a perfect phrase loop
Recording a perfect phrase loop is not easy. Here are three key factors to success:
- Perfect start
- Stable playing in the middle
- Perfect ending
"Perfection" means that start and end of the recording are perfectly in sync with the timing of your performance. Let's see what happens when you do something less than perfect:
- Less than perfect start:

Scenario 1: Recording started too late, resulting in missing notes at the beginning.
Scenario 2: Recording started too early, resulting in a gap at the beginning of the loop. - Unstable playing:

- Less than perfect end

Scenario 1: Recording ends too early, resulting in missing notes at the end.
Scenario 2: Recording ends late, resulting in a gap at the end of the loop.


Are you plagued by these easy-to-make "mistakes", which can lead you into a vicious cycle of being more and more afraid of mistakes, and more and more afraid of being more and more wrong?
We have designed a series of features to address these problems as much as possible, so that you can focus only on your playing and complete perfect phrase recordings.
AUTO REC
The secret to a perfect start: "Auto Rec input signal detection".
AUTO REC detects the input signal and starts recording automatically, thus avoiding the problem of inaccuracy caused by the lack of synchronization between the operation of the GL100 and the timing of the performance. It can be activated with a single press of a button:

If you want to cancel the recording in standby mode, step on the left footswitch again, or press the AUTO REC button again to turn off the function.
AUTO REC trigger threshold
The factory trigger threshold may not be suitable for the signal strength of your instrument. If the threshold is set too low, the recording can easily be triggered by mistake; if the threshold is set too high, it can be difficult or impossible to trigger. Please use one of the following two methods to adjust the threshold to your instrument and playing style:
Method 1: Long press AUTO REC to enter the threshold adjustment menu, and adjust the threshold by rotating the MENU knob. Click the "back" symbol at the top of the screen to return to the previous view.

Method 2: Press and hold AUTO REC and simultaneously rotate the MENU knob to quickly adjust the threshold. The screen will automatically return to the previous view.

Count-in
Another secret to a perfect start: the "Count-in".
We didn't design a separate switch for the count-in, because the first thing you need to do for this to work is to determine the tempo and the time signature you want to use.
The logic for count-in recordings is as follows:
- make sure AUTO REC is off (count-in cannot be used with auto recording)
- select an empty storage position
- enter a desired tempo using the TAP button (BPM number indicated on screen)
- if necessary, open the DRUM menu and select a pattern/time signature
- press the left footswitch
A count-in will be played for one bar, using the time signature and tempo you have selected. The recording will automatically start after the one-bar count in. If the Drum Machine is in Standby mode (DRUM button LED blinking), the Drum machine will also start playing after the count-in.
There are three ways enter tempo values:
Method 1: Press the TAP button several times to set the tempo.

Method 2: Press and hold the TAP button and rotate the MENU to adjust the tempo.

Method 3: Use the default tempo of the Drum Machine:

- Click the touch screen drum icon or long-press the DRUM button to open the DRUM menu.
- Short-press the DRUM button to switch the Drum machine to Standby.
Note: If the Drum Machine is already running in an empty position, there will be no count-in when you press the left footswitch to start a recording.
Alignment/quantization of Drum Machine and Phrase Loop
The secret to the perfect ending: synchronizing the Drum Machine to the end of the phrase.
We have not provided a special switch for this function, and its functional conditions are similar to those of the count-in recording.
If you record in a storage position with tempo value and time signature assigned, the end of the recording will be aligned to the bar determined by the time signature selected in the Drum Machine menu based on the 1/2 bar principle (more = make up, less = cut).
Take a 4/4 beat as an example: when you record and step on the footswitch during the third beat of a bar, the LOOPER will continue to record until the end of the current bar, and then start from the beginning, to ensure that the length of the phrase and the Drum Machine time signature are synchronized.

If you step on the footswitch before the end of the second beat of a bar (less than 1/2 bar), everything between the end of the last bar and the footswitch activation will be discarded and the Looper will start from the beginning immediately.
If you press the footswitch before the first half of the first bar is recorded, the recording will be cancelled entirely and the Looper resets to "ready to record" status.

With the "secret techniques" mentioned above, you only need to focus on stabilizing your tempo during the playing process to record a perfect phrase loop to enter a wonderful world where there is no lagging, or snapping, and where drums and the looper phrases are always in sync.
Automatic Drum Machine matching
The GL100's DrumMatch function can be used automatically match the tempo of the Drum Machine to a recorded phrase. After activating the function, you can start recording a phrase loop in an empty slot, and then end the phrase when the Drum Machine indicates that matching is complete, to get a synchronized playback of the phrase and the drum machine.
Enabling DrumMatch
Press the MENU knob to enter the system menu.
Rotate MENU to find the DrumMatch option and select "On".

When DrumMatch is activated, the word "Match" is displayed under the Drum Machine icon in an empty slot.

Using DrumMatch
Before using DrumMatch, press and hold the DRUM button, or tap the Drum Machine icon in the screen to enter open Drum Machine menu, where you can select the genre and pattern/time signature you want to play later.

Return to the main interface to record your phrase. While you are playing, the GL100 will match the tempo according to what you play. The matching progress is displayed in the lower right corner of the phrase loop screen.
The matching process lasts for about 8 seconds. It should be noted that the recording of the phrase does not have to end after the Drum Machine produces the result.
You can continue to play, but everything you play after the matching is completed will not be used for the matching process.

If no audio input is detected during the matching process, or if the recording is terminated before the matching process is complete, the matching process will fail, the recoding will be discarded and you will need to repeat the process.

After a match is successfully generated, the GL100 will synchronize the phrase and the drum machine rhythm during playback.

Starting Over
Perhaps you're not happy with what you played during the recording or the tempo matching result of the Drum Machine. You can then either keep the Drum Machine tempo and re-record the phrase, or start all over again.
- Keep the drum machine rhythm and re-record the phrase:
If you execute "Clear before manual save" (long-press the right footswitch) only the phrase content will be cleared and the drum machine rhythm will be kept. You can re-record the phrase, and after playback, press the DRUM button to turn on the original drum machine for synchronized looping. - Delete all:
If you execute "Delete all" (long-press the right footswitch + press Menu button) the recorded phrase and the previously matched tempo will be deleted and the matching status is reset to "Match" (Standby).
Notes:
- Using "Delete all" to delete the drum machine matching results only works with DrumMatch active.
- In DrumMatch mode, a phrase loop must be recorded which can then be used to determine the matching Drum Machine tempo. You cannot select a drum machine tempo or perform operations such as time signature setting until the matching result is generated. However, you can change these settings after the matching result was generated.
Time Stretch
TIME STRETCH shifts the speed of recorded or imported audio without changing the pitch of the audio.
When you feel that a faster or slower background audio might better match the performance of the phrase, you don't need to re-record or import it. You can just perform the speed change function to get the desired result.
You can also use this for practice with audio tracks you have imported or recorded into the GL100. Reduce the speed and play it again and again, until you can accompany the track smoothly at the original speed.
Here's how to use the Time Stretch feature:
- Record or import a piece of audio, the GL100 will automatically detect and adapt to the current BPM tempo value.

- Select the storage position with the recorded track and press the left footswitch to play the track.
- Method 1: Press the TAP button and turn the MENU knob at the same time to quickly change tempo.
- Red dial: tempo accelerated compared to the original tempo
- Cyan dial: tempo slowed down compared to the original tempo
- Green dial: original tempo

Press the MENU button to return to the original value.

- Method 2: Press the TAP button repeatedly to adjust the tempo.
You can stop the playback by pressing the right footswitch. After stopping, you can re-start the playback using the new tempo by pressing the left footswitch. If you press the left footswitch again during playback to perform an Overdub, you will be prompted to save the tempo change (right footswitch) or cancel the tempo change (left footswitch). An overdub can only be recorded after the tempo change was saved or cancelled.
![]()

Notes:
- Tempo changes must be saved or cancelled before you can overdub the track.
- When you perform a manual save for this position, the tempo change will be irreversible.
Position jumping during performance
The GL100 supports switching between different storage positions during performance.
You can use the footswitches to jump between storage positions while the Looper is running (Playback or Overdub).
The running status after the jump (Playback or Stop) depends on whether there is data at the jump target.
This feature allows you to pre-record or import passages of a song into different locations and call them up as you play, or to create different passages of a song live and in real time from scratch.
Each memory location can be used to record different drum rhythms or tempos. This feature eliminates the need to stop for saving and is designed for stage performance.
- Press both footswitches at the same time while the Looper is running (playing or overdubbing).
![]()
This activates the position switching mode (display blinking). - Select the target position by stepping on the left (down) or right (up) footswitch.
![]()
- The target position is activated 3 seconds after stopping the switching operation.
- When the audio playback of the original position finishes, it will jump to the new position to play back the loop stored there or to start a recording, if the storage position is empty.
![]()


After selecting the target position and before the jump is executed (original position still playing), you can step on the left or right footswitch to execute a forced jump or cancel the jump action.

The following table lists conditions of use and state descriptions for position jumping while the Looper is running:
| # | Start position status | Target position status | Execute after jump |
| 1 | Empty or Stop | Empty or stopped | Empty or stop |
| 2 | Recording | Empty or stopped | The start position data is discarded and the target position is kept empty or stopped. |
| 3 | Playback or overdub | Empty | Recording starts automatically after a jump |
| 4 | Playback or overdub | Stopped | Playback starts automatically after a jump |
Note: A stopped state indicates that data already exists in this storage location.
SETTINGS
In the main interface or phrase loop interface, press the MENU knob to open the setup menu. Rotate the MENU knob to switch between menu items, press the MENU knob switch to sub-menus and rotate again to change settings. Some menu items can also be selected directly by touching them on the touch-screen. Click the Back icon at the top of the screen to return to the main interface.
Capacity
This screen shows the maximum capacity of the device and the capacity already used by stored tracks. This menu is for information only. No settings can be changed here.
Note: The time showing the used capacity may not always represent the actual total time of tracks stored in the device. Some storage locations may hold temporary track layers (automatically saved) which can still be used for UNDO/REDO operations. The recorded track length of such a storage location is actually twice as long.

Play Mode
The GL100 offers two operational sequences when you record loops:
- Rec-Play-Dub
- Rec-Dub-Play
1st mode: Record-Playback-Overdubbing
In this mode, you press the left footswitch to start Playback after recording the first layer of the loop and then press it again to start overdubbing the next layer.

2nd mode: Record-Overdubbing -Playback
This mode can be used to record the second layer of the track immediately after finishing the first layer by pressing the left footswitch. The first layer will be played automatically while you overdub the second layer.

Stop Mode
The GL100 offers four stop modes to configure the way phrase loop will be stopped when you press the right footswitch while recording or playback is running:
- Immediately: Right footswitch stops the phrase loop immediately (default stop mode).
- OneShot: Step on the right footswitch and the phrase loop will continue to play to the end of the recorded track and then stop automatically. The STOP screen flashes during remainder of the loop playback.
You can stop the playback immediately when you step on the right footswitch again during the remaining playback time. - FadeOut(short): A short volume fade-out. Playback stops after 4 seconds or immediately, if you press the right footswitch again during these 4 seconds. The STOP screen flashes during the fade-out time.
![]()
- FadeOut(long): A long volume fade-out. Playback stops after 12 seconds or immediately, if you press the right footswitch again during these 12 seconds. The STOP screen flashes during the fadeout time.

Input Setting
Also see CONNECTION SCENARIOS.
The GL100 supports recording of two-channel phrase loops. This means, the Looper playback is put out at both outputs (depending on the Drum Out setting, see below).
The inputs can be routed to separate outputs or mixed and put out at both output channels. The same routing applies to the headphone output.

Stereo: Use this setting if stereo devices are connected at the inputs (which require a distinction between the left and right channel), such as stereo audio devices, some keyboards, stereo effects or two separate instruments.
- The left input will be routed to the left output and the right input to the right output (also to the left/right channel of the headphone output).
- The Looper playback and the Drum Machine signal will be routed to both outputs (depending on the Drum Out setting, see below).
- If you use the Stereo input setting with only one instrument, one output will have Instrument + Looper/Drum Machine playback and the other output will only have Looper/Drum Machine.
- If you use Stereo input setting with two separate instruments, one output will have Instrument 1 + Looper/Drum Machine playback and the other output will have Instrument 2 + Looper/Drum Machine.
Mixed: Use this setting for scenarios with mono input and stereo output.
- The signals from the inputs is mixed and routed to both outputs to maintain the pass-through signal for both outputs and both sides of the headphones.
- This can also be used also for scenarios with two separate instruments at the inputs, such as guitar + bass together. This way you can hear a mix of both instruments on both outputs, together with the Looper/Drum Machine playback (depending on the Drum Out setting, see below).
Drum Machine output
The GL100's drum machine defaults to Mixed output, which means that the Drum Machine, Phrase Loops and the pass- through signals are mixed and then put out at both the left and right outputs.
With Split Out, the signals are separated:

- pass-through + Looper signals are routed to the left output,
- the Drum Machine signal is routed to the right output.
The same applies to the headphone output.
This feature can be used when the different signals need to be routed to separate audio/amplification equipment for further processing.
Also see CONNECTION SCENARIOS.
DrumMatch
Please see chapter Automatic Drum Machine matching above.

Reset
This menu item can be used to clear all user data from the device and restore it to factory settings.
This deletes recorded and imported audio and resets drum machine and menu settings. Rotate the MENU knob to select this menu. Press and hold MENU for about 1 second to reset the data and automatically return to the "00" position.
USAGE SCENARIOS
The LOOPER or DRUM MACHINE features of the GL100 can be used individually, or both at the same time. When combined, it is important to have them properly synchronized.
The following scenarios illustrate some good ways to use the GL100:
Scenario 1: Phrase Looper alone
Make sure the Drum Machine is not activated before or after recording (DRUM button LED is not lit).
Scenario 2: Drum Machine alone
- Select an empty storage position and then step several times on the right footswitch to start the Drum Machine and enter the Tap Tempo at the same time.
Step on the right footswitch again to stop the Drum Machine after it has been running for some time. - Hold down the DRUM button to open the Drum Machine Menu and use single steps on the right footswitch to turn the Drum Machine on/off.
Note: Tap Tempo input with the right footswitch is not possible when the Drum Machine menu is opened. Use the TAP button in this case or use the MENU knob/touch screen to change the menu settings manually.
Scenario 3: Drum Machine and Phrase Looper at the same time
Note: The Drum Machine audio will not be included in the recording. You can later play back the recorded track without the drums or even use a different drum time signature for playback.
- Record the phrase loop first and then superimpose the Drum Machine:
- Find an empty position and select the desired Drum Machine rhythm and tempo.
- Play and record the phrase loop.
- When the phrase is played back, the tempo will be automatically adapted according to the currently selected tempo and time signature.
- Press the DRUM button to start the Drum Machine and synchronize it with the Looper.
Notes:
- This method requires that the content of the playing and the time signature of the drum pattern selected for the Drum Machine are the same, otherwise the Looper track will not be guaranteed to be synchronized with the Drum Machine.
- Drum machine tempo adaptation applies to phrases with a single or even number of bars. Phrases with an odd number of bars greater than one will not be guaranteed to play correctly. An odd number of bars will not guarantee correct tempo adaptation.
- This method may result in non-desired tempo values, so please adapt and re-record if necessary.
- Recording with count-in
- In an empty position, press the TAP button several times or adjust the BPM value to enter the tempo.
- Press the left footswitch to start recording, a one bar count-in based on the selected time signature and tempo will be played.
- Track recording starts automatically after the end of the count-in bar.
- Watch the flashing of the TAP button LED as a tempo reference for your playing while you are recording the first layer of the track.
- During playback following the recording, you can turn the Drum Machine on/off at any time by pressing the DRUM button.
- Follow the drum machine to record phrases
- In an empty position, turn on the drum machine and set the tempo by stepping several times on the right footswitch or by opening the DRUM menu.
- Step on the left footswitch to record the phrase. At this time the drum machine will immediately play the pattern from the beginning to ensure that the phrase starts at the same time.
- Follow the rhythm of the drum machine to complete the first layer of recording.
Now that you know all the functions of the device, get ready to start your creative journey!
Note: If the DrumMatch mode is active (see Menu settings), a phrase must be recorded to let the matching process determine the tempo.
MOOER STUDIO FOR GL100
Mooer Studio for GL100 is the dedicated computer software for this product. You can use it to import and export audio files or carry out firmware updates and reset functions.
Visit the official website www.mooeraudio.com, navigate to the download area, download Mooer Studio for GL100 and install the software to your computer.
System requirements
Win: Windows 10 and above;
Mac: Mac OS 10.15 and above
Connection
- Use the supplied USB cable to connect your GL100 and your computer.
- Open the computer software and click the connection switch in the top left area.
![]()
- Select "GL100" from the device list and click "Connect".
![]()
The software will show a progress dial and your GL100 will show a connection graphic in the touch screen.
![]()
- The connection is successfully established when "Connected" is indicated in the top left area and a list of storage positions is displayed.
![]()


Note: You will not be able to operate the GL100 while it is connected to the computer software. Audio output from the GL100 is also blocked.
Software interface

Available functions
Listening to Looper tracks
With a successful connection between the GL100 and the software, the left side shows the connection mode and operation as well as audio output on your GL100 are blocked. You can listen to the audio content on your computer by using the PLAY button behind the respective storage positions on the right side of the software screen.

Import and export
The main function of this software is the import and export of audio data. You can export the audio content recorded on your device to your computer for saving or sharing, or import acquired audio files into your device.
Import
Perform a single import by clicking the IMPORT button behind a storage position;

or import individually or in batches by checking several target positions and then click IMPORT.

Export
Perform a single export by clicking the EXPORT button behind a storage position;

or export individually or in batches by checking several positions and then click EXPORT.

Note: Mooer Studio software can only export and play back manually saved audio tracks, temporary data cannot be exported and played back. See section Saving.
Formats
The GL100 supports the import of common general audio formats, and can even automatically extract the audio content from video formats. Useable formats include, but are not limited to the following:
| Imported audio formats | Imported video formats | Export formats | Single position import length | Import sample rate |
| wav, flac, ape, mp3, m4a, aac, ogg... | mp4, mov, wma avi, mpeg | wav (dual channel) | 30 minutes | Unlimited |
Delete audio tracks
Individual deletions are performed by clicking the DELETE button behind a storage position.

You can also delete individually or in batches by checking several target positions and then click DELETE.

Firmware update
The current firmware version of your GL100 is shown on the touch screen display during start-up and in the "Reset" menu. After connection to the software, it is also displayed in the upper left area of the software interface.
When an official firmware update is released, you can download it using the corresponding function in the software interface after establishing a successful connection to your GL100.
To do so, carry out the following steps:

After clicking "Update", the device will reboot into update mode, and will automatically re-start into usage mode after displaying "Update Successful".

Note: Please make sure the power and data cables remain firmly connected during the update process to avoid unexpected issues.
Factory reset
This operation has the same effect as using the "RESET" menu item on the GL100. After resetting, all user data in the unit is cleared and restored to factory state, including recorded and imported audio files, drum machine settings and menu setting items.

DRUM MACHINE RHYTHM LIST
| GENRE | PATTERN | TIME SIG |
| 1 | 4/4 |
| 2 | 4/4 | |
| 3 | 4/4 | |
| 4 | 4/4 | |
| 5 | 4/4 | |
| 6 | 4/4 | |
| 7 | 4/4 | |
| 8 | 4/4 | |
| 9 | 4/4 | |
| 10 | 4/4 | |
| 11 | 4/4 | |
| 12 | 4/4 | |
| 13 | 4/4 | |
| 14 | 4/4 | |
| 15 | 4/4 | |
| 16 | 3/4 | |
| 17 | 3/4 | |
| 18 | 3/4 | |
| 19 | 6/8 | |
| 20 | 6/8 | |
| 1 | 4/4 |
| 2 | 4/4 | |
| 3 | 4/4 | |
| 4 | 4/4 | |
| 5 | 4/4 | |
| 6 | 4/4 | |
| 7 | 4/4 | |
| 8 | 4/4 | |
| 9 | 4/4 | |
| 10 | 4/4 | |
| 11 | 4/4 | |
| 12 | 4/4 | |
| 13 | 4/4 | |
| 14 | 4/4 | |
| 15 | 4/4 | |
| 16 | 4/4 | |
| 17 | 4/4 | |
| 18 | 4/4 | |
| 19 | 3/4 | |
| 20 | 6/8 | |
| 1 | 4/4 |
| 2 | 4/4 | |
| 3 | 4/4 | |
| 4 | 4/4 | |
| 5 | 4/4 | |
| 6 | 4/4 | |
| 7 | 4/4 | |
| 8 | 4/4 | |
| 9 | 4/4 | |
| 10 | 4/4 | |
| 11 | 4/4 | |
| 12 | 4/4 | |
| 13 | 4/4 | |
| 14 | 4/4 | |
| 15 | 4/4 | |
| 16 | 4/4 | |
| 17 | 6/8 | |
| 18 | 6/8 | |
| 19 | 6/8 | |
| 20 | 6/8 | |
| 1 | 4/4 |
| 2 | 4/4 | |
| 3 | 4/4 | |
| 4 | 4/4 | |
| 5 | 4/4 | |
| 6 | 4/4 | |
| 7 | 4/4 | |
| 8 | 4/4 | |
| 9 | 4/4 | |
| 10 | 4/4 | |
| 11 | 4/4 | |
| 12 | 4/4 | |
| 13 | 4/4 | |
| 14 | 4/4 | |
| 15 | 4/4 | |
| 16 | 4/4 | |
| 17 | 4/4 | |
| 18 | 3/4 | |
| 19 | 6/8 | |
| 20 | 6/8 | |
| 1 | 4/4 |
| 2 | 4/4 | |
| 3 | 4/4 | |
| 4 | 4/4 | |
| 5 | 4/4 | |
| 6 | 4/4 | |
| 7 | 4/4 | |
| 8 | 4/4 | |
| 9 | 4/4 | |
| 10 | 4/4 | |
| 11 | 4/4 | |
| 12 | 4/4 | |
| 13 | 4/4 | |
| 14 | 4/4 | |
| 15 | 4/4 | |
| 16 | 4/4 | |
| 17 | 3/4 | |
| 18 | 3/4 | |
| 19 | 6/8 | |
| 20 | 6/8 | |
| 1 | 4/4 |
| 2 | 4/4 | |
| 3 | 4/4 | |
| 4 | 4/4 | |
| 5 | 4/4 | |
| 6 | 4/4 | |
| 7 | 4/4 | |
| 8 | 4/4 | |
| 9 | 4/4 | |
| 10 | 4/4 | |
| 11 | 4/4 | |
| 12 | 4/4 | |
| 13 | 4/4 | |
| 14 | 4/4 | |
| 15 | 4/4 | |
| 16 | 4/4 | |
| 17 | 4/4 | |
| 18 | 4/4 | |
| 19 | 4/4 | |
| 20 | 2/4 | |
| 1 | 4/4 |
| 2 | 4/4 | |
| 3 | 4/4 | |
| 4 | 4/4 | |
| 5 | 4/4 | |
| 6 | 4/4 | |
| 7 | 4/4 | |
| 8 | 4/4 | |
| 9 | 4/4 | |
| 10 | 4/4 | |
| 11 | 4/4 | |
| 12 | 4/4 | |
| 13 | 4/4 | |
| 14 | 4/4 | |
| 15 | 4/4 | |
| 16 | 4/4 | |
| 17 | 3/4 | |
| 18 | 5/4 | |
| 19 | 7/8 | |
| 20 | 7/8 | |
| 1 | 4/4 |
| 2 | 4/4 | |
| 3 | 4/4 | |
| 4 | 4/4 | |
| 5 | 4/4 | |
| 6 | 4/4 | |
| 7 | 4/4 | |
| 8 | 4/4 | |
| 9 | 4/4 | |
| 10 | 4/4 | |
| 11 | 4/4 | |
| 12 | 4/4 | |
| 13 | 4/4 | |
| 14 | 4/4 | |
| 15 | 4/4 | |
| 16 | 4/4 | |
| 17 | 4/4 | |
| 18 | 4/4 | |
| 19 | 3/4 | |
| 20 | 3/4 | |
| 1 | 4/4 |
| 2 | 4/4 | |
| 3 | 4/4 | |
| 4 | 4/4 | |
| 5 | 4/4 | |
| 6 | 4/4 | |
| 7 | 4/4 | |
| 8 | 4/4 | |
| 9 | 4/4 | |
| 10 | 4/4 | |
| 11 | 4/4 | |
| 12 | 4/4 | |
| 13 | 4/4 | |
| 14 | 4/4 | |
| 15 | 4/4 | |
| 16 | 4/4 | |
| 17 | 4/4 | |
| 18 | 3/4 | |
| 19 | 6/8 | |
| 20 | 6/8 | |
| 1 | 4/4 |
| 2 | 4/4 | |
| 3 | 4/4 | |
| 4 | 4/4 | |
| 5 | 4/4 | |
| 6 | 4/4 | |
| 7 | 4/4 | |
| 8 | 4/4 | |
| 9 | 4/4 | |
| 10 | 4/4 | |
| 11 | 4/4 | |
| 12 | 4/4 | |
| 13 | 4/4 | |
| 14 | 4/4 | |
| 15 | 4/4 | |
| 16 | 3/4 | |
| 17 | 3/4 | |
| 18 | 6/8 | |
| 19 | 6/8 | |
| 20 | 6/8 | |
| 1 | 4/4 |
| 2 | 4/4 | |
| 3 | 4/4 | |
| 4 | 4/4 | |
| 5 | 4/4 | |
| 6 | 4/4 | |
| 7 | 4/4 | |
| 8 | 4/4 | |
| 9 | 4/4 | |
| 10 | 4/4 | |
| 11 | 4/4 | |
| 12 | 4/4 | |
| 13 | 4/4 | |
| 14 | 4/4 | |
| 15 | 4/4 | |
| 16 | 4/4 | |
| 17 | 4/4 | |
| 18 | 4/4 | |
| 19 | 4/4 | |
| 20 | 2/4 |
SPECIFICATIONS
| Input: | 2 x 1/4" mono inputs (impedance 2.2 MOhm) |
| Output: | 2 x 1/4" mono output jacks (impedance 120 Ohm) |
| Headphone jack: | 1 x 1/8" stereo jack (impedance 32 Ohm) |
| Storage locations: | 100 |
| Total recording time: | 300 minutes (stereo) |
| Sample Rate/Sample Depth: | 44.1 kHz/24 bit |
| Import file formats: | including, but not limited to: wav, flac, ape, mp3, m4a, aac, ogg, mp4, mov, wma, avi, mpeg |
| Export file format: | wav |
| Power requirements: | 9 VDC, center negative, 300 mA (we recommend using the original power adapter on an independent power outlet to prevent unnecessary crosstalk noise) |
| Size: | 125 mm (L) x 74 mm (W) x 49 mm (H) |
| Weight: | 200 g |
| Accessories: | Adapter, USB-C to USB-A cable, quick guide |
Disclaimer: Parameter updates will not be notified separately.
PRECAUTIONS
PLEASE READ CAREFULLY BEFORE PROCEEDING
Power supply
- Please only use a power supply adapter that meets the specifications of the manufacturer: 9 VDC, 300 mA, center negative. Other power supply devices may cause damage to the unit or other problems.
- Only use power supplies that have been approved by the relevant authorities and that meet local regulation requirements (such as UL, CSA, VDE or CCC).
- Unplug the power adapter when not in use or during electrical storms.
Connections
- Always turn off/disconnect the power to the GL100 and any other equipment before connecting or disconnecting signal cables. This will help prevent malfunctions and/or damage to other devices.
- Also make sure to disconnect all connection cables and the power supply before moving the device.
Storage and usage locations
To avoid deformation, discoloration or other serious damage, do not expose this device to any of the following conditions:
- direct sunlight
- extreme temperature or humidity
- excessively dusty or dirty locations
- magnetic fields
- high humidity or moisture
- strong vibrations or shocks
Electrical interference
- Use this unit at a distance from radio and TV devices to avoid interference.
Cleaning
- Clean only with a soft, dry cloth. If necessary, lightly moisten the cloth.
- Do not use abrasive cleaners, cleaning alcohol, paint thinners, wax, solvents, cleaning fluids, or chemical-impregnated wiping cloths.
Operation
- Please do not use excessive force to operate the control elements of the unit.
- Prevent metal, paper or other objects from getting into the unit.
- Please do not drop the unit, and avoid heavy blows.
- Please do not modify the unit without authorization.
- Should repairs be required, please contact the MOOER Customer Service Center for more information.
Documents / Resources
References
Download manual
Here you can download full pdf version of manual, it may contain additional safety instructions, warranty information, FCC rules, etc.
Advertisement


Need help?
Do you have a question about the GROOVE LOOP Series and is the answer not in the manual?
Questions and answers