Advertisement
Features
- 12–24V rechargeable car alarm for the cigarette lighter socket
- Has 2 USB charging ports with 5V/1A output power each
- Automatic alarm triggering at motion detection by PIR sensor (Passive Infrared sensor for physical movement detection for the car's interior)
- Built-in 450mAh battery for ~6 days standby time ensures alarm triggering even when engine is switched off
- Built-in alarm siren with 110dB
- Remote control to activate and deactivate the alarm
- Possibility to connect up to 5 remote controls
- LED status indicator
- Over-current protection 2.8A & short circuit protection
- Easy handling and installation
Technical Specification
| Detecting distance | ~3m car interior (without obstacles (e.g. rear wall in trucks) | ||
| Detecting range | 120° cone angle | ||
| Distance IR remote control | ~8m (open field) | ||
| Alarm time | 2 minutes maximum | ||
| USB output | charging 2x 5V/1A | ||
| Power | Built-in rechargeable 450mAh lithium polymer battery 4.2V | ||
| Charging time | ~3–4 hours | ||
| Working time | ~5 days (by alarm 5-times a day) | ||
| Standby time | ~6 days | ||
| Input voltage | DC 12–24V (cigarette lighter socket) | ||
| Charging current | 65mA | ||
| Operating current | 26mA | ||
| Transmission frequency | 433.92 MHz | ||
| Frequency type | ASK | ||
| Radiated output power | maximum 20mW (by pressing remote control button, not continuously) | ||
| Material | ABS | ||
| Weight / Dimensions car alarm | 44g / (L) 3.2 x (W) 3.2 x (H) 11.5cm | ||
| Weight / Dimensions remote control | 10g / (L) 5.3 x (W) 3.1 x (H) 1.0cm | ||
| Package Contents | Car Alarm with charging function TX-100, Remote Control (with button cell battery CR2032 3V), User Manual | ||
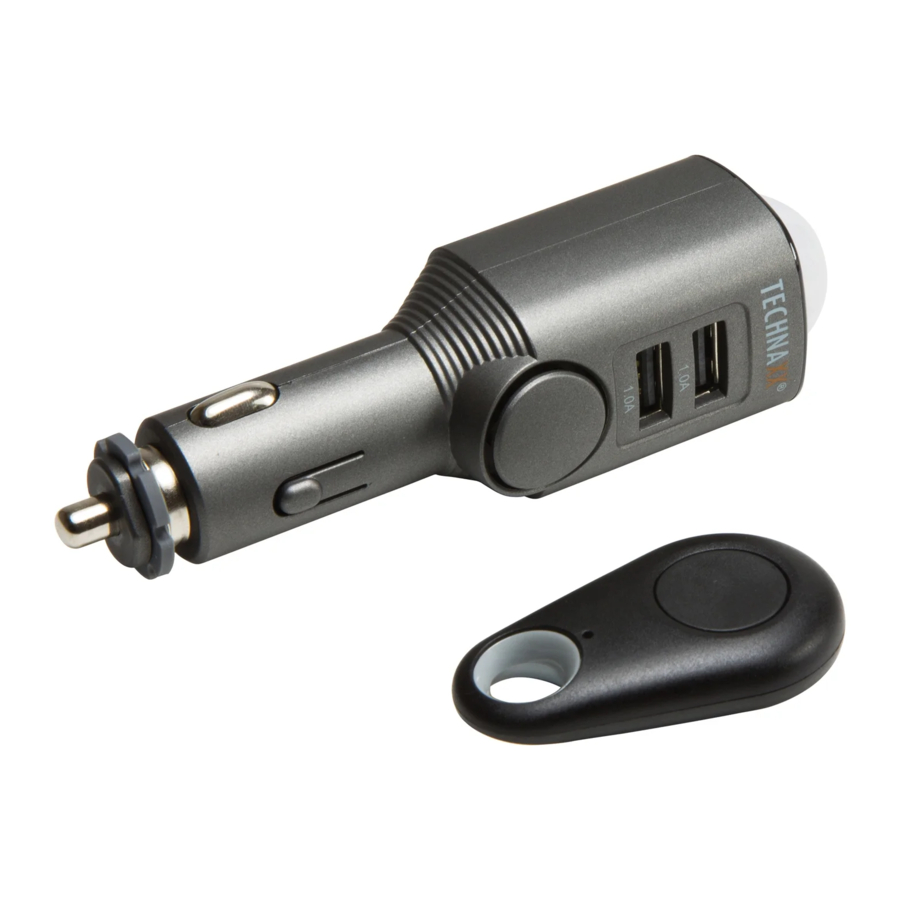
Product overview

| 1 | PIR (Motion detection) | 4 | Indicator (confirmation) |
| 2 | USB charging slot (2x 5V71A) | 5 | Remote control button (activate/deactivate) |
| 3 | Siren | 6 | Battery compartment of remote control |
Charge the product
First time using, plug device in the 12–24V cigarette socket to power on the device. Charge the device for 3–4hours before using it. You can also use an external charger* (*not included) to charge the device.
 Note: In some cars the cigarette lighter socket is off power when the engine of the car is not started. So please start your car to power the cigarette lighter socket.
Get started
After inserting to the cigartte lighter socket, three operations will happen at the same time:
- After inserting the device there is a short "beep". The device is ready for operation and can receive the command from the remote control.
- You have to pair the device with the included remote control once to be sure that the remote control is only paired with your car alarm. This is only possible in the first 5 seconds after you plugged the device into the cigarette lighter socket. Press the button on the remote control shortly until you here 4x "beep". Now the remote control is paired with your car alarm.
Each additional remote control is paired exactly the same way.
- The red light of the device inside the dome turns on. It indicates the battery is charging (Charging current 65mA). The red light will turn off when the device is fully charged.
Remote Control & Functions
Activate (Arm)
The PIR sensor can be activated by pressing the remote control button shortly.
Once the PIR sensor is activated, it takes about 5 seconds until the device is armed. When armed the blue light flashes every 5 seconds. After human action is detected, blue light flashes quickly each second and the siren is noising loudly. When the alarm will work continuous for two minutes (working current under alarm status is 26mA)
Deactivate (Disarm)
To deactivate the PIR sensor and turn off the alarm sound, press the button on the remote control shortly.
You will hear 2x short "beep" and the blue light stops flashing. The max. distance to disarm the device before getting back into the car is ~8m on open field.
Shut OFF device
If you press the remote control button long (3-4 seconds) you will hear one short "beep", and one long "beep" sound.
After that the device's battery is turned off. Not just the PIR sensor is shut off, the whole device is shut off for long time no use or for transportation.
All indicator turn off, except the charging indicator (red) when the device is still plugged into an active cigarette lighter socket.
The device can only be activated/armed when you plug it into the cigarette lighter socket again, or as soon as the cigarette lighter socket gives a new charge impuls to the device. The remote control is not working when device is shut off.
Note:
- It is possible to operate the remote control from outside the closed car through the window.
- The remote control gives an acoustic and a visual feedback by pressing the button
USB charger function
If the device is powered from a car cigarette lighter socket, you can connect the USB charger port to your mobile phone with a USB cable* (*not included). The device now is working as mobile phone charger. It is also possible to charge other devices via USB.
Note: Maximum output of USB is 2x 1A.
Dual Mode
If you have two car alarms you can handle them with one remote control. No need to take two remote controls with you. For example you can store one car alarm in the luggage compartment and the other car alarm in the centre console in the front of the car.
But before installing you have to pair both devices with the remote control. That needs to be done by inserting both devices at the same time to cigarette lighter socket.
Now both devices are for 5 seconds in pairing mode. Press the button on the remote control for pairing both devices with the remote control. 4x "beep" will confirm the pairing. For pairing also look under Get started point 2.
Attention: You cannot pair the devices one after another. It is necessary to plug the devices in at the same time to use one remote control.
Change remote control battery
When the remote control does not feedback with acoustic or visual behavior after pressing the button, change the battery (CR2032).
For changing the battery use a coin to open the battery compartment. Turn the cover on the backside of the remote control left to open and right to close. Insert the battery. After inserting you should see the "plus" pole of the battery. Now close the compartment.
Troubleshooting
→ First remove the small plastic strip on the back of the remote control.
The device could not be paired
→ If pairing fails for the first 5 seconds, unplug the device from the cigarette lighter socket, plug it in again and press the button on the remote control to pair.
Note: During the first 5 seconds right after plugging the device into the cigarette lighter socket, it is always possible to pair a remote control.
Product Video
Either scan this QR code with your Smartphone, or use this YouTube link: https://www.youtube.com/watch?v=WCX-UDRkdP4


- To prolong the life of this device, pull it out when starting the engine of the car.
- Do not remove any cover to avoid the risk of an electric shock or other damages.
- Do not attempt to disassemble the device, it may result in short-circuit or even damage.
- Do not drop or shake the device, it may break internal circuit boards or mechanics.
- Keep the device in dry and ventilated environment. Avoid high humidity and high temperature.
- Do not expose this unit to rain or moisture, to reduce the risk of fire or electrical shock. The device should not be exposed to dripping or splashing.
- Do not install the device near any heat source, such as radiators, or other equipment that produces heat. Keep the device away from direct sunlight.
- Keep the device away from little children.

Security and Disposal Hints for Batteries: Hold children off batteries. When a child swallowed a battery go to a doctors place or bring the child into a hospital promptly! Look for the right polarity (+) and (–) of batteries! Always change all batteries. Never use old and new batteries or batteries of different types together. Never short, open, deform or load up batteries! Risk of injury! Never throw batteries into fire! Risk of explosion!
The manufacturer Technaxx Deutschland GmbH & Co. KG hereby declares that this device, to which this user manual belongs, complies with the essential requirements of the standards referred to the Directive RED 2014/53/EU. The Declaration of Conformity you find here: www.technaxx.de/ (in bar at the bottom "Konformitätserklärung"). Before using the device the first time, read the user manual carefully.
Service phone No. for technical support: 01805 012643 (14 cent/minute from German fixed-line and 42 cent/minute from mobile networks).
Free Email: support@technaxx.de
This device has a rechargeable battery. It must be fully charged before first use.
NOTE: Charge the battery of the device every 2–3 month if it is not used!
Keep this user manual for future reference or product sharing carefully. Do the same with the original accessories for this product. In case of warranty, please contact the dealer or the store where you bought this product.
Warranty 2 years
Enjoy your product * Share your experience on Amazon
Documents / Resources
References
Download manual
Here you can download full pdf version of manual, it may contain additional safety instructions, warranty information, FCC rules, etc.
Advertisement


Need help?
Do you have a question about the TX-100 and is the answer not in the manual?
Questions and answers