Table of Contents
Advertisement
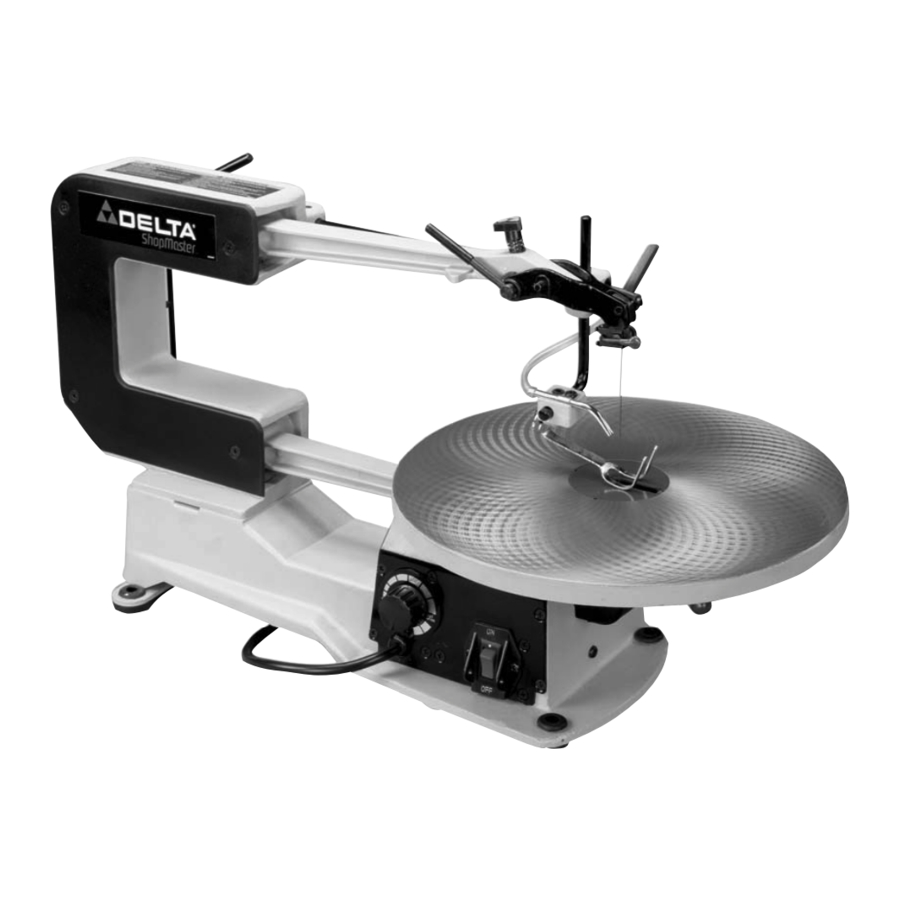
16" Variable Speed Scroll Saw
with Quickset II
®
Blade
Changing Feature
(Model SS250)
PART NO. 905574 - 05-03-02
Copyright © 2002 Delta Machinery
To learn more about DELTA MACHINERY
ESPAÑOL: PÁGINA 21
visit our website at: www.deltamachinery.com.
For Parts, Service, Warranty or other Assistance,
1-800-223-7278 (
1-800-463-3582).
please call
In Canada call
Advertisement
Table of Contents

Related Manuals for Delta SHOPMASTER SS250


Summary of Contents for Delta SHOPMASTER SS250
- Page 1 ® Blade Changing Feature (Model SS250) PART NO. 905574 - 05-03-02 Copyright © 2002 Delta Machinery To learn more about DELTA MACHINERY ESPAÑOL: PÁGINA 21 visit our website at: www.deltamachinery.com. For Parts, Service, Warranty or other Assistance, 1-800-223-7278 ( 1-800-463-3582).
-
Page 2: General Safety Rules
If you have any questions relative to a particular application, DO NOT use the machine until you have first contacted Delta to determine if it can or should be performed on the product. -
Page 3: Additional Safety Rules For Scroll Saws
Wedge open the kerf and back blade out of the workpiece. 18. THE USE of attachments and accessories not recommended by Delta may result in the risk of injuries. 19. ALWAYS hold the work firmly against the table. 20. DO NOT feed the material too fast while cutting. -
Page 4: Motor Specifications
A separate electrical circuit should be used for your machines. This circuit should not be less than #12 wire and should be protected with a 20 Amp time lag fuse. If an extension cord is used, use only 3-wire extension cords which have 3- prong grounding type plugs and matching receptacle which will accept the machine’s plug. -
Page 5: Extension Cords
OPERATING INSTRUCTIONS FOREWORD Delta ShopMaster Model SS250 is a 16" variable speed scroll saw. The variable speed range for the Model SS250 is 400-1800 cutting strokes per minute. The Model SS250 offers a full 2" depth of cut for thick workpieces. - Page 6 Fig. 1 Fig. 1 1. Scroll Saw with blade attached SCROLL SAW PARTS Fig. 2 2. Table 3. Quickset Blade Changing Wrench 4. Holddown Rod 5. 4mm Hex Wrench 6. Locking Handle 7. M10 Flat Washer 8. Blank Table Insert 9.
- Page 7 1. Remove the blade from the scroll saw. 2. Move the blade lever tension handle (A) Fig. 3, to the foreword position as shown. 3. Push chuck locking lever (B) Fig. 4 to the rear as shown. This will release the blade (C) from the upper chuck assembly (D).
- Page 8 5. Position table (A) Fig. 7, on the machine as shown. Align the two holes in the table trunnions (O) with the two holes in the base (P) of the machine. NOTE: BEFORE TIGHTENING THE M6x1x45mm SPECIAL SCREWS (B) AND M6 LOCKNUTS (C) FIG. 7, MAKE SURE THE TILT SCALE (D) FIG.
- Page 9 9. Using the 4mm wrench (L) Fig. 11, loosen the two screws (P) on bottom of bracket (M) that fasten bracket to rod (N). 10. Rotate bracket (M), to the position shown in Fig. 12. Loosen lock handle (R) and insert holddown rod (S) into hole in bracket (M), as shown.
-
Page 10: Fastening Scroll Saw To Supporting Surface
SPEED SWITCHES The on-off switch (A) Fig. 17, and variable speed switch (B) is located on the right side of the scroll saw base, as shown. To turn the saw "ON," push the switch (A) up to the “ON” position. To turn the saw "OFF", push the switch (A) down to the “OFF”... -
Page 11: Table Insert
TABLE INSERT The table insert (A) can be assembled to the saw table with the opening in the insert pointing to the front of the table, as shown in Fig. 19, or to the right as shown in Fig. With the table in the level position, 90 degrees to the blade, the insert (A) should be positioned, as shown in Fig. - Page 12 3. Push chuck locking lever (C) Fig. 23, to the rear as shown. This will release the blade (D) from the upper chuck (E). 4. Insert long end (F) Fig. 24, of quickset blade wrench into hole (G) in lower blade holder. This will align wrench (H) with blade holder screw (J).
-
Page 13: Adjusting Blade Tension
ADJUSTING CLAMPING ACTION OF UPPER BLADE HOLDER Different widths of scroll saw blades will make it necessary to adjust the clamping action of the upper blade holder. It should be noted, however, that very little adjustment is necessary and very little clamping force is required to hold the blade. -
Page 14: Tilting The Table
TILTING THE TABLE The table on your scroll saw can be tilted 45 degrees to the left for bevel cutting operations by loosening table lock handle (A) Fig. 30, tilt the table to the desired angle and tighten lock handle (A). -
Page 15: Adjusting Holddown
ADJUSTING HOLDDOWN The holddown (A) Fig. 34, should be adjusted so it contacts the top surface of the work being cut by loosening lock handle (B) and moving holddown rod (C) up or down. Then tighten lock handle (B). ADJUSTING DUST BLOWER The dust blower (A) Fig. -
Page 16: Following A Line
Make "relief" cuts before cutting long curves and never attempt to cut a curve that is too tight for the blade being used. Inside cutting is where the blade must be threaded through a hole in the workpiece. The Delta 16" Scroll Saw has the... -
Page 17: Choice Of Blade And Speed
CHOICE OF BLADE AND SPEED Your scroll saw will accept a wide variety of 5" flat end blades and can be operated at any speed from 400 to 1800 cutting strokes per minute. Consider the following as a general guideline for selecting a blade and operating speed. - Page 18 NOTES...
- Page 19 NOTES...
-
Page 20: Parts, Service Or Warranty Assistance
1-800-223-7278 (In Canada call 1-800-463-3582). Delta will repair or replace, at its expense and at its option, any Delta machine, machine part, or machine accessory which in normal use has proven to be defective in workmanship or material, provided that the customer returns the product prepaid to a Delta factory service center or authorized service station with proof of purchase of the product within two years and provides Delta with reasonable opportunity to verify the alleged defect by inspection.
Need help?
Do you have a question about the SHOPMASTER SS250 and is the answer not in the manual?
Questions and answers