Advertisement
- 1 GET TO KNOW YOUR SHARK CRYOGLOW MASK
- 2 WHAT'S IN THE BOX?
- 3 CONTRAINDICATIONS
- 4 WARNINGS & PRECAUTIONS
- 5 GETTING STARTED
- 6 FITTING THE MASK
- 7 GET TO KNOW THE REMOTE
- 8 REMOTE SETTINGS
- 9 LED SKIN ROUTINES
- 10 UNDER-EYE COOLING
- 11 LEDS AND HOW THEY WORK
- 12 UNDER-EYE CHILL PADS AND HOW THEY WORK
- 13 RUNNING A SESSION
- 14 SELECTING A ROUTINE
- 15 COOLING DURING A ROUTINE
- 16 SELECTING UNDER-EYE COOLING
- 17 TIPS
- 18 PROGRESS TRACKER
- 19 SETTINGS, MASK CARE & BATTERY CHARGING
- 20 FAQ
- 21 TROUBLESHOOTING
- 22 ERROR MESSAGES
- 23 MANUFACTURER'S GUARANTEE
- 24 Documents / Resources
GET TO KNOW YOUR SHARK CRYOGLOW MASK

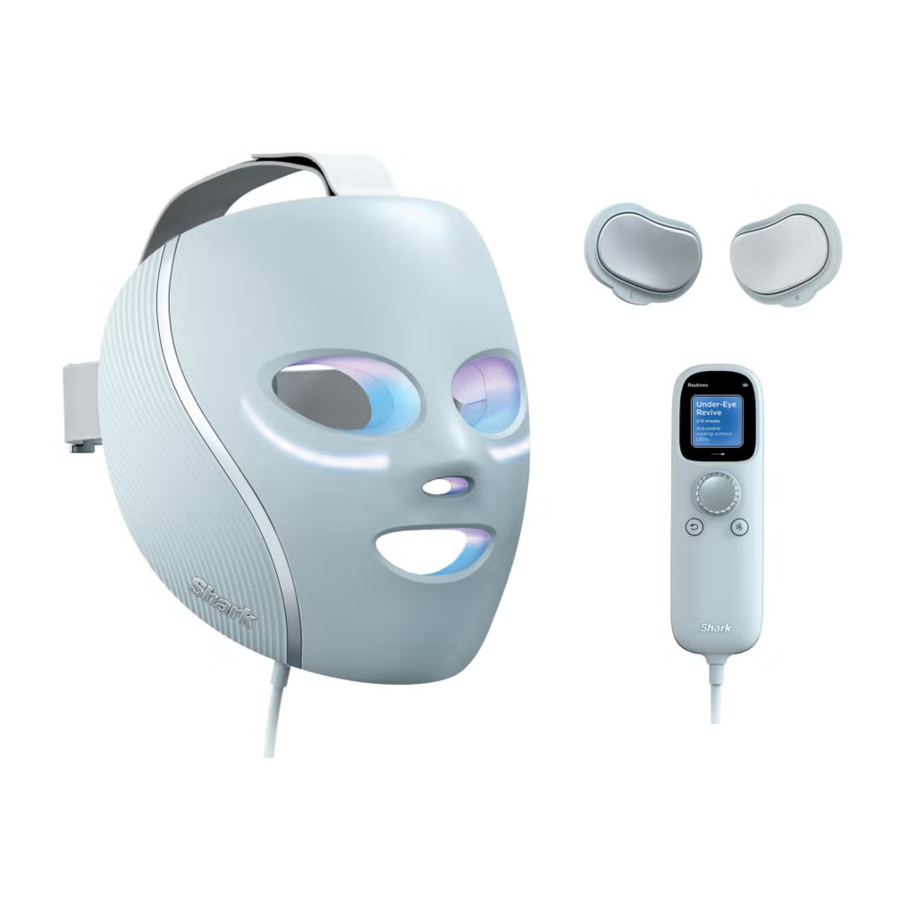
WHAT'S IN THE BOX?

CONTRAINDICATIONS
Do not use the Shark CryoGlow Mask if you are taking:
- Medication or supplements that cause sensitivity to light (photosensitivity), for example, medications for severe inflammatory acne (i.e. isotretinoin or doxycycline).
Immediately stop using the device if you experience any discomfort.
Do not use the Shark CryoGlow Mask if you have any of the following medical conditions:
- Retinal and/or macular disease, ocular albinism, or any eye condition that causes sensitivity to light
- Pregnant, nursing, or maybe pregnant
- Pacemaker or other electronic implanted device
- Implants in the face
- Lack of sensation (e.g., numbness)
- Light sensitive skin disorder (e.g., lupus, porphyria)
- Extreme light sensitivity of the eyes (i.e., photophobia)
- Light-induced headaches
- Albinism
- Melasma (i.e., condition that causes patches and spots)
- Sensitivity or allergy to plastic, aluminum, or self-fastening material
Do not use the Shark CryoGlow Mask if you have any of the following conditions on the face, hairline, ears, or neck:
- Recent facial surgery (until you have been cleared by your doctor)
- Suspicious lesions or skin cancer
- Eczema
- Psoriasis
- Irregularly shaped, new, or changing brown spots
- Birthmarks
- Broken skin, skin rash, or blisters
- Tissue inflammation
- Skin infection, cold sore, or warts
- Active current outbreak of herpes simplex virus (cold sores)
- History of herpes outbreaks without receiving preventative treatment
- Facial treatment where the skin has not fully healed, including neurotoxin, dermal filler, micro needling, laser, or chemical peel
Do not apply Shark CryoGlow Mask's cooling routines on the eyeball or upper eyelid.
Do not use the Shark CryoGlow Mask's cooling routines if you have any of the following medical conditions:
- Cold hypersensitivity
- Cold urticaria (i.e., hives brought on by cold temperatures)
- Circulatory insufficiency
 PRECAUTIONS:
Consult a medical professional before using the Shark CryoGlow Mask if:
- You have bruising on the face.
- You are experiencing skin sensitivity or irritation with retinol or benzoyl peroxide.
WARNINGS & PRECAUTIONS
To reduce the risk of fire, thermal and chemical burns, electric shock, serious injury, or death, follow the precautions in this section and the procedures in this manual. The remote control contains a rechargeable lithium-ion battery.
If damaged, the battery can overheat, catch fire, or leak a chemical that can burn skin and eyes.
SUPERVISION AND INTENDED USERS:
- Do not use if any of the conditions in "Contraindications" apply to you.
- Do not leave the equipment unattended when it is powered on.
- This equipment is not intended for use by persons with reduced physical, sensory, or mental capabilities, or lack of experience and knowledge, unless they have been given supervision or instruction concerning use of the equipment. Please refer to the contraindications before use.
- This equipment is not intended for use by children under 18 years old. Children should be supervised to ensure they do not play with the equipment.
- To reduce the risk of entanglement and potential strangulation, keep cords out of reach of children.
- Small parts can be inhaled or swallowed by children—if any small parts break off or detach from the product, dispose of safely.
- This equipment is only intended to be used by one person.
KEEP DRY.
- Keep the remote control dry. If it gets wet, do not charge or use—the battery may be damaged. Follow disposal instructions.
- Water and electricity are a dangerous combination!
- Do not use this equipment in wet surroundings (e.g., in a bathtub, shower, or swimming pool).
- Do not let water run into the device.
- It is very important to keep the device dry. Any contact with water could damage the device.
- Do not use or store the device in the bathroom or near water.
- Do not charge or use the device if it has been left outdoors.
CHARGE SAFELY.
- Follow the charger manufacturer's instructions.
- Only charge the equipment with the provided USB-C cable and charging brick: Dongguan Yinli Electronics, model YLJXA-T050200. Do not use any other USB-C cable or charging brick.
- Check if the voltage indicated on the equipment corresponds to the local mains voltage before you connect the equipment to avoid risk of electrocution or permanent damage to the equipment.
- If the wall socket used to power the equipment has poor connections, the plug will become hot. Make sure you plug the equipment into a properly installed wall socket.
- Do not charge the device in the bathroom or near water,
- Do not charge the remote after contact with water.
- Always position the equipment so the charger is easy to reach while charging.
- Store USB-C cable properly after charging.
PROTECT THE REMOTE'S BATTERY FROM DAMAGE.
- Do not try to open the remote or replace the battery.
- Do not crush, drop, or damage the remote.
- Stop use or disconnect charging cable if the remote feels unusually hot or emits smoke or a bad smell.
- If liquid leaks from the remote, avoid contact. If liquid touches skin or eyes, wash with large amounts of water and seek medical advice.
- Follow disposal instructions.
TRANSPORT AND STORAGE CONDITIONS
- Only transport and store the device in the following environmental conditions:
- Keep between -20°C (-4°F) and 45°C (113°F). For storage longer than 3 months, keep between 0°C (32°F) and 25°C (77°F).
- Keep between 5°C (41°F) to 32°C (89.6°F) at a relative humidity up to 85%, non-condensing.
- Keep between 35°C (95°F) to 60°C (140°F) at a water vapour pressure up to 50 hPa.
USE SAFELY.
- The mask limits your vision. Do not wear while doing anything (such as driving) where limited vision poses a risk.
- CAUTION: The light emitted from this device may be harmful to the eyes. Infrared emitted from this device may cause eye irritation. Do not stare at the light source.
- Do not use device when it has been left outdoors.
- If you are travelling by air, the mask should be carried in carry-on baggage and not checked in. The device must be completely switched off.
- Do not use the mask outdoors. Only use the mask indoors under the following environmental conditions:
- Temperature: between 10°C and 30°C.
- A relative humidity range of 15% to 90%, non-condensing, but not requiring a water vapour partial pressure greater than 50 hPa.
- An atmospheric pressure range of 700 hPa to 1060 hPa.
- Skin dryness, irritation, or redness may occur when using an LED routine. Apply a facial moisturiser if dryness occurs.
- To avoid the risk of temporary dry skin or hyperpigmentation, do not run back-to-back LED routines.
CHECK THE PRODUCT FOR DAMAGE BEFORE EACH USE.
- Inspect the inside of the mask and strap for cleanliness, cracks, or sharp edges.
- Check the chill pads for signs of corrosion.
- These conditions can irritate or damage your skin.
CLEAN PROPERLY.
- Clean the mask with a damp cloth.
- Avoid using chemical or alcohol based cleaners.
DO NOT REPAIR OR MODIFY.
- Do not attempt to repair or modify the mask or remote.
- Do not crush or dispose of in fire.
DISPOSAL INSERT.
- Dispose of the device according to local laws and requirements surrounding lithium-ion battery disposal.
POTENTIAL ELECTROMAGNETIC INTERFERENCE.
![]()
Use of this equipment adjacent to or stacked with other equipment should be avoided because it could result in improper operation. If such use is necessary, this equipment and the other equipment should be observed to verify that they are operating normally.![]()
Use of accessories, transducers and cables other than those specified or provided by the manufacturer of this equipment could result in increased electromagnetic emissions or decreased electromagnetic immunity of this equipment and result in improper operation.![]()
Portable radio frequency communications equipment (including peripherals such as antenna cables and external antennas) should be used no closer than 12 inches (30 CM) to any part of the mask system, including cables specified by the manufacturer. Otherwise, degradation of the performance of this equipment could result.![]()
Do not leave mask exposed in direct sunlight.

GETTING STARTED
Please read the Warnings, Instructions, and Countraindications before first use.
Charge fully before first use
Plug small end of USB-C cable into charging port on top of remote.
Plug large end of USB-C into power adapter. Plug power adapter into wall outlet.
Allow remote to charge fully (this should take about 3 hours). The remote screen will show your charging progress.
Once charged, unplug power adapter and disconnect USB-C cable from remote.
NOTE: Unplug before using face mask. Mask will not work when plugged into wall outlet.
Powering ON/OFF

ON: To turn on your mask and remote, long-press the remote's dial/center button.
OFF: To turn off, long-press the dial/center button.
AUTOMATIC SHUT-OFF: If the device is not manually turned off, the mask and remote will automatically shut off after completing a session.
The mask fans will continue to run for 60 seconds while the mask is powering down after a session.
FITTING THE MASK
Demo video will run upon first use of the remote, please watch for further fit and comfort instructions. You can also rewatch this video by heading to settings.
Step 1 / Adjust the back strap
Start by adjusting the back strap (with the buckles). To tighten or loosen, slide the buckles simultaneously together or apart. This strap may cover the top of your ears – adjust until this feels comfortable.

Step 2 / Adjust the top strap
To adjust the mask up or down on your face, loosen or tighten the self-fastening strap on the top of your head. Ensure the strap is sat in the center of your head (following a center part).

Step 3 / Adjust chill pad fit (optional)
The chill pads should be sat under your eyes, on top of your cheekbones. If the chill pads have poor or inconsistent contact with your under eye-area, add the optional clip-on chill pads to improve fit and comfort.
Remove the mask and take the optional clip-on chill pads out of the box. They are marked 'L' and 'R' - make sure the letters are pointing towards the chin of the mask. Align the optional clip-on chill pads with the built-in chill pads (that are permanently attached to the mask) and snap them in place. You'll feel a click when they are properly attached!

NOTE: LEDs work best when they are not in contact with your skin. This is why the mask sits at a slight distance from your face.
 Pro Tips:
- The back strap should be sat parallel to the floor and your eyes should be centred in the eye holes. Use one hand to hold the back strap in position and the other hand to adjust
- the top self-fastening strap until the mask is positioned comfortably and securely on your head.
Please visit sharkbeauty.co.uk for more helpful images and videos.

GET TO KNOW THE REMOTE

REMOTE SETTINGS
Changing Brightness
- Turn ON the mask using the remote.
- Turn the dial to view Settings and click the dial button to select.
- Select Screen Brightness, then use the dial to increase or decrease the brightness. Click the dial button to make your selection.
- After selecting a brightness level, you will be sent back to the main menu.
Changing Language
- Turn ON the mask using the remote.
- Turn the dial to view Settings and click the dial button to select.
- Select Language and use the dial to select the language of your choice.
- After selecting a language, you will be sent back to the main menu.
Reset Progress
- Turn ON the mask using the remote.
- Turn the dial to view Settings and click the dial button to select.
- Select Reset Progress, then click the dial button to select Confirm.
- After confirming, you will be sent back to the main menu.
Factory Reset
- Turn ON the mask using the remote.
- Turn the dial to view Settings and click the dial button to select.
- Select Factory Reset, then click the dial button to select Confirm.
- After confirming, you will be sent back to the main menu.
Pro Tips: You can also replay the demo video on the remote and access our support page through settings!
LED SKIN ROUTINES
The mask offers 3 LED routines to choose from, whether your goals are boosting your skin or maintaining it.
BOOSTING ROUTINES
For best results, select the Better Ageing or Blemish Repair routine below, and use your selection once daily for a minimum of 8 weeks.
Better Ageing (6 MINUTES)
Helps enhance skin's appearance by smoothing wrinkles and balancing texture for a radiant, even look.

Blemish Repair (8 MINUTES)
Helps reduce the appearance of textured, uneven skin and blemishes for smooth, glowing skin with an automated 3-phase routine.

MAINTENANCE ROUTINE
Once you have achieved your target results using a boosting routine for a minimum of 8 weeks, switch to using Skin Sustain once daily to help maintain your results.
Skin Sustain (4 MINUTES)
Helps to boost brightness and helps maintain complexion with daily use.
For more information on LEDs, please see LEDS AND HOW THEY WORK.

No UV light is emitted from this mask.
Did you lose your streak? Don't worry!
Readjust your goals and continue with your skincare journey.
UNDER-EYE COOLING
Use cooling in the morning to help depuff your under-eyes and in the evening to relax!
LED + COOLING

Under-eye cooling will automatically start with any LED routine and has the option to be turned off. Use the remote's chill button to cycle through 3 temperatures to help quickly depuff and soothe your under-eye area.
COOLING ONLY
Under-Eye Revive (5, 10 or 15 minutes)
An adjustable under-eye cooling ONLY routine (no LEDS) for a soothing and refreshing experience designed for optimal relaxation.

FIND YOUR PERFECT ROUTINE
Scan the QR Code to take our quiz to find the best routine for your skin concerns!

LEDS AND HOW THEY WORK
LED stands for Light Emitting Diode
Different color LEDs emit different wavelengths that are measured in nanometers (nm).
So when LEDs interact with skin, each color penetrates differently.
LED Skin Penetration

NOTE: Infrared wavelengths are invisible to the human eye.
UNDER-EYE CHILL PADS AND HOW THEY WORK
The under-eye chill pads use the Peltier Effect
The Peltier Effect describes the movement of heat-producing electricity through both sides of a surface, making one side feel cool and the other side warm. We employ the combination of the Peltier Effect and fan technology to expel excess heat outward— so the metal portion of the mask feels cool to the touch and your under-eye skin experiences instant cooling.
InstaChill Technology uses the Peltier Effect.

RUNNING A SESSION
Note: Please read the Warnings, Instructions, and Contraindications before first use.
Make sure the mask has been fully charged before first use (this could take up to 3 hours).
How to fit Shark CryoGlow into your routine
Take the time with your first few uses to experiment with how Shark CryoGlow can best fit into your existing routine. Give it a try in the morning to help you feel fresh for the day. If this doesn't work, try it in the evening to help you wind down and relax when you have more time.
Step 1 / Put on the mask
Begin with a clean, bare and dry face.
Step 2 / Adjust the back and top straps - full instructions in REMOTE SETTINGS.
Adjust the straps to position mask comfortably on your face. Slide buckles simultaneously to adjust the back strap. To adjust the positioning of the back strap on your head, release the top self-fastening strap and gently pull the back strap so that it sits parallel to the floor.
Chill pads should be positioned under the eyes, making light contact with your skin. You may need to attach the optional clip-on chill pads available in the box to achieve best fit.

The top strap should be positioned in the centre of your head whilst the back strap should be parallel to the floor.

Step 3 / Power on
Turn on the mask by pressing and holding the remote's dial button. On first use, a short demo video on the remote screen, will show you how to fit the mask and interact with the remote.
Step 4 / Select and run a routine
Use the remote to choose a routine and begin by selecting "Start." Under-eye cooling will automatically turn on. Adjust the under-eye chill pads' intensity to your desired level with the remote's chill button.
Step 5 / Remove and clean the mask
When your session is complete, remove the mask. Fans will run for 60 seconds to power down the chill pads, then the mask will shut off automatically. Once you have taken off the mask, clean the mask with a damp cloth. Continue with your daily skincare routine.
SELECTING A ROUTINE
Step 1
Using the dial on the remote, go to Routines and scroll through the different LED and Cooling routines available.

Step 2
Use the dial to select from one of the 3 available LED routines or 1 cooling-only routine. Select your routine by clicking the dial button. Under-eye cooling will automatically start with an LED routine.

COOLING DURING A ROUTINE
During a routine, you have options to adjust the under-eye chill level, and pause or end your routine.

SELECTING UNDER-EYE COOLING
Step 1
Use the dial on the remote to scroll to Under-Eye Revive.

INSTACHILL COLD TECHNOLOGY
Use this cooling function to help refresh, and depuff the under-eye area.

Step 2
Then use the dial to scroll through run-time options.
Choose one and click the dial button.

Step 3
Use the chill button to select your preferred temperature. Mask will automatically shut off at the end of the selected duration.

TIPS
Result timing
- Results are achieved through consistent use of the same routine daily for 8 weeks or more.
- After consistent use with the same boosting routine, keep going with that routine to build on your progress. Or switch to another boosting routine to work toward another skin goal.
- If you've achieved the skin goals you were working toward, you can switch to the Skin Sustain routine to help maintain your skin condition over time.
What to expect
- You may experience different skin effects in the process of your skin journey when consistently using LED routines.
- For the Better Ageing routine, skin dryness, irritation and redness might occur. Only use once daily and apply a rich facial moisturiser after each routine.
- If you experience any undesirable pigmentation or darkening of the skin, please discontinue use and contact SharkNinja at 0800 862 0453.
Take "before and after" pictures
- Be sure to take "before and after" pictures to document your journey while using the LED skin routines.
PROGRESS TRACKER
The remote keeps track of your sessions to help you meet your skin goals.
Your routine
After you finish a session, the total number of sessions completed in that routine will appear on the remote's screen. A reminder will appear above your prior completed routine when you return.

Progress
Select "Your Progress" to see your cumulative progress across routines.

Tracking
Total Sessions are the number of sessions you have completed, and Streak is how many sessions you have completed in a row.

SETTINGS, MASK CARE & BATTERY CHARGING
Remote settings
The remote settings are available to adjust from the main menu.

- Replay tutorial: replay demo video shown at first use.
- Support: scan QR code to access our support page.
- Brightness: Adjust the brightness of the remote screen.
- Language: Choose your preferred language.
- Reset Progress: Option to reset your progress level.
- Factory Reset: Option to reset your remote/mask.
Mask care
- Your mask should be cleaned after each use.
- Make sure the mask is turned off and unplugged from any power source.
- Clean the interior and exterior of the mask with a damp cloth after each use. The cloth should not be dripping wet, as it could damage the electrical components.
Ensure the chill pads are fully dry before adding clip-on pads. - Allow mask to dry completely before using again.
![warning]() Note: Do not use chemical or alcohol-based cleaners.
Note: Do not use chemical or alcohol-based cleaners.
Battery charging
- The run time of a fully charged battery depends on the types of sessions being run.
- It should take about 3 hours to fully charge the mask. The mask does not work when on charge.
FAQ
| What safety features does this product have? | Auto-timer: Mask will shut off automatically after 60 seconds of inactivity once a session is complete. Temperature regulation: Cooling temperature of the chill pads is regulated. Auto-Dim: LED lights automatically dim when the device is not close to the face while on. Silicone eye guards: Ensures safe use with closed or open eyes |
| Does the mask emit UV light? | No, UV light is not emitted from this mask. Blue and red LEDs combined can appear purple but do not mimic the effects of UV light. |
| How long should I wear the mask? | The mask's longest LED session is 8 minutes. The longest cooling-only session is 15 minutes. We recommend using only one LED routine per day. Using multiple LED routines per day could lead to dry skin or hyperpigmentation. |
| How often should I use the mask? | For best results, use the same LED mode once a day for a minimum of 8 weeks. To maintain results, continue daily usage with Skin Sustain routine. |
| When should I see results? | Results depend on your skin's starting state. With daily use, you may see improvements in about 8 weeks. See "LEDS AND HOW THEY WORK " for more information on the biology of your skin when treated with LEDs. |
| How do I travel with the mask? | Please make sure to use a power adapter usable in the country you are travelling in. The mask uses a lithium-ion battery rated at 2.35Ah, 16.92Wh. If you are travelling by air, the battery should be carried in carry-on baggage and not checked in. The device must be completely switched off. |
| Whom can I contact for support? | Should you have any questions or issues with your mask, please contact us by visiting sharkbeauty.co.uk |
| Is the battery removable? | No, the battery is not removable or replaceable. Should you have any questions or issues with the battery, please contact us by visiting sharkbeauty.co.uk |
| What happens if I miss a day? | Consistency is key for best results. However, don't be discouraged, just pick up where you left off. |
To see our full list of FAQ's please visit sharkbeauty.co.uk
TROUBLESHOOTING
The device does not power on
| Possible cause | Corrective action |
| Battery level low | Charge the device using the provided USB-C cable. |
| Device still will not power on | Long-press the dial button. If device still will not turn on, please contact visit support.sharkbeauty.co.uk. |
The battery will not charge
| Possible cause | Corrective action |
| Possible defective battery | Please visit support.sharkclean.co.uk. |
| Defective charging cable | Please visit support.sharkclean.co.uk or replace with a Shark USB-C cable and adapter. |
The battery takes more than 3 hours to charge
| Possible cause | Corrective action |
| Wrong power adapter | Make sure to use a 220-240V power adapter. |
Report any adverse events or issues to customer support at support.sharkclean.co.uk. We monitor safety and performance continually and address any reported issues to maintain high safety standards.
The chill pads do not power on
| Possible cause | Corrective action |
| Battery level low | Battery level too low to power the chill pads. Please charge the device using the provided USB-C cable. |
| The ambient temperature is too high or too low | Turn off the device and let sit for 90 seconds before turning back on. If issue still occurs, stop use and contact visit support.sharkclean.co.uk. |
| Chill pads still do not power on | Please visit support.sharkclean.co.uk. |
The cooling fans keep running after the session ends
| Possible cause | Corrective action |
| Device is powering down | Wait 60 seconds for the device to power down after the end of your cooling session. |
The chill pads are digging into my under-eye area
| Possible cause | Corrective action |
| The straps are not properly placed/fitted on your head | Revisit the "Fitting the Mask " section of this User Guide for step-by-step instructions. The chill pads should only lightly contact your under-eye area. |
ERROR MESSAGES
| Error message | Solution |
| Remote Over Temperature. Let remote cool down before using. | Let remote cool down before using. The mask should not be used in temperatures higher than 86°F (30°C). |
| Remote Under Temperature. Let remote warm up before using. | Let remote warm up before using. The mask should not be used in temperatures lower than 32°F (10°C). |
| Remote error A3. Call Customer Service. | Call Customer Service. |
| Charger not recognised. | Use the provided Shark USB-C charging cable and wall plug to charge the mask. |
| Remove remote from charger. | The mask's battery is charged; remove it from the charger. |
| Low Battery. Charge before use. | The mask's battery is low; please charge it. |
| Battery error B1. Call Customer Service. | Call Customer Service. |
| Remote error B2. Charge the remote before next use. | Charge the remote before next use using the provided Shark USB-C charging cable and wall plug. |
| Charging error C1. Disconnect and reconnect to charge. | Disconnect and reconnect the remote to charge using the provided Shark USB-C charging cable and wall plug provided. |
| Fan error F1. Call Customer Service. | Call Customer Service. |
| Error A1. Call Customer Service. | Call Customer Service. |
| Error A2. Call Customer Service. | Call Customer Service. |
MANUFACTURER'S GUARANTEE
How can I claim under the free Shark guarantee?
Contact our customer service helpline on 0800 862 0453. For service hours please visit our website under 'Contact Us'. It's free to call, and you'll be put straight through to a Shark representative.
You'll also find online support at https://support.sharkclean.co.uk/.
Where can I buy genuine Shark spares and accessories?
Shark spares and accessories are developed by the same engineers who developed your Shark skincare appliance. You'll find a full range of Shark spares, replacement parts and accessories for all Shark machines at www.sharkclean.co.uk. Please remember that damage caused by the use of non-Shark spares and accessories will not be covered under your guarantee.
Documents / Resources
References
![sharkbeauty.co.uk]() Shark Beauty | Hair Tools & Personal Care Products
Shark Beauty | Hair Tools & Personal Care Products![support.sharkbeauty.co.uk]() Shark Beauty | Hair Tools & Personal Care Products
Shark Beauty | Hair Tools & Personal Care Products![www.sharkclean.co.uk]() Shark UK Official | Vacuums, Steam, Air Purifiers & Beauty
Shark UK Official | Vacuums, Steam, Air Purifiers & Beauty
Download manual
Here you can download full pdf version of manual, it may contain additional safety instructions, warranty information, FCC rules, etc.
Advertisement


Need help?
Do you have a question about the CryoGlow and is the answer not in the manual?
Questions and answers