Master P / A Series, MAS-L024, MAS-L030, MAS-L040 Manual
- Owner's manual (31 pages)
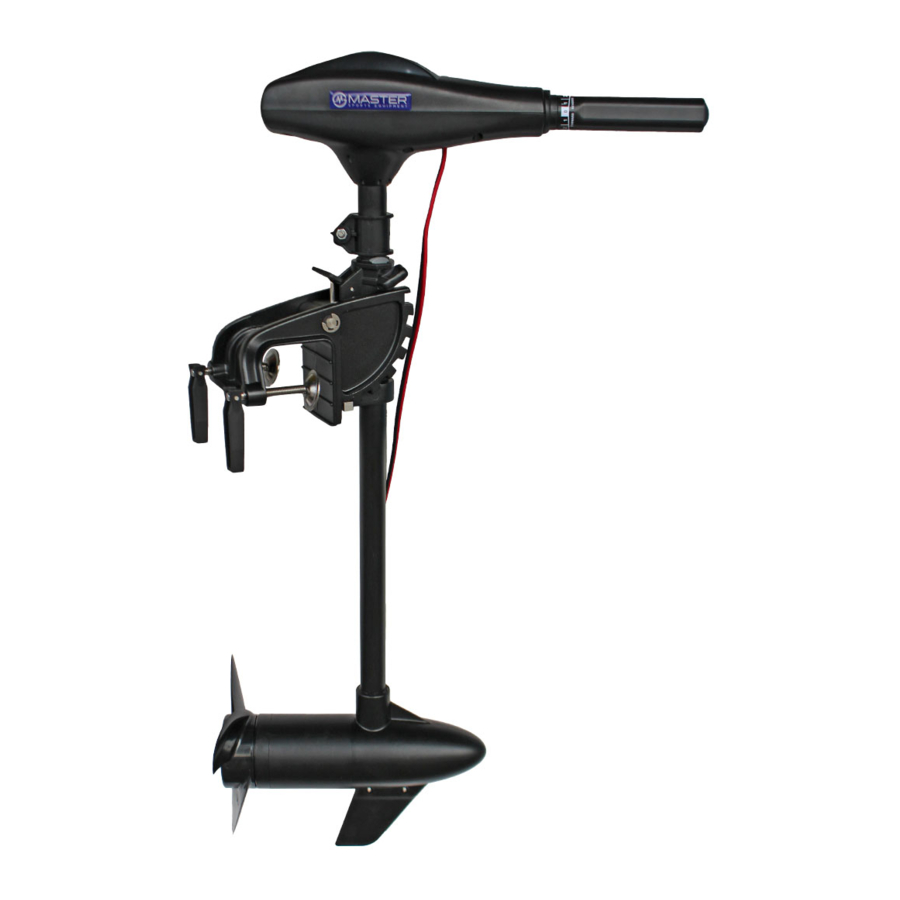
Advertisement
- 1 GENERAL INFORMATION
- 2 WIRING AND BATTERY RECOMMENDATION
- 3 SAFETY INFORMATION
- 4 FIRST TIME RUNNING
- 5 ATTACHING THE MOTOR TO YOUR BOAT
- 6 DEPTH ADJUSTMENT
- 7 STEERING
- 8 REPLACE THE PROPELLER
- 9 SPEED CONTROL
- 10 ADJUSTING THE TILT/EXTEND TILLER (ONLY FOR A SERIES)
- 11 TROUBLESHOOTING
- 12 MAINTENANCE
- 13 STORAGE
- 14 Documents / Resources
GENERAL INFORMATION
Thank you for purchasing our product and wish you will enjoy it.
The trolling motors are designed and developed by professional engineering teams. With years of efforts. The power of trolling motor has widely covered from 24LBS to 86LBS in order to fit various costumers' requirements and provide different experiences. Please read and retain this manual before using this electrical motor. The manual contains information that describes the procedure for safe operation and daily maintenance of your trolling motor. Safe operation will prevent from personal injury and product damage.
WIRING AND BATTERY RECOMMENDATION
Battery Type
Recommended battery(s): 12-volt Deep Cycle battery or Marine battery (24-volts for 86lbs), battery should has at least 50-ampere hour rating or higher. To extend running time an additional battery can be used. See section on battery connection method.

Be sure switch are in the OFF position before connecting to battery or batteries.
Electrical arcing near the battery could ignite hydrogen gas and cause the battery to explode.
SAFETY INFORMATION
Do not allow children to operate the trolling motor.
Do not modify the unit in any way or add accessories not intended for this product.
Never fully submerse the unit, if unit is accidentally submersed disconnect battery and leave to dry.
Always disconnect power from the motor when replacing propeller, removing debris around the prop, charging batteries, transporting boat or when the motor is not in use.
FIRST TIME RUNNING
BATTERY CONNECTION METHOD
Before connecting the motor's cables to the battery terminals, ensure all switches are in the OFF position and stand clear of the propeller. Connect the red cable to the positive (+) terminal and the black cable to the negative (-) terminal, making sure the terminals are clean before doing so. A clean connection will minimize power wastage and give you maximum power from the battery. (A)

The battery should be kept in a well-ventilated location. We recommend using a special deep cycle marine battery for optimum performance.
ATTACHING THE MOTOR TO YOUR BOAT
Attach the motor to the stern of the boat and tighten both mounting bolts securely while taking care not to over-tighten.
To adjust the angle of the motor after attachment, hold the motor head with one hand and depress the positioning pin at the top of the mounting bracket with your other hand.
Press and hold the positioning pin until the desired angle has been reached next release the pin and ensure the mechanism locks securely. (B)

Before the installation, Make sure the area between column and bracket is clear.
DEPTH ADJUSTMENT
Hold the motor shaft with one hand, loosen the depth adjustment screw and set the motor to the desired depth, then retighten the adjusting screw securely. (C)

STEERING
To adjust steering counter-force, simply loosen or tighten the counter force bolt. The ideal setting is one where the counter force bolt is just tight enough so that the boat will steer in the direction you are aiming without need for continual correction.

REPLACE THE PROPELLER
Hold the propeller blade and loosen the propeller knob. It can be done counter clock-wise manually without tools. Pull the propeller straight off. If prop is stuck, grasp one blade with one hand and tap on the backside of the opposite blade lightly with a rubber mallet, until the propeller comes off. If the propeller pin is bent, replace it. Align the new propeller with the propeller pin.
Re-install the propeller knob and tighten firmly by hand clock-wise. (F)

Make sure that the motor has been disconnected from batteries before replacing the propeller. Do not strike bent prop pin with hammer to remove pin. Damage to motor armature may occur that would not be covered by warranty."
Fin Instalment
Take out the plastic fin out of the accessory box. Loosen off the screws. Find the screw holes on front endbell. Keep the fin and screw holes aligned. Insert the fin and re-tighten the screws.
Make sure the screws are properly tightened to prevent the fin from loosening. (G)

Handle Instalment (ONLY FOR P SERIES)
Find on the aluminium pipe the sticker securing the marble and carefully tear it off. Keep the handle aligned with the aluminium pipe.
Adjust the direction in accord with the plastic part on top of the aluminium pipe.
Adjust the angle to push in the aluminium pipe to the handle. Lightly press down the marble to get through the handle. Once hear the "click" and push the handle to the end, means the handle fully in place.
 Note: This is a one-way instalment. Once installed, DO NOT attempt to pull out the handle again, or the self-locking unit can be damaged. (H)

SPEED CONTROL
The speed control, featuring five forward and three reverse speeds, is integrated into the handle. Turn the handle clockwise to move forward and anti-clockwise to go backwards. When you don't want to move, set the handle into neutral. No power will be used in this setting. (D)

Remember always disconnect from batteries once the motor leaves water as a rotating propeller can cause personal injury. Remember to wash the motor by using fresh water after used it in salt water as it can greatly reduce the possibility of corrosion.
ADJUSTING THE TILT/EXTEND TILLER (ONLY FOR A SERIES)
Your trolling motor features 7 usable handle tilt positions: 45°, 30°, and 15° up and down from the 0° (horizontal) position. To use the down positions, you must first press the release button located on the left underside of the pivot handle. Your trolling motor handle also features a unique stow position, that is useful for limiting the amount of space required for storage or travel.

BEFORE attempting to put the handle in the stowed position, the speed selector must be in the OFF/STOW position. Failure to do so will damage the internal mechanism.
First press the release button located on the left underside of the pivot handle, then push the handle down until you feel the handle "lock in" to the stowed position. This will be almost parallel to the motor shaft.
To extend the handle, pull the handle towards you to the desired position. The handle will extend a full 6 inches. To retract, push the handle in until it meets the face of the motor control head. (E)

(E)
TROUBLESHOOTING
POSSIBLE CAUSE/SOLUTION
Speed loss
- Check for line or weed on propeller.
- Check battery status.
- Check terminals on battery.
Motor noise/shake
- Check propeller for line or weed.
- Check to see propeller is secure and not damaged.
- Check shaft to ensure it is not bent. Detach propeller and run motor visually to ensure shaft is not shaking. If the shaft is damaged, contact your retailer.
Loss of speed setting
- Check all wiring connections.
- Switch in motor may be burned, contact your retailer.
Tight steering
- Loosen counter-force screw, apply lubricant and readjust.
MAINTENANCE
At the end of the day, wipe the motor down with a cloth soaked in warm water and then rinse unit with light spray from hose. Always check the propeller is clear of line or weed, regularly check all nuts, bolts and screws and lubricate all moving parts with an aerosol lubricant. Clean terminal connections regularly and check for frayed wires or loose connections.
STORAGE
When storing the motor, lubricate all moving parts and screws and store in a well-ventilated, dry area. Do not leave the motor outside in winter for long periods, as this will damage the permanent magnet in the unit.
WARRANTY
The product is warranted for 24 months following the date of delivery to the original purchaser.
Documents / ResourcesDownload manual
Here you can download full pdf version of manual, it may contain additional safety instructions, warranty information, FCC rules, etc.
Download Master P / A Series, MAS-L024, MAS-L030, MAS-L040 Manual
Advertisement


Need help?
Do you have a question about the P Series and is the answer not in the manual?
Questions and answers