Table of Contents
Advertisement
To learn more about DELTA MACHINERY
visit our website at: www.deltamachinery.com.
For Parts, Service, Warranty or other Assistance,
1-800-223-7278 (
please call
6" Abrasive Belt
Finishing Machine
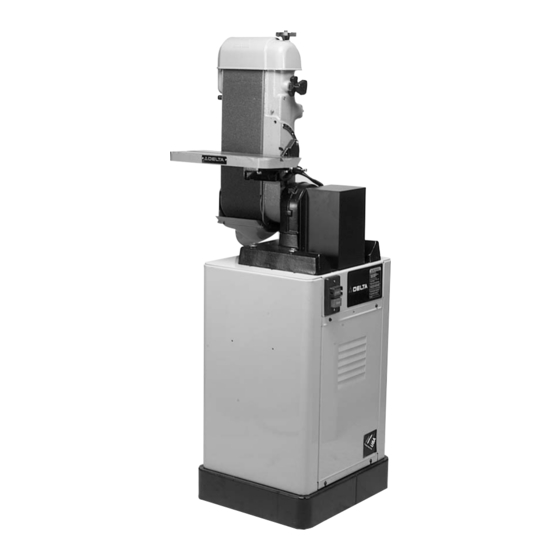
6" Abrasive Belt Finishing Machine
shown with optional enclosed steel
stand and electricals.
1-800-463-3582).
In Canada call
(Model 31-552)
PART NO. 406-03-651-0017 (0110)
Copyright © 2001 Delta Machinery
Advertisement
Table of Contents

Related Manuals for Delta 31-552


Summary of Contents for Delta 31-552
- Page 1 To learn more about DELTA MACHINERY visit our website at: www.deltamachinery.com. For Parts, Service, Warranty or other Assistance, 1-800-223-7278 ( please call 6" Abrasive Belt Finishing Machine (Model 31-552) 6" Abrasive Belt Finishing Machine shown with optional enclosed steel stand and electricals.
-
Page 2: General Safety Rules
If you have any questions relative to a particular application, DO NOT use the machine until you have first contacted Delta to determine if it can or should be performed on the product. - Page 3 ADDITIONAL SAFETY RULES FOR ABRASIVE BELT FINISHING MACHINES WARNING: FAILURE TO FOLLOW THESE RULES MAY RESULT IN SERIOUS PERSONAL INJURY DO NOT OPERATE THIS MACHINE UNTIL it is assembled and installed according to the instructions. OBTAIN ADVICE from your supervisor, instructor, or another qualified person if you are not familiar with the operation of this machine.
-
Page 4: Power Connections
IMPORTANT: Make sure the electrical characteristics are the same between the motor nameplate and the power source and make sure the power circuit the machine will be used on is properly fused and that wire size is correct. IN ALL CASES, MAKE SURE THE RECEPTACLE IN QUESTION IS PROPERLY GROUNDED. WARNING: DO NOT EXPOSE THE MACHINE TO RAIN OR OPERATE THE MACHINE IN DAMP LOCATIONS. -
Page 5: Extension Cords
OPERATING INSTRUCTIONS FOREWORD The Delta 6" Abrasive Belt Finishing Machine provides fine finishes fast. The 6" abrasive belt operates vertically, horizontally or any angle in between. The support table on the 6" Abrasive Belt Finishing Machine tilts 45° out and 20°... - Page 6 STAND AND ELECTRICALS If you purchased your machine with the optional steel stand and electricals, the stand is shipped as shown in Fig. 2. The switch (A) Fig. 2 and motor (B) Fig. 3 are completely assembled to the stand and the necessary wiring from the motor to the switch has been completed.
-
Page 7: Adjusting Belt Tension
ASSEMBLING BELT AND ADJUSTING BELT TENSION DISCONNECT MACHINE FROM POWER SOURCE Using a straight edge (A) Fig. 6, make certain the motor pulley (B) is aligned with the arbor pulley. If necessary, the motor pulley (B) can be adjusted on the motor shaft by loosening set screw (C) and moving the motor pulley (B) in or out as needed. -
Page 8: Operating Controls And Adjustments
OPERATING CONTROLS AND ADJUSTMENTS STARTING AND STOPPING THE ABRASIVE FINISHING MACHINE To start the machine, push “ON” button (A) Fig. 10. To stop the machine, push “OFF” button (B). LOCKING SWITCH IN THE “OFF” POSITION IMPORTANT: When the machine is not in use, the switch should be locked in the OFF position using a padlock (A) Fig. -
Page 9: Adjusting Table
Fig. 15 ADJUSTING TABLE DISCONNECT MACHINE FROM POWER SOURCE. To tilt the table, loosen the table tilting handle (A) Fig. 15, move the table to the desired angle, and tighten the table tilting handle. The table tilting handle can be reposition- ed by pulling out the handle and repositioning it on the hex nut located underneath the handle. - Page 10 INSTALLING OR REMOVING ABRASIVE BELT Your machine uses a 6"x48" belt. To install or remove the belt, proceed as follows: DISCONNECT MACHINE FROM POWER SOURCE. 1. Remove the idler drum guard (A) and side guard (B) Fig. 20. 2. Turn the belt tension handle counterclockwise to reduce belt tension to a minimum.
-
Page 11: Parts, Service Or Warranty Assistance
Delta supplies a wide range of belts for use on your Finishing Machine. These belts are recommended for a wide range of work on wood, metals, plastics and other materials. However, when a large amount of production work of one kind is to be done, it is best to call in a coated abrasive specialist for specific recommendations. - Page 12 Parts and accessories for Porter-Cable ·Delta products should be obtained by contacting any Porter-Cable·Delta Distributor, Authorized Service Center, or Porter-Cable·Delta Factory Service Center. If you do not have access to any of these, call 800-223-7278 and you will be directed to the nearest Porter-Cable·Delta Factory Service Center. Las Estaciones de Servicio Autorizadas están ubicadas en muchas grandes ciudades.
Need help?
Do you have a question about the 31-552 and is the answer not in the manual?
Questions and answers