Advertisement
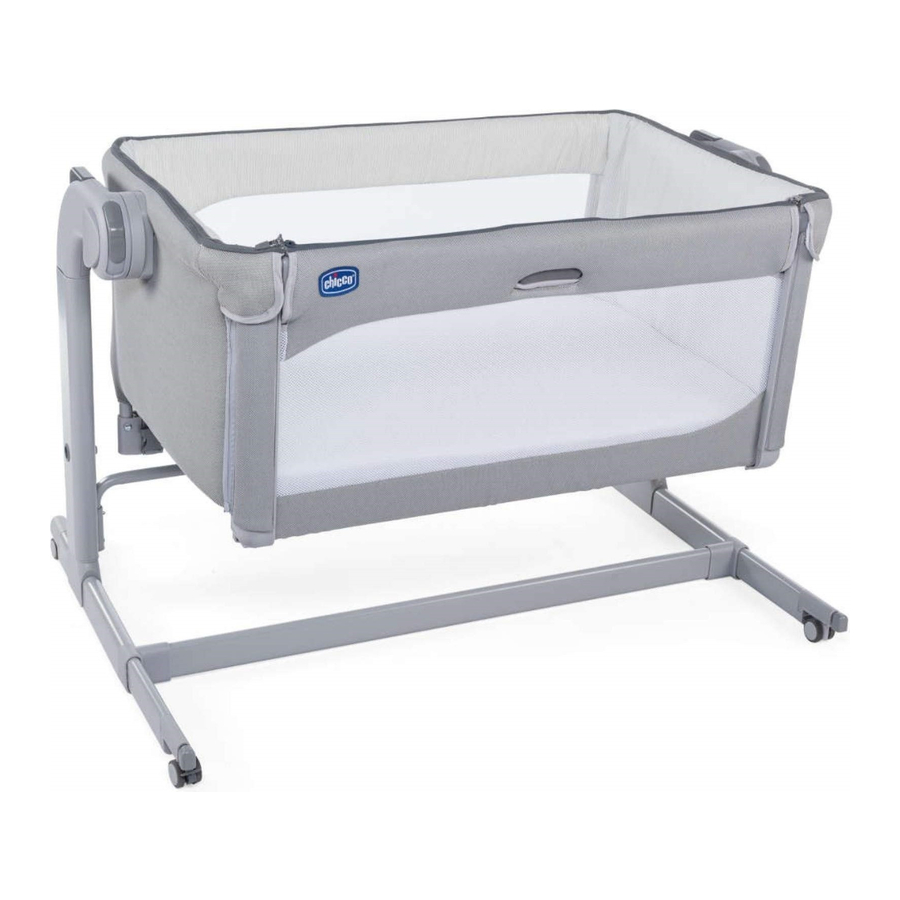
COMPONENTS
- Leg rest with wheels
A1. Height adjustment button
![]()
A2. Rocking function button

A3. Height indicator
A4. Telescopic foot release button
A5. Telescopic feet
A6. Wheels with brakes
A7. Central support structure slot
A8. Bottom bar slots
A9. Upper structure fastening support
A9.1. Upper structure release button - Bottom bar

- Central support structure

- Crib structure

D1. Fabric

D1.1 Front vertical zippers
D1.2 Upper zipper
D1.3 Fabric attachment buttons
D1.4 Side support upright openings
D2. Upper frame

D3. Structure/leg support fasteners
D4. Crib bottom
D5. Fabric attachment buttons
D6. Rear strap fastening buckle
D7. Front strap fastening buckle
D8. Mattress stopper
D9. Side tilting button
D10. Crib structure side upright fasteners - Crib structure side uprights
![]()
- Fastening straps

F1. Red crib front fastening buckle

F2. Grey crib rear fastening buckle
F3. Grey bed fastening and height adjustment buckle - Mattress with removable lining
![]()
- Bag
![]()


ASSEMBLY OF THE CRIB
- Hold the bottom support "A" and insert the lower bar "B" in the relevant slot "A8" (Fig.1), pushing the metal pin until you hear the click. Repeat the same operation for both feet.

- Now insert the central support structure "C" into the slots "A7" on both leg support, pushing the metal pin until you hear the click (Fig. 2-3).
![]()
![]()
- Hold the frame "D2" and turn the upper part of the frame by 90° (Fig.4). Repeat the same operation for the bottom of the crib "D4" (Fig. 5).

- Pass the side support uprights "E" through the openings "D1.4", on both sides of the crib (Fig.6), until they are inserted into the fasteners "D10", making sure that you have heard the click of correct installation (Fig.7).

- Close the vertical front zippers "D1.1" (Fig.8) and then the upper hinge "D1.2" (Fig.9).
![]()
![]()
- Fasten the buttons "D5" located in the upper front corners, and in the front and rear areas of the bottom of the crib (Fig.10-11-12).

![]()
- Fasten the crib structure "D" to the feet "A" inserting the uprights "E" inside the supports "A9" placed on both feet (Fig.13), until you hear the click. Be careful to position the structure D so that the tilting front panel faces in the same direction as the telescopic feet "A5".
![]()
- Insert the mattress "G" inside the crib structure "D", paying attention to orient the breathable net surface upwards (Fig.14). Make sure the mattress rests against the stopper "D7" (Fig.14A).
![]()
- Block the 4 wheels "A6" of the crib by lowering the levers that activate the brakes (fig.15). The crib is now ready to be used.
![]()


ADJUSTING THE CRIB HEIGHT
- The crib can be adjusted in 11 different heights. To adjust the height, press the buttons "A1" on the leg support "A" and lift or lower the structure "D" to the desired position (Fig.16). Release after hearing the click.
![]()
- The base of the crib can be slightly inclined by adjusting the leg supports to different heights (fig.17).
![]()
![]()
The crib can be inclined by a maximum of 4 positions between one leg support and the other (e.g., right leg support in position 5 and left leg support in position 1 (Fig. 18).
![]()
![]()
The child's head must always be positioned near the raised end (fig.19).
![]()
It is not possible to select different heights on the two sides of the crib when in rocking configuration.
![]()


ROCKING FUNCTION ACTIVATION
- You can activate the tilting function by pushing down the buttons "A2" on the leg supports "A" (Fig.20). To deactivate the function, return the buttons "A2" to their original position, pushing them upwards.
![]()
If the crib has been used previously in "Side sleeping configuration (fastened to the bed)," make sure that the side is in locked position and check that it is engaged correctly.
![]()
Always remember to deactivate rocking configuration when using the product in "Side sleeping (fastened to the bed)" or when the child is unattended.
![]()
It is not possible to select different heights on the two sides of the crib when in rocking function.
![]()

SIDE SLEEPING CONFIGURATION (FASTENED TO THE BED)
It is possible to fasten the crib to the parents' bed (side sleeping configuration).

IMPORTANT FOR YOUR CHILD'S SAFETY: This configuration is allowed only with beds that allow compliancy with all the conditions described in this paragraph.
In particular, the LOWERED side of the crib must always be positioned against the mattress of the parents' bed and the parents' mattress must be aligned with the height of the crib's side (fig.21). Moreover, the crib must be fastened to the structure of the parents' bed or to the mattress support (mesh or slat sprung base).

Check that the structure of the crib in side sleeping configuration does not interfere with the parents' bed.
During use, make sure that the bedsheets, blankets, etc. do not interfere with the crib's space.
- Lower the side of the crib by pushing button "D9" and accompanying the side until it reaches the end of its travel (Fig.22).
![]()
Use the crib with the side lowered only in side sleeping mode, (fastened to the bed).
![]()
- Put the crib against the parents' bed and check its height compared to the parents' mattress (Fig. 23).
![]()
The height of the parents' mattress must be higher than or the same as that of the side of the crib, (fastened to the bed). If this is not the case, use the adjustment system to achieve this condition on both sides.
![]()
In side sleeping configuration, the 2 leg supports of the crib must be set at the same height.
![]()
- To fasten the crib to the parents' bed (side sleeping configuration), use the pair of supplied straps "F".
- Carefully release the buckles "D6" and "D7" by pushing them slightly upwards and then pulling them out (Fig.24).
![]()
- Fasten the grey buckles "F2" to the buckles "D6" located in the rear part of the bottom of the crib "D4" (Fig.25).
![]()
- Fasten the red buckles "F1" to the buckles "D7" located in the front part of the bottom of the crib "D4" (Fig.26).
![]()
- Then pass the straps around the parents' bed structure from top to bottom (Fig.27) and fasten the grey buckles "F3" to form a loop (Fig.28). Make sure to repeat the step on both sides. To make installation easy, when fastening the buckles, always keep the crib slightly away from the parents' bed.

- At this point put the crib against the parents' bed and tighten the noose pulling the straps (fig.29). Carry out this step first on one side and then on the other, adjusting the straps until the crib is in contact with the parents' mattress.
![]()
Before use, always make sure that there is no space between the parents' mattress and crib's side. Otherwise adjust the straps pulling them until the required condition is restored. Make sure that the side is always free to be lowered and raised completely.
![]()
- Lock the crib's wheels.
If when fastening the crib to the parents' bed it is not possible to fit the crib's feet under the parents' bed, the crib can be fastened anyway by the following the instructions above and retracting the telescopic feet "A5" when putting the crib against the bed.
To activate retraction, simply push the crib towards the bed so that the release buttons "A4" (Fig.30) are activated, retracting the feet as much as necessary to install the crib correctly.
![]()
- To close the side, simply lift it upwards, holding it from the centre (Fig.31). Always make sure that it is engaged correctly.
![]()
Whenever the side is lowered, make sure that the position compared to the parents' mattress has not changed from that illustrated in the paragraphs above.
![]()
Never use the rocking function when the crib is in "Side sleeping configuration (fastened to the bed)."
![]()
Use the product with beds and/or mattresses with straight sides only. Do not use the product with round beds and/or mattresses or water mattresses.
![]()
When the product is used in "Side sleeping configuration (fastened to the bed)," it must always be mounted on the long side of the bed. DO NOT install the product at the head or feet of the bed.
![]()


CARE AND MAINTENANCE
The crib and mattress have a resistant fabric lining that can be removed completely and washed.
To remove the fabric, follow the instructions in the paragraph "HOW TO REMOVE THE FABRIC COVER."
Covering or removing the fabric may take a few minutes and must be carried out by an adult.
Regularly inspect the crib for signs of wear and any damage. In the case of damage do not use and keep out of reach of children.
When washing the fabrics pay close attention to the instructions on the label.
Do not use solvents, abrasive or overly aggressive products.
 | Hand wash in cold water |
 | Do not bleach |
 | Do not tumble dry |
 | Do not iron |
 | Do not dry clean |
Check that the fabric and the stitching are in good condition after each wash.
When covering or removing the cover, take care when handling the fabric parts so as to avoid accidental tears or damage.
The fabric part of drop side cannot be removed. Do not open the zipper.
MAKING THE BED
It is possible to unfasten the crib from the parents' bed when making the bed. Just unfasten the grey buckles under the fabric lining.
When fastening the crib again to the parents' bed, pull the straps again to make sure that the crib is correctly and securely fastened to the parents' bed. Make sure that all the steps illustrated above in "Side sleeping configuration (fastened to the bed)" have been completed.
REMOVING THE COVER
- Remove the mattress.
- Release the crib structure "D" from the feet "A" by pushing the buttons "A9.1" and pulling it upwards (Fig.32).
![]()
- Open the 3 zippers "D1.1" and "D1.2" on the fabric.
- Release the fastening buttons "D1.3."
- Remove the side support uprights "E" by pushing on the appropriate tabs (Fig.33) and operating on the pins in the upper fasteners to remove them from the fabric.
![]()
- You can now remove the lining.


DISASSEMBLING THE CRIB
The crib can be disassembled completely to put it away in the supplied bag. In order to complete the disassembly of the crib after removing the fabric, remove the bottom bar "B" and the central support structure "C" by repeating the steps illustrated in "ASSEMBLY OF THE CRIB."

Safety

RETAIN FOR FUTURE REFERENCE - READ CAREFULLY.
TO AVOID DANGER OF SUFFOCATION REMOVE THIS PLASTIC COVER BEFORE USING THE PRODUCT. THIS COVER SHOULD BE DESTROYED OR KEPT AWAY FROM BABIES AND CHILDREN.
![]()
This product is intended for use by children of 0 to 6 months (weighing up to 9 kg).![]()
When a child is able to sit, kneel or to pull itself up, the product must not be used anymore for this child.![]()
Do not use the product when any part is broken, torn or missing.![]()
DO NOT USE the crib if any part is missing, damaged or broken. Contact Artsana SPA for spare parts and user instructions if needed. Do not replace missing, damaged or broken parts with non-OEM components or components not approved by Artsana SPA.![]()
Read the instructions for use for the list of components. Examine the product regularly to make sure that there are no loose, damaged or missing parts.![]()
Always use all parts needed for each configuration of use.![]()
To avoid the risk of fire, do not place the product near electric bar fires, gas fires and other sources of heat.- Before assembly, check that the product and all of its components have not been damaged during transportation. Should any part be damaged, do not use it and keep it out of reach of children.
- Make sure that the adult using the product knows how to operate in accordance with manufactures instructions.
![]()
The product is ready for use only when the locking mechanisms are engaged. Make sure they are securely fixed before use.![]()
When your child is unattended in the product in "stand alone", always make sure that the side is raised and locked in closed position, and aligned with the upper perimeter of the crib.- When the product is being used, and above all in "stand alone", the wheels must always be locked.
- All operations for opening, adjusting, fastening and positioning the product must be carried out by an adult.
- Before using in "Side sleeping configuration (fastened to bed)," make sure the product is fastened and positioned correctly.
![]()
To prevent the risk of trapping the child's head, the crib in "Side sleeping configuration (fastened to the bed)" must be duly fastened to parents' bed according to the instructions for use with the fastening straps.![]()
When the product is used in "Side sleeping configuration (fastened to the bed)," before laying down your child, make sure that the fastening straps are fastened and tightened correctly, the product must be fastened to the bed frame /structure of the parent's bed and there must be no gaps between the product and the mattress of the parents' bed. DO NOT use the product if there are any gaps.- Do not fill any spaces or gaps between the parents' mattress and the crib with pillows, blankets, bedsheets or any other material that may cause the risk of suffocation.
![]()
To avoid all risks of strangulation, on the top edge of the side of the crib in contact with the parents' bed, the top edge of the lowered side of the crib must not be higher than the upper surface of the parents' mattress.- The product must always be placed on a horizontal surface. Never leave the product on a sloping surface with your child inside.
- Unattended children must not be left to play near the product.
- Do not use the product without the frame.
- Keep the fastening straps out of reach of children.
- Only use the mattress provided with the product or replacement mattresses approved by Artsana.
![]()
Do not use more than one mattress in the crib. Only use the mattress supplied with the crib.![]()
Only use the mattress sold with the crib. Do not add a second mattress, choking hazard.- Infants can suffocate on soft bedding. Avoid placing pillows or similar items under newborn babies for additional comfort during sleep.
- Use the crib in "Side sleeping configuration (fastened to the bed)" only with beds of the size indicted in the reference figure at the beginning of the manual.
- Do not leave anything inside the product that might reduce its depth.
- To prevent the child being trapped, do not place the crib close to walls or obstacles.
- Do not leave any small objects inside the product that might be swallowed.
- Only use spare parts approved by the manufacturer. Do not attach any accessories to the product that have not been supplied by the manufacturer.
- Do not make adjustments to the product when the child is in it.
- Do not use the rocking function if the child is unattended in the crib. Lock the crib in locked position whenever the child is unattended.
- Do not use the rocking function when the crib is in "Side sleeping configuration (fastened to the bed)."
- Do not move the product when the child is inside.
- Do not use the product with more than one child at a time.
- The product must be kept away from electrical cables and cords: do not position close to windows where cords, curtains or similar could pose a suffocation or choking hazard. To avoid all risks of strangulation, never give children objects with cords or strings attached, or leave them within their reach.
- Prolonged exposure to direct sunlight may cause the product colours to fade. After prolonged exposure of the product to high temperatures, wait a few minutes prior to putting your child in it.
- All components must be firmly fixed in place at all times; also make sure that there are no open zippers or buttons, as body parts or clothing of the child may get caught (strings ties ribbon, necklaces, pacifier chains, etc.), causing a hazard of strangulation.
- Keep the product out of reach of children when it is not in use.
![]()
The lower fabric panel is not a glove compartment: never insert or place any object or weight on top of it to avoid compromising the product's function.
Documents / ResourcesDownload manual
Here you can download full pdf version of manual, it may contain additional safety instructions, warranty information, FCC rules, etc.
Advertisement

Need help?
Do you have a question about the Next2ME Magic and is the answer not in the manual?
Questions and answers