Pioneer AVIC-D1 Hardware Manual
Double-din dvd navigation system
Hide thumbs
Also See for AVIC-D1:
- Service manual (276 pages) ,
- Operation manual (133 pages) ,
- Installation manual (54 pages)
Table of Contents
Advertisement
Quick Links
Advertisement
Table of Contents

Subscribe to Our Youtube Channel
Related Manuals for Pioneer AVIC-D1


Summary of Contents for Pioneer AVIC-D1
- Page 1 Hardware Manual ENGLISH DOUBLE-DIN DVD NAVIGATION SYSTEM AVIC-D1...
-
Page 3: Introduction
Introduction Manual Overview Terminology Before moving on, take a few minutes to read the This manual mainly describes hardware-related following information about the conventions information such as the part names of the Navi- used in this manual. Familiarity with these con- gation System or precautions for use. -
Page 4: Table Of Contents
MP3 additional information 19 Safety Information 4 WMA additional information 19 Precaution 4 WAV additional information 20 After-sales service for Pioneer products 6 About folders and MP3/WMA/WAV files 20 Product registration 6 Ambient conditions for playing disc 21 Upgrade DVD Map Disc 6... -
Page 5: Important Safety Information
Upgrade DVD Map Discs are available for pur- instructions. chase through your local Pioneer dealer. ❒ Never use this Navigation System to route to ❒ Never use headphones while driving. hospitals, police stations, or similar facilities in an emergency. -
Page 6: Notes Before Using The System And Additional Safety Information
Notes Before Using the System • Never set the volume of your Navigation Sys- tem so high that you cannot hear outside traf- and Additional Safety Informa- fic and emergency vehicles. tion • Protect this product from moisture. • If the battery is disconnected or discharged, the memory will be erased and must be repro- Information to User grammed. - Page 7 To ensure safe driving To avoid battery exhaustion Be sure to run the vehicle engine while using this unit. Using this unit without running the engine can result in battery drainage. • To avoid the risk of accident and the potential violation of applicable laws, this unit should never be used while the vehi- cle is being driven except for Navigation...
-
Page 8: After-Sales Service For Pioneer Products
L3R OP2 You can use discs intended for this Navigation 1-877-283-5901 System. Use only discs approved by Pioneer. For warranty information, please see the Limited ➲ For details on other discs ➞ Page 18 Warranty sheet included with your product. -
Page 9: About The Wma Logo
ADPCM recordings). CD loading slot indicates that the Satellite Radio NTSC compatibility Tuner for Pioneer (i. e., XM tuner and Sirius satel- This unit is NTSC system compatible. When con- lite tuner which are sold separately) can be con- necting other components to this unit, be sure trolled by this unit. -
Page 10: About The Xm Navtraffic Logo
About the XM NAVTRAFFIC For Viewing LCD Comfortably Logo Due to its construction, the view angle of the LCD screen is limited. The viewing angle can be increased, however, by using BRIGHTNESS to adjust the black density of the video. When using for the first time, adjust the black density in accordance with the viewing angle to adjust for Required $12.95 basic monthly XM radio sub-... - Page 11 ❒ If you have connected other equipment (for example, a TV tuner) to this Navigation Sys- tem, be sure to reset that equipment too. ❒ After completing connections or when you want to erase all memorized settings or return the unit to its initial (factory) settings except for some navigation items, switch your engine ON or set the ignition switch to ACC ON before pressing RESET button.
-
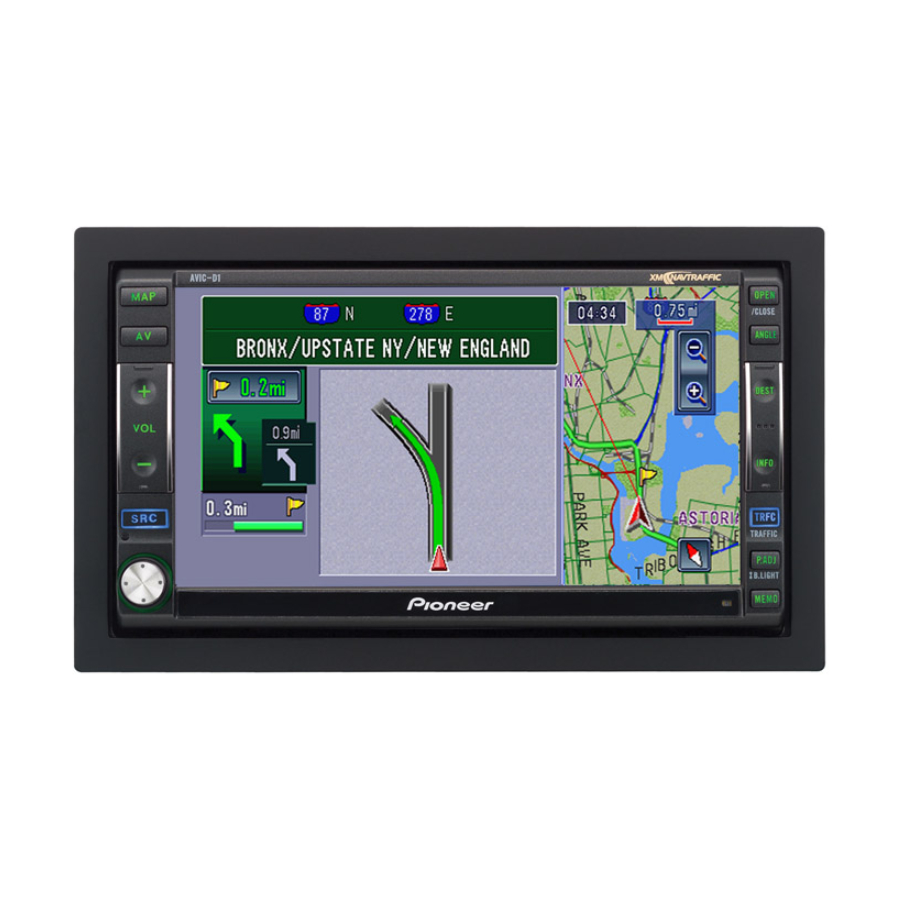
Page 13: How To Use Navigation Unit And Names Of The Parts
Chapter 1 How to Use Navigation Unit and Names of the Parts Navigation Unit This section gives information about the names of the parts and main features using the buttons. ❒ For more detail operation, functional limitations, please refer to the Operation Manual. (1) MAP button (2) AV button Press to view the map or return to guidance. - Page 14 (4) SRC (SOURCE) button (13) MEMO button This unit is turned on by selecting a source. Press When the XM tuner (GEX-P10XMT) is con- to cycle through all of the available sources. nected and the XM source is selected*: Press and hold to turn the source off. Press and hold this button to memorize the track currently being played.
-
Page 15: Turning The Unit On And Selecting A Source
❒ External unit refers to a Pioneer product (such Turning the Unit On and Select- as one available in the future) that, although ing a Source incompatible as a source, enables control of basic functions by this unit. Two external units can be controlled by this unit. -
Page 16: Inserting/Ejecting A Disc
❒ When a disc is already loaded in the CD Inserting/Ejecting a Disc loading slot, select the CD source by pressing SRC button. ❒ You can use AV button to switch between • Do not use with the LCD panel left open. If navigation map displays and audio operation LCD panel is left open, it may result in displays. -
Page 17: Inserting The Dvd Map Disc
Inserting the DVD Map Disc Ejecting the DVD Map Disc Press and hold OPEN/CLOSE button. Press and hold OPEN/CLOSE button. The LCD panel fully opens, and the DVD-ROM The LCD panel fully opens. loading slot appears. Press DVD-ROM EJECT button. DVD-ROM loading slot The DVD Map Disc is ejected. -
Page 19: Appendix
Appendix Troubleshooting ➲ About troubleshooting other than description below ➞ Appendix of the Operation Manual Symptom Cause Action (See) No picture. The parking brake cord is not connected. Connect a parking brake cord, and apply the parking brake. The parking brake is not applied. Connect a parking brake cord, and apply the parking brake. -
Page 20: Handling And Care Of The Disc
ROM drive/CD drive to dry out and wipe any Do not use discs other than those intended for damp discs with a soft cloth to remove the this product. Use only discs approved by Pioneer. moisture. ➲ For suitable discs ➞ Page 6 •... -
Page 21: Mp3, Wma And Wav Files
MP3, WMA and WAV files • Some audio CDs contain tracks that merge into one another without a pause. When these discs are converted to MP3/WMA/WAV files Important: • When naming an MP3/WMA/WAV file, add the and burned to a CD-R/CD-RW/CD-ROM, the corresponding filename extension (.mp3, .wma files will be played back on this player with a or .wav). -
Page 22: Wav Additional Information
WAV additional information • This unit plays back WAV files encoded in Lin- ear PCM (LPCM) format or MS ADPCM format. • You can only play back WAV files in the fre- quencies 16, 22.05, 24, 32, 44.1 and 48 kHz (LPCM), or 22.05 and 44.1 kHz (MS ADPCM). -
Page 23: Ambient Conditions For Playing Disc
Touch power immediately and consult your Panel functions. The LCD screen can scratch dealer or the nearest authorized PIONEER easily. Service Station. Do not use the Navigation • Be careful not to place anything between the... -
Page 24: Keeping The Lcd Screen In Good Condition
— When the fluorescent tube reaches the end of its useful life, the LCD screen will be dark and the image will no longer be projected. If this happens, consult your dealer or the nearest authorized PIONEER Service Sta- tion. -
Page 25: Specifications
Specifications Audio Continuous power output is 22 W per channel minimum into 4 ohms, both channels driven 50 to 15,000 Hz with General no more than 5% THD. Rated power source .... 14.4 V DC Maximum power output ..50 W ✕ 4 (10.8 - 15.1 V allowable) 50 W ✕... - Page 26 Usable sensitivity....8 dBf (0.7 µV/75 Ω, mono, S/ N: 30 dB) 50 dB quieting sensitivity ..10 dBf (0.9 µV/75 Ω, mono) Signal-to-noise ratio .... 75 dB (IHF-A network) Distortion......0.3 % (at 65 dBf, 1 kHz, stereo) 0.1 % (at 65 dBf, 1 kHz, mono) Frequency response ....
- Page 27 TEL: (03) 9586-6300 PIONEER ELECTRONICS OF CANADA, INC. 300 Allstate Parkway, Markham, Ontario L3R OP2, Canada TEL: 1-877-283-5901 PIONEER ELECTRONICS DE MEXICO, S.A. de C.V. Blvd.Manuel Avila Camacho 138 10 piso Col.Lomas de Chapultepec, Mexico, D.F. 11000 TEL:55-9178-4270 Published by Pioneer Corporation.
Need help?
Do you have a question about the AVIC-D1 and is the answer not in the manual?
Questions and answers