Tone King Imperial Manual
- User manual (12 pages) ,
- Instruction manual (7 pages)
Advertisement
- 1 Features
- 2 PEDAL BOARD AMP - DIRECT OUT
- 3 EXTERNAL AMP PREAMP
- 4 POWERAMP AND IR CABINET SIMULATOR
- 5 CONNECTING THE IMPERIAL PREAMP TO YOUR HEAD OR COMBO
- 6 FRONT PANEL CONTROLS AND CONNECTIONS
- 7 REAR PANEL CONTROLS AND CONNECTIONS
- 8 TONE KING EDITOR SOFTWARE
- 9 INCLUDED IR'S
- 10 FIRMWARE UPDATES
- 11 TOP PANEL CONTROLS
- 12 SIDE PANEL CONTROLS
- 13 Safety
- 14 Documents / Resources
Features
- Two Channel High-Voltage preamp – DI
- 3 x 12AX7 preamp tubes running at proper high voltages
- Built-In zero-watt poweramp - phase inverter circuit
- Two channels with independent Volume and Attenuation controls
- Rhythm Channel (top)
- '60s-era American blackface combo tone
- Bass and Treble controls
- Lead Channel (Bottom)
- '50s-era American tweed combo and British rock tones
- Tone and Mid-Bite controls
- Spring Reverb (convolution)
- Reverb and Dwell controls o Independently assignable to each channel
- Tremolo (digital)
- Depth and Speed controls
- Independently assignable to each channel
- Stereo, Series FX loop (bypassable)
- MIDI programmable
- Save up to 128 presets for instant recall via an external MIDI switcher
- Presets save:
- Channel selection
- Master bypass setting
- IR selection
- IR bypass setting
- Effects loop bypass setting
- Reverb bypass and tails settings
- Tremolo bypass settings
- Onboard Impulse Response (IR) Technology
- Low-latency Impulse Response cabinet simulation (bypassable)
- 3-position CAB/IR select switch per channel (programmable via software)
- Included OwnHammer IRs
- Poweramp simulation with software editable HF Comp and Low-Pass filters (per channel)
Connections:
- Dual stereo balanced XLR outputs with Ground Lift Switch
- ¼" Headphone output
- Effects Send and Stereo Return Jacks
- MIDI 5-pin standard connector
- USB-C connector for use with the included Tone King Editor software editor and USB Audio Streaming from external device to Imperial onboard Headphones and DI.
- To Amp In, From Amp Send and From Amp Return Jacks – for adding Imperial channels to your amp or preamp
- Tone King Editor Software is powered by SYNERGY.
- Included
- 6' USB Cable
- Universal 12V Power Supply
- Dimensions: 7.2" (W) x 5.7" (D) x 2.75" (H)
- Weight: 1.9 lbs.
PEDAL BOARD AMP - DIRECT OUT
Use the IMPERIAL preamp as a portable pedalboard amp replacement, or with headphones at home for practicing.
You can also use the integrated DI output to directly connect the IMPERIAL preamp to your RECORDING interface, monitors or PA system.
The IMPERIAL preamp can fully replace your existing amplifier by giving you the exact same HIGH VOLTAGE tube tone without compromise.

EXTERNAL AMP PREAMP
When you feel the need to hear a 4x12 cabinet's shaking response, connect the IMPERIAL preamp's "TO AMP RETURN" to your favorite guitar amplifier's effects loop Return and feel the IMPERIAL preamp's capabilities.
You will still be able to use the internal poweramp and IR cabinet simulation for direct recording at the same time!

POWERAMP AND IR CABINET SIMULATOR
Use the IMPERIAL preamp solely as an IR Cabinet and amp simulator by simply connecting it to any other preamp. See the "CONNECTING IMPERIAL preamp TO YOUR HEAD OR COMBO" section for more information.
CONNECTING THE IMPERIAL PREAMP TO YOUR HEAD OR COMBO
The IMPERIAL preamp can be used to ADD channels to your existing head or combo. You will need three high-quality, shielded instrument cables in addition to your guitar cable. Follow these simple steps:

- Connect your guitar to the INPUT of the IMPERIAL preamp
- Connect an instrument cable from "TO AMP IN" on the IMPERIAL preamp to the INPUT of your amp.
- Connect an instrument cable from "FROM AMP FX SEND" to the FX LOOP SEND of your amp.
- Connect an instrument cable from "TO AMP FX RETURN" to the FX LOOP RETURN of your amp.
- The BYPASS switch allows you to toggle between the channels on your IMPERIAL preamp or in BYPASS mode, bypasses the IMPERIAL preamp channels and engages your amplifier's channel(s). In BYPASS mode, your amp will operate as normal. The Reverb and Tremolo effects of the IMPERIAL canstill operate on your amp channels if you wish.
You have just magically added two new channels to your amp! - Use the EFFECTS loop of the IMPERIAL (SEND and STEREO RETURN) now becomes the EFFECTS LOOP of your entire system. Use LEFT RETURN when connecting in MONO.

if placing the IMPERIAL preamp on top of a head cabinet or combo, you MUST place the IMPERIAL preamp on the opposite side of your amp's main transformer (usually the input side). Placing the IMPERIAL preamp over the mains transformer may cause noise to enter the signal chain.
There are some special requirements and/or caveats when using the IMPERIAL preamp to add channels to your amp. The loop on your amp MUST be a 100% series loop. The IMPERIAL preamp will not work with a parallel loop. If in doubt, consult the manufacturer of your amp to determine this. One known issue is with the Mesa Dual and Triple Rectifier, Road King and Roadster amps that prevents the IMPERIAL preamp from working properly in the loop. By design, the Boogie loops on these models always have a small amount of dry signal mixed in with the loop which will wreak havoc with many rack effects as well as the IMPERIAL preamp. There may be other amps that we are not aware of with loops that are not compatible.
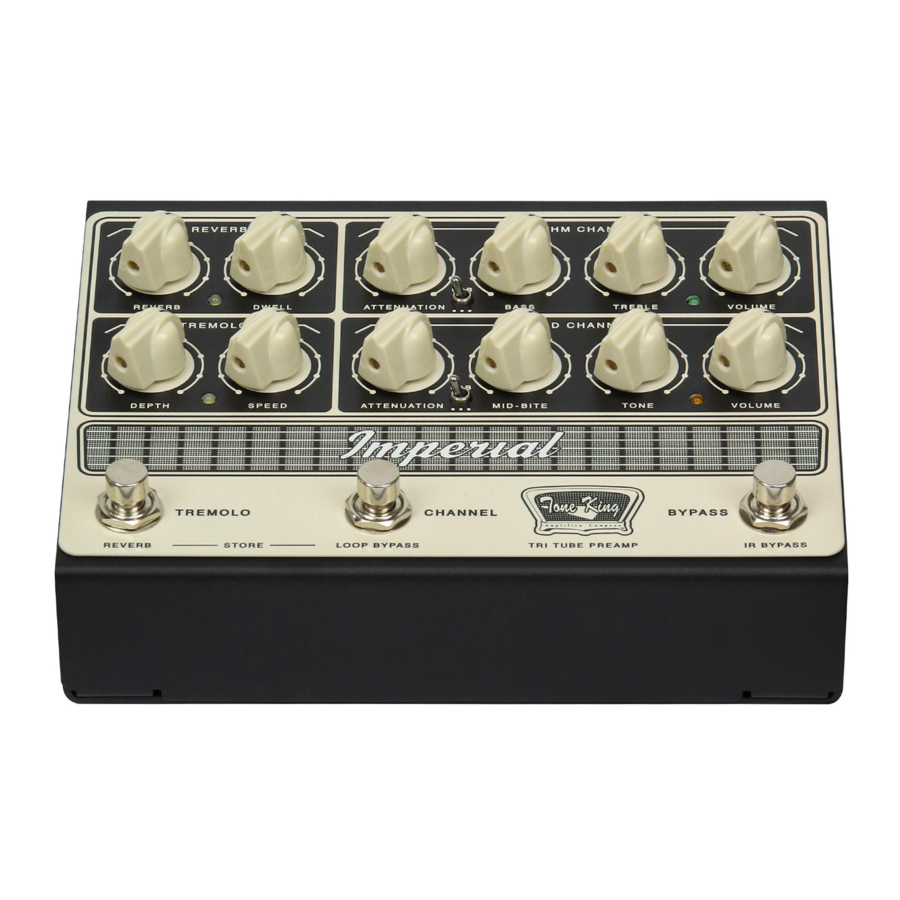
FRONT PANEL CONTROLS AND CONNECTIONS

- REVERB
- LEVEL: Mix control for the Reverb.
- DWELL: Decay time control for the Reverb.
- Long press the "TREMOLO" button to engage the Reverb. The assigned LED will let you know when the Reverb is ON or OFF.
- TREMOLO
- DEPTH: Sets the intensity of the Tremolo effect.
- SPEED: Sets the speed of the modulation. Lower settings produce a smooth, floating sound. Higher settings produce a rotor-like effect.
- Press the "TREMOLO" button to engage the TREMOLO. The assigned LED will let you know when the Tremolo is ON or OFF.
- RHYTHM CHANNEL:
- Use the CHANNEL button to toggle between the RHYTHM and LEAD channels
- CAB SWITCH: 3-Way Cabinet/IR Preset Selector.
- ATTENUATION: Determines how much the signal is attenuated after the phase inverter – poweramp simulation, use it as master volume control.
- BASS: Controls the amount of low frequencies.
- TREBLE: Controls the amount of high frequencies.
- VOLUME: Controls the volume of the Rhythm channel.
- LEAD CHANNEL:
- Use the CHANNEL button to toggle between the RHYTHM and LEAD channels
- CAB SWITCH: 3-Way Cabinet/IR Preset Selector.
- ATTENUATION: Determines how much the signal is attenuated after the phase inverter – poweramp simulation, use it as master volume control.
- MID-BITE: Transforms the basic tweed tone to more of a crunchy rock tone as the MID-BITE control is turned up. This is accomplished by simultaneously tightening up the bass, rolling off the very high frequencies, increasing the gain resulting in a pronounced upper midrange peak.
- TONE: Controls the amount of high frequency contour.
- VOLUME: Controls the volume of the Lead channel.
- TREMOLO FOOTSWITCH: Short press: Activates TREMOLO, Long press: Activates REVERB.
- CHANNEL FOOTSWITCH: Short press: Changes from RHYTHM and LEAD Channel, Long press: LOOP BYPASS.
- BYPASS FOOTSWITCH: Short press: TRUE BYPASS the preamp. In Bypass mode, the current channel indicator will PULSE. Long press: IR BYPASS. This can be used to "ADD" channels to your amp (see the "CONNECTING THE IMPERIAL preamp TO YOUR HEAD OR COMBO" section of this manual).
- STORE:
MIDI STORE: Simultaneously long press TREMOLO and CHANNEL buttons to STORE the current preset on active MIDI preset number, including CHANNEL, REVERB, TREMOLO, LOOP BYPASS and IR/CAB.
STORE RIGHT ON THE PEDAL: Select your CHANNEL and if you want the REVERB, TREMOLO, IR and LOOP to be ON or OFF for that channel and then STORE by long pressing the TREMOLO and CHANNEL buttons simultaneously. Do this for both channels. Your desired settings will now be stored on the LEAD or RHYTHM channels.
The poweramp settings including HF COMP and LOWPASS can be stored per channel via the included Tone King Editor software (powered by a SYNERGY).
REAR PANEL CONTROLS AND CONNECTIONS

- INPUT: This is the IMPERIAL preamp Guitar Input Jack. Plug your guitar or the output of your pedal board here (just as you would with your amplifier)
MASTER EFFECTS LOOP:
- SEND JACK: This is your system's master effects loop SEND - this is where you plug the your pedal board here (just as you would with your amplifier)
- SEND JACK: This is your system's master effects loop SEND - this is where you plug the INPUT of your Effect(s).
- STEREO RETURN JACKS: This is where you plug the OUTPUT of your Effect(s). Use the LEFT jack when operating in MONO. Use a high-quality shielded guitar cable.
You can turn the LOOP ON or OFF using the LOOP BYPASS switch.
- BALANCED OUTPUTS: XLR outputs used to send your IMPERIAL preamp tone straight to the mixing board or active cabinet. These outputs will have your IR and POWER AMP sim. The IR can be bypassed.
- GND LIFT: This switch enables or disables the ground connection on the BALANCED OUT to eliminate possible ground loops.
TO AMP IN, FROM AMP SEND and TO AMP RETURN - please visit the "CONNECTING THE IMPERIAL preamp TO YOUR HEAD OR COMBO" section of this manual. - TO AMP IN: Instrument true bypass output. Connect this to the input of an external preamp or guitar amplifier to expand your channels. This will only be active in BYPASS mode.
- FROM AMP SEND: Connect to the OUTPUT of an external preamp, or to the SEND of an external guitar amplifier to expand your channels. This will only be active in BYPASS mode.
- TO AMP RETURN: Connect to the RETURN of an external guitar amplifier to expand your channels. TO AMP RETURN is always active regardless of BYPASS mode.
You can also use this jack as an input of your guitar poweramp to simultaneously use the IMPERIAL preamp as DI/Record Interface and poweramp for monitoring. - HEADPHONES: Headphones connector. Always make sure to lower the master volume before wearing the headphones and slowly increase the volume to the desired level to avoid too much SPL on your ear.
NOTE: When using the IMPERIAL preamp with just a guitar and headphones, using a regular non-earthed power supply like the one supplied, there will be no connection to your house earth and your guitar will likely pick up more noise (HUM) depending on your environment. For a noise free experience, please connect the SEND, RETURN, BALANCED OUT or USB to an earthed device such as an amp, audio interface, monitor or an effects pedal. Consider using an earthed power supply if this will be your primary use case. - MIDI-IN: MIDI connector to control IMPERIAL preamp with an external midi device (Default channel is OMNI)
- USB: USB Connector for software update, IMPERIAL preamp remote programming and AUDIO streaming from an external device to IMPERIAL preamp headphones and DI output.
- DC INPUT: DC Input power connector, use 9V to 12V adapter with >= 9W power available.
TONE KING EDITOR SOFTWARE
Please visit www.toneking.com to download the Tone King Editor software.
The Tone King IMPERIAL preamp features an easy-to-use software (powered by SYNERGY) that allows you to upload your own IR'S, program all MIDI presets and MIDI functionalities, including selecting HF Comp and Low Pass filters per channel.

INCLUDED IR'S
The Tone King IMPERIAL preamp is pre-loaded with three IR'S. You can load different one, or your own, using the Editor Software.
- OH 112 Imperial TK1660 Tone King 1660 captured in a Tone King IMPERIAL 1x12 combo by Kevin Rowe of OwnHammer using Shure SM57, Neumann U87, and Royer 121 microphones through mid-late 1970's API 312 preamps.
- OH 212 Class A Blue Celestion Blue's from 1963 captured in a Vox AC30 2x12 combo by Kevin Rowe of OwnHammer using Shure SM57, Neumann U87, and Royer 121 microphones through mid-late 1970's API 312 preamps.
- OH 412 Basketweave M25 Celestion G12M-25's from 1971 captured in a basketweave 1960B 4x12 cabinet by Kevin Rowe of OwnHammer using Shure SM57, Telefunken MD421, and Royer 121 microphones through mid-late 1970's API 312 preamps.
FIRMWARE UPDATES
The IMPERIAL preamp Editor Software automatically checks for device firmware updates when using an internet connection.
DO NOT DISCONNECT OR POWER DOWN IMPERIAL PREAMP DURING A FIRMWARE UPDATE to avoid damage to your unit.
TOP PANEL CONTROLS

- CONNECTION indicates the connection status of the IMPERIAL preamp.
- REVERB TAILS Select if the Reverb tails are active or not while changing a preset or channel.
- PROGRAM CHANGE selector lets you navigate through all the 128 storable MIDI PROGRAM CHANGES available and its relative settings. This will actively interact with the connected IMPERIAL preamp and allows you to switch a preset on the device as well.
- BYPASS LOCK lets you lock the BYPASS switch when not needed, to avoid accidentally bypassing the preamp.
- MIDI CHANNEL programs the MIDI INPUT channel the IMPERIAL preamp will use. Default is OMNI mode (the IMPERIAL preamp will receive messages on all channels).
- BYPASS toggle selector to select BYPASS mode on/off
- CHANNEL toggle selector alternates between RHYTHM and LEAD channels.
- REVERB toggle selector to turn the REVERB on/off.
- TREMOLO toggle selector to turn the TREMOLO on/off.
- LOOP BYPASS toggle selector to turn the FX LOOP on/off.
- IR BYPASS toggle selector to turn the IR Cabinet simulation on/off.
SIDE PANEL CONTROLS

- STORE use to store all the changes made to each preset inside the unit. MAKE SURE TO STORE ANY CHANGE before powering down IMPERIAL preamp.
- HF COMP (PER CHANNEL) compensates for the high frequency loss caused by the attenuator.
- LOWPASS (PER CHANNEL) lets you select between 3 different levels of lowpass filtering.
- IR SELECTOR (PER CHANNEL) select one of 3 pre-loaded IR'S for the selected channel.
- IR LOADING (PER SLOT) folder button lets you load your preferred IR by simply selecting it. Supported formats are WAV 44.1K to 96K.
- PLUS button lets you access the internal library consisting of 15 OwnHammer custom IRs
- EXTRACT ALL lets you save the 15 OwnHammer custom IRs to your drive, to be used with your preferred plugin
- AUDITION button will automatically load the current displayed IR
- MIDI CC: The IMPERIAL preamp pedal supports MIDI CC commands which are listed in the "MIDI CC LIST" software.
Safety
Please keep this instruction manual for future reference and for the duration of owning this TONE KING preamp. Please carefully read and understand the instructions inside this user's manual before attempting to operate your new amp. This instruction manual includes essential safety information regarding the use and maintenance of the Pre-Amp. Take special care to heed all warning symbols and signs inside this manual and those printed on the Pre-Amp itself.

TO PREVENT FIRE OR SHOCK HAZARD, DO NOT EXPOSE THE PRE-AMP TO WATER OR MOISTURE. DO NOT OPERATE NEAR ANY WATER SOURCE
 WHAT'S THE MEANING OF THIS?
The lightning flash with an arrow triangular symbol is intended to alert the user to the presence of non-insulated "dangerous voltage" within the products enclosure, and may be of sufficient magnitude to constitute a risk of electric shock
 WHAT'S THE MEANING OF THIS?
The exclamation point triangular symbol is intended to alert the user to the presence of important operating and maintenance (servicing) instructions in the user manual accompanying this Pre-Amp!
- Read Instructions – All the safety and operating instructions should be read before this product is operated.
- Retain Instructions – The safety and operating instructions should be retained for future reference.
- Heed Warnings – All warnings on the Pre-Amp and in the operating instructions should be adhered to.
- Follow Instructions – All operating and use instructions should be followed.
- Water and Moisture – The Pre-Amp should not be used near water – for example, a bathtub, washbowl, kitchen sink, laundry tub, wet basement, or near a swimming pool, and the like.
- Heat – Pre-Amp should be situated away from heat sources such as radiators, heat registers, stoves, or other Pre-Amp (including Pre-Amps) that produce heat.
- Power Sources – This product should be operated only from the type of power source indicated on the rating label.
- Power-Cord Protection – Power-supply cords should be routed so that they are not likely to be walked on or pinched by items placed upon or against them, paying particular attention to the cord in correspondence of plugs, convenience receptacles, and the point where they exit from the Pre-Amp.
- Non-use Periods – The power cord of the Pre-Amp should be unplugged from the outlet when left unused for a long period of time.
- Object and Liquid Entry – Care should be taken so that objects do not fall, and liquids are not spilled into the enclosure through openings.
- Damage Requiring Service – The Pre-Amp should be serviced by qualified service personnel when:
- The power-supply cord or the plug has been damaged; or
- Objects have fallen, or liquid has been spilled into the Preamp; or
- The Pre-Amp has been exposed to rain; or
- The Pre-Amp does not appear to operate normally or exhibits a marked change in performance; or
- The Pre-Amp has been dropped, or the enclosure damaged.
- The Pre-Amp needs tube replacement
- Servicing – The user should not attempt any service to the Preamp beyond that described in the operating instructions.
All other servicing should be referred to qualified service personnel. - Ventilation – Slots and openings in the cabinet are provided for ventilation and to ensure reliable operation of the product and to protect it from overheating, and these openings must not be blocked or covered.
- Replacement Parts – When replacement parts are required, be sure the service technician has used replacement parts specified by the manufacturer or have the same characteristics as the original part. Unauthorized substitutions may result in fire, electric shock, or other hazards.
- Safety Check – Upon completion of any service or repairs to this product, ask the service technician to perform safety checks to determine that the product is in proper operating condition.
NOTE: This equipment has been tested and found to comply with the limits for a Class B digital device, pursuant to part 15 of the FCC Rules. These limits are designed to provide reasonable protection against harmful interference in a residential installation. This equipment generates, uses and can radiate radio frequency energy and, if not installed and used in accordance with the instructions, may cause harmful interference to radio communications. However, there is no guarantee that interference will not occur in a particular installation. If this equipment does cause harmful interference to radio or television reception, which can be determined by turning the equipment off and on, the user is encouraged to try to correct the interference by one or more of the following measures: - Reorient or relocate the receiving antenna. - Increase the separation between the equipment and receiver. - Connect the equipment into an outlet on a circuit different from that to which the receiver is connected. - Consult the dealer or an experienced radio/ TV technician for help.
IMPERIAL PREAMP – THREE TUBE HIGH VOLTAGE PREAMP
The Imperial All-Tube Preamp pedal delivers Tone King's legendary MKII amplifier's '50s tweed, '60s blackface, and vintage British rock tones in a compact, pedalboard-friendly format. It features the exact preamp section and phase inverter circuitry of the Imperial MKII amp, as well as Reverb, Tremolo and Attenuation, resulting in a pedal that sings with harmonic richness and blooming touch response. Powered by three 12AX7 preamp tubes running at high voltage, this preamp delivers the amp's sound, responsiveness, and exquisite interaction with your pickups and effects. The onboard, low-latency impulse response (IR) loader (per channel), Headphones, easy integration and expansion with your existing gear, and MIDI capabilities, takes these iconic tones into the new era of guitar playing.
Documents / Resources
References
Download manual
Here you can download full pdf version of manual, it may contain additional safety instructions, warranty information, FCC rules, etc.
Advertisement


Need help?
Do you have a question about the Imperial and is the answer not in the manual?
Questions and answers