Advertisement
Table of Contents
Taurus Professional 2 / 3 Plus Manual
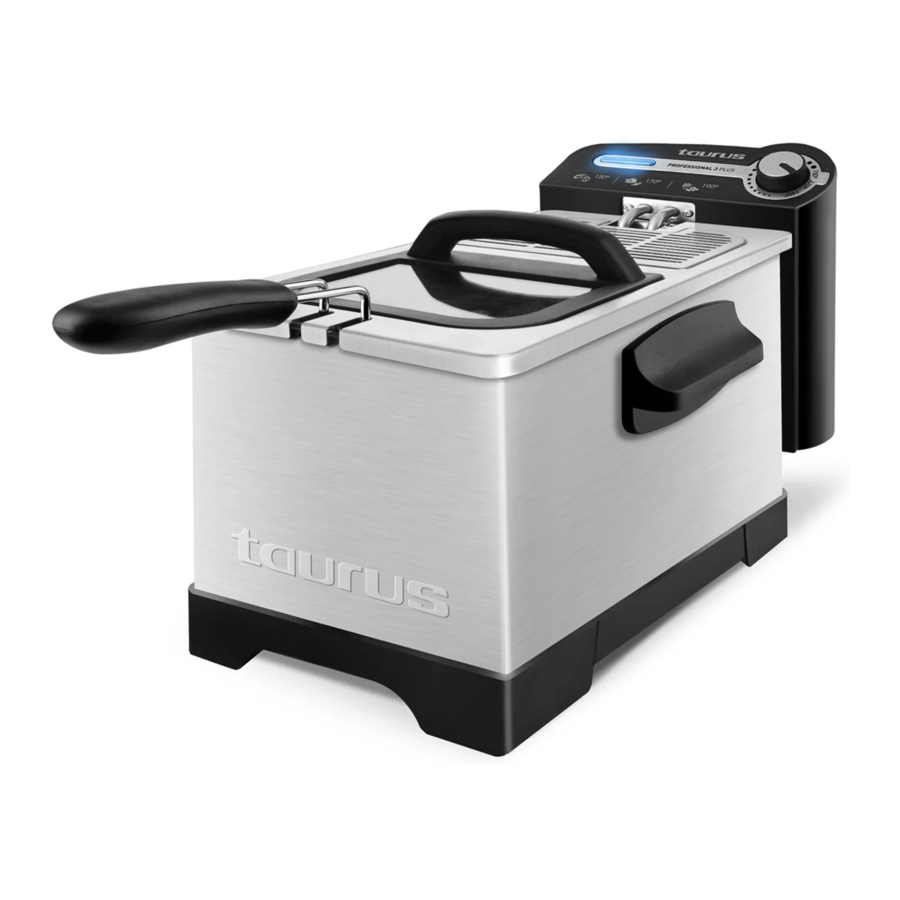
DESCRIPTION


- Lid
- Lid handle
- Temperature regulating thermostat
- Pilot light
- Automatic safety button
- Level profiles
- Control Unit
- Heating element
- Basket
- Basket handle
- Basket support
- Tank
- Level indicators
- Body
- Rearm button
- Mains connection housing
- Mains connection
- Control unit support
- Cover grill (*)
- Peephole frying (*)
- Filter
(*) Only available in the model Professional 3 Plus
USE AND CARE
- Fully unroll the appliance's power cable before each use.
- Never connect the appliance without having first of all filled the oil bowl
- Do not use the appliance if the on/off switch does not work.
- Do not move the appliance while in use.
- Do not move the appliance whilst in operation or if the oil is still hot. Once cooled, transport the appliance using the handles.
- Use the appliance handle/s, to catch it or move it.
- Do not turn the appliance over while it is in use or connected to the mains.
- Respect the MAX and MIN levels
- Disconnect the appliance from the mains when not in use and before undertaking any cleaning task.
- This appliance should be stored out of reach of children and/or the disabled.
- Do not store or transport the appliance if it is still hot.
- Never leave the appliance unattended while in use.
- Never leave the appliance unattended when in use and keep out of the reach of children, as this is an electrical appliance that heats oil to high temperatures and may cause serious burns.
- If fat is used instead of oil, melt first in a separate recipient.
- If fat has hardened in the tank, make a few holes in the solid fat in order to allow the water, which has been retained in the fat to be released as steam when heated at the minimum thermostat temperature.
- If, for some reason, the oil were to catch fire, disconnect the appliance from the mains and smother the fire using the lid, a cover or a large kitchen cloth.. NEVER WITH WATER.
- Turn the thermostat control to the minimum (MIN) setting. This does not mean that the iron is switched off permanently.
- Any misuse or failure to follow the instructions for use renders the guarantee and the manufacturer's liability null and void.
INSTRUCTIONS FOR USE
BEFORE USE
- Make sure that all the product's packaging has been removed.
- Before using the product for the first time, clean the parts that will come into contact with food in the manner described in the cleaning section.
OIL FILLING
- Open the cover.
- Ensure that the electrical equipment is appropriately positioned.
- Pour oil up to the mark indicating the MAXIMUM level on the bowl.
- The appliance must not be used with less oil than that indicated by the MINIMAL mark.
USE
- Take the length of cable required out of the housing.
- Connect the appliance to the mains.
- Professional 2 plus, Remove the lid. This fryer is not designed to fry with the lid on. Profesional 3 plus can.
- Remove the basket and attach the handle by pivoting until the rods engage in the housing.
- The pilot light (D) comes on.
- Select the desired frying temperature using the thermostat control. The indicator light will turn red, indicating that the oil is being heated.
- Prepare the food to be fried and place it in the basket, making sure that it does not rise above ¾ of its capacity. Allow the food to drain before placing it in the basket.
- Frozen food must be allowed for thaw beforehand. The placing of frozen food or food with high water content in the basket may cause the oil to suddenly spit after a few seconds.
- Wait until the pilot light (D) has gone out which will indicate that the appliance has reached an adequate temperature.
- Slowly place the basket in the bowl to avoid overflowing and splashing.
- When the food has been fried sufficiently, remove the lid, lift the basket and hang it with the hook in the tank in order to allow draining the excess of oil from the food.
- Empty the basket.
- Change the oil approximately every 15 or 20 frying operations, or every 5 – 6 months if not used frequently.
- In order to minimize the generation of acrylamide during the frying process, avoid reaching dark brown colours on the fried food, remove any burnt leftovers from the oil container, food rich in starch (such as potatoes or corns) should be fried at temperatures lower than 170ºC.
OIL DRAINING POSITION
- When the food has been fried sufficiently, remove the lid, lift the basket and hang it with the hook in the tank in order to allow draining the excess of oil from the food.
ONCE YOU HAVE FINISHED USING THE APPLIANCE
- Select the minimum position (MIN) using the thermostat control.
- Unplug the appliance from the mains.
- Put the cable back in the cable housing.
- Fit the basket into the tank.
- The basket handle may be left attached or you can whisk towards the interior of the basket by pressing sideways on the rods and pivoting.
- Close the lid.
CORD HOUSING
- This appliance has a cable compartment situated on its posterior.
CARRY HANDLE/S
The device has a handle on the upper part so it can be transported easily and comfortably.
PRACTICAL RECOMMENDATIONS
- Fry a few pieces of bread to remove the smell of used oil.
- For food with a high water content, it is better and quicker to fry in two lots with less food than in just one. This will reduce the risk of splashes and spillage.
- This will reduce the risk of splashes and spillage. This system consists of first frying the food until it is reasonably well done and then frying again using very hot oil to brown the food.
- Olive oil with a minimum acidity level is recommendable for frying.
- Do not mix different oils.
- Wash potatoes before frying to stop them from sticking.
SAFETY THERMAL PROTECTOR
- In the event of overheating, the thermal safety mechanism will be activated and the appliance will stop operating. When this occurs the appliance should be disconnected from the mains and left to cool. Then press the rearming button, situated at the back of the electrical circuit, with the tip of a pen or similar in order to reactivate the appliance (Fig.1)


CLEANING
- Disconnect the appliance from the mains and let it cool before undertaking any cleaning task.
- Dismantle the appliance as follows:
- Take off the lid
- Remove the basket and take out the electrical equipment
- Remove the tank
- Carefully pour the used oil from the bowl into a container (not the sink), according to the regulations in force for the treatment and disposal of waste.
- Except for the power unit and the mains connection, all the parts can be cleaned with detergent and water or in washing up liquid. Rinse thoroughly to remove all traces of detergent
- Clean the electrical equipment and the mains connection with a damp cloth and dry. DO NOT IMMERSE IN WATER OR ANY OTHER LIQUID.
- Clean the equipment using a damp cloth with a few drops of washing-up liquid and then dry.
- Do not use solvents, or products with an acid or base pH such as bleach, or abrasive products, for cleaning the appliance.
- Do not submerge the appliance in water or any other liquid, or place it under a running tap.
- If the appliance is not in good condition of cleanliness, its surface may degrade and inexorably affect the duration of the appliance's useful life and could become unsafe to use.
- The following parts are suitable for cleaning in hot soapy water or in a dishwasher (using a soft cleaning program):
- Basket
- Lid
- Tank
- Body
Documents / ResourcesDownload manual
Here you can download full pdf version of manual, it may contain additional safety instructions, warranty information, FCC rules, etc.
Advertisement


Need help?
Do you have a question about the Professional 2 Plus and is the answer not in the manual?
Questions and answers