Behringer EUROLIVE B205D Manual
- Quick start manual (33 pages) ,
- Operating/safety instructions manual (21 pages) ,
- Quick manual (4 pages)
Advertisement
EUROLIVE B205D Hook-up
Linking several speakers

Connecting microphones, instruments, and stereo signal sources.

Mounting B205D on microphone stand

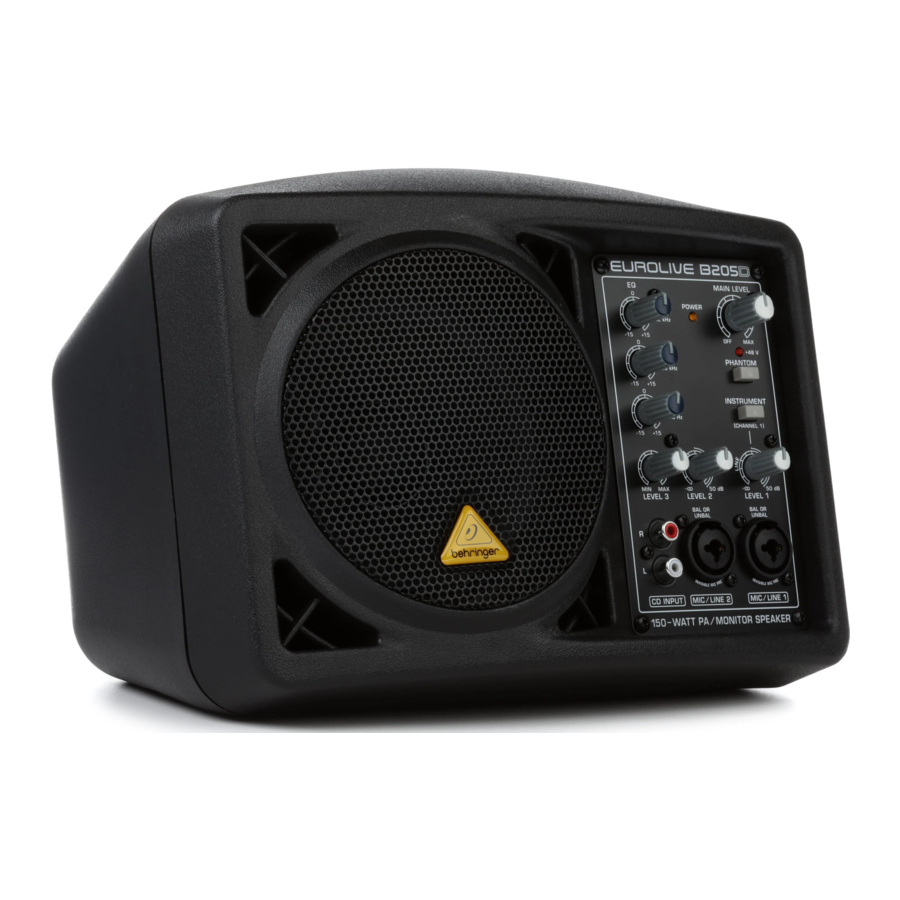
EUROLIVE B205D Controls

- LEVEL 3 Adjusts the input sensitivity (gain) for the CD INPUT RCA jacks.
- EQ Cut or boost treble, mid, and bass frequencies by ±15 dB.
- CD INPUT Route signals from CD players, MP3 players, DJ mixers, and other line-level sound sources into these RCA jacks.
- MIC/LINE INPUTS (Channels 1 and 2) Route line-level input signals into these combination jacks using XLR, balanced ¼" TRS, or unbalanced ¼" TS connectors.
- POWER LED Lights when the speaker is turned on.
- MAIN LEVEL Adjusts the overall volume.
- PHANTOM Sends 48 V of phantom power to the MIC/LINE inputs to power condenser microphones. The LED lights when the PHANTOM button is engaged.
- INSTRUMENT Press this button to optimize the MIC/LINE 1 input for unbalanced signals from instruments using ¼" TS plugs.
- LEVEL 1/LEVEL 2 Adjusts the input sensitivity for the MIC/LINE combination jacks.

- HEAT SINK Make sure you allow plenty of space behind the speaker for heat dissipation.
- POWER SWITCH Turns the speaker on and off.
- POWER SOURCE Plug the included IEC power cable into this jack.
- THRU Route a signal to another speaker or device by using a balanced cable with a male XLR plug. The THRU jack draws a signal from just before the MAIN LEVEL and EQ section, combined with the MAIN IN signal.
- LEVEL Adjust the level of the outgoing THRU signal.
- MAIN IN Connect the THRU signal from another speaker using a balanced cable with either a female XLR plug or a balanced ¼" TRS plug.
EUROLIVE B205D Getting started
- Place the speaker(s) in desired locations, preferably on stands as personal monitors or mains.
![]()
- Set all controls as shown: EQ knobs to 50%, MAIN LEVEL and input LEVEL knobs all the way down.
![]()
- Make all necessary connections. DO NOT turn on the power yet.
- Turn on your audio sources (mixer, microphones, instruments).
- Turn on your speaker(s) by pressing the POWER SWITCH. The POWER LED will light up.
![]()
- Turn the MAIN LEVEL knob up to around 50% on each speaker. (If using multiple speakers, the MAIN LEVEL knob must be adjusted separately on each speaker.
![]()
- Play your audio source or speak into your microphone at a normal to loud level.
- Adjust each channel LEVEL knob to the desired volume level. If the signal distorts, turn the channel LEVEL knob back down.
- If necessary, adjust the HIGH, MID, and LOW EQ knobs on each speaker to boost or cut treble, mid, and bass frequencies to your taste.
- Make final overall volume adjustments using the MAIN LEVEL knob.


Specifications
| Amplifier Power Output | |
| RMS power | 125 Watts @ 6 Ω |
| Peak power | 150 Watts @ 6 Ω |
| Speaker Size | |
| Size | 5.25"/133.5 mm |
| Audio Inputs | |
| Channel 1: XLR/¼" TRS Combo Jacks | |
| Sensitivity | -40 dBu to +4 dBu |
| Input impedance | 20 kΩ/1 MΩ switchable |
| Channel 2: XLR/¼" TRS Combo Jacks | |
| Sensitivity | -40 dBu to +4 dBu |
| Input impedance | 20 kΩ |
| Channel 3: RCA Jacks | |
| Sensitivity | -10 dBu to +4 dBu |
| Input impedance | 10 kΩ |
| Phantom Power | |
| Channels 2 and 3 | +48 Volts, switchable |
| Channel Level Controls | |
| Input Trim | -∞ to + 30 dB |
| Max. Input Level | +22 dBu |
| Link | |
| Thru | XLR connector, mic/line switchable |
| Main in | XLR/¼" TRS combo jack |
| Loudspeaker System Data | |
| Frequency response | 65 Hz to 18 kHz (-10 dB) |
| 95 Hz to 12 kHz (-3 dB) | |
| Sound pressure level | max. 113 dB SPL @ 1 m |
| Limiter | Optical |
| Dynamic equalizer | Processor-controlled |
| Equalizer | |
| HIGH | 12 kHz/±15 dB |
| MID | 2.5 kHz/±15 dB |
| LOW | 100 Hz/±15 dB |
| Power Supply | |
| Voltage (Fuses) | |
| USA/Canada | 120 V~, 60 Hz (T 3.15 A H 250 V) |
| UK/Australia | 240 V~, 50 Hz (T 3.15 A H 250 V) |
| Europe | 230 V~, 50 Hz (T 3.15 A H 250 V) |
| Japan | 100 V~, 50/60 Hz (T 3.15 A H 250 V) |
| Power consumption | max. 180 Watts |
| Mains connection | Standard IEC receptacle |
| Dimensions/Weight | |
| Dimensions (H x W x D) | 7.30 x 11.42 x 8.70"/185 x 290 x 220 mm |
| Weight | 7 lbs/3.20 kg |

- Register online.
Please register your new Music Tribe equipment right after you purchase it by visiting musictribe.com. Registering your purchase using our simple online form helps us to process your repair claims more quickly and efficiently. Also, read the terms and conditions of our warranty, if applicable. - Malfunction.
Should your Music Tribe Authorized Reseller not be located in your vicinity, you may contact the Music Tribe Authorized Fulfiller for your country listed under "Support" at musictribe.com. Should your country not be listed, please check if your problem can be dealt with by our "Online Support" which may also be found under "Support" at musictribe.com. Alternatively, please submit an online warranty claim at musictribe.com BEFORE returning the product. - Power Connections.
Before plugging the unit into a power socket, please make sure you are using the correct mains voltage for your particular model. Faulty fuses must be replaced with fuses of the same type and rating without exception.
Important Safety Instructions

RISK OF ELECTRIC SHOCK!
DO NOT OPEN!
 Terminals marked with this symbol carry electrical current of sufficient magnitude to constitute risk of electric shock. Use only high-quality professional speaker cables with ¼" TS or twist-locking plugs pre-installed. All other installation or modification should be performed only by qualified personnel.
This symbol, wherever it appears, alerts you to the presence of uninsulated dangerous voltage inside the enclosure - voltage that may be sufficient to constitute a risk of shock.
 This symbol, wherever it appears, alerts you to important operating and maintenance instructions in the accompanying literature. Please read the manual.
To reduce the risk of electric shock, do not remove the top cover (or the rear section). No user serviceable parts inside. Refer servicing to qualified personnel.
To reduce the risk of fire or electric shock, do not expose this appliance to rain and moisture. The apparatus shall not be exposed to dripping or splashing liquids and no objects filled with liquids, such as vases, shall be placed on the apparatus.
These service instructions are for use by qualified service personnel only. To reduce the risk of electric shock do not perform any servicing other than that contained in the operation instructions. Repairs have to be performed by qualified service personnel.
- Read these instructions.
- Keep these instructions.
- Heed all warnings.
- Follow all instructions.
- Do not use this apparatus near water.
- Clean only with dry cloth.
- Do not block any ventilation openings. Install in accordance with the manufacturer's instructions.
- Do not install near any heat sources such as radiators, heat registers, stoves, or other apparatus (including amplifiers) that produce heat.
- Do not defeat the safety purpose of the polarized or grounding-type plug. A polarized plug has two blades with one wider than the other. A grounding-type plug has two blades and a third grounding prong. The wide blade or the third prong are provided for your safety. If the provided plug does not fit into your outlet, consult an electrician for replacement of the obsolete outlet.
- Protect the power cord from being walked on or pinched particularly at plugs, convenience receptacles, and the point where they exit from the apparatus.
- Use only attachments/accessories specified by the manufacturer.
- Use only with the cart, stand, tripod, bracket, or table specified by the manufacturer, or sold with the apparatus. When a cart is used, use caution when moving the cart/ apparatus combination to avoid injury from tip-over.
![]()
- Unplug this apparatus during lightning storms or when unused for long periods of time.
- Refer all servicing to qualified service personnel. Servicing is required when the apparatus has been damaged in any way, such as power supply cord or plug is damaged, liquid has been spilled or objects have fallen into the apparatus, the apparatus has been exposed to rain or moisture, does not operate normally, or has been dropped.
- The apparatus shall be connected to a MAINS socket outlet with a protective earthing connection.
- Where the MAINS plug or an appliance coupler is used as the disconnect device, the disconnect device shall remain readily operable.
- Do not install in a confined space, such as a book case or similar unit.
- Do not place naked flame sources, such as lighted candles, on the apparatus.
- Please keep the environmental aspects of battery disposal in mind. Batteries must be disposed-of at a battery collection point.
- This apparatus may be used in tropical and moderate climates up to 45°C.

Documents / Resources
References
Download manual
Here you can download full pdf version of manual, it may contain additional safety instructions, warranty information, FCC rules, etc.
Advertisement


Need help?
Do you have a question about the EUROLIVE B205D and is the answer not in the manual?
Questions and answers