Yamaha CL5 Manual
- Reference manual (306 pages) ,
- Owner's manual (67 pages) ,
- Supplementary manual (26 pages)
Advertisement
To the owner
This Owner's Manual contains information needed for proper operation. A thorough understanding of these simple instructions will help you obtain maximum enjoyment from your new Yamaha. If you have any questions about the operation of the meter, please consult a Yamaha dealer.
In this Operation Manual, particularly important information is distinguished in the following ways.
 This is the safety alert symbol. It is used to alert you to potential personal injury hazards. Obey all safety messages that follow this symbol to avoid possible injury or death.

A WARNING indicates a hazardous situation which, if not avoided, could result in death or serious injury.
NOTICE
A NOTICE indicates special precautions that must be taken to avoid damage to the outboard motor or other property.
TIP:
A TIP provides key information to make procedures easier or clearer.
Information about the Owner's Manual
Yamaha continually seeks advancements in product design and quality. Therefore, while this manual contains the most current product information available at the time of printing, there may be minor discrepancies between the product and this manual.
Display Item List


*1 Displayed only when using Helm Master EX (Upgradable).
*2 It is not displayed when using the mechanical remote controller.
*3 Displayed only when using Bennett Auto Trim Tab.
*4 Displayed only when using Battery Management System.
*5 Displayed only when using Command Link and one outboard motor.
*6 Displayed only when using Electronic Key Switch (EKS).
*7 This item is displayed only when the boat is equipped with a Vetus PRO series bow thruster and is equipped with twin or triple engine application.
TIP:
Some menus may not be displayed, depending on your connection system.
Device Overview
See the Important Safety and Product Information guide in the product box for product warnings and other important information.

Turning the Power ON
Turning the main switch to the ON position to start the engine will supply power to this device.
TIP:
Pressing the power button "![]() " of this device will supply power even if the main switch is in the OFF position.
" of this device will supply power even if the main switch is in the OFF position.
Using the Touchscreen
- Tap the screen to select the displayed item.
- Swipe the screen up and down to scroll the display.
- Swipe the screen left and right to switch the display.
Disabling the Touchscreen

You can disable the touchscreen to prevent inadvertent screen touches.
To lock the touchscreen:
- Press "
![]() ".
". - Select "Lock Touchscreen".
To unlock the touchscreen, press "![]() ".
".
Original Factory Settings
When starting up for the first time, you must set your region and the number of outboard motors.
Select the items displayed on the screen and create your settings.
TIP:
For the display information when quint engine application is installed, see the manual for quint engine application.
To set:
- Select country or region.
![]()
- Set the number of outboard motors installed on your boat.
TIP:
You can reset the number of outboard motors installed.
![]()
- Select the steering system for the outboard motor to be used.
![]()


TIP:
Select "Yamaha Steering" if you have outboard motors equipped with Yamaha electric steering, and select "Other" if you have outboard motors equipped without Yamaha electric steering.
General Screen Flow
This device displays a variety of information related to boat equipment. Swipe to switch through the Engine Data Screen, Boat Information Screen, and Menu Screen.

- Engine Data Screen
- Boat Information Screen
- Menu Screen
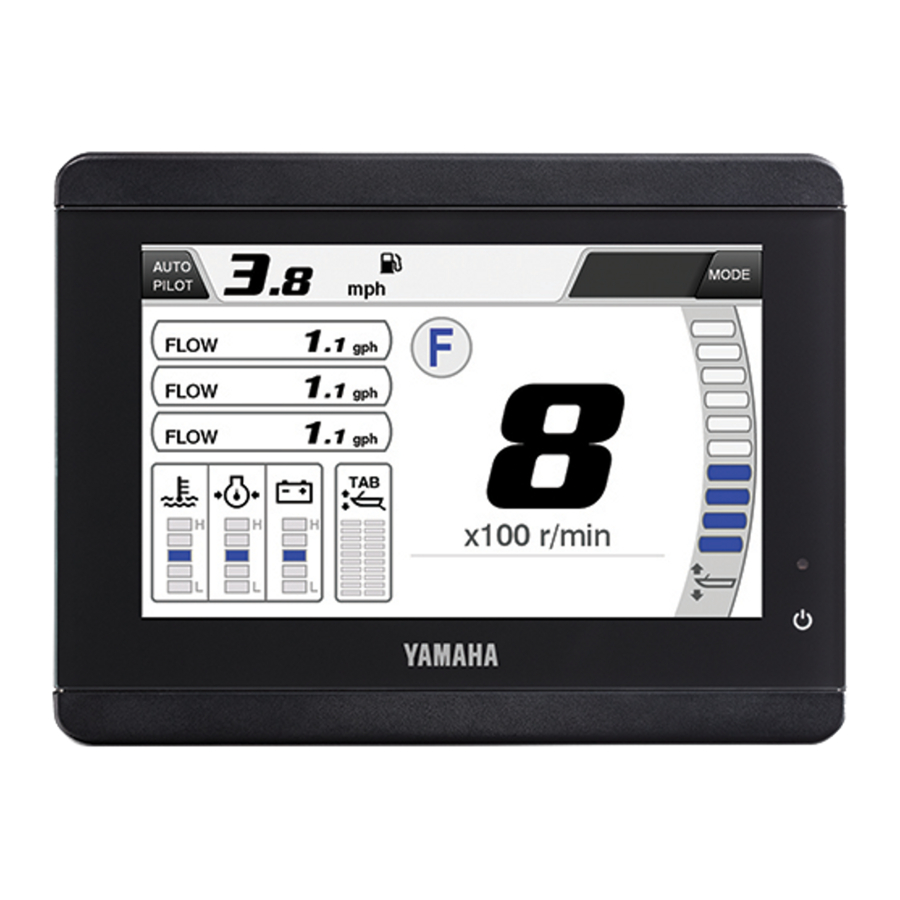
Engine Data Screen
Single engine application

| 1 | Autopilot button | Select the button to display information on the autopilot feature. See how to use the autopilot feature. TIP:
|
| 2 | SetPoint button | SetPoint is the feature for maintaining a fixed point. TIP: The SetPoint button is displayed only when using Helm Master. |
| 3 | Boat status | Displays the status of the boat such as boat speed, rudder angle, fuel consumption, and trip distance. TIP: Press and hold the Boat Status to change the display information. See how to change the display information. |
| 4 | Speedometer | Displays the boat's water speed. |
| 5 | Shift | Displays the outboard motor shift status. |
| 6 | Tank level | Displays the remaining amount in the fuel tank, freshwater tank, etc. TIP:
|
| 7 | Engine condition | Displays the status of the engine. : Yamaha security system is on. : Yamaha security system is on. : Engines are under synchronization control. : Engines are under synchronization control. : Engines are cold. : Engines are cold. |
| 8 | Boat control indicator | Displays the active boat control feature. : Autopilot : Autopilot : Speed control : Speed control : Single lever : Single lever : Trim assist : Trim assist : Battery management system : Battery management systemTIP:
|
| 9 | GPS indicator | Displays GPS signal strength. TIP: Displays only when using Helm Master. |
| 10 | Boat control mode button | Helm Master EX equipped with a joystick can switch the FishPoint mode. |
| 11 | Set RPM button | Helm Master displays the setting screen for the upper limit of revolutions of FishPoint. |
| 12 | Trolling mode button | The engine speed can be adjusted by approximately 50 r/min when the shift is in the forward or reverse position and the throttle is fully closed. To exit trolling mode, select the Cancel button, stop the engine, or increase the engine speed to 3000 r/min or higher. TIP:
|
| 13 | Trim angle | Displays the trim angle of the outboard motor. TIP: Press and hold the Trim Angle for more information on the trim angle. |
| 14 | Engine alert | When a malfunction in the engine occurs, the following engine alert icon will appear. : Low oil pressure alert : Low oil pressure alert : Overheat alert : Overheat alert : Water in fuel alert : Water in fuel alert : Low voltage alert : Low voltage alert : Check engine alert : Check engine alert : Check system / Steering malfunction alert : Check system / Steering malfunction alertNOTICE When the engine alert icon appears, take appropriate measures for each alert. |
| 15 | Tachometer | Displays the engine speed. TIP: Press and hold the Tachometer to change the screen background design. See changing the background design. |
| 16 | Sub status | Displays the status of connected devices such as the status of the trim tab, unit voltage, and accessory battery voltage. TIP: Press and hold the Sub Status to change the display information. See changing the display information. |
| 17 | Engine status | Displays the status of the engine, such as oil pressure, water pressure, and battery voltage. TIP: Press and hold the Engine Status to change the display information. See changing the display information. |
Display button table
| Mechanical Remote controller | 6X6/6X7 Remote controller | Helm Master | Helm Master EX with DEC, DES | Helm Master EX with Autopilot panel | Helm Master EX with Joystick | |
| Autopilot button | × | × | × | × |  | |
| SetPoint button | × | × | | × | × | × |
| Boat status | | | | | | |
| Speedometer | | | | | | |
| Shift | × | | | | | |
| Tank level | | | | | | |
| Engine condition | | | | | | |
| Boat control indicator | × | × | × | | | |
| GPS indicator | × | × | | × | × | × |
| Boat control mode button | × | × | × | × | × | |
| Set RPM button | × | × | | × | × | × |
| Trolling mode button | | | × | × | × | × |
| Trim angle | | | | | | |
| Engine alert | | | | | | |
| Tachometer | | | | | | |
| Sub status | | | | | | |
| Engine status | | | | | | |
Twin engine application

Quad engine application

Triple engine application

Quint engine application


In the case of a Twin engine application, the boat status, engine status, and sub status are displayed on the screen to the right of the engine data screen.
In the case of triple and quad engine application, the engine status and sub status are displayed on the screen to the right of the engine data screen. The boat status is displayed on the second screen to the right from the engine data screen.
TIP:
- The display of the engine data screen varies depending on the number of outboard motors installed, remote controller, and other connected devices.
- For the display information when quint engine application is installed, see the manual for quint engine application.
Engine alert icons and pop-up window
Red icons indicate engine abnormalities. When an abnormality occurs, a pop-up window will be displayed, and the buzzer will sound.

- Pop-up window
- Confirm button
Press the confirm button to change to the normal display. The engine alert icon will start to blink.

- Engine alert icon
NOTICE
When the engine alert icon appears, measures for each alert.
Menu
NOTICE
Be sure the station settings are set correctly. If not, the engine data screen will not display the correct information.

To display the menu screen, swipe from left to right on the engine data screen, or swipe from right to left with the Boat Status displayed.
Select an item displayed with "![]() " to display the subsequent menu item.
" to display the subsequent menu item.
Select " " displayed in the screen to display a detailed settings screen.
Select " " to return to the previous screen.
GPS Satellite Signals
When satellite data has been received, ![]() is displayed at the top right of the screen.
is displayed at the top right of the screen.
TIP:
Contact your Yamaha dealer for information on how to connect a GPS receiver.
Trip
Menu > Trip
Displays the trip data, such as trip distance and hours, and allows you to reset these values.
Steer Friction
Menu > Steer Friction
You can select either "Regular" or "Heavy" steering friction.
TIP:
- The steering friction feature can be set only when the electric steering is equipped.
- For detailed settings of the steering friction feature, contact your Yamaha dealer.
Lock to Lock
Menu > Lock to Lock
You can select either "Variable" or "Constant" as the number of revolutions when turning the steering fully to the right from the state where the steering is fully turned to the left.
TIP:
- The lock-to-lock feature can be set only when the electric steering is equipped.
- For detailed settings of the lock-to-lock feature, contact your Yamaha dealer.
Trim Assist
Menu > Trim Assist
This button turns the trim assist feature on and off.
See details on how to set the trim assist feature.
TIP:
- This feature is displayed only when using Helm Master EX.
- Use the remote controller to change the Trim Assist when using Helm Master.
Speed Control
Menu > Speed Control
You can change the source of the speed control feature. Speed Control RPM and Speed Control GPS are available as the speed control feature. Select the button, then select the source.
Speed Control RPM:
Adjusts the engine speed to control the boat speed.
Speed Control GPS:
Controls the boat speed by the speed determined by GPS information.
TIP:
- If the boat is equipped with Helm Master EX, press the "UP" or "DN" button on the digital electronic control to activate speed control feature.
- Displays only when the GPS is connected and Helm Master EX is used. Contact your Yamaha dealer for more information.
Information
Menu > Information
Displays comprehensive information such as trip data and maintenance information.
Boat Settings
Menu > Boat Settings
You can create detailed settings for various features.
Device Settings
Menu > Device Settings
You can set the display unit and layout for the device.
Reset
Menu > Reset
You can change or reset the registered settings.
Information

Menu > Information
Viewing and Resetting the Trip Data

Menu > Information > Trip
Displays the total trip time, trip distance, trip time, and fuel consumption.
Press and hold to reset each item data.
Select "Reset All" to reset the trip distance, trip time, and fuel consumption data all at once.
Setting the Maintenance Reminder

Menu > Information > Maintenance Reminder The maintenance reminder is a feature that notifies you when maintenance is required in a pop-up window. To use the maintenance reminder, you must specify an interval time that matches the type of maintenance. The maintenance reminder cannot be disabled.
To set the interval:
- Select one from the type of maintenance.
![]()
- Type of maintenance
- Select "Set Interval".
![]()
- Specify the maintenance interval time.
![]()


To reset elapsed time:
- Select one from the type of maintenance.
- Select "Reset".
![]()
- Select the engine to reset the elapsed time for.
TIP: If there is only one engine, the engine selection screen is not displayed.
![]()
- Select "Yes".
![]()


To reset all elapsed time:
- Select menu button "
![]() ".
". - Select "Reset All".
![]()

Viewing the Tank Information

Menu > Information > Tank Displays the information of the set tank. Select the displayed data to display detailed information on the tank.

TIP: To display the tank information, you must perform tank settings. See tank settings.
Viewing the Trim Information

Menu > Information > Trim Displays the trim angle of the outboard motor. When the outboard motor reaches the tilt area, the display information will flash.
Viewing Software Information

Menu > Information > Software Info Displays the software version information.
The software must be updated regularly.
To update the software, contact your Yamaha dealer.
Viewing System Information

Menu > Information > System Info
Displays the connected device, the software being used, and the serial number.
TIP:
- This is displayed only when a compatible Yamaha device is connected.
- This will not be displayed when using a mechanical remote controller.
Active Alarms
Menu > Information > Active alarm
Displays any active alarm information.
Alarm information is also displayed in the engine alert section of the engine data screen as an icon. The "" next to the item will come on when there is alarm information during activation.
NOTICE
If a warning is displayed, return to port immediately and contact your Yamaha dealer without delay.
Low Oil Pressure Alert " "
"
The low oil pressure alert comes on when the engine oil pressure drops below the specified value. At the same time, the engine speed is limited and the buzzer sounds. Stop the engine and check the engine oil level. See the outboard motor's Owner's Manual for how to check the engine oil level.
NOTICE
- Do not run the engine without oil. Otherwise, the engine could be seriously damaged.
- Contact your Yamaha dealer immediately if you cannot identify the cause and take measures.
Overheat Alert "  "
"
When the engine overheats, the cooling water temperature icon flashes and the overheat alert comes on. At the same time, the engine speed is limited and the buzzer sounds. Stop the engine and check that the cooling water inlet is not clogged.
NOTICE
- Avoid using the engine while the overheat alert is on. Otherwise, the engine could be seriously damaged.
- Contact your Yamaha dealer immediately if you cannot identify the cause and take measures.
Water in Fuel Alert "  "
"
If water accumulates in the fuel separator (fuel filter) while navigating, the water in fuel alert flashes. Stop the engine and drain the water from the fuel separator (fuel filter). See the outboard motor's Owner's manual for how to drain the water.
NOTICE
- If fuel mixed with water is sent to the engine, it may cause engine failure.
- Contact your Yamaha dealer immediately if you cannot identify the cause and take measures.
Low Voltage Alert " "
"
When the battery voltage drops, the low voltage alert flashes. When the alert activates, start the engine immediately to charge the battery. If the alert remains activated even when the engine is running, return to port immediately and have your Yamaha dealer check the battery charging system.
Check Engine Alert "![]() "
"
When a malfunction in the engine occurs, the check engine alert flashes. Return to port immediately and get it checked by a Yamaha dealer.
TIP:
The check engine alert will come on until the malfunction is resolved.
Check System / Steering Malfunction Alert ""
When a malfunction occurs in the system, this alert is activated. Return to port immediately and contact your Yamaha dealer.
Viewing Trouble Codes
Menu > Information > Trouble Code
Displays the active alarm information trouble code. The "" next to the item will come on when there is a trouble code during activation.
Please report the trouble codes to your Yamaha dealer to solve various problems.
Warning Manager

Menu > Information > Warning Manager
Displays a list of warning item that has occurred so far. Select each warning information to display detailed information.
The "" next to the item will come on when there is warning information during activation.
To sort the list of the warnings:
- Select menu button
![]()
- Select "Sort/Filter".
![]()
- Select the sorting method from the following.

- Sort by Date/Time
- Sort by Active/Inactive
- Sort by Criticality
TIP:
To display the date and time correctly, you must connect a GPS to the device.
To save warning information to USB Memory stick:
- Select menu button "
![]() ".
". - Select "Save to Card".
![]()

TIP:
When not using the USB memory stick, attach the cap to the device.
To clear all messages:
- Select menu button "
![]() ".
". - Select "Clear Warning Manager".
![]()
- Select the "OK" button in the pop-up window.
![]()


Viewing the Battery Management System Information

Menu > Information > Batteries
Displays the information of the set battery management system.
Select the displayed data to see detailed battery information.

TIP:
- A battery management system must be equipped to display battery information.
- The battery management system may not be available depending on the destination.
- Initial settings are required to display battery information. See initial battery settings.
Boat Settings
Autopilot (Uppgradable)
The Autopilot, which has four modes, is an automatic piloting function that assists with steering and throttle operations to keep the boat moving to a desired point or heading. The Autopilot system is a device that assists with steering. The captain is responsible for safe navigation, and should carefully monitor his boat while underway.
- The operator is responsible for confirming there are no obstacles or shallow water along the route.
- This function does not avoid obstacles. It also does not automatically steer through waves. The operator must remain in the operator seat and monitor the surrounding conditions.
TIP:
- The autopilot feature can be used only when using Helm Master EX with Autopilot panel or Helm Master EX with Joystick.
- The Autopilot function is cancelled if the GPS antenna cannot receive a GPS signal.
- In addition to not being able to receive the GPS signal, the signal could become unreliable if a large building is nearby that reflects the satellite signal so accurate information cannot be received.
- For details about the autopilot feature, see the 6X9 Digital Electronic Control Owner's Manual.
To display the Autopilot screen:
- Select Autopilot button on the engine data screen.
![]()
- Autopilot button
- Select the full-screen view button on the displayed autopilot bar.
![]()
- Full-screen view button


HEADING HOLD
This mode keeps the boat moving in the direction of the bow at the time the mode is set. After it is set, the desired direction can be adjusted. (The desired direction is maintained even if current or wind causes the boat's bow to swing about.)
COURSE HOLD
This mode keeps the boat moving on the vector at the time the mode is set. After it is set, the desired direction can be adjusted. (A course is set to a hypothetical destination, and this course is maintained along the desired course, while compensations are done for the effects of current and wind.) TIP:
This mode is a function to keep the boat's heading at the time the mode is set. This mode cannot be turned on while the boat is rotating, or strong currents or wind are causing it to move sideways or reverses.
TRACK POINT
This mode moves the boat to its final destination along the transit points set on the MFD. Depending on the settings, it can slow down and stop when it reaches the final destination. It can change to a preset mode after it stops.
Your boat may not decelerate even if it goes past its final destination, according to the MFD.
TIP:
- If a route is not set, "TRACK POINT" cannot turn on.
- This mode may not be able to follow a route, due to the route's set conditions or the boat's speed.
PATTERN STEER
This mode allows you to steer along a pattern set in advance in the MFD. This mode has "Spiral", "Zigzag", "Pattern Search" and "Williamson Turn". See mode selection.
Autopilot Setting

Menu > Boat Settings > Autopilot Setting Changes settings related to autopilot.
TIP:
![]() Selecting the menu button "
Selecting the menu button "![]() " on the Autopilot screen also displays the Autopilot setting screen.
" on the Autopilot screen also displays the Autopilot setting screen.- Press and hold the Autopilot button to open the Autopilot setting.
Pattern Set
The steering patterns used in the pattern steering mode can be changed.
Select the steering pattern from "Spiral", "Zigzag", "Pattern Search", and "Williamson Turn".
Zigzag

Spiral

Pattern Search

Williamson Turn

Direction
The turning direction when using pattern steering can be selected from either port rotation or starboard rotation.
For Spiral

- Port rotation
- Starboard rotation
For Pattern Search

- Port rotation
- Starboard rotation
For Williamson Turn

- Port rotation
- Starboard rotation
TIP:
Direction is displayed only when you select "Spiral", "Pattern Search" and "Williamson Turn" in the Pattern Set.
Spacing
You can specify the width of the spiral route. When wide, the boat draws a gentle spiral.

- Spacing
TIP:
Spacing is displayed when you select Spiral in the Pattern Set.
Initial Radius
You can specify the length of the radius of the first circle drawn on the spiral route.

- Radius of first circle
TIP:
Initial Radius is displayed when you select Spiral in the Pattern Set.
Amplitude
You can specify he zigzag angle.

- Amplitude
TIP:
Amplitude is displayed when you select Zigzag in the Pattern Set.
Length
Set the length of the route when "Zigzag" or "Pattern Search" is selected in the Pattern Set.
When "Zigzag" is selected, the length specifies from the left edge to the right edge of the "Zigzag".
When "Pattern Search" is selected, the length specifies the distance of the forward route.
To set the Length, select the "Length" and then select the distance.
For Zigzag

- Length
For Pattern Search

- Length
TIP:
Length is displayed when you select "Zigzag" or "Pattern Search" in the Pattern Set.
Width
Width is the length of the lateral route in the Pattern Search. To set the Width, select the "Width" and then the distance.

- Width
TIP:
"Width" is displayed when you select "Pattern Search" in the Pattern Set.
Length Spacing
The Length Spacing is the distance between the lateral route and the rout turned back from the lateral route. To set the Length Spacing, select the "Length Spacing" and then select the distance.

- Length Spacing
TIP:
"Length Spacing" is displayed when you select "Pattern Search" in the Pattern Set.
Width Spacing
The Width Spacing is the distance between the forward route and the route turned back from the forward route. To set the Width Spacing, select the "Width Spacing" and then select the distance.

- Width Spacing
TIP:
"Width Spacing" is displayed when you select "Pattern Search" in the Pattern Set.
Final Track Point Mode
Menu > Boat Settings > Autopilot Setting > Final Track Point Mode
Enabling Final Track Point mode allows you to slow down your boat before it reaches the designated point.
TIP:
- When setting a route from another MFD, your boat may decelerate and stop after arriving at the designated point, depending on the MFD.
- When the lever is moved to the neutral position after the boat is stopped, the mode is switched to the preset SetPoint mode.
- The preset mode cannot be changed during deceleration.
Deceleration Setting
Menu > Boat Settings > Autopilot Setting > Decel. Setting Deceleration distance setting allows you to select from three levels of deceleration starting distance. When approaching the final destination, deceleration starts at different timings depending on the selected setting.
NOTICE
Choosing Short/Very Short might overshoot your Final Track Point depending on the boat's speed.
Course Hold Offset
Menu > Boat Settings > Autopilot Setting > Offset Distance Set the offset amount from the route when operating the joystick.
Setting the Joystick/SetPoint

Menu > Boat Settings > Joystick and SetPoint Settings related to maneuvering with the joystick can be made.
TIP:
Displays the Joystick/SetPoint settings only when using Helm Master EX with Joystick.
Setting the Joystick Thrust
Menu > Boat Settings > Joystick and SetPoint > Joystick Thrust
You can set the thrust when maneuvering with the joystick. Set the thrust level for maneuvering with the joystick. Set thrust level 1 for the slowest maneuvering speed. Set thrust level 5 for the fastest maneuvering speed.
Setting the bow thruster output
Menu > Boat Settings > Joystick and SetPoint > StPt Thrstr Output
Change the output of the bow thruster collaborating with Helm Master EX.
To change the output of the bow thruster, select "StPt Thrstr Output" to open the setting screen, and select the output from "Low", "Mid", and "High".

TIP:
- This item is displayed only when the boat is equipped with a Vetus PRO series bow thruster and is equipped with twin or triple engine application.
- Contact your Yamaha dealer for information on how to connect a bow thruster.
Trim Presets
Menu > Boat Settings > Joystick and SetPoint > Trim Preset You can set or select the trim angle when maneuvering with the joystick.
When turned ON, the trim angle specified when using the joystick is applied.
TIP:
When turned ON, the trim angle item is displayed, and the trim angle can be specified.
Setting the Trim Angle
You can set the trim angle of the outboard motor when maneuvering with the joystick. To set:
- Turn "Trim Preset" ON.
Menu > Boat Settings > Joystick and Set Point > Trim Preset
![]()
- Enter the desired trim angle.
Menu > Boat Settings > Joystick and Set Point > Trim Angle
![]()
- Select "Done".
![]()


Fine Tuning Distance
Menu > Boat Settings > Joystick and Set Point > Fine Tuning Distance
You can set the distance when moving the designated position using the joystick.
If you adjust the point with the joystick while the SetPoint is activated, the display will show the distance from the boat to the new point in a pop-up window.
Switching the FISHPOINTS
Menu > Boat Settings > Joystick and Set Point > Fish Point
Setting
You can select the type of FISHPOINT feature.
FISHPOINT Bow:
The FISHPOINT feature is activated based on the bow.
FISHPOINT Stern:
The FISHPOINT feature is activated based on the stern.
TIP:
- The FISHPOINT feature can be switched using the boat control mode button on the engine data screen.
- For details about the FISHPOINT feature, sea the 6X9 Digital Electronic Control Owner's Manual.
Setting the Lateral Assist
Menu > Boat Settings > Joystick and Set Point > Lateral Assist
This function automatically corrects the deviation between the joystick operation and the boat movement in JOYSTICK mode.
PTT Switch
Menu > Boat Settings > PTT Switch
You can set the corresponding engine assignment when you press the PTT switch on the remote controller.
There are two types of assignment patterns.
For pattern 1 quad engine

For pattern 1 quint engine

For pattern 2 quad engine

For pattern 2 quint engine

TIP:
This display appears when more than quad engine applications are installed, and the Helm Master EX is equipped.
Remote Control Settings
Menu > Boat Settings > Remote Control Settings Configure the settings for the remote controller equipped on the boat.
TIP:
It may not be possible to show "Remote Control Settings" depending on the device equipped on the boat or the version of the system.
Trim Assist Preset
Menu > Boat Settings > Remote Control Settings > Trim Assist Preset
The trim assist feature is a feature to adjust the trim of the outboard motor to a specified angle according to the speed of the boat.
To use the trim assist, you must set the trim angle according to the boat speed in advance.
To use the trim assist, you must specify the source of the boat speed. See source specification. To activate the trim assist feature, turn on the Trim Assist button in the menu.
TIP:
You can also activate Trim Assist feature by pressing the "TRIM ASSIST" button on the digital electronic control.

Menu > Trim Assist
Setting the Trim Assist While Stopped
Menu > Boat Settings > Remote Control Settings > Trim Assist Preset > Static (RPM)
Menu > Boat Settings > Remote Control Settings > Trim Assist Preset > Static (GPS)
While your boat is stationary, you can set an appropriate trim angle corresponding to the speed.
"Static (RPM)" and "Static (GPS)" can be set only when the engine is stopped.
To set:
- Turn off the Trim Assist feature.Menu > Trim Assist
- Select "Static (RPM)" or "Static (GPS)" to open the setting screen.
![]()
- Select position 1.
![]()
- For "Static (GPS)", select "Set Speed" and enter the boat speed.
![]()
- Set the trim angle.
![]()
- Select the next lower position.
- Enter the engine speed for RPM and the boat speed for GPS.
- Set the trim.
- Repeat steps 6 to 8 to set the remaining positions.


TIP: In the case of triple and quad engine application, the trim angle different from that of port and starboard can be set by the central motor.
Setting the Trim Assist While Underway
Menu > Boat Settings > Remote Control Settings > Trim Assist Preset > Underway (RPM) Menu > Boat Settings > Remote Control Settings > Trim Assist Preset > Underway (GPS) While operating the boat, you can set an appropriate trim angle corresponding to the speed.
TIP: "Underway (RPM)" and "Underway (GPS)" can be set only while the engine is starting.
To set:
- Turn off the Trim Assist feature.
Menu > Trim Assist - Select "Underway (RPM)" or "Underway (GPS)" to open the setting screen.
![]()
- For "Underway (GPS)", operate at the boat speed you want to set.
- Adjust the trim angle.
- Select position 1.
![]()
- For "Underway (RPM)", operate at the engine speed you want to set, and for "Underway (GPS)", operate at the boat speed you want to set.
- Adjust the trim angle.
- Select the next lower position.
![]()
- Set the remaining positions by repeating steps 6 to 8.


Resetting the Trim Assist
Menu > Boat Settings > Remote Control Settings > Trim Assist Preset > Reset RPM Settings
Menu > Boat Settings > Remote Control Settings > Trim Assist Preset > Reset GPS Settings
You can reset the trim assist value that has been set.
Selecting the Source to be Used
Menu > Boat Settings > Remote Control Settings > Trim Assist Preset > Speed Source (RPM / GPS) Sources used for trim assist are engine speed (RPM) and boat speed (GPS).
TIP:
To use a GPS source, you must equip a GPS receiver that supports Helm Master EX.
LED Color Setting
Menu > Boat Settings > Remote Control Settings > LED Color Setting
Change the illumination lamp of the remote controller equipped on the boat.
To change the color of the illumination lamp when the shift is in neutral, select "Lever Pos. N" and select a color.

To change the color of the illumination lamp when the shift is forward and reverse, select "Lever Pos. F/R" and select a color.

TIP:
- With this setting, the illumination lamp of the joystick also changes. When using the joystick mode, the joystick LED lamp is only the color of the remote control when it is neutral.
- It may not be possible to change the color of the illumination lamp depending on the device equipped on the boat or the version of the system.
Trim Tab
Menu > Boat Settings > Trim tab Set the Bennett Auto Trim Tab.
TIP:
"Trim tab" is displayed when equipped with the Bennett Auto Trim Tab.
To calibrate the Trim Tab Sensor:
- Display the sensor calibration screen.
Menu > Boat Settings > Trim tab > Trim Tab Sensor > Sensor Calibration - Display the confirmation message, select "Yes".
![]()
- Press and hold the "DN" button on the AUTO TAB CONTROL until the actuator on the Bennett Auto Trim Tab is fully extended.
TIP:
Follow the instructions in the displayed information to operate AUTO TAB CONTROL. - Select "Confirm".
![]()
- Press and hold the "UP" button on the AUTO TAB CONTROL until the actuator on the Bennett Auto Trim Tab is fully retracted.
TIP:
Follow the instructions in the displayed information to operate AUTO TAB CONTROL. - Select "Confirm".
![]()


To display Sensor Status:
To display the sensor status of Bennett Auto Trim Tab, select the button as follows.
Menu > Boat Settings > Trim tab > Trim Tab Sensor > Sensor Status

To switch the LED on the panel:
To switch the LED of the AUTO TAB CONTROL on and off, select the button as follows.
Menu > Boat Settings > Trim tab > Trim Tab Sensor > Panel LED

To display the setting status:
To check the settings of the Bennett Auto Trim Tab, open the status screen.
Menu > Boat Settings > Trim tab > Auto Trim Tab Control >
Auto Trim Tab Status
To set the Auto Trim Tab Orientation (Numeric Input):
- Display the orientation setting screen.Menu > Boat Settings > Trim tab > Auto Trim Tab Control > Auto Trim Tab Orientation > Numeric Input
![]()
- On the numerical input screen, follow the display procedure to operate the boat and select "Enter Heading".
![]()
- Follow the displayed "Step 1: Rest State" procedure to operate the boat and select "Set".
![]()
- "Success" is displayed. Select "Set" to continue to the "Accel. Input" step.
![]()


To set the Auto Trim Tab Orientation (Accel. Input):
- Display the orientation setting screen.Menu > Boat Settings > Trim tab > Auto Trim Tab Control > Auto Trim Tab Orientation > Accel. Input
![]()
- Follow the displayed "Step 2: Acceleration State" procedure to operate the boat and select "Set".
![]()
- Follow the displayed "Step 3: Acceleration State" procedure to operate the boat.
![]()
- "Success" is displayed.
![]()


To set the mode for the FAV button:
Display the mode setting screen, and select the mode to be assigned to the FAV button of AUTO TAB CONTROL from "Roll Control", "Pitch Control", and "Roll & Pitch".
Menu > Boat Settings > Trim tab > Auto Trim Tab Control > FAV1 & FAV2 Settings > FAV1 > Mode
Menu > Boat Settings > Trim tab > Auto Trim Tab Control >
FAV1 & FAV2 Settings > FAV2 > Mode

TIP:
Select either "FAV1" or "FAV2" and select the mode to assign to the button.
To set the trim angle of the FAV button:
- Displays the trim angle setting screen.Menu > Boat Settings > Trim tab > Auto Trim Tab Control > FAV1 & FAV2 Settings > FAV1 > Position Menu > Boat Settings > Trim tab > Auto Trim Tab Control > FAV1 & FAV2 Settings > FAV2 > Position
TIP:
Select either "FAV1" or "FAV2" and select the position you want to assign to the button.
![]()
- Manually determine the Bennett Auto Trim Tab, throttle, and outboard motor trim to get the desired roll and pitch, and operate the boat.
- Select "Set".
![]()
- "Success" is displayed.
![]()


Off Timer
Menu > Boat Settings > Off Timer
You can switch the Off Timer feature.
The Off Timer is a feature that turns off the ignition switch of all engines one hour after the engine stops.
TIP:
"Off Timer" is displayed only when using Electronic Key Switch (EKS).
Tank Presets
Menu > Boat Settings > Tank Preset
You can set the tank information to be used. Tank preset setting is required to display tank level information on the engine data screen.
TIP:
Fuel sender is required to display "Tank Preset".
To set:
- Select the tank to set.
- Select "Name", enter the tank name, and select "Done".
![]()
- Select "Type" and select the type of tank.
![]()
- Select "Sensor" and select the type of tank level sensor.
![]()
- Select "Tank Capacity", enter the tank capacity, and select "Done".
![]()
- Select "Calibration" to choose the calibration method.
![]()
- Calibration method
- Calibrate according to the procedure displayed on the device.
![]()


TIP:
The tank preset cannot be set unless a fuel sender is connected.
Calibration
Fuel Flow Offset

Menu > Boat Settings > Calibration > Fuel Flow Offset The fuel flow display may differ depending on the natural environment and usage conditions.
To correct the display, follow the steps below.
To correct:
- Travel with the fuel tank full.
- After traveling, fill the fuel tank again and check the difference between the actual refueling amount and the fuel consumption display.
- Open the fuel flow offset screen, and enter the difference between the actual refueling amount and the meter's fuel consumption display.
Trim Zero Set

Menu > Boat Settings > Calibration > Trim Zero Set Allows you to initialize the trim angle to zero when all outboard motors are fully trimmed down.
To initialize:
- Select the menu button "
![]() ".
". - Select "Set Zero".
- Select "OK".
Adjusting the Compass

Menu > Boat Settings > Calibration > Compass Setup The compass must be set before using the autopilot and SetPoint features.
TIP:
If you do not set the compass, a pop-up window will appear. Selecting "Now" in the pop-up will also display the compass setting screen.
Compass Calibration
Menu > Boat Settings > Calibration > Compass Setup To set:
- Select the menu button "
![]() " and select "Compass Calibration".
" and select "Compass Calibration". - Select "Begin" button.
- Follow the instructions on the screen and turn your boat 1.5 turns to the left or right.
- When "Calibration Status: Success" is displayed, Select "OK".
Set North
Menu > Boat Settings > Calibration > Compass Setup TIP:
Before setting Set North, you must set Compass Calibration.
To set:
- Select the menu button "
![]() ", then select "Set North".
", then select "Set North". - Select "Begin".
- Follow the on-screen instructions to make your boat travel.
- When "Set North Status: Success" is displayed, select the "OK" button.
Fine Heading Adjustment
Menu > Boat Settings > Calibration > Compass > "" > Fine Heading Adjustment
By selecting the "Up" and "Down" buttons, you can adjust the compass in 1° increments.
Adjusting the Joystick

Menu > Boat Settings > Calibration > Joystick Calibration Displays the joystick calibration procedure. Adjust according to the procedure shown.
Joystick Calibration with Bow Thruster

Menu > Boat Settings > Calibration > Joystick Calibration w/ Bow Thruster
Helm Master EX can be used in collaboration with a bow thruster.
Displays the joystick calibration procedure when collaborating with Helm Master EX and bow thruster.
TIP:
It is recommended that this calibration be done first with the joystick system.
To calibrate:
- Select "Next".
![]()
- Confirm that bow thruster collaboration is activated. Select "OK".
![]()
TIP:- While in bow thruster power switch is ON, push the "F1" switch on the autopilot panel to activate the bow thruster collaboration.
- If the bow thruster is powered off or there is a problem with the bow thruster, collaboration with the bow thruster cannot be activated. See the Vetus manual for more information on bow thrusters.


- Select "Next".
TIP:
Push and hold the "JOYSTICK" switch on the joystick until the "Joystick calibration with bow thruster started." message appears.
![]()
- Operate the joystick and select "Next".
TIP:
Maneuver to the port side or starboard side and keep the boat moving straight in the selected side.
![]()
- Select "Next".
TIP:
Push the "JOYSTICK" switch on the joystick to complete calibration.
![]()
- Select "Next" to complete the calibration.
![]()


TIP:
If the boat does not maneuver as desired, repeat the calibration or calibrate the opposite side.
Autopilot Sensitivity
Menu > Boat Settings > Calibration > Autopilot Sensitivity You can adjust the steering sensitivity when using the autopilot feature.
Increase the level for quick steering and decrease the level for slow steering.
Battery Management
Menu > Boat Settings > Battery Management You can set the battery management system.
TIP:
- It can be set only when equipped with a battery management system.
- The battery management system may not be available depending on the destination.
To set the battery management system:
- Select "BMS Preset", and select the battery to set.
![]()
![]()
TIP:- In Initial Settings, it is necessary to make settings for 3 settings: "Start 1", "Start 2", and "House".
Start 1: Main battery 1
Start 2: Main battery 2
House: House battery - Only the battery names for "Other 1" and "Other 2" can be changed.
- In Initial Settings, it is necessary to make settings for 3 settings: "Start 1", "Start 2", and "House".
- Select "Type", and enter the battery type.
TIP:
Select the battery type from the following 3 types.
FLStd: Flooded Battery
AGM: AGM Battery GEL: GEL Battery
![]()
![]()
- Select "Capacity", and enter 1 to 5000 Ah for the capacity of the selected battery.
![]()
![]()


NOTICE
- Enter the value at a 20-hour rate for the battery capacity. If a battery capacity that was calculated by a different calculation method is entered, it will not be possible to display the correct information on the Display Meter.
- If batteries are connected in parallel, enter the total value of the capacity of the connected batteries.
TIP:
- If you don't know the 20-hour rate for the battery capacity, contact the battery maker and then enter the correct value.
- If you replace the battery, you will need to make the initial settings again.
Device Configuration

Menu > Device Settings
Various settings for the device can be performed.
Changing the Background Design

Menu > Device Settings > Background
You can select and change the background design.
- Brushed Metal
- Carbon
- White
Setting the Display Unit and Time
Setting the Display Unit

Menu > Device Settings > Units > System Units You can set the units to be displayed.
Statute: Display unit suitable for the set navigation area
Metric: Meter unit
Nautical: Display unit used in navigation Custom: Select the unit for each item
Setting the Display Time

Menu > Device Settings > Units > Time You can set the time display.
Time Format: Sets the time display
Time Zone: Sets the time zone
Daylight Saving Time: Adjusts to daylight savings time.
Changing the Keyboard Layout
Menu > Device Settings > Keyboard Layout You can select either "QWERTY" or "ABCDE" keyboard layouts.
If you select "ABCDE", the keys will be arranged in alphabetical order.
Display Layout Settings

Menu > Device Settings > Edit Gauge Layout You can change the arrangement of the information displayed on the display.
Change the layout of the engine data screen and boat information screen.
Changing the Engine Data Screen Layout

Menu > Device Settings > Edit Gauge Layout > Edit Engine screen
Press and hold each item to change the display layout.
After pressing and holding each item, select the item you would like to display.
To return to the menu screen from the display layout screen, select the back button.
TIP:
When multiple outboard motors are installed, the display of boat status, engine status, and sub status items must be changed from the boat screen layout.
Changing the Boat Screen Layout
Menu > Device Settings > Edit Gauge Layout > Edit Boat screen
You can change the display of the boat status, engine status, and sub status items displayed when multiple outboard motors are installed.
After pressing and holding each item, select the item you would like to display.
TIP:
Displays "Edit Boat Screen" only when multiple outboard motors are installed.
Display Boat Speed
Menu > Device Settings > Edit Gauge Layout > Display Boat Speed
Select this button to show or hide the speedometer.
Trim Display
Menu > Device Settings > Edit Gauge Layout > Trim Display Select this button to show or hide the trim angle.

TIP:
Displayed only when using Command Link and one outboard motor.
Adjusting the Backlight

Menu > Device Settings > Brightness Adjusts the backlight.
Adjusting the Backlight Brightness

Menu > Device Settings > Brightness >Backlight
+: Increases brightness.
–: Decreases brightness.
Auto: Adjusts brightness automatically.
Backlight Sync
Menu > Device Settings > Brightness > Backlight Sync The brightness of multiple displays will be synchronized while the sync function is activated.
Changing the Color Mode

Menu > Device Settings > Brightness > Color Mode You can select the color of the screen display.
Day Color:
The background color will be the color selected in the Background.
Night Color:
The background color will be always black.
Auto:
The background color will be automatically switched between Day Color before sunset and Night Color after sunset according to the set time information and longitude.
TIP:
To select Auto, you must equip a GPS.
Setting the Buzzer Sound

Menu > Device Settings > Beeper You can adjust the buzzer sound.
Off: Turns off the buzzer sound.
Alarms Only: The buzzer sounds only when an alarm occurs.
Key and Alarm: Buzzer sounds when being selected and when an alarm occurs.
Resetting the Settings

Menu > Reset
You can reset the set information.
Resetting the Number of Outboard Motors
Menu > Reset > Number of Engines
You can change the number of outboard motors displayed on this device.
Display the selection screen and enter the number of outboard motors.
TIP:
- For Helm Master EX, you can select up to 5 outboard motors.
- For Command Link, you can select up to 4 outboard motors.
Resetting the System
Menu > Reset > Reset System
You can reset the system information.
Resetting the Steering System
Menu > Reset > Reset Steering System You can reset the steering system information.
TIP:
The steering system varies depending on the outboard motor installed on your boat. If you would like to change the settings, contact your Yamaha dealer.
Switching the Stations
Menu > Reset > Change Station
You can set the station where the display is equipped.
TIP:
The selected station is displayed next to the Change Station button.
Restoring the Factory Settings
Menu > Reset > Reset Default Settings
Returns the CL5 display settings to the factory settings.
NOTICE
- Restoring the factory settings will reset the various settings entered so far.
- If there is a problem with the display, contact your Yamaha dealer before resetting.
Cleaning the Screen
NOTICE
Cleaners containing ammonia, ethanol blended gasoline, benzine and ethanol will harm the anti-reflective coating.
The device is coated with an anti-reflective coating which is sensitive to waxes and abrasive cleaners.
To clean:
- Apply an eyeglass lens cleaner suitable for anti-reflective coatings to a soft, clean, lint-free cloth.
- Gently wipe the screen.
Screenshots
You can save a screenshot of any screen shown on your display as a bitmap (.bmp) file.
You can view the screenshot on your computer.
To take a screenshot:
- Connect the USB memory stick to this device.
- Turn on the capture settings.
Menu > Device Settings > Screenshot Capture - Display the screen you would like to capture.
- Tap and hold the lower left corner of the screen.
TIP:
When not using the USB memory stick, attach the cap to the device.
Troubleshooting
My device will not acquire GPS signals
If your device is not acquiring GPS signals, there could be a few causes. If your device has moved a large distance since the last time it acquired GPS signals or has been turned off for a long time, your device may not be able to acquire the GPS signals correctly.
- Ensure your device is using the latest software. If the software is not up-to-date, update the software. Contact your Yamaha dealer for software updates.
- Make sure the antenna has a clear view of the sky so that the antenna can receive the GPS signal. If it is mounted inside a cabin, make sure it is close to a window so that it can receive the GPS signal.
My device will not turn on or keeps turning off
Devices erratically turning off or not turning on could indicate an issue with the power supply to your device. Check the following to determine the cause of the power supply problem:
- Check if the battery is charged. You can check the battery charge status by checking whether other devices powered by the battery are functioning.
- Check the power fuse.
The fuse is located in a holder on the red wire of the power cable. Check that the correct amperage fuse is installed. See the label on the cable or the installation instructions for the appropriate amperage.
Also make sure there is still a connection inside the fuse. Use a multimeter to check. If the fuse is good, the multimeter will read 0 ohm. - Make sure that your device is supplied with a voltage of 10V or more (12V is recommended).
To check the voltage, measure the DC voltage at the female power socket and the ground socket of the power cable. If the voltage is less than 10V, your device will not turn on. - If the device is receiving enough power but does not turn on, contact your Yamaha dealer.
Contacting Yamaha Support
Contact the Yamaha dealer from which you purchased your boat.
Documents / ResourcesDownload manual
Here you can download full pdf version of manual, it may contain additional safety instructions, warranty information, FCC rules, etc.
Advertisement


Need help?
Do you have a question about the CL5 and is the answer not in the manual?
Questions and answers