Advertisement
Using this Manual
Legend
 Important
 Hints and Tips
Read Before Use
DJI™ provides you with tutorial videos and the following documents:
- Safety Guidelines
- Quick Start Guide
- User Manual
It is recommended to watch all the tutorial videos and read the Safety Guidelines before using for the first time. Make sure to review the Quick Start Guide before using for the first time and refer to this User Manual for more information.
Product Profile
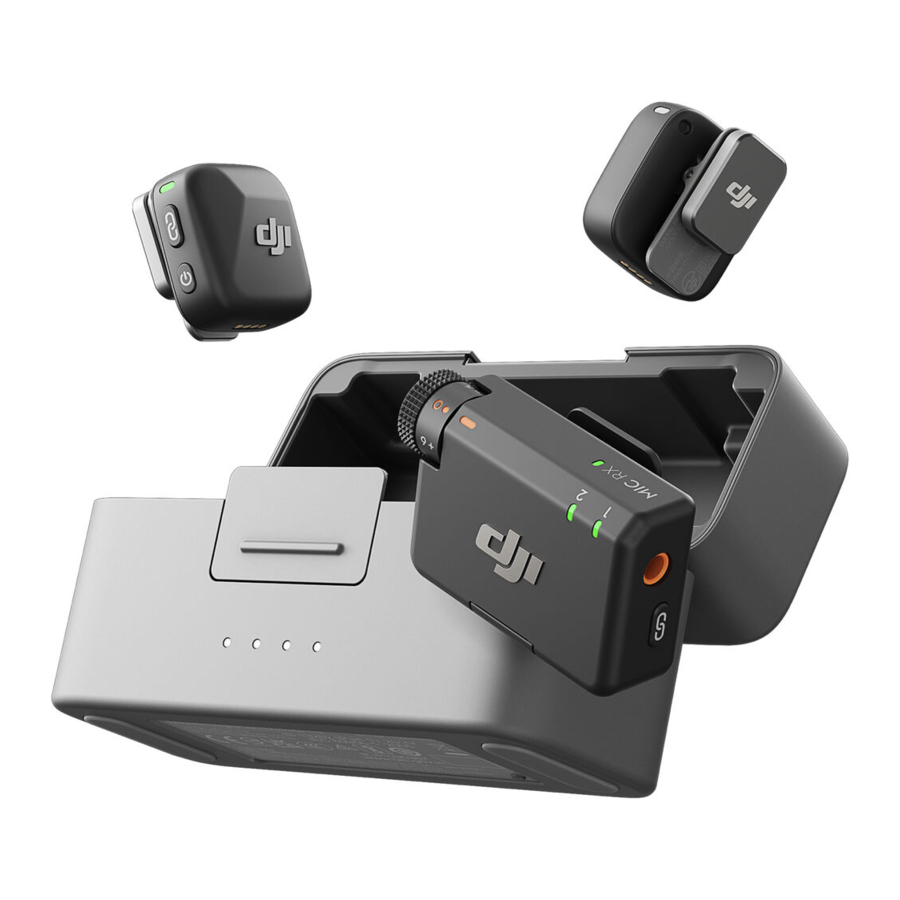
Transmitter

- System Status LED
Battery Level ![]()
Solid red 0-10% ![]()
Solid green/blue * > 10% Link Status with the Receiver ![]()
Solid green Linked with the receiver ![]()
Blinks green slowly Not linked with the receiver ![]()
Blinks blue and green alternately Linking Bluetooth Link Status ![]()
Solid blue Linked with a Bluetooth device ![]()
Blinks blue slowly No Bluetooth device linked ![]()
Blinks blue and green alternately Linking Battery Level During Charging* ![]()
Blinks green/blue slowly 0-25% ![]()
Blinks green/blue twice 26-50% ![]()
Blinks green/blue three times 51-75% ![]()
Blinks green/blue four times 76-100% ![]()
Off Fully charged Firmware Update ![]()
Solid yellow Firmware updating * The color of the light depends on the working mode. Take the green light as an example.


- Linking Button
Press and hold for two seconds to start linking. After connecting the microphone to DJI filming device, press to start or stop recording videos. - Power Button
Press and hold for two seconds to power on or off. Press to enable or disable noise cancelling. - Noise Cancellation LED
Solid yellow: Noise cancelling enabled
LED off: Noise cancelling disabled
Receiver

- Power Button
Press and hold for two seconds to power on or off. - Dial
Rotate to adjust the gain of the receiver. - Transmitter Status LED
Battery Level ![]()
Solid red 0-10% ![]()
Solid green > 10% Status ![]()
Off Not linked with the receiver ![]()
Blinks green quickly Linking ![]()
Solid yellow Noise cancelling enabled
- Receiver Status LED
Battery Level ![]()
Solid red 0-10% Channel ![]()
Solid green Mono/Safety Track ![]()
Solid cyan Stereo ![]()
Blinks green/cyan slowly * No audio recording device linked Bluetooth Link Status ![]()
Solid blue Linked with a Bluetooth device ![]()
Blinks blue slowly No Bluetooth device linked Battery Level During Charging** ![]()
Blinks green/blue slowly 0-25% ![]()
Blinks green/blue twice 26-50% ![]()
Blinks green/blue three times 51-75% ![]()
Blinks green/blue four times 76-100% ![]()
Off Fully charged Firmware Update ![]()
Solid yellow Firmware updating * The color of the light depends on the current channel used. Take the green light as an example.
** The color of the light depends on the working mode. Take the green light as an example.


- 3.5mm Audio Output Jack
For audio output to a camera. - Linking Button
Press and hold for two seconds to start linking. Press twice to switch between Mono and Stereo. - Expansion Port
Used for connecting to the phone adapter. - Data Port (USB-C)
- Clip
Charging Case

- Battery Level LEDs
![]() LED is on
LED is on
![]() LED is blinking
LED is blinking
![]() LED is off
LED is off Battery Level During Charging (LEDs Blink in Sequence) ![]()
76%-99% ![]()
51%-75% ![]()
26%-50% ![]()
≤25% ![]()
Fully charged Battery Level ![]()
76%-100% ![]()
51%-75% ![]()
26%-50% ![]()
10%-25% ![]()
< 10%
 LED is on
 LED is blinking
 LED is off


- Charging Port (USB-C)
- Fully charge the battery at least once every three months to maintain battery health. If the battery is not used for an extended period, battery performance maybe affected or may even cause permanent battery damage.
Using the Product
Charging
Charging with the Charging Case
Place the transmitters and the receiver in the charging case to start charging simultaneously. If the charging case runs out of power, use the provided USB-C cable to charge the case. The transmitter and receiver will automatically power on once removed from the charging case.

Charging with the Charging Dock
If the combo purchased does not include a charging case, attach the transmitter to the charging dock and use the provided charging cable to charge the transmitter and receiver.

Installing the Windscreen
In outdoor or windy environments, use the windscreen to reduce wind noise and improve audio quality.

Wearing the Transmitter
The transmitter can be attached to clothing using the clip or magnet, or can be placed on a stable surface using the magnet.

Linking the Transmitter and Receiver
Before first use, refer to Updating Firmware to update the device to the latest firmware version. The transmitter and receiver in the combos are linked by default. Follow the steps below to link the transmitter and receiver if they become unlinked.
Linking via the Charging Case
Place the transmitters and the receiver in the charging case to link them automatically.
Linking Manually

- Press and hold the linking button on the transmitter for two seconds until the system status LED blinks blue and green alternately.
- Press and hold the linking button on the receiver for two seconds until the transmitter status LED on the front of the receiver blinks green rapidly, indicating that the device is in linking status. The status LEDs will turn solid green after successful linking.
Using with a Phone
Install the receiver (RX) to the phone using the adapter, then clip or magnetically attach the transmitter (TX) to the collar. The transmitter can then capture audio for the phone.

- Press the linking button on the transmitter to start and stop recording.
- For extended filming or live streaming, it is recommended to use the adapter to attach the receiver to the phone. After installation, when using the charging cable to charge the receiver, the phone can be charged simultaneously.
- The Lightning adapter is sold separately.
Using with a Camera
Mount the receiver to the camera using the clip and connect the audio cable. The transmitter will then capture audio for the camera.

- After installation and connection, visithttps://www.dji.com/mic-mini/downloads and refer to the Instructions on Recommended Gain for Camera Setup to reduce the camera gain in order to prevent audio clipping.
- After adjusting the camera gain, it is recommended to increase the gain of the receiver for better audio quality.
Using with a Computer

Connect the receiver to the computer using the provided charging cable or adapter, and set the audio input options on the computer. The transmitter can then be used as an external microphone.
Transmitter Directly Connected to Filming Devices
The transmitter can connect to phones or DJI filming devices via Bluetooth.

Connecting to a Phone
- When the transmitter is powered on, press and hold the linking button on the transmitter for two seconds until the system status LED blinks blue and green alternately.
- Enable Bluetooth on the phone and select DJI Mic Mini-XXXXXX among the searched Bluetooth devices to connect. Connection is successful when the status LED on the transmitter is in solid blue.
The transmitter will then function as an audio input device and can be used with thirdparty recording or live streaming applications.
Connecting to DJI Filming Devices
Enter the system settings interface of your DJI filming device. Tap Wireless Microphone and follow the on-screen instructions to complete the connection. Connection is successful when the status LED on the transmitter is on solid blue.
Press the linking button on the transmitter to start and stop recording on the filming device. Tap Wireless Microphone to configure audio-related settings for the transmitter.
Firmware Update and Parameter Adjustment
After connecting the microphone to the DJI Mimo app, you can update the firmware or adjust parameter settings using your phone.
Connecting to the DJI Mimo App
Connecting via the Adapter

- Make sure that the transmitter and receiver are linked.
Connecting via Bluetooth
Connecting the Transmitter
- Refer to Connecting to a Phone to connect the transmitter to a phone via Bluetooth.
- Open the DJI Mimo app to automatically search for nearby available devices. Tap to connect once the transmitter is discovered. After successful connection, the app will automatically enter the device settings interface.
Connecting the Receiver
- When the receiver is powered off, press and hold the power button for six seconds. The system status LED on the receiver will blink green and then blink blue slowly, indicating that the receiver is ready to be connected.
- Open the DJI Mimo app to automatically search for nearby available devices. Tap to connect once the receiver is discovered. After successful connection, the app will automatically enter the device settings interface.
Updating Firmware
Tap About Devices on the device setting interface of the DJI Mimo app to view the device name, SN code, and firmware version. Tap the firmware version to download and install the latest version.
- When updating the firmware on an iOS device, disconnect the adapter and then connect the transmitter and receiver to the DJI Mimo app via Bluetooth separately.
Adjusting Parameters
In the device settings interface of the DJI Mimo app, you can view connected devices and their battery status or adjust parameters.
- When the transmitter status LED is disabled, press any button can turn it on.
Specifications
Visit the following website for specifications. https://www.dji.com/mic-mini/specs
Aftersales Information
Visit https://www.dji.com/support to learn more about aftersales service policies, repair services, and support.
WE ARE HERE FOR YOU

Contact
DJI SUPPORT
Documents / Resources
References
Download manual
Here you can download full pdf version of manual, it may contain additional safety instructions, warranty information, FCC rules, etc.
Advertisement


Need help?
Do you have a question about the MIC MINI and is the answer not in the manual?
Questions and answers