Advertisement
LET'S GET STARTED
ESTIMATED TIME FOR ASSEMBLY

YOU WILL NEED:
- Safety Glasses
- Tape Measure
- Pencil
- Drill
- Phillips-Head bit, 5/16" hex head bit, & 1/4" bit
- Rubber Mallet
- Chop Saw (if needed)
CARE & MAINTENANCE
Use a damp cloth to wipe off dust and dirt periodically. When necessary, use warm, soapy water to clean your railing. Regular cleaning of the railing is necessary to keep the railing in good condition and ensure its durability.
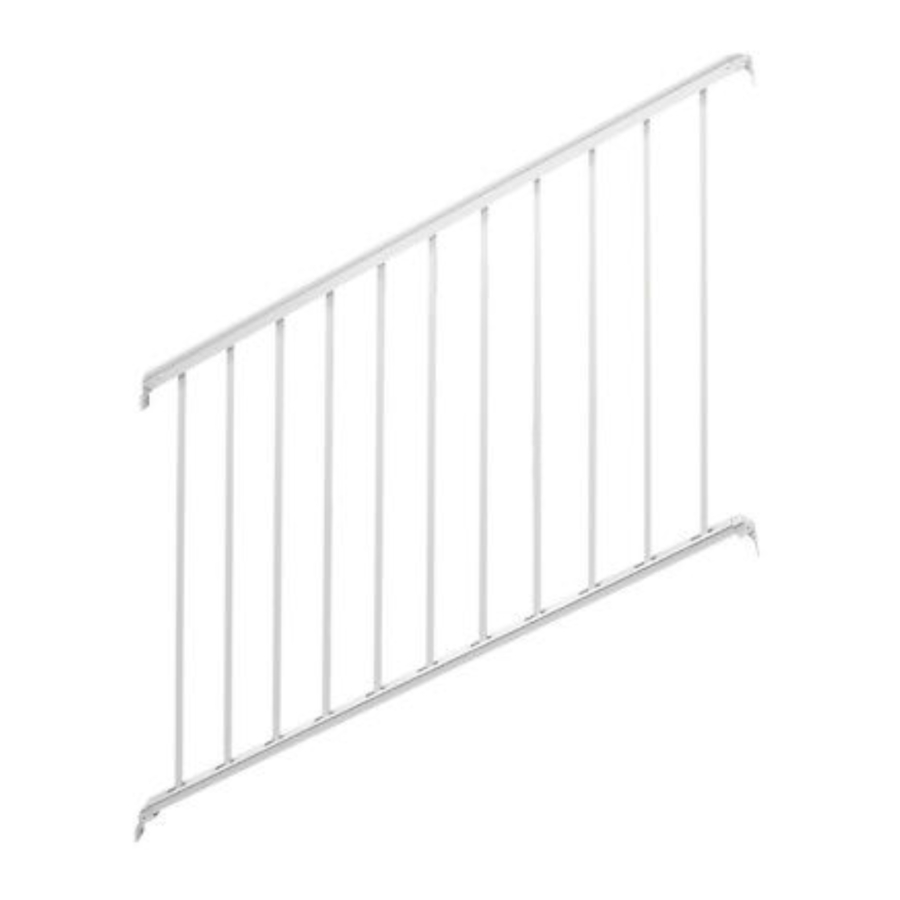
WHAT'S INCLUDED

SIZING YOUR RAIL
(IF NECESSARY)
If you determine that your railing needs to be cut down, follow these steps before moving to the assembly of your rail kit. If your rail does not need cut, skip to Part 1.
- This step assumes that your stairs have a standard pitch between 28° and 35°. If your stairs fall outside this range, contact us or consult a professional contractor.
Slide the screw covers (C) out from the top (A) and bottom rail (B). Measure from the tip of the landing that your top stair post will be mounted on to the tip of the bottom stair. This is what will be referred to as tip-to-tip length.
Subtract 6-1/4" from tip to tip length to find your cut length. Mark the top and bottom rail at cut length, being mindful of picket spacing (cut with the same amount of rail past each end picket. Be sure first picket hole is not within 1 ½" of end of rail to allow for bracket).

- Use a chop saw to make the necessary cuts to both the top rail, bottom rail, and screw covers.


RAILING ASSEMBLY
- Slide the screw covers (C) out from the top (A) and bottom rail (B). Insert a picket (D) into the first opening in the top rail, aligning the holes. Insert a picket screw (H) through both holes. Do not tighten the picket screw yet.

- Repeat Step 1, inserting all pickets and picket screws into the top rail, but don't tighten the picket screws yet.

- Repeat the above steps with the bottom rail (B), aligning all picket holes and inserting screws, but not yet tightening the screws.
Note: Getting the first picket in and adding the screw is key to getting the rest of the bottom pickets to line up. You may have to tap the bottom rail with a rubber mallet to get this done.

- Once all pickets and picket screws are set, use a drill (set on a low torque) to tighten the screws into both the top rail and bottom rail.
Note: Be sure not to over-tighten the screws

- Slide the screw cover (C) into the groove on both the top rail and bottom rail to conceal the picket screws.


ATTACHING TO POSTS
(POSTS SOLD SEPARATELY)
Note: Mounting your railing to an existing structure, such as a porch column or a wall, uses a similar process. Follow the instructions below, but pay attention to special instructions with a (*) next to them.
- Begin with the top post (shorter post). Then mark a line on the post 1-3/4" above the top of the base.
*When mounting to an existing structure, mark the structure at 2-1/4" from the ground.
Ensure the brackets are installed on the side of the post that is perpendicular to the holes in the post base.


- Align the bottom edge of the bottom bracket with the marked line on the post and secure it in place using 2 self-drilling screws.

- The rail only angles one way. Before attaching the bracket, ensure the open space on the bottom rail next to each picket is toward the top step.
Next, slide the top end bracket onto the end of the top rail. Slide the post with bottom bracket attachment onto the bottom railing but do NOT fasten.
*When mounting to an existing structure, you'll need to prop up the railing to achieve this step. For best results, use a wood spacers or an additional person for support.

- Mark each mounting hole location for the top end bracket. Remove the railing from the end brackets.

- Use 3 self-drilling screws to mount the top rail end bracket onto the post, being careful to attach where marked.

- Slide the post that now has two brackets back onto the rail. Using the 1/4" drill bit, a hole should be drilled from one side of top/bottom rail through bracket and out other side. Fasten brackets to top and bottom rail using the binder bolts. It is highly recommended this be done on the side of the railing with the screw covers.

- Insert top and bottom end brackets into the open end of your railing.
Stage your rail by placing the top post on the top landing where you will mount it. (It is recommended to place the base 4" from the tip of the top step.)

- Stage the bottom post at the end of the rail so that brackets are flush to bottom post and mark hole locations of brackets on bottom post.
Note: This may be easier with a second person.

- Remove the brackets from the rail and use your marks to attach the brackets to the bottom post using self-drilling screws. Then, slide the rail into the attached brackets and attach using the remaining binder bolts by sliding the female end through the opening and attaching the male end on the opposite side.


MOUNTING YOUR RAILING
Due to a variety of mounting conditions, Superior does not provide specific instructions for mounting your railing.
Typically, Superior Aluminum railing will be mounted in one of two ways:
Surface mounted to concrete: It is recommended to utilize a wedge anchor at least 3" in length. Diameter of anchors for Superior Aluminum Series 9P post bases should be 3/8". If possible, railing should be mounted at least 5" from the edge of concrete to the middle of the post to avoid breakage.
Surface mounted to wood/composite material: It is recommended to utilize an anchor that is at least 4" in length. Wood/composite surfaces MUST have proper blocking underneath mounting point to ensure sufficient strength. Diameter of anchors for Superior Aluminum Series 9P post bases should be 3/8". If possible, railing should be mounted at least 4" from the edge of surface to the middle of the post to avoid breakage.
Whenever possible, it is recommended that mounting be performed or supervised by individuals experienced and familiar with construction trades. Superior Aluminum maintains no liability for issues related to improper mounting of railing.
WARRANTY
For full warranty details, please email info@superioraluminum.com.
QUESTIONS OR CONCERNS?
CONTACT US
info@superioraluminum.com
(937) 526–4065
Have an issue?
Let us know.
Love your product?
Let everyone know.
Leave us a review
superioraluminum.com/reviews
Documents / Resources
References
![superioraluminum.com]() Customer Reviews - Superior Aluminum Products
Customer Reviews - Superior Aluminum Products![superioraluminum.com]() Superior Aluminum Products | Railing, Columns, and Fence
Superior Aluminum Products | Railing, Columns, and Fence
Download manual
Here you can download full pdf version of manual, it may contain additional safety instructions, warranty information, FCC rules, etc.
Advertisement

Need help?
Do you have a question about the Aluminum Series and is the answer not in the manual?
Questions and answers