Advertisement
- 1 Overview
- 2 Hardware Overview
- 3 Start Up
- 4 Synth Audio Structure
- 5 Display & Controls
- 6 QWERTY Keyboard
- 7 First Steps with Scenes
- 8 Synth Grid
- 9 Chords
- 10 Synth Presets
- 11 Macros
- 12 Sequencer & Arp
- 13 Mixer
- 14 Effects
- 15 Modulation
- 16 MIDI Control of Synth
- 17 Other Settings
- 18 Firmware Update
- 19 Emergency Firmware Update
- 20 Documents / Resources
Overview
Synth is a multi-engine polyphonic synthesizer. Synth can operate with up to 3 synth engines each of which is selectable from the engine types available. Some engines have an element of familiarity, being conceived in the Polyend Tracker and Play family of devices. Others are new and expand the sonic possibilities even further. The Synth workflow and structure revolves around 'Scenes'. A scene is a collection of all the elements including presets, macros, settings, effects and parameters that create the sound and pattern. These are stored as self contained functions in a library from which to assemble bigger and more complete productions.
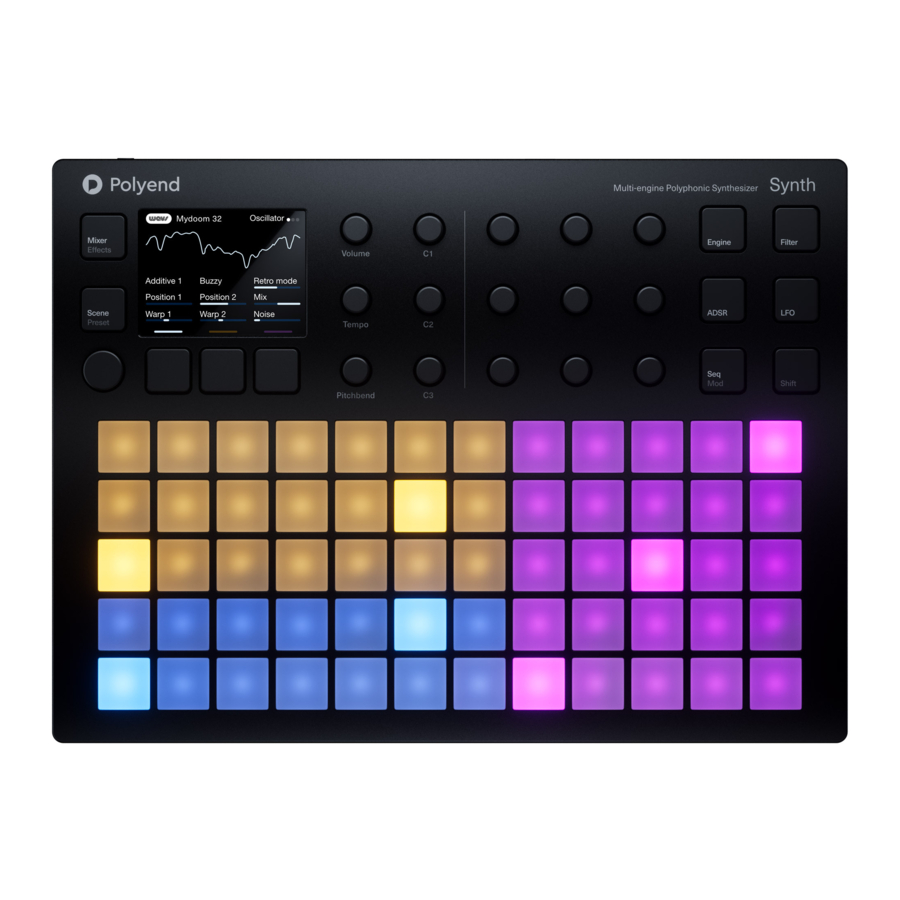
Hardware Overview

Start Up
Synth is a low power user and can therefore be powered from the supplied mains USB adapter or from a rechargeable battery power bank. When restarting Synth the previously open project will be re-opened.
POWERING ON / OFF SYNTH

- Connect the supplied USB-C Mains cable between Synth and the supplied USB plug. Also Synth can operate with a portable USB power bank*. Synth requires a 5V, 1A rated supply.
- Ensure the SD Card is installed correctly for Synth to operate.
- Quickly press the small power button located on the rear left (looking from the top). Synth will start up and the previous project reopened.
- To power off, press and hold the small power button located on the rear left (looking from the top) until the 'Powering Down' message appears and the timer bar ends. Synth will power off.
* It is recommended by Polyend to use a standard power bank without smart features. Intelligent / smart power banks or PC / Mac power may have features that interfere with the continuous supply required by Synth. A USB - C to USB - A cable is supplied.
Synth Audio Structure

Diagram is a single line illustration, used only for guidance. This is not a detailed schematic and does not show the stereo channels

- LCD Display Hi Resolution Display.
- Synth Engine / Multi Function Buttons Each [Screen] button selects one of the 3 synth engines or selects a defined option in a function menu.
- Multi-Functional Screen Knob Clickable encoder. Click to select the main menu. Turn to change synth function pages. (Screen)
- Grid Pads 5 x 12 Silicone [Pads]. Configurable for playing and controlling the 3 synth engines.
- Parameter Knobs 9 Dynamic knobs control the respective parameter set for the function displayed on the screen.
- Master Volume Control of primary master (Vol) dB level.
- Tempo & Swing Adjusts the global (Tempo). Range is 10 to 400 beats per minute. Use Shift to adjust swing 25%-75%
- Pitchbend Adjusts the (Pitchbend) value -100 to +100 only while turning the knob. Resets to 0 when the knob is released
- Macro 1 & Combo Control. Adjust synth macros or relative common parameters for all or selected synth engines using one (C1) Knob.
- Macro 2 & Combo Control. Adjust synth macros or relative common parameters for all or selected synth engines using one (C2) Knob.
- Macro 3 & Combo Control. Adjust synth macros or relative common parameters for all or selected synth engines using one (C3) Knob.
- Mixer & Effects Opens the mixer page for Level and Pan of all the synth engines. Shift to open the ModFX parameters.
- Scene & Preset Opens the [Scene] manager to load & save. Use [Shift] + [Scene] to open the synth preset browser.
- Synth Engine Osc Parameters Opens the oscillator page for the selected synth engine. Engine is selected with [Screen] buttons.
- Synth Engine Filter Parameters Opens the filter page for the selected synth engine. Engine is selected with [Screen] buttons.
- Synth Engine ADSR Envelope Parameters Opens the Filter and Amp Envelope pages for the selected synth engine. Selected synth with [Screen].
- Synth Engine LFO Parameters Opens the Low Frequency Oscillator pages for the selected synth engine. Selected synth with [Screen].
- Sequencer Mode & Modulation Routing Opens the sequencer mode page for the selected synth engine. Shift to adjust modulation amounts.
- Shift Use [Shift] in conjunction with a control to access a secondary function, e.g. the button grey text option.
The 5 x 12 grid pads are velocity sensitive. All knobs with the exception of the left side screen knob are touch sensitive.
Display & Controls
Each page will display the parameter information and control options for the selected function. While generally this is based on the context and mode of operation, there are some common features and navigation principles that apply across all (or most) of the generic pages of Synth.

Colour Scheme Represents the Synth Engine Selected

The 3 [Screen] Buttons under the display represent each of the synth engines 1, 2, 3 by default. In some modes, these buttons will represent the function on the display directly above the button.

The values, range and scale as displayed will depend on the parameter represented.

| [Engine] | Square brackets in the descriptions represent the physical button or pads on the front panel. Push or hold to activate. |
| (Vol) | Round brackets in the descriptions represent the physical knobs on the front panel. All knobs except the screen knob are touch sensitive. Knobs are turned and / or tapped. |
QWERTY Keyboard
Some functions will require text editing for example when saving and naming scenes. The same functionality applies whenever the alphanumeric pop-up editor is used. The screen will display the QWERTY keyboard and the text string to edit, while the 5 x 12 pad grid will act as the keyboard's input. The screen buttons are also available to select actions.

The screen will display the characters which are represented by the grid pads. The 'f' and 'j' pads are highlighted to give a reference between the pads and the screen characters. Text can be typed in with the currently selected character lit orange on the display and the pad.

The following Synth controls also operate in the naming editor when the naming screen is presented:-
- Press (Screen) to add the highlighted character at the current cursor position in the name string.
- Move the character cursor left or right within in the text name string, Turn (Screen) knob.
- The dynamic screen buttons action specific commands, as displayed above the button. Confirm, Caps Lock and Auto Name are the three available commands.
First Steps with Scenes
Scenes are the core of the Polyend Synth. A scene is a collection of patches, settings, macros, parameters and sequence data. Think of a scene as one specific section or building block that contributes to a complete song or arrangement. A scene is the container for the all of the musical elements and helps to compose and organise discrete sections of an arrangement by working with manageable parts.
Artist Scenes are a library of scenes that showcase how Synth is used as an instrument, offering unique insights into the composition of the scene and bringing a signature style and flair to the collection.
Generic Scenes are song based scenes designed and build by the Synth user to develop custom productions and sound designs.
Components of a Scene

To create a scene, the configuration and development of these elements is required. The assembly of these will develop sounds and construct the scenes that can be used together in a wider production. You will develop your own workflow but the following steps cover the basic principles of scene creation.
Managing Scenes
Scenes can be managed either in the main menu under 'Project' or more directly by using the dedicated [Scene] button located to the left of the display screen. Up to 1000 scenes can be saved on the Micro SD Card.

Press the [Scene] button to open the Scene menu options. Alternatively, Press (Screen) Knob to open the main menu and select 'Projects'. Turn (Screen) to scroll and navigate the menu. Press (Screen) to select the highlighted option or sub-menu.
The [Screen] Buttons can be used to navigate back up the menu or select an option.
Navigate the list with the (Screen) knob.

Press the screen buttons located below the display to navigate backup in the menu, load or save a highlighted scene. Choose <Init> to create a new scene
| Creating a New Scene. | Press [Scene] button and then select [Init] button. Press [SHIFT] + [SaveAs] Button to save and name the scene. Enter the name with the keyboard on the grid. Press [Confirm] screen button when complete or Press [Back] to exit and move back to the scenes loader. The selected scene will now be active for editing. |
| Save a Scene. | Press the right [Save] Button to save to a highlighted and selected scene in the list. Hold [Shift] to 'Save As'. The naming menu will open to edit the name if required. Press [Confirm] screen button when complete to save / overwrite or Press [Scene] to exit and backup in the menu. |
| Load a Scene. | Navigate and highlight a scene to load using the (Screen) knob. Press the middle [Load] Button to load the highlighted and selected scene from the list. The scene will open ready to edit. |
Synth Grid
Synth user interface is based in a 5 x 12 pad grid which is used for playing synth presets. The grid is customizable to match your preferred style and also to take advantage of using all 3 synth engines at the same time. The synths, modes, chords, scales and root notes are configurable.
Configuring the Grid
Configuration is found in the main menu, under the grid options. The main menu is accessed with the screen knob. The grid settings are saved with the scene.
 Press the (Screen) Knob to open the main menu. Turn (Screen) to scroll and navigate the menu. Press (Screen) to select a highlighted option or sub-menu.
Turn to highlight 'Grid' - Press (Screen) knob to select.
The [Screen] Buttons can be used to navigate back up in the menu or to change pages.

Root e.g. C, Octave can be set per synth C1, C2 etc
Scale e.g. Chromatic, pads represent all notes in the selected scale.
Grid Page Settings accessed in the main menu, under the 'Grid' options. Press (Screen) knob to open the main menu and Turn the knob to navigate.
| Option | Global / Synth | Knob | Description |
| Layout | Global | C1 | 3 Devices Mixed: 3 Synths are positioned in a mixed arrangement across the pads |
| 3 Devices Vertical: 3 Synths are positioned in a vertical arrangement in the pad columns | |||
| 1st Device. Pads only represent Synth 1, notes horizontally positioned. | |||
| 2nd Device. Pads only represent Synth 2, notes horizontally positioned. | |||
| 3rd Device. Pads only represent Synth 3, notes horizontally positioned. | |||
| Scale | Global | C2 | Chromatic, Minor, Major, Dorian, Lydian Major, Lydian Minor, Locrian, Phrygian, Phrygian Dominant, Mixolydian, Melodic Minor, Harmonic Minor, BeBop Major, BeBop Dorian, BeBop Mixolydian, Blues Minor, Blues Major, Pentatonic Minor, Pentatonic Major, Hungarian Minor, Ukrainian, Marva, Whole Tone, Diminished, Super Locrian, Hirajoshi, In Sen, Yo, Iwato, Kumoi, Overtone, Double Harmonic, Indian, Neapolitan Major, Neapolitan Minor, Enigmatic |
| Root | Global | C3 | C, C#, D, D#, E, F, F#, G, G#, A, A#, B |
| Mode | Per Synth | Param 1, 2, 3 | Note |
| Ch Scale | |||
| Chord | |||
| Ch Pack | |||
| Follower - Only available when a chord mode is selected on another synth | |||
| Chord | Per Synth | Param 4, 5, 6 | Selects the Chord types when a Chord Mode is selected. Chord Types available (see below); None, Pow4th, Pow5th, Minor, Major, Dim, Aug, Sus2, Sus4, Maj7, Min7, Dom7, Min7b5, Maj6, Min6, MinMaj7, Maj9, Min9, Maj11, Min11, Maj13, Min13 |
| Root | Per Synth | Param 7, 8, 9 | Sets the root note octave range for each synth between C0-C8. The default is C1. Also this can be changed using a shortcut by Pressing [Screen] for a selected Synth + Turn (Screen) knob when in a synth display page. |
Polyphony:
Remember to configure a synth's voices when using chords. For example a triad would need 3 voices to play the chord. This setup is in the main menu under 'synths'.
Playing the Grid Pads
The pads will be lit to represent the colour for each synth. Synth 1, Blue, Synth 2, Yellow and Synth 3 Magenta. The root notes will also be identified for each pad. All pads will represent a note based on the scale and octave range selected for each synth.
| To play a note or chord. |  | Press the [Pad] or pads for the notes to play. The polyphony played will be based on the voice settings. |
| To play & sustain notes / chords |  | Hold [Shift] + Press the [Pad] or pads for the notes to play or to release a single note. Pads are velocity sensitive so the pressure applied will affect the output sound. |
| To release sustained a note |  | Double tap [Shift] to release all sustained notes. Also to release only specific notes, Hold [Shift] + Press the [Pad] or pads. |
| To apply velocity while playing. |  | Press the [Pad] or pads. Pads are velocity sensitive so pressure applied will affect the output sound volume level. The pad colour shade will also change to reflect the pressure applied. |
| Note orientation. |  | The pad colours represent the notes in the synth's scale. The alternate coloured pads represent the root note. Example, Synth 1 is Yellow Pads with an Orange pad defining the root note. |
Chords
The grid page, found in the main menu, offers a number of options to set how the grid will be used to play back notes or chords. Custom chords are also available as Chord Pack presets. These options are available in the 'Mode' options for each synth when in the Grid page.
Select Grid Option from the Main Menu
 Press the (Screen) Knob to open the main menu. Turn (Screen) to scroll and navigate the menu. Press (Screen) to select a highlighted option or sub-menu.
Turn to highlight 'Grid' - Press (Screen) knob to select.

| Mode | Description |
| Note | Plays only the individual notes from a single pad. Pressing multiple pads can play multiple notes as a chord manually if the voice count allows. |
| Chord | Allows individual pads to play as a chord as opposed to a note. This is the leading chord synth. Only one synth can be assigned to a chord mode and the others can be set as followers to this scale or remain as note pads. |
| Ch Scale | Allows individual pads to play as a chord within the selected scale. This is the leading chord synth. Only one synth can be assigned to a chord mode and the others can be set as followers to this scale or remain as note pads. |
| Ch Pack | Enables access to a selection of chord presets. These are selected using the 'Chord' option when in Chord Pack Mode. |
| Follower | This option is only available if another synth is set to a chord mode. The synths where this option is applied will automatically adapt the notes presented on the pads to match the chord scale. |
Synth Presets
Synth operates with up to 3 synth preset slots in a scene. The preset can be assigned with one of the available synth engine models each with a customizable voice count and parameter set based on the specific model.
Selecting A Synth Engine
Firstly select the synth slot to work on. The assignment of a synth model to a preset is performed in the 'Preset' Menu while its global configuration is found in the main menu, under the 'Synths' options. The main menu is accessed with the screen knob.
First you need to select synth slot (1, 2 or 3), then go to Scene/Preset menu and then select engine and/or Preset

Hold [Shift] + Press [Preset] button to open the preset menu options.
Turn (Screen) to scroll and navigate the list. Press (Screen) to select the highlighted option or sub-menu.

| Creating a New Preset. | Press [Shift]+[Scene] button and then select [Init] button. Press [SHIFT] + [SaveAs] Button to save and name the preset. Enter the name with the keyboard on the grid. Press [Confirm] screen button when complete or Press [Back] to exit and move back to the presets loader. |
| Load a Preset. | Navigate to a desired synth engine and select. The list of presets for the specific engine are listed. Select a preset, Press (Screen) Knob to load. The option to initialise to a blank state is available with the [Init] screen button option. |
| Save a Preset. | Once a preset has been edited and formed to a desired state, it can be saved. In the preset menu, Press [Save]. The preset can be renamed if desired. Confirm upon completion. |
Synth Engine Models
A collection of synth models are available to select from, each with a different style and character.
ACD

ACD transports you back to the golden age of electronic music with its recreation of iconic single-oscillator monophonic analog synths. Paying homage to Japanese legends, ACD not only captures the essence of these classics but also propels you into the future with a lightning-fast synthesis experience. It offers a rich palette of options, ranging from faithful monophonic analog recreations to entirely unique and innovative soundscapes.
VAP

VAP is a virtual analog polysynth, boasting a dual-oscillator architecture and a versatile modulation matrix. Complete with multiple filter flavors and pulse width modulation, VAP allows you to sculpt intricate patterns. This engine shines when it comes to creating mesmerising, evolving textures, crafting lush pads, and conjuring up one-of-akind sound effects.
PHZ

With PHZ classic phase distortion tones or experimental new sounds are possible. PHZ consists of 2 oscillators with varying shapes and unlike classic phase distortion synths, filters and a Polyend style mod-matrix have been included. The phase of an input waveform is distorted by functions/methods. Each of these functions can be gradually modulated by parameters X and Y ranging 0 ~ 1.
WAVS

Wavs is a unique wavetable synthesizer engine which plays and morphs between two wavetable oscillator samples while applying filtering. Wavetables are stored in plain WAV files in the Samples > Wavetables folder. Control of Position controls the scanning while it interpolates between the WAVs. Warp affects the the oscillator phase, stretching or warping from the centre to the edge of the sample point. This operates in a positive or negative dimension.
FAT

FAT is a powerhouse synth engine that epitomizes the lush, vintage warmth of classic analog synthesizers. At its core, FAT hosts three virtual analog oscillators and offers an intuitive drift and detune control, ensuring you can effortlessly sculpt iconic massive sounds. The presets contain two distinct flavors of ladder filters inspired by two unique analog classics. It offers a versatile range of sounds, from deep reese basses to ethereal pads, expressive leads and classic keyboards.
WTFM

WTFM is a unique 2-operator FM synth engine that utilized wavetable based oscillators driven by a 3x feedback system. The operators are based on sweeping wavetables, ranging from fundamental sine waves to harmonically rich timbres, offering a diverse tonal palette. Whether you're sculpting smooth, enveloping pads or crafting cutting-edge metallic tones, WTFM empowers you to achieve unique textures with precision and authenticity.
PMD

Classic Physical modelling synthesis with unique controls and modulation options. Timbre controls the sound in a way specific to each generator. Mallet and Air Flow are specific parameters for each generator. The Exciter envelope should not be treated as an equivalent of amp envelope in a traditional synth - it's behavior has different effect on each generator (does not affect Strike at all). The Resonator further shapes the mixed sound of the generators.
GRAIN

Grain is a granular synth engine which takes a standard WAV sample file and generates a series of audio fragments called grains. The generation of the grains such as size, density and shape can be controlled as well as how these are scanned and played back, for example scanning position and direction. The cloud and burst features control how grains are generated, continuously or in cyclic batches of grains. Grain pitch can be played in paraphonic mode as chords.
Synths Configuration
The generic synth configuration for each of the 3 synth slots can be set in the main menu.
![]() Press the (Screen) Knob to open the main menu. Turn (Screen) to scroll and navigate the menu. Press (Screen) to select a highlighted option or sub-menu.
Press the (Screen) Knob to open the main menu. Turn (Screen) to scroll and navigate the menu. Press (Screen) to select a highlighted option or sub-menu.
Turn to highlight 'Synths' - Press (Screen) knob to select.
The [Screen] Buttons can be used navigate back up the menu or change page.
The 9 Macro knobs represent the 9 Parameters on display. The colours of the parameters represent the synths slots, 1-Blue, 2-Yellow and 3-Magenta

| Option | Knob | Description |
| Voice Count | Param 1, 2 or 3 | A maximum of 8 voices in total can be assigned although some configurations may be limited to less than 8 voices. The voice count of 8 is shared across all synths. |
| Midi Channel | Param 4, 5 or 6 | MIDI Channel assigned to control the synth when using an external MIDI controller. The channels are 1-16 across the mini jack MIDI interface or by using USB. |
| Local Mode | Param 7, 8 or 9 | Local mode 'On' ensures that the Synth's on-board pads are used for controlling the synth engines. When local mode is 'Off' the pads are not used for playing the synth and a connected MIDI controller will have exclusive control. |
Synth Parameter Settings
The parameter set available for sound design within the synth preset will depend on the synth model applied. As the synth engine models are all different, the parameters will vary significantly. The synth parameter buttons will allow quick access to the parameter sections.

Tap button to select the function and continue to tap to cycle through all the available pages for the selected function. Pages and parameters will vary depending on the current engine selected.
Global Parameter Settings
There are 3 global parameters available directly from the user interface. The first is Volume which controls the overall output volume level. Tempo sets the beats per minute and also swing setting. Finally, Pitchbend adjusts the synth pitch, typically used while playing live as a performance tool

Macros
Macros allow a collection of selected parameters to be assigned to a single control knob. This knob is then used to adjust all these parameters together. The three C1, C2 and C3 knobs are used for macro control. Velocity (default volume) and Pressure Macros also exist.
Creating and Editing Macros
Macro configuration is performed in the main menu. Up to 5 Parameters can be assigned to each of the 'C' Knobs. Velocity and Pressure can be setup with the same method.
 Press the (Screen) Knob to open the main menu. Turn (Screen) to scroll and navigate the menu. Press (Screen) to select a highlighted option or sub-menu.
Turn to highlight 'Macros' - Press (Screen) knob to select.
The [Screen] Buttons can be used navigate back up the menu or select options.
- Timbre
Macro Name
![]()
- Movement
Macro Name
![]()
- Experiment
Macro Name
![]()


Turn a parameter knob to adjust the assigned parameter range.
Macro name can also be edited.
Bipolar, On will configure the macro with a +/- range.
Assignments can also be deleted
The assignment is made in the synth function parameter pages.
Up to 5 Parameters can be assigned per macro knob
Using Synth Macro & Combo Controls
The macros are controlled using the C1, C2 and C3 Knobs. This will adjust the values of the parameters assigned. An example is to control both the filter and amp envelope attack with one knob. When adjusting the macro knob the parameters of the currently selected synth are edited.
In addition the C1, C2 and C3 knobs can be used to control a macro combination of all common parameters for multiple synths. This is performed by holding multiple synth screen buttons while adjusting the macro knob.

Typical Macro Convention
- Timbre
Affects timbral / tonal character of the sound. - Movement
Temporal effect using envelope duration, LFO rate etc - Experiment
Unexpected, unusual sounds
Sequencer & Arp
Each of the 3 synth presets has its own sequencer or arpeggiator. The option can be set up using the 'Seq' button.
 Press the [Seq] button to open the sequencer options. Press the [Screen] button to select one of the 3 synth presets to edit.
Turn Parameter Knob to select 'Arp', 'Seq' or 'Off' Pages.
or
Tap [Seq] to cycle through 'Arp', 'Seq' or 'Off' Pages The [PADS] can be used to input notes.
Off


Turn (Knob) or Press [Seq] to cycle the options.
Arpeggiator

Automatically plays a pattern loop based on the notes selected with the pads and the application of the settings and type.
Sequencer

Records a note pattern based on the settings applied to the sequence. Pads are used in 'Play' mode to replay the sequence based on the pitch of the note played.
Sequencer or Arpeggiator Options
| Arp/Seq | Parameter | Description |
| Arp / Seq | Swing | Adds an amount of variation by shifting some notes slightly off grid to play earlier or later |
| Arp | Type | Determines the arpeggio notes playback behaviour. Options are: Up, Down, Play Order, Random, Chord, Dyad, Triad, Inside out, Outside in, Up Down, Down Up, Weave, Return, Double Return. |
| Seq | Play | Rec | Select 'Rec' to play and record a sequence using the note pads. Once recorded, select 'Play' to use the pads to play back the recorded pattern based on the played note pitch. |
| Arp / Seq | Groove | Selects a groove template 1-11 in order to apply to the arpeggio or sequence pattern. |
| Arp / Seq | Humanize | Adds a human shuffle or rhythmic feel to the generated arpeggio or pattern. |
| Arp / Seq | Rate | Selects the note interval for the arpeggio. The options are: 1/1, 1/2, 1/4. 1/8, 1/16, 1/32, 1/64. |
| Arp / Seq | Gate Length | Length of each note in the arpeggio or sequence pattern. Length range is 1% to 200% |
| Arp / Seq | Oct Range | The number of octaves used to play in the arpeggio or sequence pattern. Plays back the notes across the selected octave range. |
Mixer
The mixer section enable the levels and pan for each of the synth audio channels to be adjusted. The final output mix will be determined by the settings within the mixer. In addition, the mixer section also controls the effect send levels.
 Press the [Mixer] button to open the mixer section pages. This contains the audio for each synth audio channel as well as the effect sends. Tapping the [Mixer] button will cycle through the two mixer pages.
Mixer

Mixer

Use the 9 parameter knobs to adjust the settings. The relative position of the knob will change the respective parameter on the display.
Effects
The master effect section consists of a Mod, Delay and Reverb effect and operates as a send/return arrangement. This means that a controllable amount of audio from the primary signal path of each synth can be sent to the effects and then the effect output returned back into the main mix. The sends are controlled in the Mixer pages.

The parameter settings for each of the effects are found in the effect pages, accessed using [Shift] + [Effects] the secondary function of the mixer button and also with [Shift] + [Filter]. Each effect is common for all synth preset audio channels. Effect presets can be saved and loaded in the 'Preset' menu, [Shift] + [Preset]. A Preset can also be initialised in this menu.

Hold [Shift] + Press [Effect] button to open the effect pages. Mod, Delay and Reverb are available. Tapping [Shift] + [Effect] will cycle through each of the effects and its parameter pages.
Mod

All-round modulation effect similar to dual delay line effect but better suited to chorus and flanger styles.
Delay

Classic 1 or 2 delay line effect. Enables mono or stereo delay.
Reverb

A combination of reverb models from classic plate to more experimental Warp algorithms..
Effect Parameters
| Effect | Parameter | Description |
| Mod | Model | Single, Dual (Dual tap single line mono), Stereo and Stereo X (cross channel feedback). |
| Mod | Mod Depth | Amount of modulation applied to the effect |
| Mod | Mod Freq | Speed of modulation applied to the effect. |
| Mod | Variation | Modulation variation which specific to each model. |
| Mod | Filter Freq | Adjusts the bandpass filter cutoff applied in the feedback loop |
| Mod | Filter Width | Adjusts the internal filter band width in octaves |
| Mod | Time Shift | Time shift between modulation lines |
| Mod | Feedback | Amount of output audio fed back to the input. |
| Delay | Model | Single, Dual Tap, Triple Tap (all single delay line) and Stereo or PingPong (two delay lines). |
| Delay | Time 1 | Delay line 1 time between taps in ms or note intervals if sync is on. |
| Delay | Time 2 | Delay line 2 time between taps in ms or note intervals if sync is on |
| Delay | Feedback | Amount of output audio fed back to the input. This generates the repeats on the delay lines. |
| Delay | Filter Freq | Internal band pass filter cutoff for reverb effect feedback |
| Delay | Filter Width | Adjusts the internal filter band range. |
| Delay | Flutter | Adds an audio character reminiscent of tape variations |
| Delay | Stereo | Adjusts the delay stereo width in the audio plane. |
| Delay | Tempo Sync | Synchronises the delay to the tempo clock when on. |
| Reverb | Model | Natural and Plate emulate more classical types while Warp model offers more creative movement. |
| Reverb | Time | Reverb time of the overall effects tail duration. Tail is also affected by other parameters such as geometry and size. |
| Reverb | Predelay | Represents the initial reflections from the first sound |
| Reverb | Brightness | Adjusts the Shelf EQ/Gain balance to affect clarity and character. |
| Reverb | Size | Emulates the room size. |
| Reverb | Geometry | Emulates a room shape for reflections or absorption of sound. |
| Reverb | Diffusion | Time between early reflections. Thickens or thins the sound. Typical user range 50-80. Try experimenting outside of this range. |
| Reverb | Filter Freq | Affects the reverb character using a shelf filter. |
| Reverb | Filter Gain | Shelf filter gain. Using in conjunction with brightness and Freq.. |
To initialise an effect preset, Select the effect then Hold [Shift] + Press [Preset] button to open the preset pages. In the preset menu, Press [Init]. The default settings are applied.
Modulation
Modulation refers to the process of changing or modifying a parameter. At the most basic level, changing a volume control by turning a knob, modulates its volume level. In an audio system modulation is typically applied using a function such as an envelope or low frequency oscillator to affect or modulate one or more other destination parameters. An example is a variation of a volume level to create a characteristic tremolo effect. Synth's modulation function is accessed as the secondary option on the Seq button which presents two pages of 6 modulation slots.

Hold [Shift] + Press [Mod] button to open the modulation section page.

Turn the respective parameter knob to change the setting for each of the three modulation functions.
Modifier: The Modifier is the modulation source and is the function which controls and modifies the destination parameter. For example an LFO - Low Frequency Oscillator or an ADSR - Envelope.
Destination: The destination is the specific parameter that will be modulated and affected by the modifier. It is the parameter that is changed. Example Osc1 Pitch.
Amount: The amount of modulation applied to the destination parameter. Typically a Bipolar range. Affects how much impact on the destination from the modulator Example 

MIDI Control of Synth
Synth can be controlled from an external device for example to play a note sequence from an external keyboard or to control the clock. MIDI - Musical Instrument Digital Interface is the protocol which manages communication between devices and Synth operates with MIDI directly via the TRS I/O or by using the USB-C Connection.

The starting point is to ensure that Synth is configured correctly for communicating with a MIDI Device. Each Synth can then be assigned to a MIDI input Jack or USB and one of the 16 MIDI Channels. This assignment is performed in the 'Synths' options of the main menu.
MIDI Configuration
MIDI Configurations settings are found in the main menu. Press (Screen) Knob to open the menu and navigate by turning (Screen) to highlight 'MIDI'. Press to select. Use the (Screen) knob and buttons to navigate and select within the MIDI Sub-menu.
| MIDI Function | Options | Description |
| Clock In | Internal, MIDI In Jack, MIDI In USB | Assign master clock control |
| Transport In | Off, MIDI In Jack, MIDI In USB | Master control of transport |
| Clock Out | Off, MIDI Out Jack, MIDI Out USB | Select clock output options |
| Wait for Start | Off, On | External transport input control off or on |
| Control Change Mapping | Various | Select a target option from the parameter Pages |
| Program Change Mapping | Various | Select a target option from the list |
MIDI Applications
Synth can be controlled by an external MIDI controller to play notes and chords, to change parameters using CC - Continuous Control Change messages and PC - Program Change messages to select a synth preset.

CC Control Change
A MIDI Controller knob or fader can be used to change the parameter in Synth. Set the MIDI Controllers CC setting for a knob to the mapped parameter in Synth. Mappings are visible for parameters from the MIDI Main Menu. Turn (Screen) knob to cycle through the pages showing the CC Number in ().

PC Program Change
A MIDI Controller knob or fader can be used to change synth preset. This is set in the MIDI settings using the 'Program Change Mapping' option. Set a preset to a PC number and then set the MIDI control to send this PC message. Turn (Screen) knob to navigate and Press (Screen) to select.

Other Settings
The main menu settings have been covered in the sections specific to the function. A set of other generic settings also are available in the main menu for the global behaviour of Synth.
 Press the (Screen) Knob to open the main menu. Turn (Screen) to scroll and navigate the menu. Press (Screen) to select a highlighted option or sub-menu.
Turn to highlight 'Settings' - Press (Screen) knob to select.
The [Screen] Buttons can be used navigate back up the menu or select options.
| Setting | Description |
| Grid Sensitivity | A range of settings to control the sensitivity of the grid pads when playing notes. Adjust to your personal preference. |
| Aftertouch Mode | Off, Intermediate, Delayed. |
| Pitchbend Range | Octave +/- range which will apply when adjusting the pitchbend knob. |
| Pitchbend Speed | Speed adjusts the behaviour of the pitchbend knob. Affects speed of return to centre. A setting of 0 will ignore 'return to centre' and set the pitch nominally. |
| Save Workspace When Idle | Automatically save the Synth state when no activity is detected. |
| Enter USB Storage Mode | Places the Synth into USB Mass storage mode. This allows a PC/Mac connection over USB to see the Synth and its SD Card as an external drive. |
| Firmware | Firmware version and build. Also option to update firmware. |
Firmware Update
Firmware updates may be provided by Polyend from time to time, to fix bugs or add new features. The process of updating can be performed in several ways. When performing updates it is strongly advised to follow the Polyend instructions supplied with each update. The instructions here are a generic guide only.
FIRMWARE UPDATE

- Download the latest firmware. Access firmware updates for your device from your registered account at Polyend.
- Copy the downloaded.psf firmware file into the /Firmware folder. This can be found in the root directory of the SD Card.
- Insert the SD card into Synth and power up.
- Press (Screen) knob to open the configuration and settings menu.
- Navigate through the Main Menu. The 'Firmware' sub-menu is found under the 'Settings' Menu. Open the 'Update Firmware' function, highlight the firmware version to install.
- Press (Screen), knob to select firmware.
- The screen will prompt "Yes' or 'No' to confirm using the left screen buttons. To continue press [Yes].
- The firmware will install and the on screen prompts provided will guide. The install process is typically less than 1 minute.
- Synth should restart automatically. If not and only when the update is 100% completed, Press On/Off to perform a manual start.
Emergency Firmware Update
Firmware updates are available from the Polyend portal for your registered device. A reset button is provided, recessed behind the rear panel for emergency situations. A reset can be performed if there are issues with the update method or to clear Synth issues but should not be used as a regular process for updates.
SYNTH & FIRMWARE RESET

- Download the latest firmware. Access firmware updates for your device from your registered account at Polyend.
- Copy the downloaded.psf firmware file into the /Firmware folder. This can be found in the root directory of the SD Card. Also ensure any previous update files remain in the firmware folder.
- Insert the SD card into Synth.
- Use a pin or thin object to press the internal reset button. This is located on the rear of the device behind the case next to the USB connection.
- Synth will reset and search the firmware folder on the SD Card. A random firmware will be selected and installed in order to recover Synth to a working state. The install process is typically less than 1 minute.
The reset option is useful if any lock ups or freezing occurs on Synth. It is not necessary in these situations to download a new OS. It is advised to keep a series of official, known good, firmware releases in the / firmware folder. That way steps 4-5 can be performed in case of issues and a random update will be performed from a known state. A manual update in the main menu to select the latest version can then follow. If problems persist, try updating after removing the 'workspace' folder from the SD Card.
Documents / Resources
References
Download manual
Here you can download full pdf version of manual, it may contain additional safety instructions, warranty information, FCC rules, etc.
Advertisement


Need help?
Do you have a question about the Synth and is the answer not in the manual?
Questions and answers