Advertisement
Quick Links
Advertisement

Related Manuals for Mercia Garden Products 01DTOVPN0705SDFW-V3


Summary of Contents for Mercia Garden Products 01DTOVPN0705SDFW-V3
- Page 1 MADE IN GREAT BRITAIN 2mm Drill bit Water proof Preservative...
-
Page 2: Any Questions
ANY QUESTIONS? Scan the QR code to contact us via our customer portal. - Page 3 ACCESSING VIDEO GUIDES... ACCESSING VIDEO GUIDES... 3. Scan QR code... Some steps within this set of instructions come with an added video guide for your convenience. These can be accessed via the QR code and used to aid you in constructing that step.
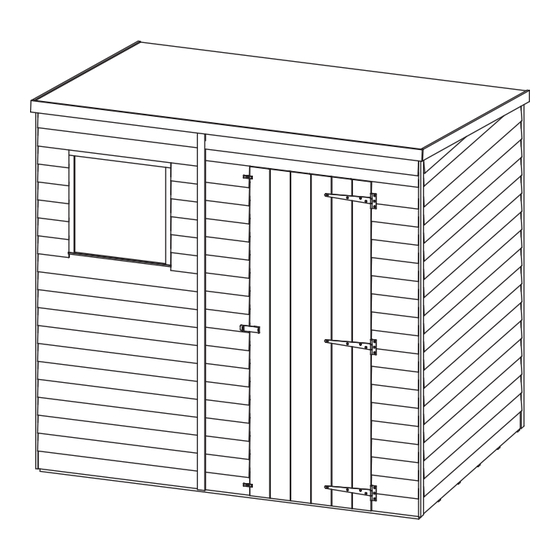
- Page 4 01DTOVPN0705SDFW-V3 End View Overall Dimensions: Ridge Bar - 27x44x1410mm QTY 1 Width = 2134mm F2744-1410mm Depth = 1558mm Height = 2010mm End View Base Dimensions: Eaves Frame - 28x28x1055mm QTY 2 Width = 2066mm F2828-1055mm Depth = 1456mm End View...
-
Page 5: Missing Parts
Pre Assembly Before assembling remove the transportation blocks from the bottom of each panel. Turn Button QTY 2 PI-07-0034 Take care removing the blocks as to not damage the panels. Tap with a at headed screwdriver and hammer. Dispose of the blocks once removed. Hasp and Staple QTY 1 PI-07-0207 Felt QTY 1... - Page 6 Step 2 Step 3 IMPORTANT: Pre-drill before xing screws. IMPORTANT: Pre-drill before xing screws. Parts needed - No. 1 QTY 1 Parts Needed - No. 4 QTY 1 No. 9 QTY 1 No. 5 QTY 1 No. 21 QTY 3 Place the Plain Panel 1 (No.
- Page 7 Step 5 Step 7 IMPORTANT: Pre-drill before xing screws. IMPORTANT: Pre-drill before xing screws. Parts Needed - No. 1 QTY 1 Parts Needed - No. 8 QTY 2 No. 3 QTY 1 No. 11 QTY 2 Place one Eaves Frame (No. 11) Place the Right Gable (No.
- Page 8 Step 8 Step 9 IMPORTANT: Pre-drill before xing screws. Parts Needed - No. 24 QTY 1 Once the Roof is xed, secure the Panels to the Floor using 50mm screws. Cut the Felt (No. 24) into two sheets measuring: 2210mm (L) x 1000mm (W). 22x50mm Screws Lay the sheets onto the Roof in the order shown in the diagram below.
- Page 9 Step 11 Step 10 IMPORTANT: Pre-drill before xing screws. IMPORTANT: Pre-drill before xing screws. Parts Needed - No. 15 QTY 3 Parts Needed - No. 18 QTY 2 No. 16 QTY 3 No. 19 QTY 1 No. 20 QTY 2 Fix the Cover Trims (No.
- Page 10 Step 13 Step 15 IMPORTANT: Pre-drill before xing screws. Parts Needed - No. 12 QTY 1 No. 17 QTY 2 Once constructed, apply a preserving treatment and a waterproo ng treatment Fix the Door Beading Strips (No. 17) to to your garden building as soon as the inside of the door panel framing, possible.
- Page 11 ANY QUESTIONS? Scan code contact us via our customer portal.
Need help?
Do you have a question about the 01DTOVPN0705SDFW-V3 and is the answer not in the manual?
Questions and answers