Advertisement
- 1 Packing list
- 2 Product appearance
- 3 Quick start
- 4 Set Up the Camera
- 5 Bluetooth Set Up the Camera
- 6 Wi-Fi connection troubleshooting
- 7 Install the camera
- 8 Share the camera
- 9 Charge the camera
- 10 Indicator light status
- 11 Product specification
- 12 Firmware upgrade
- 13 FAQ
- 14 Customer Service
- 15 Documents / Resources
Packing list
- Camera* 1
- Bracket* 1
- Mounting kit* 1
- User manual* 1
- Type-C charging cable* 1
- Operation instruction* 1
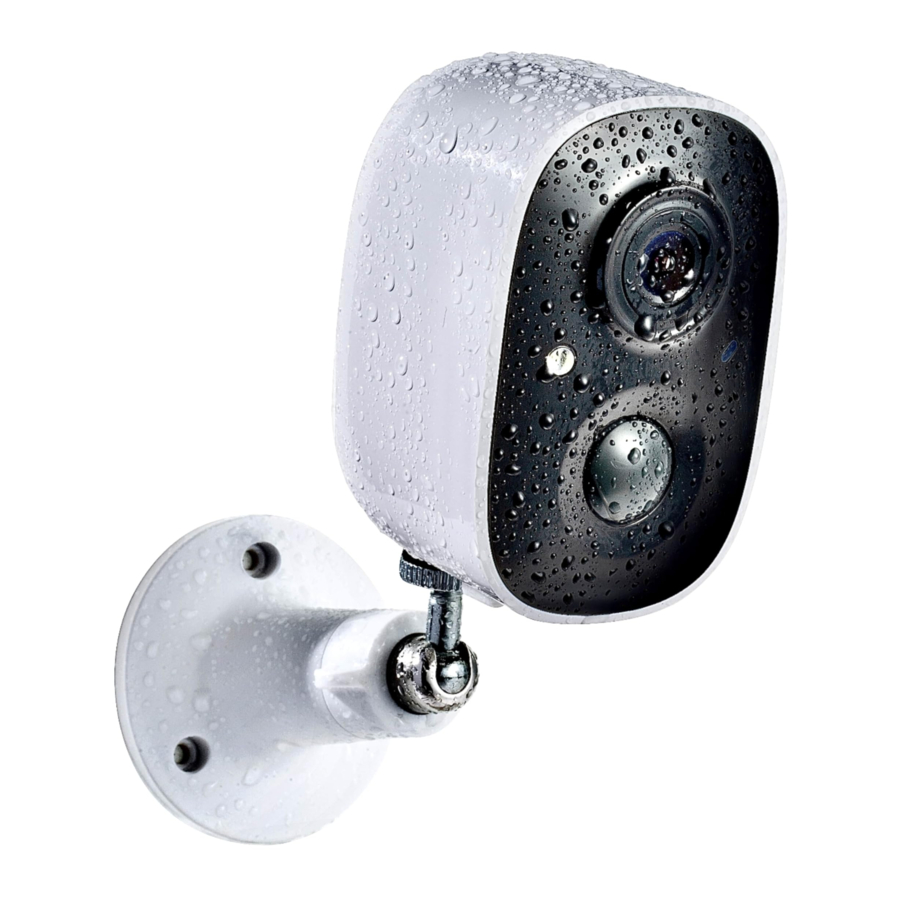
Product appearance


Quick start
The wireless smart battery camera powered by the built-in battery.
- Download and install the APP
The wireless smart battery camera supports Android and iOS devices using the mobile APP. For your best experience, please scan the QR code below with your mobile phone, install the APP, and follow the instruction to complete the user registration.


Please use your phone's camera or Google Chrome to scan the QR code.
 ATTENTION: Other methods or Apps may cause your privacy at risk.
- Add the device
Sign in to App, tap on the Green "+1' symbol on the upper right corner, then tap on " Add a New Camera " and follow the prompts displayed on screen(please bring the camera and device close to the router when initially configuring).


Set Up the Camera
- After pressing the camera switch for 3 seconds, the camera will turn on. The camera will emit the scanning sound "Ding Dong Ding Dong" after it is turned on ( if you do not hear it, please quickly press the power button twice).

- Tap on the "Add Camera Now" button on the App and follow the on screen instructions for the Battery Camera by long pressing the power button on the bottom of the camera. Once you hear the camera chime please tap on the circle next to "l heard the sound or saw the light on", then tap on "Next Step".
![]()
- On the following page please confirm that you hear the camera emitting a beeping sound and tap on the circle next to ' heard a beeping sound" then tap on "Next Step".
![]()
- On the next page select your desired 2.4GHzWiFi network from the drop down menu under "WiFi Name (SSID)" then enter the password. To ensure a longer connection range, the camera only supports 2.4GHzWiFi with stronger wall penetration capability and does not currently support enterprise level authentication. Once complete please tap on "Next Step".
![]()
- Point the lens of the camera at the QR code generated by the App about 7 inches away until you hear a "Ding" sound.

- After a few moments the camera will provide a prompt sound indicating that the connection was successful. A t this point the App will request that you place the camera at the location you wish to set it up at (you do not need to mount it at this point). Please check the signal strength to ensure that it is adequate for this location then tap on "Next Step".


Bluetooth Set Up the Camera
- Click the "Add Now" button in the APP, press and hold the camera switch button for 3 seconds to turn on the camera, and the APP will automatically search for devices that are on and not bound. Select the device you want to connect in the search results for the next step.

- Enter the name and password of the Wi-Fi network you want the camera to connect to. To ensure long distance connection, the camera only supports 2.4GHz WiFi network with stronger wall penetration capability and does not support Wi-Fi with enterprise level authentication. Please make sure that the Wi-Fi meets the requirements, click Next after completion, and the app can try to connect the camera to the Wi-Fi.

- After a while, the camera will play a sound indicating that the connection is successful. At this point, please set a name for the camera on the app and select the location where you want to place the camera. Click Finish to complete the pairing.


Wi-Fi connection troubleshooting:
24/7 customer service email: PMG-aftersale@outlook.com If you encounter any problems, please feel free to contact us.
- If you hear "WiFi password error" from the camera, please check whether the WiFi password you entered into the App is correct. The first letter of the password is automatically capitalized on some devices.
- If you hear "WiFi not found", please check whether your selected WiFi network has the correct name and make sure to place the camera as well as the device you installed the App on is near the router. Also make sure the network is broadcasting in 2.4GHz, 5GHz is not supported.
- If you hear "Authentication error", please ensure that the WiFi network is not set up with enterprise level authentication as the device only supports security-levels of WPA-2 and below.
- If you hear "Retrieving IP timeout", this indicates that there are too many devices connected to your router and is unable to allocate additional space for the camera. Please remove some of your connected devices and restart the router before attempting to connect the camera again.
- If you hear "Cloud service connection fail", please make sure your router is properly connected to the external network, typically this is your modem connection. This error is usually caused by a network disconnection or your router is set up for local area connections only. Please check your network connectivity then attempt to connect the camera again.
Install the camera
You can place the camera on a shelf or other surfaces to use, or you can install it on a wall to use.
- Select a good spot for your camera
Select a good spot for your camera, please install the camera in a position where its view is not blocked and ensure that it is within the coverage of the Wi-Fi network. The PIR infrared sensor is more sensitive to movements across the camera's field of view than movements toward or away from the camera.

- Install the bracket
- Screw fixing:
Use the drilling tool to punch holes on the wall according to the hole distance of the base. It is recommended to mark the holes on the wall with a pencil before drilling. Screw the expansion nut into the holes on the wall, and then connect the bracket to the expansion nut with screws to complete the fixing.

- Fix the camera
Align the bracket screw with the screw hole on the back of the camera, and then rotate it to the tightened state.

- Adjust the angle
Adjust the camera to an appropriate angle, the best angle is about 15 degrees downward, and then tighten the base by rotating it in clockwise direction to fix the angle.

- Screw fixing:


Share the camera
When you need to view the camera with other family members or friends, you can use this function. Only the administrator whose account is bound with the camera for the first time can share and set the device. Other members can only view the live or playbacks of the device.
- Find the camera you want to share on the App homepage or camera setting page. Find the button and enter the sharing page.

- Click "Invite", and a QR code will be generated for sharing.
- For the members you need to share, find "Add Friend's Camera" in the "User" page to enter the scanning page.

- Scan the QR code on your mobile phone, and you will receive the confirmation notification after success. The sharing will be completed after you agree.


Charge the camera
App will remind you to charge your camera when the battery is low. Please use the Type-C cable to plug into the 5V/1.5A charging adapter to charge the camera. During charging, the camera's indicator light is solid yellow, and when the camera is fully charged, the indicator light will turn into solid green. It will take 8 hours to fully charge the camera.
Indicator light status
| Mode | Status |
| Working mode | Blue |
| Sleep mode | Off |
| Charging mode | Yellow |
| Fully charged mode | Green |
Product specification
| Item | Specification |
| Camera lens | Field of view: 110° |
| Image resolution | Max. 1920 X 1080 |
| Video bit rate | Adaptive |
| Storage media | Micro SD card (Up to 128GB) |
| Battery capacity | 5000mAh |
| Adapter requirement | 5V/1.5A |
| Size | 70*59.2*90 (mm) |
Firmware upgrade
When you connect your camera through the App, it will prompt you if the latest firmware is available. You can also manually check the firmware upgrade in the settings of the App.
Please make sure that your camera is fully charged or connected to the power adapter before upgrading the firmware, please do not cut off the power supply during the upgrading.
FAQ
24/7 customer service email: PMG-aftersale@outlook.com If you encounter any problems, please feel free to contact us.
- Q: Camera permission management: How to invite family and friends to use my camera together?
A: Open the App and select your camera on the home page. Click the share button on the home page or the "Share" in the camera settings to enter the sharing page, and then click "Invite" to generate a QR code. Your friends can now get some of the access rights by scanning the QR code in your phone. - Q: Why doesn't the Wi-Fi name appear when I connect to Wi-Fi?
A: On Apple devices with iOS13 and above, you need to turn on the "location permission" for the app in the system settings and change it to "allow when using." - Q: Will the camera show red lights when night vision is activated?
A: The built-in infrared lamp beads make the camera only show some dim red lights when night vision is activated, but the image quality is still clear under no light environment. - Q: What are the requirements for Wi-Fi?
A: Please use a 2.4GHz wireless network. The device does not support the 5GHz wireless network. Meanwhile, please set the WiFi authentication method to WPA2-PSK or other lower level of the security method. A password is required. - Q: How far should the camera be placed from the router?
A: After testing, the WiFi connection distance can normally reach up to 150 meters in the open area. However, the actual situation depends on the strength of WiFi and its surrounding environment (thick walls, electromagnetic devices, large metal objects will all cause interference to the WiFi signals). If the camera connection signal is weak or unstable, please place the camera as close to the router as possible. - Q: What is the maximum length of recording time?
A: VicoHome Awareness subscribed users: Maximum recording time up to 3 minutes if you set duration to "Auto" Unsubscribed users: The maximun length of recording time is 20 seconds. - Q: How to quickly view videos by category?
A: Click the icon in the upper left corner of the "Library" page to start filtering videos by category. Select the category you want to see and then click "Save" to view the video playbacks. - Q: What should I do when the device is in malfunction?
A: Long press the power button for 3 seconds to restart it. If there is no response, you can remove the rubber plug at the bottom of the camera. Press the reboot button to restart the camera while charging.
24/7 customer service email: pmg-aftersale@outlook.com;
If you encounter any problems, please feel free to contact us.
Customer Service
Email:
pmg-aftersale@outlook.com
Hotline:
+ 1 313-380-6888
8:00 AM - 5:00 M (Business Day)
Documents / Resources
References
Download manual
Here you can download full pdf version of manual, it may contain additional safety instructions, warranty information, FCC rules, etc.
Advertisement


Need help?
Do you have a question about the CG6 and is the answer not in the manual?
Questions and answers