Advertisement
- 1 WARNING AND SAFETY INSTRUCTIONS
- 2 PRODUCT OVERVIEW
- 3 POWERING ON YOUR PRODUCT
-
4
USlNG THE BABY MONITOR
- 4.1 Music setting
- 4.2 VOX setting
- 4.3 Zoom in / out setting
- 4.4 Split screen
- 4.5 Switch & Scan cameras
- 4.6 Add camera
- 4.7 Delete camera
- 4.8 Temperature unit setting
- 4.9 Temperature alert setting
- 4.10 Time setting
- 4.11 Language setting
- 4.12 Timer setting
- 4.13 Alert volume setting
- 4.14 Frequency setting
- 4.15 Night vision setting
- 4.16 Camera angle setting
- 5 TROUBLE SHOOTING
- 6 TECHNlCAL DATA SHEET
- 7 MAINTENCE
- 8 Documents / Resources
WARNING AND SAFETY INSTRUCTIONS

Keep this cord out of reach of children. The cord needs to be at least three feet away from the child at all times. Do not use with an extension cord. Do not remove this tag. Children have STRANGLED in cords.
Follow these safety precautions to prevent fire, injury or damage to the product.
Read and keep instructions: it is very important that you read all the safety and operating.
STRANGULATION HAZARD: Children can become entangled in cords. Make sure the baby unit, parent unit and mains adapter cables are kept out of reach of you baby and other young children at all times, at least 6 feet away.

CHOKING HAZARD: This product contains small parts which may Cause Choking. Exercise care when unpacking and assembling the product and keep the small parts away from children.
RISK OF SUFFOCATION: Keep all packaging materials and protective foils out of reach of children.
DANGER FROM POWER CORDS: To avoid possible danger from power cords the cords should be secured and never be hung on or near the crib. Never place the baby unit or parent unit inside your playpen.
DO NOT HANDLE ROUGHLY, DROP OR THROW: Baby monitor is a high-quality electronic device which must be handled with care.
WATER AND MOISTURE: The product should not be exposed to rain, moisture, or splashing. Never use or place the product in or near moisture or water.
THIS PRODUCT CANNOT REPLACE RESPONSIBLE ADULT SUPERVISION: Your video monitor is designed to be an aid and should not be used as a substitute for responsible and proper adult supervision of a child.
VENTILATION: This product should not be used on a or similar surface that may block the ventilation or speaker openings, or be placed in an enclosed area, such an a bookcase or drawer that may impede air flow. Never cover the product with clothes, towels. Never cover the product with or any other item.
THIS PRODUCT IS NOT A TOY: It should be kept out of children's reach.
KEEP AWAY FROM SOURCES OF HEAT: This unit should not be exposed to direct heat sources such as a register or other appliance that emit heat, the unit should not be left in direct sunlight.
BATTERY: Before you use the product, we recommend you fully charge the battery of the parent unit, so that it continues to work if you disconnect it from the power supply to carry it to another location.
INSTALLATION LOCATION: The installation location plays an important role in ensuring proper operation. Therefore, maintain a distance of at least 5 feet from other electronic equipment, such as microwave ovens or Wi-Fi routers, otherwise they could cause interference," this occurs, move the baby and parent units to another location.
RANGE: Range of all baby monitor is always measured in an open space. The actual range may be shortened due to environmental obstacles (such as concrete walls).
DAMAGE REQUIRING SERVICE: This product should be serviced by qualified personnel only.
DO NOT TRY TO OPEN AND REPAIR THE PRODUCT: If you have any problems with the product, please contact the authorized distributor.ln case of unusual noises or smells originating from the device, immediately disconnect the product from the power outlet and contact authorized.lf the product becomes dirty, use a lightly damp soft cloth to wipe surfaces, taking care to not allow water into any openings.

This baby monitor is designed only for hearing the baby's voice and seeing the images of the baby. This product is not a medical device and should not be used as a sub5titude for responsible adult supervision.lt is important that you regularly check on your baby personally.
Safety Instructions for AC Power Adapter
The adapter should not be exposed to direct heat sources such as a register or other appliance that emit heat.
During continual use, the power adapters may become warm to the touch. This is normal and should not be a cause of concern.
Examine intactness of the power cord and its plug.
The adapter must be handled with care: Do not handle roughly, drop or throw.
When removing the power adapter from the wall outlet, hold and pull from the receptacle. Do not pull on the cable itself or bend the cable as that will put additional stress on the cable and could lead to damages.
Do not touch the power adapter With wet hands or allow liquids to spill on it.
Make sure the mains adapter cables are kept out of reach of your baby and other young children at all times.
To avoid possible danger from power cords, the cords Should be secured and never be hung on or near the crib.
Do not replace the plugs or cable on your power adapter. This product should only be used with the AC power adapter supplied by the manufacturer, as included in this package.
Never cut, damage or bend the power cord.
Do not put any objects on top of the power cord, which could cause overheating, damage, combustion and electronicution.
Do not leave the power adapter connected to the wall outlet when it is not plugged into the baby or parent unit.
Do not replace the power cord With non-original substitutes. Improper connection cause electrocution. Do not place the AC adaptor cable in a high wear and tear location. Never use a frayed or compromised cord. Itended for indoor use only.
Safety Instructions for Li-ion battery (Non removable pre-installed battery)
Do not attempt to repair or adjust any of the electrical or mechanical functions of the unit.
Do not shred cells or batteries.
If a battery leaks, do not let the battery liquid touch skin or eyes. lf this happens, immediately flush the affected areas with water, and seek medical assistance.
The battery should not be exposed to direct sunlight or heat sources such as a candle, stove, radiator, heat register or other appliance that emit heat.
Do not modify, remanufacture, attempt to insert foreign objects into the battery, or immerse  or expose it to water or other liquids. Batteries may explode if damaged. use only the battery pack supplied with the product or the same type, sold by the manufacturer or its authorized distributors.
Improper use or use of unapproved batteries may present a risk of other hazards, and may invalidate the warranty.
If you believe the battery is damaged, remove product from the charge and stop using the product.
Never a damaged battery.
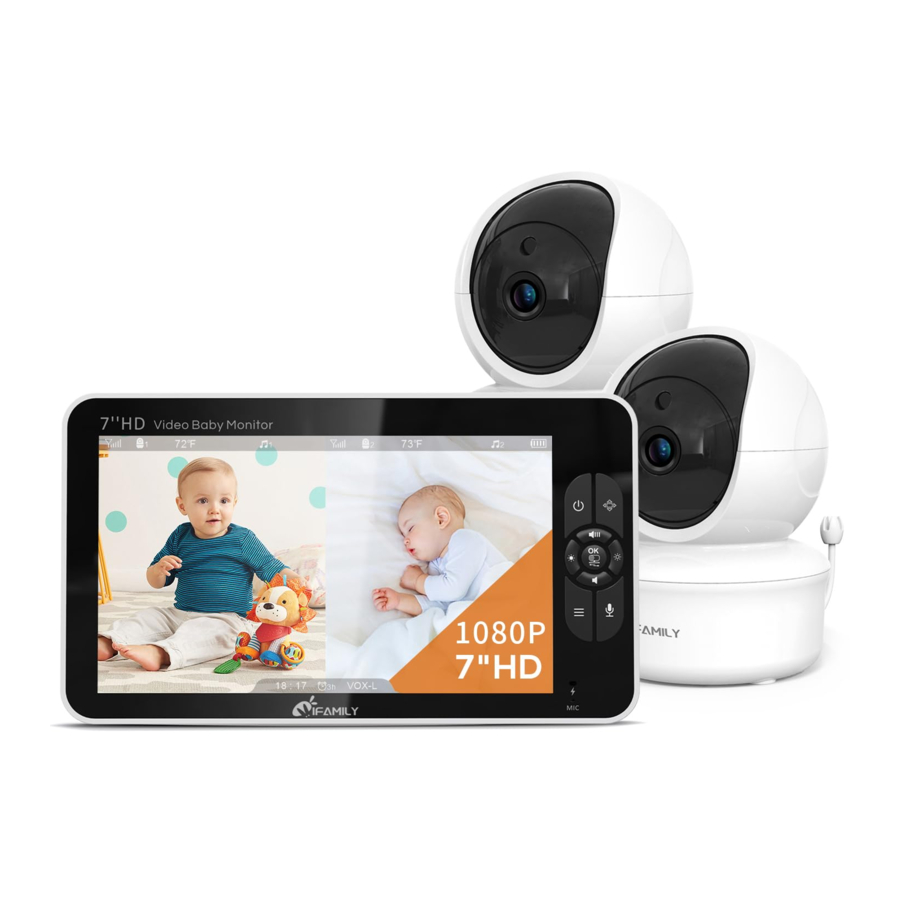
PRODUCT OVERVIEW
Parent unit overview

- Volume up
Press Volume+ to increase the volume. - OK key
Press the OK key to confirm. - Brightness down
Press the Bright- to decrease the brightness. - Volume down
Press volume- to decrease the volume. - Menu
Short press the menu key the menu will pop up, and press again to Exit.
Press and hold the Menu key around 2 seconds to operate Zoom in/out. - Power & Charging LED
- The LED shows red when charging under the display is turn off state.
- The LED shows orange when charging under the turn on state.
- The LED shows green after the battery is fully charged.
- Microphone
When talk to the baby, collect the voices of the parents. - Power key
Long press to turn on/off the monitor; short press to screen on/off. - Pan/Tilt
Press the key![]() to enter into the Pan/TiIt mode.
to enter into the Pan/TiIt mode. - Brightness up
Press the Bright+ to increase the brightness. - Speaker
Hear the sound from the baby. - Talk to baby
To talk, press and hold the talk key on the front of the monitor. - DC jack
Charge the monitor by connecting the Power Adapter to the monitor and a socket. - Stand
Monitor placement stand. - Battery door
Baby unit overview

- Light sensor
- Infrared LEDs
- CMOS lens
- Power LED
- Mic
- Speaker
- Pairing key
- DC jack
- Temperature sensor
- Antenna
Icon overview
![]()
Product list

- Parent Unit x 1
- Baby Unit (Camera) x 2
- AC power Adapter x 3
- Screw Set x 2
- User Manual x 1
POWERING ON YOUR PRODUCT
Step 1: Charge the baby unit.

Step 2: Press ![]() for two seconds to Power on the parent unit.
for two seconds to Power on the parent unit.

Step 3: Set the parent unit to prepare for connecting.

Step 4: Press the PAIR button for two seconds until it has been paired (the  symbol appears before
 ![]() ).
).

 NOTE: If the baby unit and parent unit has been connected, the steps 3 and 4 are unnecessary.
USlNG THE BABY MONITOR
Music setting
- Press menu button
![]() to access menu.
to access menu.
Choose![]() and press
and press ![]()
- SeIect the lullaby you want to play and press
![]()
- Press the NAVIGATION key to select the duration and music volume.
- In order to stop the lullaby playback, select
![]()
- Press the menu
![]() button to exit after finish.
button to exit after finish.

 to access menu.
NOTE: The lullaby default setting is off.
VOX setting
- Press menu button
![]() to access menu.
to access menu.
Choose![]() and press
and press ![]()
- Press the up key
![]() or DOWN key
or DOWN key ![]() to select the VOX level.
to select the VOX level. - Press
![]() to confirm.
to confirm. - Press the menu button
![]() to exit after finish.
to exit after finish.

 or DOWN key
  to select the VOX level.
VOX is a voice reactive mode in baby monitor. In VOX mode, the monitor screen will be dark When the Camera Stays below VOX level for 30 seconds, During this Standby period, the video feed is temporarily paused, conserving battery power and extending the monitor's overall runtime. However, the microphone remains active, constantly monitoring for any sounds in baby's room. The screen will wake up and video run again when the camera detect sounds above VOX level. (VOX-H:60db±3 VOX-M:65db±3 VOX-L:70db±3).
Zoom in / out setting
- Press menu button
![]() to access menu.
to access menu.
Choose![]() and press
and press ![]()
- Press the UP key
![]() or DOWN key
or DOWN key ![]() to select the magnification.
to select the magnification. - Press
![]() to confirm.
to confirm. - Press the menu button
![]() to exit after finish.
to exit after finish.

 or DOWN key
NOTE: This function is unavailable in split mode.
Split screen
- Press menu button
![]() to access menu.
to access menu.
Choose![]() and press
and press ![]()
- Press the up key
![]() or DOWN key
or DOWN key ![]() to select the desire options.
to select the desire options. - Press
![]() to confirm.
to confirm. - Press the menu button
![]() to exit after finish.
to exit after finish.


NOTE: This function is only available when two or more cameras are paired.
Switch & Scan cameras
Switch cameras
Confirm both cameras are connected.
Click the switch/OK button ![]() to switch the video and audio between cameras.
to switch the video and audio between cameras.
Scan cameras
Confirm both cameras are connected.
Long press the switch/OK button ![]() to active the scan mode.
to active the scan mode.
In scan mode, the video and audio will switch between cameras every 10 seconds.

Add camera
- Press menu button
![]() to menu.
to menu.
Choose![]() and press
and press ![]()
- Press the UP key
![]() or DOWN key
or DOWN key ![]() to select the camera to be paired.
to select the camera to be paired. - Press
![]() to start the pairing, while the screen shows pairing then press PAIR button on the back of the camera.
to start the pairing, while the screen shows pairing then press PAIR button on the back of the camera. - Press the pair button on the back of the camera.
- Press the menu button
![]() to exit after finish.
to exit after finish.


NOTE: Please keep the camera and monitor close together (about 1 ft) and confirm they are turn on/plugged in before pairing/ adding camera.
Delete camera
- Press menu button
![]() to access menu.
to access menu.
Choose![]() and press
and press ![]()
- Press the UP key
![]() or DOWN key
or DOWN key ![]() to select the camera to be canceled.
to select the camera to be canceled. - Press
![]() to confirm.
to confirm. - Press the menu button
![]() to exit after finish.
to exit after finish.

 and press
Temperature unit setting
- Press menu button
![]() to access menu.
to access menu.
Choose![]() and press
and press ![]()
- Select
![]() and press
and press ![]()
- Press the UP key
![]() or DOWN key
or DOWN key ![]() to select ºC or ºF
to select ºC or ºF - Press
![]() to confirm.
to confirm. - Press the menu button
![]() to exit after finish.
to exit after finish.

 and press
Temperature alert setting
- Press menu button
![]() to access menu.
to access menu.
Choose![]() and press
and press ![]()
- Select
![]() and press
and press ![]()
- Press the UP key
![]() or DOWN key
or DOWN key ![]() to set the maximum and minimum alarm temperatures.
to set the maximum and minimum alarm temperatures. - Press
![]() to confirm.
to confirm. - Press the menu button
![]() to exit after finish.
to exit after finish.

 and press
Time setting
- Press menu button
![]() to access menu.
to access menu.
Choose![]() and press
and press ![]()
- SeIect
![]() and press
and press![]()
- Press the UP key
![]() or DOWN key
or DOWN key ![]() to select 12H or 24H
to select 12H or 24H - Press
![]() to confirm.
to confirm. - Press the menu button
![]() to exit after finish.
to exit after finish.

 to access menu.
Language setting
- Press menu button
![]() to access menu.
to access menu.
Choose![]() and press
and press ![]()
- SeIect
![]() and press
and press ![]()
- Press the UP key
![]() or DOWN key
or DOWN key ![]() to select the language.
to select the language. - Press
![]() to confirm.
to confirm. - Press the menu button
![]() to exit after finish.
to exit after finish.

 and press
Timer setting
- Press menu button
![]() to access menu.
to access menu.
Choose![]() and press
and press ![]()
- SeIect
![]() and press
and press ![]()
- Press the UP key
![]() or DOWN key
or DOWN key ![]() to select the desired alert tme.
to select the desired alert tme. - Press
![]() to confirm.
to confirm. - Press the menu button
![]() to exit after finish.
to exit after finish.


Alert volume setting
- Press menu button
![]() to menu.
to menu.
Choose![]() and press
and press ![]()
- SeIect
![]() rand press
rand press ![]()
- Press the UP key
![]() or DOWN key
or DOWN key ![]() to select the desired alert volume.
to select the desired alert volume. - Press
![]() to confirm.
to confirm. - Press the menu button
![]() to exit after finish.
to exit after finish.

 rand press
Frequency setting
- Press menu button
![]() to access menu.
to access menu.
Choose![]() and press
and press ![]()
- SeIect
![]() and press
and press ![]()
- Press the UP key
![]() or DOWN key
or DOWN key ![]() to select 50HZ or 60Hz
to select 50HZ or 60Hz - Press
![]() to confirm.
to confirm. - Press the menu button
![]() to exit after finish.
to exit after finish.

 and press
NOTE: 60HZ is available in US/CA/MX. 50HZ is available in most countries of Europe.
Night vision setting
- Pressmenu button
![]() to access menu.
to access menu.
Choose![]() and press
and press ![]()
- Select
![]() and press
and press ![]()
- press the UP key
![]() or DOWN key
or DOWN key ![]() to select the state of night vision.
to select the state of night vision. - Press
![]() to confirm.
to confirm. - Press the menu button
![]() to exit after finish.
to exit after finish.

 and press
Camera angle setting
- Press menu button
![]() to access menu.
to access menu.
Choose![]() and press
and press ![]()
- SeIect
![]() and press
and press ![]()
- Press the UP key
![]() or DOWN key
or DOWN key ![]() to select the angle at which the camera is placed
to select the angle at which the camera is placed - Press
![]() to confirm.
to confirm. - Press the menu button
![]() to exit after finish.
to exit after finish.

 and press
Volume/Brightness adjustment
Press  or
or  to increase/decrease the sound of the parent unit.

Press ![]() or
or ![]() to increase/decrease the brightness of the parent unit.
to increase/decrease the brightness of the parent unit.
the brightness of the
Talk to baby
Press and hold the button ![]() to talk to your baby.
to talk to your baby.
Release the button when you are finished talking.
TROUBLE SHOOTING
| No reception on the Parent Unit |
|
| Interference or poor reception |
|
| Image frozen on the Parent Uni |
|
| A high pitched ear piercing noise is heard from the units (feedback, static) |
|
| Cannot hear the baby sounds on the parent Unit |
|
| Background noises |
|
If above tips are not help; maybe the system crashed, please disconnect the battery and the power adapter with your unit; then plug in it again and turn your unit.
If the above troubleshooting guide did not help you solve your problem, please contact our customer service via: service@ifamily.vip
TECHNlCAL DATA SHEET
| Frequency | 2.4GHz FHSS |
| Type of modulation | GFSK |
| Transmission range | Up to 960 feet/300 meters (Open space - No obstructions) |
| Input voltage | SV, 1/1.2A |
| Power adapter | Input: 100-240VAC 50/60Hz, 200mA Max |
| LCD screen | 7"HD TFT LCD |
| Rechargeable battery | Model: SM70A-2 3.7V, 4000mAh |
| Transmition Power | 18dB |
| mage sensor type | 1/2.9" color CMOS, 1920* 1080 pixels |
| IR LED Type | 940 nm |
| Operating environment | Indoor use only; Temperature: 32-104F / 0-40 'C; Humidity: 5%-90% (relative humidity) |
MAINTENCE
All of the following maintenance procedures should only be performed when baby and parent units are unplugged and off. Clean the surfaces of the baby and parent units with a soft, fluff-free cloth. Never use cleaning agents or solvents. If the units become dirty, use a lightly damp cloth to wipe surfaces, taking care not to allow water into any openings.
Documents / ResourcesDownload manual
Here you can download full pdf version of manual, it may contain additional safety instructions, warranty information, FCC rules, etc.
Advertisement

Need help?
Do you have a question about the SM70A-2 and is the answer not in the manual?
Questions and answers