PELOTON ROW Manual
- Owner's manual (34 pages) ,
- User manual (30 pages) ,
- Manual (16 pages)
Advertisement
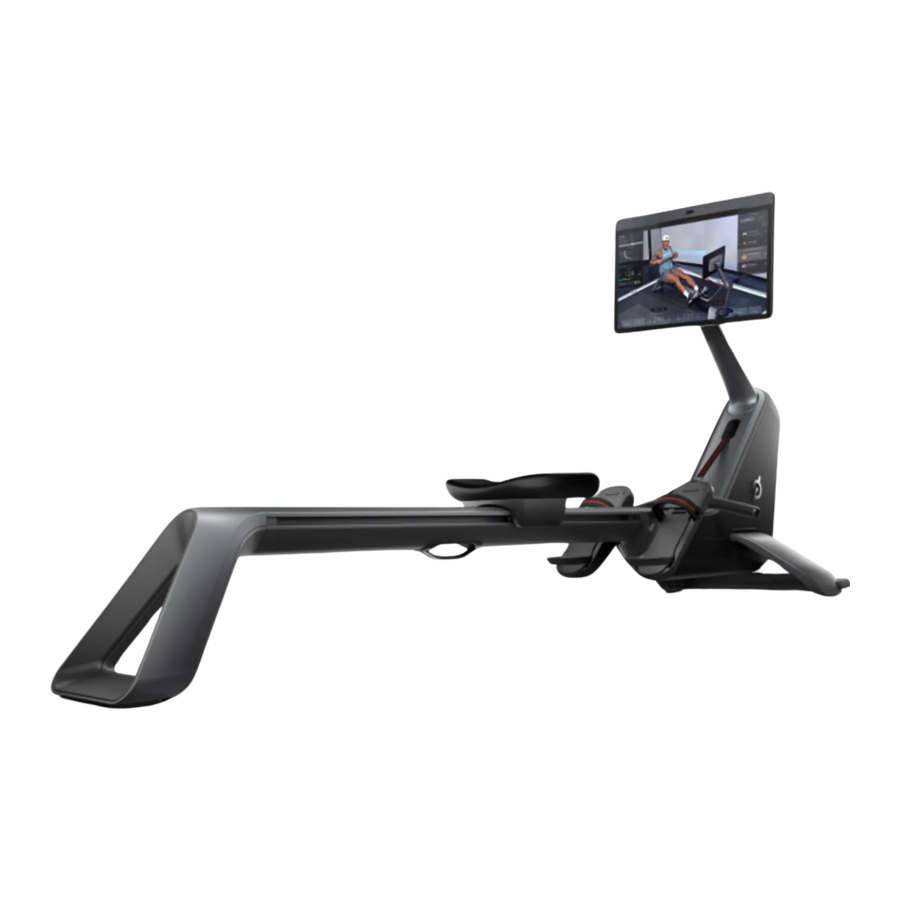
GETTING TO KNOW THE PELOTON ROW


- Power Button (on back of Touchscreen)
- Volume Control
- Monitor Arm
- Base
- Power Cord
- Wheels
- Power Switch (under the Base)
- Rowing Handle
- Foot Rest
- Rail Handle
- Rail
- Rail Foot
- Seat
- Foot Straps
- Heel Slide
- Accessory Tray
- Touchscreen
SETTING UP THE PELOTON ROW
LOCATION REQUIREMENTS

 | Row required clearance |
 | Row workout footprint: 10 ft long x 6 ft wide / 3 m long x 2 m wide |
 | Row + bootcamp workout footprint: 10 ft long x 8 ft wide / 3 m long x 2.5 m wide |
- Make sure there is a clearance of no less than 24 in/60 cm on both sides and behind the Peloton Row.
- Keep the dimensions of the Row in mind when determining the location (Height/length: 7 ft 10 in/2.39 m; width: 24 in/60 cm).
- Do not store the Row near heaters.
JOINING THE COMMUNITY
CONNECTING TO YOUR WI - FI

- Select your Wi-Fi network
- Enter the password
- Tap Connect
LOGGING IN
When you log in for the first time, you will need ONE of the following:

- Your Subscription Activation Key
- The username and password you set up when you purchased your Peloton Row
CREATING AND ADDING A PROFILE
- If you don't already have a Peloton profile, you'll be prompted to create one when you first set up your Row. The information you enter will be used to calculate metrics and organize your leaderboard.
- If you want more than one person to use your Row, create a new account for them from the Login Screen.
We recommend creating a new account for each user because calibration data will be saved to your profile.
Sharing profiles can cause some features to work improperly.
USING THE PELOTON ROW
STRAPPING IN YOUR FEET
Always wear appropriate footwear when using the Row.

- Adjust the length of the heel slide so that the foot strap rests across the base of your toes.
- Tighten the foot strap so there is enough room to insert two fingers between the strap and the top of your shoe.
NOTE: Make sure you can lift your heel comfortably while your toes and the ball of your foot press firmly against the foot rest.
NOTE: Loosen straps to exit the Row
CALIBRATION: ACTIVATING FORM ASSIST
When setting up your Peloton Row, you will be prompted to calibrate your form. To confirm your calibration, make sure the Form Assist figure is following your motions during your first workout. Once calibrated, Form Assist will provide real-time form feedback and form summaries after workouts. If the Form Assist figure seems to be out of sync with your movements, it may need to be recalibrated. To recalibrate, tap into your profile and select Calibrate.
HOLDING THE HANDLE
Position your hands wide apart so your little fingers are at the ends of the handle. Hold the handle loosely so your knuckles are directly on top of the handle and your palms are not touching it.
Your wrists should be horizontal, forming a straight line with the handle strap, and the handle should rotate smoothly under your fingers throughout the stroke.

ADJUSTING YOUR VOLUME

ADJUSTING YOUR MONITOR
Touchscreen swivels 45 degrees left and right and 25 degrees up and down.

SELECTING A CLASS
- Live and on-demand classes are available.
- Filter by instructor, class length, class type and more.
- If the workout does not include a warmup or cooldown, they are available separately.
- Select More for a Scenic Row or Just Row experience.
CLASS TYPES
Row classes
Take place only on the Row.

Bootcamp
Part of the class is on the Row and part is off the Row.

Strength/Yoga/Cardio
Take place off the Row.

CLASS SCREEN


MAXIMIZING YOUR FIRST WORKOUT
WHAT DO THE PELOTON ROW SCREEN METRICS MEAN?
Stroke Rate: Stroke rate is measured in "Strokes Per Minute" (SPM), which is the total number of times your body moves back and forth along the rail in 60 seconds.
NOTE: Remember that moving the handle while driving the seat back along the rail is the only way to feel the resistance the machine provides.
- Pace: Pace describes how fast your boat would be moving if you were rowing on the water. Your pace is the amount of time it would take you to row 500 meters at your current speed. The harder you work, the shorter your pace time will be.
- Peloton Instructors will coach using pace targets because it's a good way to measure how hard you're working, and it's directly connected to your power output.
- You can make your boat go faster without increasing your stroke rate by driving your legs harder.
- Drag Factor: Drag factor controls how much resistance builds up as you pull the handle faster. It's important to know that Drag Factor is not equivalent to resistance on bikes or other workout equipment, because resistance on rowers increases by default as the velocity of the handle increases.
NOTE: Drag Factor is not intended to be a difficulty setting like those found on other Peloton products, and may not lead to a more efficient workout. It may even get in the way of your learning and could lead to bad habits or injuries if not used properly. We recommend sticking with the default setting for the best experience.
PELOTON 101
Check out our Peloton Row 101 videos for details on rowing metrics, instructions on setting up your Row, Form Assist and calibration, and more.
To access Peloton 101, tap on the three dots icon on the lower right of the home or classes screen and select Peloton 101.

HOW DO I GET A BETTER WORKOUT WHILE ROWING?
- Check how you are situated in the seat - too far forward or back, and you may not be able to hinge/pivot from the hips as easily.

- Check the position of your feet - where you position your feet determines how easy or hard it is to slide forward towards the catch. Find a comfortable height (usually around the balls of your feet) and don't strap in too tightly!

- Be aware of how you are using the handle - as you start to 'pull', remember that the more you push with your legs and move the handle (without bending your arms), the more power you will be able to generate and maintain.

- Focus on your form (rather than output, pace, and stroke rate) - as you learn how to row, proper form will help you maximize the effectiveness of your workout and better enjoy the wide array of rowing that Peloton offers. The images below demonstrate the proper form for each position.


MOVING THE PELOTON ROW AND STORING IT UPRIGHT

NEVER store the Peloton Row vertically without properly installing and using the Upright Wall Anchor. To avoid risk of serious injury, read and follow all instructions in the Upright Wall Anchor Guide.
Always verify that the Upright Wall Anchor is securely mounted to the wall and check for damage before using it.
For your safety, Peloton recommends having the Peloton Upright Wall Anchor installed by a professional such as a handyman, appliance installer, or local hardware retailer.
The Upright Wall Anchor is designed to be screwed into a load-bearing wooden stud only. Do not install into unsupported drywall, metal studs, or masonry.
Never insert your fingers into the rail groove.
- Power off the Row and unplug it.
- Tilt the monitor all the way down.
- Move the seat all the way forward. Be careful not to pinch your fingers as the seat moves freely.

- Press the monitor arm release button.
- Carefully lower the monitor arm until it stops, and then release the button. Slowly lift the monitor arm until you hear a click. Confirm that the monitor arm is locked into place before attempting to move the Peloton Row.
![]()
To avoid instability when stowing the Row vertically, the monitor must be stored with the monitor arm in the lowered position shown.
![]()
Fully tighten rail bolt during assembly and before stowing upright to prevent rail separation and risk of injury.

- Lift the rail foot until you can reach the rail handle. The wheels will engage, allowing you to roll it to the desired location.


- Center the Peloton Row in front of the Peloton Upright Wall Anchor. When stowing the Row, carefully lift it until it is fully upright. Be careful to leave enough space between the Row and the wall so your Row doesn't collide with the wall when you're tipping it up. The rail foot and handle should be facing out.
![]()
Never store the Peloton Row vertically on the Peloton Mat or any other mat. Always roll the Peloton Mat up with the logo facing out and store it where it will not be a tripping hazard.

- Unwind the tether and loop the tether and carabiner around the rail and through the rail handle. Clip the carabiner to the tether.


MAINTENANCE AND CARE
To avoid risk of injury, service (other than the procedures described here or specifically instructed by a Member Support representative) must be performed by an authorized technician.
Always unplug the Row prior to cleaning. After cleaning, make sure the power cord is free of any moisture before plugging it back in.
The safety and integrity of the Row can only be maintained when it is regularly examined for damage and repaired.
It is the owner's sole responsibility to ensure that regular maintenance is performed.
Replace worn or damaged parts immediately. Do not use the Row until repairs are made.
BEFORE EVERY CLASS
- Check the area around and underneath the Peloton Row for potential obstructions.
- Inspect the Peloton Row and do not use it if it appears damaged or inoperable.
BEFORE STOWING THE PELOTON ROW UPRIGHT:
- Make sure the Accessory Tray is cleared of any items.
- Make sure that the Upright Wall Anchor is securely mounted to the wall and that the cord is not frayed or otherwise damaged. Always attach the Row to the Upright Wall Anchor when stowing vertically, and never stow vertically if the Upright Wall Anchor is not securely attached to the wall.
MONTHLY
- Check the power cord for damage.
- Check the entire Row for wear and damage, especially the handle strap and foot straps. y Clean the area underneath the Row.
- Remove the front cover of the Upright Wall Anchor and verify that the tether is secured to the mounting bracket and not frayed, and that the bolts are secured to the wall.
- Clean all visible surfaces of the Row thoroughly using a damp cloth and a mild household cleaner diluted in water. Do not use harsh cleaning products containing bleach or ammonia.
SPECIFICATIONS
USER REQUIREMENTS
Height: 4 ft 11 in - 6 ft 5 in/150 - 195 cm
Weight: under 300 lb/136 kg
Age: 16 years or older
POWER REQUIREMENTS
Universal AC input:
100-240Vac, 50-60Hz, 0.65A-1.5A
POWER CONSUMPTION
Networked Standby Mode:
Power Consumption: 1.7W
Power consumption with all interfaces connected: 1.7W
Time to enter Standby Mode: 20 mins of inactivity
Off Mode:
Power Consumption: 0.0W
Time to enter Off mode: N/A; Turn off equipment using power switch
DIMENSIONS
Total: 7 ft 10 in L x 24 in W/2.39 m L x 61 cm W
Weight: 156.5 lb/71 kg
Foot stretcher: women's size 5 US/3 UK/36 EU to men's size 13.5 US/13 UK/47.5 EU
PERFORMANCE
Screen Adjustment: 0-25 degree vertical tilt
Screen Adjustment: 0-45 degree horizontal tilt
TECHNOLOGY
Screen: 23.8 in/60.5 cm 1080p HD touchscreen
Camera: 8MP still photo/1080P video camera with privacy cover 4 Digital Microphone Array
Sound:
Front-facing stereo speakers, 2.2 channel with rear-facing woofers 80Hz to 20KHz frequency response
Connection:
WiFi 802.11 a/b/g/n/ac, MIMO 2x2 Antenna
ANT+™ wireless
Bluetooth® 5.0
Read all precautions and instructions in this manual before using this equipment.
Improper use or maintenance can void the warranty. Keep this manual for future reference.
The information in this manual may not reflect recent updates as we continue to improve our product.
WARNINGS AND SAFETY INSTRUCTIONS
For safe use, read and follow all warnings and instructions in the User Manual, the Upright Wall Anchor Guide, and warning labels. Use only as described. Misuse of this equipment may result in serious injury or death. Peloton is not responsible for damage or injury caused by improper use not in accordance with these instructions.
RISK OF PERSONAL INJURY—KEEP PEOPLE UNDER THE AGE OF 16 AWAY FROM THE PELOTON ROW.
NEVER store the Peloton Row vertically without properly installing and using the Peloton Upright Wall Anchor provided.
To avoid risk of serious injury from the Row tipping over, read and follow all the instructions in the Upright Wall Anchor Guide provided.
Fully tighten rail bolt during assembly and before stowing upright to prevent rail separation and risk of injury
Always remain alert while using the Peloton Row. Cease exercise if you feel faint or dizzy.
Metrics on the screen, including heart rate monitoring, may be inaccurate. Use values for reference only.
Inspect the Peloton Row before use and do not use if it appears damaged or inoperable.
Use only Peloton original parts. Use of unauthorized parts could damage the Peloton Row, impair its operation and cause serious injury. Damage caused by unauthorized parts is not covered by the express warranty.
Do not attempt to assemble or service the Peloton Row yourself other than performing the basic maintenance described in this manual or instructed by a Peloton Member Support Representative. Service other than basic maintenance should be performed by authorized personnel.
The power cord must never pass under the Peloton Row. Never operate the Row if it isn't working properly, or if the power cord has been damaged. Keep power cord away from heated surfaces, sharp edges, and water. Always keep the power cable clean and dry. Sweat, spills, and other damage to the power cable may result in property damage or bodily harm.
To reduce the risk of burn, fire, electric shock, or injury to persons, connect this appliance only to a properly grounded outlet. See the Grounding Instructions in this manual.
Always turn the power switch to the off position and unplug the Peloton Row from the electrical outlet before cleaning, assembling or disassembling it.
Do not operate where aerosol (spray) products are being used or where oxygen is being administered
Do not carry this appliance by its cord or use its cord as a handle.
If you are not able to lift more than 40 lbs/ 18 kg, over your head, get assistance in stowing, unstowing or moving the Peloton Row.
The Peloton Row must be stored
- flat on the ground with the touchscreen upright OR
- vertically, with the touchscreen folded down and anchored to a wall using the Upright Wall Anchor. Storing the Row in any other manner could result in:
- Injury to yourself and/or bystanders,
- Damage to the Peloton Row or,
- Damage to personal property
For your safety, Peloton recommends professional installation of the Peloton Upright Wall Anchor, such as by a handyman, appliance installer or local hardware retailer.
The Upright Wall Anchor is designed to be installed through drywall, on a load-bearing wall into a wooden stud only. Do not install into drywall alone, metal studs, or masonry.
Always verify that the Upright Wall Anchor is securely mounted to the wall and check for damage before using. DO NOT use the Upright Wall Anchor if any damage is visible. Using a damaged Upright Wall Anchor could result in injury to persons, animals or personal property.
The tether and clip move freely and could present a strangulation hazard. Always wrap the tether securely around the mounting bracket when the Peloton Upright Wall Anchor is not in use.
People under the age of 16 and persons with reduced physical, sensory, or mental capabilities that impair the safe use of the equipment must not use the Row. People with a lack of experience and knowledgemust be given supervision or instruction before using the Row. Do not allow children of any age to perform maintenance.
The Row is intended for users ages 16 and over weighing under 300 lbs/136 kg.
Consult a physician before beginning a new fitness plan. Incorrect or excessive training can result in serious injury.
Never put your fingers near the seat or rail when using or storing the Row. Exposed moving parts can cause serious injury. Keep clear.
To avoid serious injury, keep loose clothing, exercise equipment, furniture and other objects as well as animals clear of the Row. Make sure you have 24 in/0.6 m of clearance on either side of the Row.
Keep towels away from the seat and rail. Make sure your shoelaces don't extend past the soles of your shoes. Always wear appropriate footwear when using the Row.
You may experience chafing or sores on your hands due to repetitive friction when you first begin rowing. Chafing and sores will usually develop into callouses over time. Improper handle grip can also cause persistent chafing, sores and wrist pain. Always follow instructions for proper handle grip.
Allow time for your skin to recover between workouts if necessary. Ensure that chafing or sores are properly cared for. See a physician if chafing, sores or other skin irritation persists despite rest and proper care.
To avoid risk of injury, use only on a solid, level surface.
Do not store or operate the Row outdoors, at high humidity levels, or in damp or wet locations. The Row is designed for home use. Do not use in a commercial or rental setting.
SAVE THESE INSTRUCTIONS.
GROUNDING INSTRUCTIONS
This product must be grounded. If it should malfunction or break down, grounding provides a path of least resistance for electric current to reduce the risk of electric shock. This product is equipped with a cord that has an equipment-grounding conductor and a grounding plug. The plug must be plugged into an appropriate outlet that is properly installed and grounded in accordance with all local codes and ordinances.

Improper connection of the equipment-grounding conductor can result in a risk of electric shock. Check with a qualified electrician or serviceman if you are in doubt as to whether the product is properly grounded. – if it will not fit in the outlet, have a proper outlet installed by a qualified electrician. Do not modify the plug provided with the product.
This product is for use on a nominal 120-volt circuit in the US and a nominal 230-volt circuit in the AU/DE/ UK. Grounding plugs and sockets look like the ones pictured below.
| Make sure that the product is connected to an outlet having the same configuration as the plug. Do not use an adapter with this product. | |||
| COUNTRY | GROUNDED PLUG | GROUNDED SOCKET | TYPE RATING |
| US/CANADA |  |  | Type B 120V/60Hz |
| UK |  |  | Type G 230V/50Hz |
| AUSTRALIA |  |  | Type I 230V/50Hz |
LABELS
Familiarize yourself with all warnings on the Peloton Row before use. If any label is damaged or lost, contact member support at: support.onepeloton.com, support.onepeloton.co.uk, support.onepeloton.com.au, support.onepeloton.ca for a replacement immediately.

MEMBER SUPPORT
Member satisfaction is a top priority for Peloton. If you require assistance or are experiencing issues with your Peloton Row, please contact Member Support for additional help.
![]()
support.onepeloton.com
support.onepeloton.ca
support.onepeloton.co.uk
support.onepeloton.com.au
When you contact Member Support, have the following information ready:
- Row ID/serial number*
- Purchase Date
- Your order number or the email address associated with your Row purchase
*Access the Row ID/serial number from the touchscreen by tapping the menu icon at the lower right, and selecting About.
DISTRIBUTED BY:
US/CANADA
Peloton Interactive, Inc.
441 9th Ave, 6th Floor New York, NY 10001
UK
Peloton Interactive UK Limited
1 Langley Street London WC2H 9JG
United Kingdom
AUSTRALIA
Peloton Interactive Australia Pty Ltd
ACN 644 958 047
20 Martin Place
Sydney NSW 2000
Australia
Documents / Resources
References
Download manual
Here you can download full pdf version of manual, it may contain additional safety instructions, warranty information, FCC rules, etc.
Advertisement


Need help?
Do you have a question about the ROW and is the answer not in the manual?
Questions and answers