Nebula Capsule Air Manual
- Owner's manual (13 pages) ,
- User manual ,
- Manual (27 pages)
Advertisement
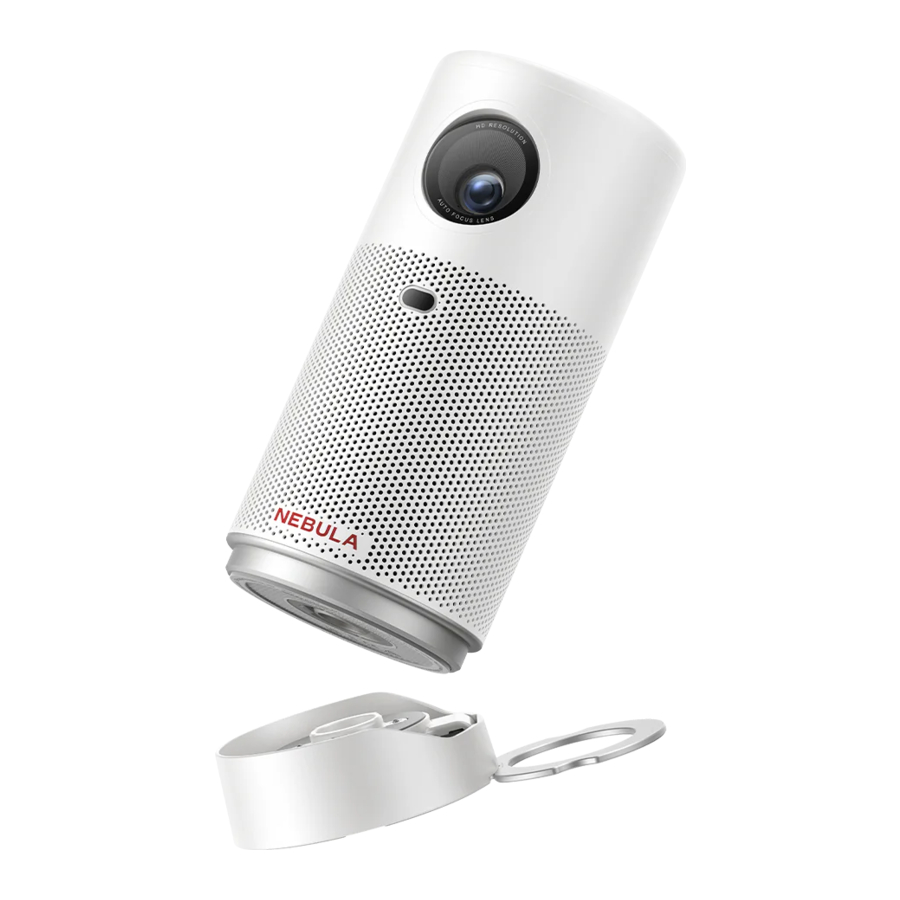
What's Included

- Nebula Capsule Air
- Adapter
- Charging Cable
- Remote Control
- AAA Batteries
- Snap-on Base
- Quick Start Guide
At a Glance
Projector
Front View

- Lens
- TOF for Auto Focus and Auto Keystone Correction
Rear View

- Speaker
- Infrared Receiver
- Power Button
- Press and hold for 1.5 seconds to power on / off.
- Press to wake up the projector / enter standby mode in projector mode.
- USB-C Port
- Connect to a USB drive.
- Connect to a power source via a charging cable.
- HDMI Port
- Connect to a playback device via HDMI output.
Top View

- Volume Up / Down Buttons
- Confirmation Button
- Return Button
- Navigation Buttons
LED Light Guide
| Confirmation Button | LED Status | Description |
 | Steady Blue | Powered On |
| Light Off | Powered Off | |
| Flashing Red | Low Battery | |
| Steady Red | Charging | |
| Steady Green | Fully Charged | |
| Steady Orange | Standby Mode |
Bottom View

- 1/4" Tripod Socket
Remote Control

- Auto image adjustment
- Power on / off / switch to standby mode
- Navigation
- Return button
- Volume down
- Open YouTube
- Open Prime Video
- Activate the Google Assistant (Only available in Google TV mode)
- Confirm a selection / pause / resume
- Access the home menu
- Access more options
- Volume up
- Open Netflix
- Press to mute or unmute the sound
Getting Started
Prepare the Remote
- Slide to open the battery compartment.
![]()
- Insert new batteries matching the polarity (+/-) and close the battery compartment.
![]()
- For first-time use, follow the on-screen instructions to pair the remote with your projector.


- During the initial Bluetooth pairing process, ensure the remote control is within 20 cm (8 inches) of the projector.
- For regular use, maintain a distance of no more than 10 meters (33 feet) between the remote control and the projector.
Position Your Projector
Place the projector on a stable, flat surface in front of the projection surface. For the best results, the projection surface should be white and flat.

- It is unnecessary to tilt the projector towards the projection surface. You can correct the projection image with the built-in autofocus and auto-keystone correction.
- You may also install the projector onto a tripod (sold separately).
- The distance between the projector and the projection surface determines the projection image size. For the best result, position the projector 0.5 - 2.7 m / 1.64 - 8.86 ft away from the projection surface to get a screen size of 40~120 inches.
| Screen Size | Distance Between Projector Lens and Screen |
| 40 inches | 1.06 m / 3.47 ft |
| 50 inches | 1.33 m / 4.36 ft |
| 60 inches | 1.60 m / 5.24 ft |
| 70 inches | 1.86 m / 6.10 ft |
| 80 inches | 2.13 m / 6.98 ft |
| 90 inches | 2.39 m / 7.84 ft |
| 100 inches | 2.65 m / 8.69 ft |
Charge Your Projector
For first-time use, fully charge your projector using the provided adapter and charging cable.

Power On / Off
Press and hold the projector power button for 1.5 seconds to power on / off.

- When the projector is connected to an adapter, you can use the remote control to power it on.
- In HDMI Source Mode, the projector will switch to standby mode after 10 minutes of button inactivity or when no signal is detected.
- When standby mode lasts for 30 minutes, the projector will automatically power off.
Auto focus and Auto Keystone Correction
How to trigger auto focus:
- Press the [Auto image adjustment] button on the remote control.
- Auto-trigger upon powering on.
- Auto-trigger after moving the projector.
How to perform manual focus:
Go to [Settings] > [Projector] > [Focus Settings] > [Manual Focus Correction].
How to trigger Auto Keystone Correction:
After enabling Auto Keystone Correction in [Settings] > [Projector] > [Image Correction] > [Auto Keystone Correction Settings], Auto Keystone Correction will be triggered in the following scenarios:
- Pressing the [Auto image adjustment] button on the remote control.
- Auto-trigger upon powering on.
- Auto-trigger after moving the projector.
How to perform manual keystone correction:
Go to [Settings] > [Projector] > [Image Correction] > [Perform Manual Keystone Correction].
Setup
When using the projector for the first time, follow the on-screen display (OSD) instructions to complete the basic setup.
Use with the Snap-on Base
- Firmly attach Nebula Capsule Air to the Snap-on Base by aligning the projector's bottom with the base's inner circle and turning it clockwise.

![information]()
You can choose to install the device with the Nebula logo facing either the front or back side of the base, so as to use the device in multiple angles and scenarios. - Now you're ready to enjoy your favorite content wherever you like.


To Mount the Snap-on Base on the Wall:
- Prepare the template paper, Snap-on Base, two screws and two plastic anchors.

- Fix the provided template paper on the wall, and drill two holes according to the specified locations.

![information]()
Please use a 6mm diameter drill bit. - Insert the plastic anchors into the drilled holes.

- Secure the Snap-on Base to the wall using the provided screws, and make sure it's firmly attached. Now you can adjust the projecting angle as you like.

- Now you can adjust the projecting angle as you like.


When mounted on the wall, the maximum tilt angle is 90°.
Nebula Connect App
To easily control the projector, we recommend you download the Nebula Connect app.

- Download the Nebula Connect app from the App Store (iOS devices)
![www.apple.com]()
or Google Play (Android devices).
![play.google.com]()
- Enable Bluetooth on your smartphone.
- Open the Nebula Connect app and select [Capsule Air] as the device to be connected.
- Follow the on-screen instructions to complete connection setup.


Settings
Go through the setup process when you power on the projector for the first time.
Network
This projector can be connected to the Internet via a wireless (Wi-Fi) connection.
- On the home page, select
![]() > [Network & Internet] and press confirm.
> [Network & Internet] and press confirm. - Follow the on-screen instructions to complete the network connection.
Projector
On the home page, select ![]() > [Projector] and press confirm.
> [Projector] and press confirm.
| [Image Correction] | Auto Keystone Correction Settings [Auto Keystone Correction By Remote]: Enable or disable auto keystone correction by remote. [Auto Keystone Correction At Startup]: Automatically perform keystone correction when the projector powers on. [Auto Keystone Correction After Movement]: Automatically perform keystone correction when you move the projector. [Real Time Keystone Correction]: During the movement of the device, it continuously and quickly performs keystone correction to transform the image into a rectangular shape. [Perform Manual Keystone Correction]: Manually perform keystone correction by adjusting each corner. [One-click Image Correction]: Automatically adjust the image size to your surface. [Zoom]: Zoom in or out of the projection image from 50% to 100%. |
| [Focus Settings] | [Manual Focus Correction]: Enable manual focus correction. [Auto Focus When Image is Blurry]: Enable to perform auto focus when the image is blurry. |
| [Advanced Settings] | [Projection Mode]: Select a way of placing the projector.
|
| [Motion Settings]: Set a sensitivity level for the G-sensor to trigger auto focus and auto keystone correction after movement. | |
[Smart Solutions]:Receive alerts when issues are detected.
| |
| [Display & Sound] | Picture [Brightness]: Adjust the brightness of the projector display. |
[Picture Mode]: The projector is preset with several predefined picture modes so that you can choose one to suit your environment and input source.
| |
[Advanced Settings]: Customize advanced settings to enhance image quality.
| |
| Sound [Movie]: Creates a surround-sound listening experience for watching movies. [Music]: Enhances the treble for listening to music. [Outdoors]: Increases volume for playing audio / video outdoors. [Custom]: Manually set audio settings such as balance, bass, and treble. [Turn on the Bluetooth Speaker Mode]: Enable to use the projector as a Bluetooth speaker. [Speaker Delay]: To synchronize the sound with the image, adjust the sound delay by 10 milliseconds for each operation. [Expert Settings]: Customize advanced settings to enhance audio quality.
| |
| Audio Output [Auto]: Automatically select the best audio output mode. [Bypass]: Pass the digital audio signal through without processing it, allowing the connected device to decode the audio. [PCM]: Output audio in PCM format. [Dolby Digital Plus]: Output audio in the Dolby Digital Plus format. [Dolby Digital]: Output audio in the Dolby Digital format. [Digital Output Delay]: Adjust the delay of the digital audio output to synchronize the sound with the video. |
Apps
- On the home page, select
![]() > [Apps],and press confirm.
> [Apps],and press confirm. - Select an app to check its current version, open or force stop it, review the storage it uses, clear its data or cache, uninstall it, or enable/ disable its notifications and permissions.
System
On the home page, select ![]() > System and press confirm.
> System and press confirm.
| [Accessibility] | Change the caption settings or enable accessibility service. |
| [About] | Check the product information, update the system, reset the device, or rename the device. |
| [Date & Time] | Enable or disable automatic date and time. Manually set date and time, select time zone, or set time format. |
| [Language] | Select an on-screen display language. |
| [Keyboard] | Check and manage keyboards. |
| [Storage] | Check the device storage. |
| [Ambient Mode] | Set your preferences to diaplay photos, weather, and time on your Google TV. |
| [Power & Energy] | Change the auto-sleep settings, turn off the current display, or set auto power-off time when no signal is available. |
| [Cast] | Choose to show notifications on all Android devices connected to your Wi-Fi and let them control media casting to this device. |
| [System Sounds] | Turn on/off system sound notifications. |
| [Restart] | Restart the system. |
Others
On the home page, select ![]() to find more setting options.
to find more setting options.
| [Accounts & Sign-in] | Sign in to make the most of Google TV. |
| [Remotes & Accessories] | Search for accessories (such as Bluetooth speakers, remote control, etc.) for pairing. |
Using Your Projector
Select an App
Once connected to a wireless network, you can access online services, enjoy movies, music and pictures, and browse online. You can download more apps from Google Play.
- Press
![]() to access the home page.
to access the home page. - Select [Apps] > [Search for apps and games].
 to access the home page.
Voice Assistant
After pairing your remote control with the projector via Bluetooth, press the Google Assistant button on the remote, you can speak to the Google Assistant and request your commands.
Wireless Casting
You can wirelessly cast movies, games, music, and entire screen from your iOS, macOS, Android, or Windows device to Nebula Capsule Air.
Make sure Nebula Capsule Air and your device are connected to the same wireless network. The network can be a WiFi network or your phone's hotspot.
Cast In-App Content
You can cast content from apps that support Chromecast, such as YouTube and Prime Video.
For iOS Devices:
- Ensure both the projector and your iOS device are connected to the same Wi-Fi network.
- On the projector, install and open the Nebula Cast App from Google Play.
- Open the Control Center on your iPhone, tap on Screen Mirroring, find "Nebula Capsule Air" in the device list, and tap to connect.
For Android Devices:
- Ensure both the projector and your Android device are connected to the same WiFi network.
- Install and open the Google Home App on your device.
- Add a new device, find "Capsule Air" and connect.
- Select the connected Nebula device, then tap "Cast my screen".


Certain content cannot be cast on Nebula Capsule Air due to copyright restrictions. You can stream the content via the same app installed on your projector.
Play from HDMI Playback / USB Devices
The projector can be connected to various HDMI playback devices such as a TV box, TV stick, DVD player, set-top box (STB), gaming console, or other devices.
- Connect the projector to an HDMI playback device with an HDMI cable (not provided).
- Press
![]() to access the settings menu, then select [Dashboard] > [Inputs] > [HDMI].
to access the settings menu, then select [Dashboard] > [Inputs] > [HDMI].


The projector will automatically start HDMI playback once connected to an HDMI playback device for the first time.
To play from a USB drive:
Since the projector has only one USB-C port, you will need to use a hub to charge the device and read a USB drive simultaneously.
Instructions:
- Connect the hub to the projector's USB-C port.
- Plug the charger into the hub's charging port.
- Insert the USB drive into the hub's USB port.
Ensure all connections are stable during use.
Bluetooth Speaker Mode
You can use this projector as a standalone Bluetooth speaker.
- Go to [Settings] > [Display & Sound] > [Sound] > [Turn on the Bluetooth Speaker Mode] to switch your Nebula projector from Projector Mode to Bluetooth Speaker Mode.
- Go to Bluetooth settings on your phone to pair with your Nebula projector.
To exit Bluetooth Speaker Mode, press the return button on the remote control.
Connect the Projector to an External Bluetooth Speaker
- Turn on your Bluetooth speaker and set it to pairing mode (refer to your speaker's manual for specific instructions as the process may vary).
- Go to [Settings] > [Remotes & Accessories] in the project's settings. Find your Bluetooth speaker's name and select it to pair.
- Once paired successfully, the projector's audio will be output through the external Bluetooth speaker.
Other Bluetooth accessories can also be connected to the projector via the above-mentioned process.
System Update
To fully enhance your experience with this product with the latest features, you are recommended to update the system from time to time.
To update the system, go to [Settings] > [System] > [About] > [System update].
Specifications
Specifications are subject to change without notice.
| Input | 20V  2.25A 2.25A |
| Power Consumption | < 37W |
| Standby Power Consumption | < 0.5W |
| Resolution | 1280x720 |
| Compatible Resolutions | 480p (60 Hz), 576p (50 Hz), 720p(30 Hz), 720p (50 Hz), 720p (60 Hz) |
| Contrast Ratio | 400:1 |
| Aspect Ratio | 16:9 |
| Screen Size | 10" to 100" |
| Throw Ratio | 1:2 |
| Throw Distance | 0.3m~2.7m/0.98~8.86 ft |
| Light Source | 0.3m~2.7m/0.98~8.86 ft |
| Focus | Auto |
| Keystone Correction | Auto |
| Speaker Output Power | 5W |
| Noise | <28dB |
| Wi-Fi | WiFi5 802.11a/b/g/n/ac, Dual Frequency 2.4/5GHz |
| Bluetooth Version | 5.1 |
| Bluetooth Range | 25 m / 82 ft |
| USB Format | FAT, FAT32 |
| Operating Temperature | For Europe and UK, 0°C to 25°C For other countries and regions, 0°C to 35°C / 32°F to 95°F |
| Remote Control Batteries | AAA x 2 |
Troubleshooting
- Fails to Power On
- The projector may be out of power. Charge the projector for 15-30 minutes and see if the power button light turns on.
- Cannot Charge
- Use the included adapter and charging cable to charge the projector.
- Try a different adapter (at least 45W) and USB-C charging cable.
- Cannot Connect to a Wi-Fi Network
- Place your projector within 16 ft / 5 m of the router and reconnect.
- Set your router to 2.4 GHz or 5 GHz and retry.
- Restart your projector and router and retry.
- Try a different Wi-Fi network or your phone's hotspot.
- Blurry Image
- Slightly move the projector or press on the remote to start autofocus.
- To manually adjust the focus, go to [Settings] > [Projector] > [Focus Settings] > [Manual Focus Correction],and use left and right on the remote.
- Adjust the projection angle and direction as well as the height of the projector if necessary.
- Distorted Image
- Update the firmware to the latest version via [Settings] > [System] > [About] > [System update].
- Go to [Settings] > [Projector] > [Image Correction] > [Perform Manual Keystone Correction].
- Move the projector left or right, or alter the tilt if necessary.
- No HDMI Signal
- Use a different HDMI cable.
- Connect your projector with another HDMI playback device.
- Connect the HDMI playback device to your TV via HDMI cable to check if the device or cable malfunctions.
- Adjust the HDMI playback device's output resolution / frequency to be the same as the projector's.
- How to Play Videos without Wi-Fi
- Download videos to a USB drive in FAT32 format. For the following steps, see Play from a USB Drive.
Documents / Resources
References
Download manual
Here you can download full pdf version of manual, it may contain additional safety instructions, warranty information, FCC rules, etc.
Advertisement


Need help?
Do you have a question about the Capsule Air and is the answer not in the manual?
Questions and answers