
Related Manuals for Nebula Capsule Air


Summary of Contents for Nebula Capsule Air
- Page 1 What’s Included Nebula Capsule Air Adapter Charging Cable Remote Control AAA Batteries Snap-on Base Quick Start Guide...
- Page 2 At a Glance 1. Projector Front View Lens TOF for Auto Focus and Auto Keystone Correction...
- Page 3 Rear View Speaker Infrared Receiver Power Button • Press and hold for 1.5 seconds to power on / off. • Press to wake up the projector / enter standby mode in projector mode. USB-C Port • Connect to a USB drive. •...
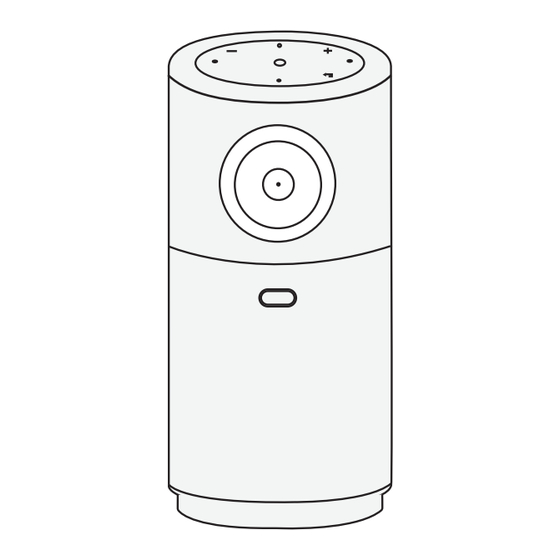
- Page 4 Top View Volume Up / Down Buttons Confirmation Button Return Button Navigation Buttons LED Light Guide Confirmation Button LED Status Description Steady Blue Powered On Light Off Powered Off Flashing Red Low Battery Steady Red Charging Steady Green Fully Charged Steady Orange Standby Mode...
- Page 5 Bottom View 1/4" Tripod Socket...
- Page 6 2. Remote Control Auto image adjustment Activate the Google Assistant (Only available in Google TV mode) Power on / off / switch Confirm a selection / to standby mode pause / resume Navigation Access the home menu Return button Access more options Volume down Volume up Open YouTube...
- Page 7 Getting Started 1. Prepare the Remote ① Slide to open the battery compartment. ② Insert new batteries matching the polarity (+/-) and close the battery compartment. ③ For first-time use, follow the on-screen instructions to pair the remote with your projector. During the initial Bluetooth pairing process, ensure the •...
- Page 8 2. Position Your Projector Place the projector on a stable, flat surface in front of the projection surface. For the best results, the projection surface should be white and flat. • It is unnecessary to tilt the projector towards the projection surface.
- Page 9 3. Charge Your Projector For first-time use, fully charge your projector using the provided adapter and charging cable. 4. Power On / Off Press and hold the projector power button for 1.5 seconds to power on / off. • When the projector is connected to an adapter, you can use the remote control to power it on.
- Page 10 When using the projector for the first time, follow the on-screen display (OSD) instructions to complete the basic setup. Use with the Snap-on Base ① Firmly attach Nebula Capsule Air to the Snap-on Base by aligning the projector's bottom with the base's inner circle and turning it clockwise.
- Page 11 ② Front Back • You can choose to install the device with the Nebula logo facing either the front or back side of the base, so as to use the device in multiple angles and scenarios. ② Now you're ready to enjoy your favorite content wherever you like.
- Page 12 ② Fix the provided template paper on the wall, and drill two holes according to the specified locations. ② • Please use a 6mm diameter drill bit. ③ Insert the plastic anchors into the drilled holes. ③ ④ Secure the Snap-on Base to the wall using the provided screws, and make sure it's firmly attached.
- Page 13 ⑤ • When mounted on the wall, the maximum tilt angle is 90°.
- Page 14 ① Download the Nebula Connect app from the App Store (iOS devices) or Google Play (Android devices). ② Enable Bluetooth on your smartphone. ③ Open the Nebula Connect app and select [Capsule Air] as the device to be connected. ④ Follow the on-screen instructions to complete connection setup.
- Page 15 2. Projector On the home page, select > [Projector] and press confirm. Auto Keystone Correction Settings [Auto Keystone Correction By Remote]: Enable or disable auto keystone correction by remote. [Auto Keystone Correction At Startup]: Automatically perform keystone correction when the projector powers on. [Auto Keystone Correction After Movement]: Automatically perform keystone correction when you move the projector.
- Page 16 [Smart Solutions]:Receive alerts when issues are detected. • [Projection Issue Alerts]: Receive alerts when issues are detected. • [ Fine Tuning Popup]: Receive a popup after Auto Gridless Keystone Correction. • [Nebula Smart Popup]: Receive prompts when the projector status changes.
- Page 17 Picture [Brightness]: Adjust the brightness of the projector display. [Picture Mode]: The projector is preset with several predefined picture modes so that you can choose one to suit your environment and input source. • [Standard]: Keeps natural looking colors with a [Display &...
- Page 18 Sound [Movie]: Creates a surround-sound listening experience for watching movies. [Music]: Enhances the treble for listening to music. [Outdoors]: Increases volume for playing audio / video outdoors. [Custom]: Manually set audio settings such as balance, bass, and treble. [Turn on the Bluetooth Speaker Mode]: Enable to use the projector as a Bluetooth speaker.
- Page 19 3. Apps ① On the home page, select > [Apps],and press confirm. ② Select an app to check its current version, open or force stop it, review the storage it uses, clear its data or cache, uninstall it, or enable/ disable its notifications and permissions.
- Page 20 3. Wireless Casting You can wirelessly cast movies, games, music, and entire screen from your iOS, macOS, Android, or Windows device to Nebula Capsule Air. Make sure Nebula Capsule Air and your device are connected to the same wireless network. The network can...
- Page 21 1. Ensure both the projector and your iOS device are connected to the same Wi-Fi network. 2. On the projector, install and open the Nebula Cast App from Google Play. 3. Open the Control Center on your iPhone, tap on Screen Mirroring, find "Nebula Capsule Air"...
- Page 22 4. Play from HDMI Playback / USB Devices The projector can be connected to various HDMI playback devices such as a TV box, TV stick, DVD player, set-top box (STB), gaming console, or other devices. ① Connect the projector to an HDMI playback device with an HDMI cable (not provided).
- Page 23 ① Go to [Settings] > [Display & Sound] > [Sound] > [Turn on the Bluetooth Speaker Mode] to switch your Nebula projector from Projector Mode to Bluetooth Speaker Mode. ② Go to Bluetooth settings on your phone to pair with your Nebula projector. To exit Bluetooth Speaker Mode, press the return button on the remote control.
- Page 24 System Update To fully enhance your experience with this product with the latest features, you are recommended to update the system from time to time. To update the system, go to [Settings] > [System] > [About] > [System update]. Specifications Specifications are subject to change without notice.
- Page 25 Keystone Correction Auto Speaker Output Power Noise <28dB WiFi5 802.11a/b/g/n/ac ,Dual Frequency Wi-Fi 2.4/5GHz Bluetooth Version Bluetooth Range 25 m / 82 ft...
- Page 26 USB Format FAT, FAT32 For Europe and UK, 0°C to 25°C Operating Temperature For other countries and regions, 0°C to 35°C / 32°F to 95°F Remote Control Batteries AAA x 2 Troubleshooting ① Fails to Power On • The projector may be out of power. Charge the projector for 15-30 minutes and see if the power button light turns on.
- Page 27 • Go to [Settings] > [Projector] > [Image Correction] > [Perform Manual Keystone Correction]. • Move the projector left or right, or alter the tilt if necessary. ⑥ No HDMI Signal • Use a different HDMI cable. • Connect your projector with another HDMI playback device. •...
Need help?
Do you have a question about the Capsule Air and is the answer not in the manual?
Questions and answers