Advertisement
- 1 Introduction
- 2 Functional diagram
- 3 Quick Installation Guide
- 4 Riding preparation
- 5 Learning to ride
- 6 Instructions for the use of vehicles
- 7 Charging instructions
- 8 Electric off-road motorcycle parameters
- 9 Other considerations
- 10 Fault Phenomenon and Solution
- 11 Maintenance guide
- 12 Maintenance record cards
- 13 Safety Precautions
- 14 Documents / Resources
Introduction
This manual shall be considered a permanent part of the electric motocross motorcycle and shall be forwarded along with it to the next owner at the time of resale.
This publication includes the latest production information available prior to printing.
Rawrr adds the right to make changes at any time without notice or obligation.
Rawrr reserves the right of final interpretation of this manual.
No part of this publication may be copied, translated, reproduced or transferred without the written permission of Rawrr.
The electric motocross bike shown in this manual may not match your actual electric motocross bike.
- Please ensure your safety and enjoyment of the ride
- Read this manual carefully
- Follow all recommendations and procedures contained in this manual.
Pay close attention to the safety information and tips contained in this manual.
To protect your property, we strongly recommend that you keep your vehicle well maintained. In addition, follow the operating instructions and always perform the pre-ride and other periodic inspections contained in this manual.
Your Rawrr dealer knows your electric off-road motorcycle best. We recommend that you contact Rawrr or an authorized dealer with any questions and concerns regarding your vehicle, manuals and related policies. We are not responsible for any unofficial statements or opinions regarding electric off-road motorcycles, manuals and related policies.
You can also visit our website at www.rawrrmantis.com. For more information, please visit. Enjoy your electric off-road ride.
Your safety, and the safety of others, is a top priority. Safely operating this electric off-road motorcycle is an important responsibility.
To ensure your safety and the safety of others, we have provided operating procedures and other safety labeling information in this manual that could injure you or others.
Please understand that it is not practical or possible to inform or warn you about hazards when operating or maintaining your electric motocross motorcycle. You must use your own good judgment.
You will find important safety information in various forms, including:
- Safety labels on your electric motocross bike
- A safety alert precedes the safety message.
This electric off-road motorcycle is strictly prohibited from being driven on non-permitted occasions.
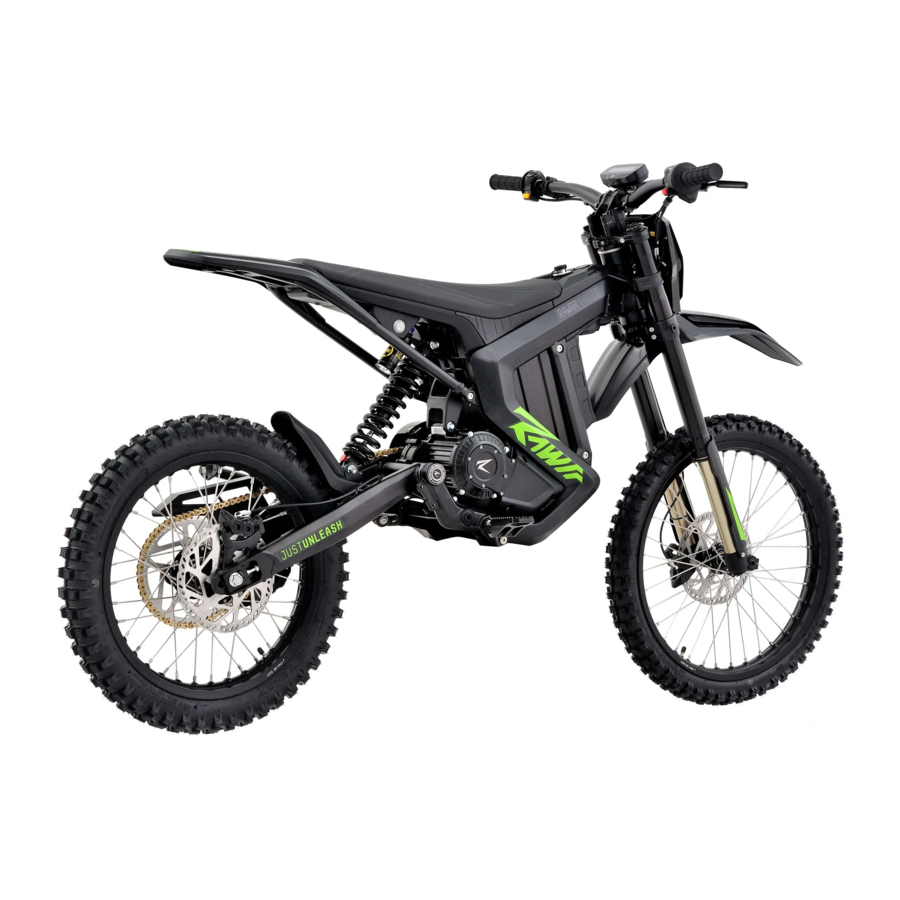
Functional diagram

- Instrumentation
- Headlights
- Front mudguard
- Front shock absorbers
- Key
- Charging port
- Body
- Motor
- Cushions
- Rear shock absorbers
- Rear mudguard
- Rear Tailboard
- Brake Disks
- Front brake calipers
- Horns
- Controller
- Battery
- Footrests
- Side support
- Chain
- Rear Flat Fork
- Rear chain guide
- Rear chain cover
- Rear Sprocket

- Left combination function switch
- Left brake lever (rear brake)
- meter (i.e. measuring instrument)
- Right brake lever (front brake)
- Right combination function switch
- Turnbuckles
| Left switch |  |  | |
| High beam and low beam switching (requires headlights to be turned on) | Horn Switch | ||
| Right switch |  |  |  |
| One-touch ignition off switch | ECO, Sport, Race mode toggle switch | Swivel handle |

| Serial Number | Functionality | Display Symbols | Commentation |
| 1 | Tempo |  | Current speed display while riding |
| 2 | ODO |  | Total mileage ODO display, metric mileage switchable |
| 3 | Single mileage |  | Individual miles are recalculated each time you turn the power on |
| 4 | Gear display |  | ECO/SPORT/RACE according to actual display |
| 5 | Operational state |  | Work indication, speed off, no speed on |
| 6 | Under-voltage indication |  | Blinks when the battery is under-voltage |
| 7 | High beam display |  | High beams on indicator lights |
| 8 | Turn indicator (auto.) |  | Left and right turn signal indication |
| 9 | Motor failure |  | fault indication |
| 10 | Percentage of power |  | Current speed display while riding |
| 13 | Fault Codes Display |  | Total mileage ODO display, metric mileage switchable |
Recommended torque for installation of critical components
| Serial Number | Mounting Position | Recommended Torque |
| 1 | Front Axle Tightening | 25-30N.m |
| 2 | Function switch fastening | 4-5N.m |
| 3 | Rear wheel sprocket fastening | 18-20N.m |
| 4 | Front and rear disc brake disk tightening | 12-15N.m |
| 5 | Front and rear caliper tightening | 12-15N.m |
| 6 | Chain rear guide fastening | 12-15N.m |
| 7 | Chain front guide fastening | 3-5N.m |
| 8 | Foot bracket fastening | 28-32N.m |
| 9 | Motor fixing | 20-25N.m |
| 10 | Rear Fork Tightening | 30-35N.m |
| 11 | Rear Shock Absorber Tightening | 22-28N.m |
| 12 | Rear Tailstock Fastening | 15-20N.m |
| 13 | Rear Axle Tightening | 60-70N.m |
| 14 | handlebar sth. tight | 7-9N.m |
| 15 | Steering column adjusting nut | 3-5N.m |
| 16 | Steering column locking bolt | 30-35N.m |
Quick Installation Guide
Do not assemble, disassemble or pack electric motocross bikes alone. Teamwork is required.
Mounting Handle
- Place the headlight bracket on the upper attachment plate and align the four 4-holes.


- Place the booster block and handlebars on the headlight bracket, align the holes and lock the 4 screws with a 5# Allen wrench. Note: Bullet spacers must be added to the 4 screws.


Handle Adjustment
- Loosen the 4 screws with a 5# Allen wrench to adjust the meter angle.
NOTE: Do not lose the bolt retaining spacer.


Instrument adjustment
- Loosen the 2 screws with a 3# Allen wrench and rotate the meter at the proper angle.


Brake and Crank Adjustment
- Adjust the front brake handle to a comfortable 10°-15° angle horizontally as shown in the picture. Use a 4# Allen wrench to secure the brake handle.


- As shown in the picture, adjust the turnbuckle to a horizontal level plus or minus 5° to fit your grip comfortably. Use 4# Allen wrench to fix it.


- Turn the turnbuckle inward to the end, then release the turnbuckle and let it return to its natural position.
Note: Power must be turned off for turnbuckle adjustment. The turnbuckle rotates inward to accelerate and return smoothly, if there is any jamming. Please check the turnbuckle and follow the turnbuckle adjustment procedure.
NOTE: The procedure for adjusting the left brake handle (rear brake) and left function switch is the same as above.


Installation of front wheel
- Install front axle bushings on both sides
![]()
Do not crush seals.


- Remove the brake caliper clamping block


- Put the front wheel into the installation position of the front fork and the brake disc into the brake caliper, and use an 8# hex wrench to fix the front axle.

- Tighten the bolt in the front wheel axle hole, a total of 4 pieces.


Notes:
- After removing the caliper clamping block, please do not pinch the right brake handle, pinching the right brake handle will cause the brake to clamp and the brake disk will be difficult to insert.
- When installing the front wheel, you need to pay attention to the brake disk and caliper position. After the installation is completed, make sure the front wheel rotates smoothly and there is no strange noise.
- When installing the brake disk, add anaerobic adhesive to the threaded portion (heat the threaded portion when removing).
Front Fender Installation
Using a 5# Allen wrench, secure the front fender to the lower attachment plate with 3 screws, including flat and spring pad locks

Headlight Installation
- Place the headlights on the front fender locating pins and add adjusting shims between the headlights and the bracket.


- Adjust the position and tighten the center fixing screw with 5# hexagonal wrench.


Headlight Adjustment
Adjust the height of the light by twisting the adjusting screw left and right with a Phillips screwdriver.
Note: Tighten the light clockwise to turn the light angle down. Tighten counterclockwise to turn the light angle up.

Installation of batteries
- Open the cushion by inserting the key into the cushion lock.


- Place the battery discharge port against the right side of the frame into the battery compartment, install the discharge plug (the door lock switch must be in the closed position), and close the cushion.


Riding preparation
Please make sure you have read all the items in P04 (Safety Precautions) of this manual before riding and focus on the following items.
Check front and rear tires:
- The tires are in good condition with no abnormality.
- Normal tire pressure front wheels 23 ~ 25psi (160 ~ 170Kpa) rear wheels 35psi (240Kpa) If the tire pressure is insufficient, there will be abnormal wear and tear, steering, low speed, short distance; tire pressure is too high will lead to abnormal localized wear of the tire tread, tire adhesion is reduced, ride comfort is reduced, or even bursting, resulting in a potential safety hazard.
Check gauges, horn and brakes:
- Check whether the function display of each part of the instrument is normal.
- Check whether the horn is normal.
- Hold the left and right brake handles respectively, check whether the front and rear brakes brake normally, whether the front and rear brake cutoff function is normal.
Check the handlebars:
The handlebars need to be tightened, no wobble, flexible, no interference, no weird noises.
Shock absorber adjustment:
SHOCK ABSORBER ADJUSTMENT: Please adjust the shock absorber according to the actual situation to meet your riding needs.


Always wear a helmet and other protective equipment. For your safety, choose a full-coverage off-road helmet and off-road protective equipment.
These images are for illustrative purposes only: Please take full safety precautions. Please do not allow others who are not familiar with this electric motocross bike to ride it. It is extremely dangerous to ride one-handed or to perform extreme maneuvers while under the influence of alcohol or inattentive.
Learning to ride
Beginning
- Insert the key into the motorized locking hole and turn it clockwise to power it up.

- Check that switches, gauges, horn, front and rear brakes are working properly.

- Before starting the vehicle: get in the car and sit firmly, put away the side support.

- Slowly turn the handlebar, rotating inward to accelerate and turning outward to stop accelerating.


The driver must first familiarize himself with the use of EC0 mode before switching to the use of Sport mode. Acceleration must be even.
Operate the brake brake handle according to the actual situation and gradually increase the force. To prevent the wheel from locking up, skidding and causing injury, do not grab it suddenly. Try to pre-empt the situation and avoid hard braking, hard steering and other maneuvers that could easily lead to skidding and falling. The situation is especially dangerous when the roads are slippery in the rain.
Sudden squeezing of the right brake lever (front brake) by the right hand while riding may result in a rollover.

Sudden squeezing of the left brake handle (rear brake) with the left hand while riding may result in a rollover.

Park
Be aware of road conditions and slow down to approach the parking position. Once the vehicle is stabilized, turn off the switch lock, remove the key, lower the side supports and secure the vehicle.

When parking (before leaving the buggy), please open the side support and enter the P-gear parking off function to ensure that the buggy is disconnected from the power, so as to avoid touching the speed turn handle to cause accidents.
Please do not tow other vehicles.

Do not use cell phones, cameras, headphones, earbuds or other devices while riding.

Drive slowly and carefully on complex road conditions.

Do not drive in bad weather or when extremely tired. Do not wade into water too deeply, as this can damage the battery and may even cause personal injury.

Always slow down before making a sharp turn.

Please hold the handlebars with both hands and do not speed.

Safety Hazards: Take care to avoid them. Do not use dangerous behaviors. Riding after drinking alcohol is prohibited.
Instructions for the use of vehicles
P-park function
- Enter the P gear park when the power is turned on.
- Enter P-gear park when the side support is lowered.
- Close the one-touch switch and enter P-gear park.
Note: Ensure that the side supports are open before toggling the one-touch kill switch to disengage the P-gear park function!
Vehicle "power off" (power on but no power)
- Brake power off: when pinching the brake handle, there will be no power output when turning the turnbuckle;
- Motor overheating protection.
- Controller overheating protection.
- Battery overheating, power supply reaches undervoltage protection point.
- Turn off the one key off switch.
Vehicle power reduction
- The controller overheats (when the operating temperature exceeds 85°C, it starts to enter the deceleration process; each increase of 1°C will decelerate it by 10%. If it continues to overheat to 20% of the rated value, the power output will be cut off and it can be used again after the controller cools down).
- Motor overheating (when the working temperature exceeds 110℃, it starts to enter the derating process, every 1℃ increase will increase the derating value by 10%. If the overheating continues, the derating to 20% of the rated power output will be cut off and wait for the motor to cool down, then it will be ready for use).
- Battery voltage is processed by linear derating starting from 71V, every 1V lower, the amount of reduction will be 20%, the minimum drop to 15% of the rated value. 63V voltage battery enters undervoltage protection.
- When the power supply is zero, stop the power output. (The battery may enter over-discharge protection if it is not recharged in time for continued use). Note: After over-discharge protection, the battery needs to be charged and activated with a charger, see Fault Phenomena for activation method.
Environment during use
- When the temperature is below 0℃, it is not recommended to use SPORT mode and RACE mode.
- When the temperature is higher than 50℃, it is not recommended to drive with high power for a long time.
About Wading
Electric motocross bikes will occasionally wade in water (no more than 24 cm/9 inches deep) but should not be submerged for too long, especially if the motor is at a high temperature as the cooling of the water and the contraction of the internal air can cause water to be absorbed by the oil seals and the cable locations, resulting in internal damage. Below are the waterproof ratings for each component.
Battery: IP55 Motor/Controller: IP66
Whole vehicle connector: IP55
Charging instructions
Charge the entire electric motocross bike
Connect the charger output to the vehicle's charging port and then connect the other end to a power source.

It is prohibited to charge the battery below 0°C, otherwise the battery will be damaged. Please wait for the battery temperature to rise to charge. The correct use and maintenance of lithium batteries: used lithium batteries should not be dismantled without permission, and should be recycled by the relevant departments of the organization. *When the vehicle is not used for a long time for more than one month, be sure to turn off the power-off switch or unplug the power supply and store it fully charged. *When not charging, please fasten the charging sealant cap.
Portable Charging
- Remove the battery

- Make sure the electric door lock switch lock is off.
![]()
- Unlock the cushion lock with the key and open the cushion.

- Open the card on the lithium battery, pull the power head upward and take out the lithium battery.

- Make sure the electric door lock switch lock is off.


- Battery charging
- Connect the output of the charger to the charging port of the lithium battery first, and then connect the other end to the power supply.

- The charger indicator shows. Red color means it is charging. When it is fully charged, the green light stays on; when the battery is fully charged, please turn off the power in time.

- Connect the output of the charger to the charging port of the lithium battery first, and then connect the other end to the power supply.


About Charging
- Charge the electric motocross bike away from children.
- Do not place any objects on the charger. Use the charger in a dry and well-ventilated environment.
- If you smell an odor or the temperature is too high during charging, stop charging immediately, or if it does not show full for a longer period of time, send it to the service office for repair.

Always use an authorized lithium battery charger. When replacing the charger, use an authorized special charger. Before installing or removing the battery, turn off the power to the entire vehicle. Turning on the power will affect the battery life reduction. When the battery plug is not fully inserted into the battery, there is a risk of ignition when the power is turned on, which can easily lead to damage to the plug.
Electric off-road motorcycle parameters


Note: The range may vary greatly depending on the test environment. The data is measured with the rider weighing 100Kg and the ambient temperature at 25℃.
Other considerations
- RAWRR is committed to continually improving the performance of its products. Product specifications and manual content are subject to change without notice. Please understand! If there is any discrepancy between the icons and pictures in the manual and the actual product, please refer to the actual product.
- RAWRR reserves the right to interpret and construe this product statement to the extent permitted by law.
- If you want to resell or transfer your RAWRR electric motocross bike, please don't forget to forward this manual as it is part of the product. If you have any questions for RAWRR, we are happy to assist you at any time. Thank you again for your choice and trust in this product!
Attachment (complete vehicle electrical schematic)
")
Controller Alarm Code List
| Alarm Code (Buzzer Beep) | Fault name | Protective Measure | Fault Resolution |
| 1 (1 short) | Software overcurrent | Shut down |
|
| 2 (2 short) | Motor overspeed | Shut down |
|
| 3 (3 short) | Battery overvoltage | Shut down |
|
| 4 (4 short) | KEY power supply abnormality | Shut down |
|
| 5 (5 short) | Controller 12V power supply abnormality | Shut down |
|
| 6 (6 short) | Controller 5V power supply abnormality | Shut down |
|
| 7 (7 short) | Angle sensor disconnected | Shut down |
|
| 8 (8 short) | Hardware overcurrent | Shut down |
|
| 9 (9 short) | Current Closed Loop Fault | Shut down |
|
| 10 (1 long) | Battery undervoltage | Derating |
|
| 11 (1 long, 1 short) | Controller temperature too high | Derating |
|
| 12 (1 long, 2 short) | High motor temperature | Derating |
|
| 13 (1 long, 3 short) | Current sensor abnormality | Shut down |
|
| 14 (1 long, 4 short) | Motor signal interference | Shut down |
|
| 15 (1 long, 5 short) | No signal from the turnbuckle. | Shut down |
|
| 16 (1 long, 6 short) | Turnbuckle not reset | Shut down |
|
| 17 (1 long, 7 short) | motor stalling | Derating |
|
| 18 (1 long 8 short) | Battery communication disconnection | Shut down |
|
| 19 (1 long, 9 short) | Battery communication failure | Shut down |
|
| 21 (2 long and 1 short) | brake failure | Shut down |
|
Note: Depending on the test environment, the range may vary significantly. Data was measured using a motorcyclist weight of 220 pounds and an ambient temperature of 26°C.
Fault Phenomenon and Solution
| Serial Number | List of items | Cause of Failure | Troubleshooting |
| 1 | Turn on the power, the motor does not work |
|
|
| 2 | Governor does not work, or maximum speed is low |
|
|
| 3 | Turn on the power, the motor does not work once the charging range is not enough |
|
|
| 4 | Charger not charging |
|
|
| 5 | The cushions won't open |
|
|
| 6 | The body of the all-terrain off-road electric motorcycle made an abnormal rattling sound during riding |
|
|
| 7 | After turning on the power, the charger does not work properly and the power meter does not show the power level |
|
|
| 8 | brake not working | Worn friction plates | Replacement of friction plates |
| 9 | Other faults |
| If you experience any of the above conditions, contact your supplier or a service station. Do not open the above mentioned parts without permission. Otherwise, you will lose the company's warranty commitment. |
| 10 | Display P |
|
Maintenance guide
In principle, you can have the first check (also understood as the first warranty) at 10 to 30 kilometers during a normal ride.
Inspection content.
- The tightness of the front and rear wheel guide spokes.
- Whether there is clearance in the front steering column bearing.
- Chain tension check.
- Check whether the shock absorber is leaking oil and whether the back pressure position is correct; (Note: Please do not turn the adjustment knob left or right during the adjustment process).
- Check the tightening torque of the screws holding the handle.
SPECIAL NOTE: Always turn off the power before starting any maintenance.
Due attention should be paid to safety issues during inspections.
- choose a wide and level place and park your vehicle.
- When it is necessary to drive to check, in a safe place, pay attention to the surroundings and the situation.
- If you find any abnormality, please remove the abnormality and then drive the vehicle. If you can't solve the problem by yourself, please contact the after-sales service or designated authorized service outlets.
 Attention:
- front and rear brakes are disc brakes brake friction pads should be replaced before serious wear.
- Pay attention to the cleanliness of the disc brake system in daily use to avoid mud and sand adhering for too long, especially to avoid oil pollution.
Inspection of operating parts
- Check the shock absorber for bending, deformation or damage. If the front shock absorber is damaged or leaking oil, rock the handlebar up and down to check for abnormal sounds from the front shock absorber.
- Brake check Check whether the free clearance of the brake handle is within the specified range (15~30mm), and adjust it if it does not meet the requirements after measurement.
- Braking effect check Check the braking effect by driving at low speed on a dry and flat road, and use the front and rear brakes separately.
- Checking tires, spokes, tensioning wheels and chains The tires of your off-road electric motorcycle are in contact with the ground for a long time, and foreign objects such as stones, glass, and nails on the ground will damage your tires, so you should pay attention to the roads and avoid riding in places where your tires may be damaged In addition, you should always check the tires for obvious cracks and other damages, whether they are embedded in stones, glass, and other foreign objects, and whether they are unreasonably and abnormally worn.
When the tires are cool, check the air pressure with a tire gauge. - Check for cracks, damage and abnormal wear.
- Check for loose rim spokes.
- Check the tension of the chain link, the up and down range is 10~20mm; .
- Check the depth of tire grooves Check the tire wear, check the depth of the grooves, and replace the tires when the wear reaches 2/3 of the cam When the tires have strange noise or shaking, please contact the aftermarket or designated authorized outlets for inspection and repair. .
Note: Hold the brake handle tightly, if you still can't achieve the desired braking effect, please check the cleanliness and thickness size of the disc brake pads, if you still can't solve the problem, please contact the authorized service outlets for after-sales inspection.
Lithium battery check
- Check the power supply Electric off-road motorcycles use sealed lithium batteries to check whether the batteries are full or not, and then use a multimeter to measure the positive and negative voltage of the electric port. In normal operation, the full voltage should be between 66.2 ~ 84V.
- Check the appearance of the battery Check if it is damaged, for example, if the upper and lower sealing caps and power indicator of the battery are damaged, it will lead to the risk of water seepage after sealing failure, then please contact the aftermarket or designated authorized service provider.

- Before removing and installing the battery, turn off the switch lock and air switch and cover the charging port sealing rubber cover.
- If you find that the battery can not be put into the battery compartment, please do not force your way in to remove the battery, check if the battery is stuck due to foreign objects.
- For lithium battery storage in winter, it is recommended that the battery be stored indoors at a temperature above 0℃. Also, check the power supply regularly.
Battery charging and use of chargers
- The electric motocross bike must be charged with a charger compatible with the prototype model. Do not use other models that do not match the charger, as this may damage the battery or be dangerous.
- Check whether the input voltage of the charger is consistent with the voltage of the power grid.
- The charger will automatically turn off when it is fully charged, but try to avoid connecting the charger to the grid for a long period of time the maximum time after a full charge is not more than 6 hours
- Users are strictly prohibited from disassembling the battery to avoid damage and danger.
- When the battery over-discharge protection occurs, it needs to be activated by charging with the charger. For activation method, see Fault phenomenon and troubleshooting method.
Use and maintenance of electrical components
- Periodically check the motor set screws for looseness.
- Periodically check motor and controller wiring for looseness and insulation.
- Regularly check the air switch wiring for looseness.
- Don't drive in too deep water, so as not to affect the brake friction life and the motor working
Note: When the motor temperature or controller temperature is too high, or the battery power is too low, the electric motocross motorcycle will automatically run with less power, this is not a malfunction.
Maintenance and repair of motors
Utilization
- During operation, if the controller does not work properly, the vehicle cannot be started directly.
- During operation, there should be no intermittent or abnormal sound or vibration.
- During operation, if the gear oil is not filled (with GL-4 85W-90 oil, about 60 mL), the vehicle must not be started directly.
Uphold
Carry out the first repair when the vehicle is driven to 1000km, the first repair should change the gear oil of the reducer, clean the iron filings on the drain screw plug, clean the residual iron filings in the reducer, clean the dust and foreign matter around the vent plug and keep it clean, then check the sensor signals and the bolts to see if they are tightened....
After the first repair, repair and check the assembly according to the electric motocross motorcycle repair requirements as follows.
- Check the motor sensor signal, if the signal wire is found damaged or broken, it should be replaced in time.
- Check the suspension of the assembly, check whether the fastening bolts of each component are loose, if loose, they should be tightened immediately.
- Check the sealing surface and oil seal of the assembly, and replace the damaged oil seal in time to ensure the sealing performance of the assembly.
- Clean foreign objects around the exhaust plug and keep the exhaust plug open.
- Change the gear oil every three months or 5,000 kilometers (whichever comes first) according to the riding condition of the electric off-road motorcycle and clean the iron chips.
Maintenance record cards
| Periodic maintenance record card | ||
| Maintenance cycle | Materials required for maintenance | Maintenance staff/Unit stamp |
| 300 km/1 month | Fasteners, check chain tension checks, brakes, spokes, etc. for the entire electric motocross bike | |
| 1000km/3 months after the first warranty period | Whole electric motocross motorcycle safety parts fastening check, high voltage circuit check, chain tension check motors, brakes, spokes etc. | |
| 2000 km/6 months | High voltage current circuit check, brake fluid circuit check, brake pad check, spoke and chain tension check. | |
Remarks:
- Users must attend to the mandatory maintenance items described in the "Regular Maintenance Record Card" at the designated authorized service outlets on time.
- Failure to perform maintenance on time may void the warranty.
- Please follow the 1000km/3 months and 2000km/6 months maintenance intervals, otherwise the warranty may be voided.
Safety Precautions
For your safety and the safety of others, please read this chapter carefully!
Before the ride:
- Do not assemble, disassemble or pack this electric motocross bike alone. Teamwork is a must.
- Please use electric off-road motorcycles in accordance with local regulations.
- It is important that you know your local laws and comply with these laws and regulations when using an electric off-road motorcycle.
- When recommending the use of an electric off-road motorcycle, please bring documentation of this manual and other proof of purchase.
- DO NOT OVERLOAD ELECTRIC MOTORCYCLE: Avoid overweight restrictions on this electric motocross bike. This electric motocross motorcycle is not to be used by any passenger without driver training other than the owner of this vehicle.
- Make sure you are trained in electric motocross and understand all of its controls.
- Understand the capabilities and limitations of electric motocross bikes. Familiarize yourself with the brakes and motor system to ensure good control. Practice using the brakes in an unobstructed area until you can smoothly control this electric motocross bike. The off-road sport mode of this electric motocross motorcycle is very powerful and without proper knowledge and training, riders can be seriously injured.
- Avoid riding sideways as this can lead to loss of control or damage to tires.
- It is not recommended to modify this electric motocross bike in any way as it modifications could lead to property damage and injury.
- This electric motocross bike is not a children's toy.
- Be sure to use Rawrr's special lithium battery charger, the input AC voltage is 110-250V, before charging, check whether there is moisture or water in the charging port and charger, do not use electricity when charging, keep away from flammable and explosive, high temperature objects, high dust and other special environments; after charging is completed, disconnect the power supply in time.
- Charging at temperatures below 0°C is prohibited or the battery pack will be damaged. Please wait for the battery temperature to rise before charging.
Perform a safety check each time before starting the motor or riding.
Pre-Ride Checklist
Loose part
There should be no rattling or sounds from loose parts or broken parts. If assistance is needed, have an authorized dealer check it for you or call customer service.
Check (bad habits)
Check that the brakes are functioning properly. The brake should provide positive braking action when you squeeze the brake handle. The brake cutoff switch will stop the motor when you press the brake pedal with the speed control on.
Tire inflation
Regularly check tire pressure and wear, and inflate or replace tires as necessary. Tire pressure must be 23 to 25 psi (160 to 170 Kpa) for the front wheels and 35 psi (240 Kpa) for the rear wheels, with normal tread pattern and no nails, stones, glass or other foreign objects embedded.
Frame, fork and handlebar
Check for cracks or broken connections. While frame breaks are rare, it is possible for a belligerent rider to hit a curb or wall, wrecking, bending or snapping the frame. Get in the habit of checking your product regularly.
Other components
- Check lights/reflectors for damage or contamination.
- Check power circuits, lighting, etc. for proper functioning to ensure that power meets ride requirements.
- Spoke looseness: Synchronize with the actual spoke tension of the vehicle. If loose, tighten immediately.
- Speed control handle is smooth and free of jams and quick returns. Chain: If chain is stuck, it is recommended that it be cleaned of dirt and sand.
- Strip the chain surface and add chain lubricant; under normal conditions, the chain displacement from the lowest to the highest position is 15-20mm.
- Front and rear shock absorber moving parts are clean and free of dirt.
Safety device
Make sure you wear approved PPE and appropriate clothing. Included:
- Properly fitted protective helmets
Approved protective helmet with eye protection and high visibility.
![]()
Failure to properly wear an approved helmet increases the likelihood of serious injury or death in an accident. - Gloves
Highly wearable full-finger leather gloves. - Elbow and knee pads
Soft elbow and knee pads that cover joints but don't restrict your movement. - Boots or riding shoes
Sturdy boots with non-slip soles and ankle protection. - Jacket and pants
Protective, highly visible long-sleeved jacket and durable cycling pants (or protective clothing) - Additional off-road equipment
Road apparel is also suitable for casual trail riding. However, if you plan on doing any serious off-road riding, you will need more serious off-road gear. In addition to your helmet and eye protection, we recommend motocross boots and gloves, riding pants with knee and hip padding, jerseys with elbow padding, and chest/shoulder protectors. Avoid wearing loose or baggy clothing that could get caught in any part of the vehicle. Do not allow another person to ride your electric motocross bike on their own unless, after carefully reading this manual, they understand the features, functions, capacities, capabilities, and risks of this motocross bike. The safety of the new rider is your responsibility. Assist new riders until they are fully able to operate this electric motocross bike. Ensure that other riders are also wearing approved PPE and appropriate clothing.
Transportation process: This electric motocross motorcycle is heavy. Do not attempt to lift the vehicle alone while the electric off-road motorcycle is being ridden or serviced to avoid any injury or damage to the vehicle. It is recommended that proper protection be provided to the vehicle and handler at all times when moving and lifting the electric off-road motorcycle. Keep away from sharp and moving parts when moving the electric motocross motorcycle, including wheels, handlebars, gears, chains, foot pegs, and any other parts that could be injured. Securely fastening the electric motocross bike during transportation reduces the chance of injury and damage.
On the bike:
- Ride this electric off-road motorcycle on public streets, highways or pedestrians. Due to the heavy weight of the vehicle, please take care to anticipate road conditions in a timely manner to avoid damage to life or property.
- Regardless of the location, accidents will occur when driving this electric off-road motorcycle at full speed. Do not exceed the speed limit that may cause danger, and consider the existing climate and terrain conditions to avoid accidents or injuries.
- Consider the weather and roads, be careful and low speed driving conditions.
- Riding in extreme weather such as snow, storms, high winds, or in wet areas is not recommended on muddy, icy or slippery roads for any reason.
- Braking distances are extended when driving in rain, snow or on wet roads. When there is more than 9 inches of water on the road, it may interfere with the proper operation of the brakes.
- Keep your hands on the handles and your feet on the pegs at all times. And be aware of road conditions and surroundings.
- The use of cell phones, cameras, headphones, earbuds, or any other mobile device is so absolutely forbidden.
- Always consider the safety of other drivers and passengers.
- When approaching or passing through intersections, highways, turnouts, doorways, etc. slow down and avoid pedestrians and vehicles.
- When traveling at high speed for a long period of time, it is recommended to use the ECO mode and choose the appropriate equipment to meet the riding needs; prolonged use of the sport mode will shorten the range and affect the battery life.
- If the vehicle appears to be running erratically, stop driving and find the cause of the alarm or malfunction immediately: wait until the warning has been removed and repaired before using the vehicle again. Contact after-sales service for support as required.
It is illegal to drive under the influence of alcohol. Driving under the influence of alcohol or drugs reduces your judgment of road conditions and your ability to react to changes in your environment. Driving under the influence of alcohol is absolutely prohibited.
People who should not ride an all-terrain off-road electric motorcycle include:
- Anyone under the influence of alcohol or drugs.
- Anyone with a medical condition that puts them at risk if they engage in strenuous physical activity.
- Anyone whose weight exceeds the prescribed limit (see specification). The recommended maximum weight is 100 kg (220 lbs).
- Anyone who cannot balance bicycles, motorcycles and similar cycles.
- Anyone who is pregnant.
- Anyone who is legally restricted from driving or riding a horse.
- Anyone who is unable to engage in strenuous physical activity due to illness. 8.Minors who are not under the supervision of an authorized adult.
If you have been involved in a collision. Personal safety is your top priority. If you or anyone else has been involved in a car accident, take the time to assess the severity of the injuries. If necessary, request emergency assistance. In addition, if another person or motorized off-road motorcycle was involved in the accident, follow applicable laws and regulations.
Li-ion battery
If you notice an unusual odor emanating from the lithium battery, immediately park your vehicle in a safe, open area, turn off the power and move away from the vehicle. And notify your dealer to arrange for a professional to inspect your vehicle as soon as possible.
Competition (sports etc)
No matter how specialized or trained a rider is, racing has potential safety hazards.
Park
Park your electric motocross bike on a sturdy, level and secure surface. Conveniently the rider can quickly and safely straddle the vehicle to get on or off.
Stopping procedure:
- Stop the motor.
- lower the side support.
- slowly tilt the electric motocross bike to the left side face of the body until it firmly anchors the body.
- Turn the handlebars fully in the same direction as the side stand.
- Lock the vehicle and remove the key.
- If you must park on an uneven or loose surface, you must look for a flat surface to secure the parking so that the vehicle cannot move or fall.
- Make sure there are no flammable materials, etc., near hot parts such as batteries, motors, brakes, etc.
- Make sure there are no flammable materials, etc., near hot parts such as batteries, motors, brakes, etc.
- Confirm that the turnbuckle is in the off position and remove the key from the vehicle to minimize theft or accidental starting. We recommend that you use other anti-theft devices as well.
- This electric motocross bike is an electric vehicle with many electrical parts in the accessories. Avoid immersing parts and the bike in water. Also avoid prolonged exposure of parts and components to water or rain.
When not riding:
- Always turn off the power when not riding an electric motocross bike.
- Keep your motorized motocross bike in a safe condition.
- It is important to keep your electric motocross bike in proper storage and safe riding conditions.
- Thoroughly check your electric off-road motorcycle before each ride to avoid malfunctions that can occur when the vehicle is off-road away from the campground.
- Turn off your electric off-road motorcycle when you are not riding to avoid power outages that could injure you or anyone and damage the vehicle.
- Keep unsupervised minors away from motorized off-road motorcycles to reduce potential safety risks.
- When storing electric off-road motorcycles and batteries, keeping cords away from water and away from open flames and heat sources can effectively reduce the risk of disaster. Extremely hot or cold conditions may cause damage to the off-road vehicle that could result in an accident while riding.
- Do not immerse the battery in water (the battery will be damaged or it will be damaged destroying the waterproof performance of the battery); if the battery is immersed in water, it is strictly prohibited to charge the battery again because it may cause the battery to overheat and may catch fire, resulting in a risk of combustion and explosion.
- Battery temperature: Vehicle operating temperature between -10°C and 45°C. Recommended storage temperature for lithium batteries is between 0°C and 40°C. Do not store batteries or drive outside this safety range.
- Battery maintenance: Within 60 days from the date of receipt of the vehicle, if the vehicle is not being ridden, the battery should be charged to 70-80%.
- ELECTRIC MOTORCYCLE CLEANING MATTERS: Please clean the vehicle after removing the battery and use only low water pressure NEVER use a hydraulic spray gun to clean the vehicle, this may damage electrical parts due to water ingress.
- Children should not operate or play with any parts or tools of this electric motocross bike. Children or any unauthorized adult should not perform cleaning or maintenance work.
Accessories and Modifications
The private addition of accessories not designed or authorized by Rawrr for the vehicle is not encouraged. We do not recommend making any personal or unauthorized modifications to your electric motocross bike. Doing so may break the original design and make the vehicle unsafe to use. Before using accessories, check them carefully to make sure they do not reduce ground clearance or cornering clearance, limit suspension travel, steering travel or control operation, or obscure lights or reflectors. Accessories in the handlebar or fork area can cause instability due to improper weight distribution. If accessories are added to the handlebar or fork area, they must be as light as possible and should be kept to a minimum. Heavy accessories may seriously affect the stability of an electric motocross bike due to weight distribution. Certain accessories can affect the rider's riding position, and this improper position and limited movement may impair control and result in a crash in which the rider may be seriously injured or killed. Privately modifying your electric motocross bike may also void your warranty and make it illegal to operate your vehicle. Before installing accessories on your vehicle, make sure any modifications are safe and legal.
Never carry cargo that would impair the performance of your vehicle, such as pulling a trailer with your vehicle or adding a sidebar to your vehicle. Never try to modify your vehicle to carry other passengers. This electric off-road motorcycle is not designed for carpooling and cargo or delivery transportation.
Driving a vehicle in the rain reduces friction between the tires and the road, decreases braking performance and visibility, and greatly increases risk.
Special Warning: If the vehicle smokes or burns when damaged by external forces, extinguish it with a dry chemical fire extinguisher or sand. Lithium-ion batteries may contain various chemicals that may harm humans and the environment due to aging or external damage, and it is strongly recommended to discard it. Please submit it to a specialized company for special treatment within 36 months of purchase and use. The manufacturer is liable for non-compliance with the instructions / for unauthorized modifications, for any damage caused by force majeure.
Documents / Resources
References
Download manual
Here you can download full pdf version of manual, it may contain additional safety instructions, warranty information, FCC rules, etc.
Advertisement

Need help?
Do you have a question about the MANTIS and is the answer not in the manual?
Questions and answers