Table of Contents
Advertisement
Advertisement
Table of Contents

Subscribe to Our Youtube Channel
Related Manuals for Minolta ZOOM 160C


Summary of Contents for Minolta ZOOM 160C
- Page 1 E INSTRUCTION MANUAL...
-
Page 2: Table Of Contents
APPENDIX Thank you for your purchasing this Selecting the Flash Mode ....32 Care and Storage ......55 Minolta camera. Before using your GETTING STARTED Flash Range ........34 Technical Specifications ....60 new camera, please take the time to Names of Parts........ -
Page 3: For Proper And Safe Use
• Do not disassemble this product. Electric shock may cause injury if a high or explode which may damage property or cause personal injury. Do not ignore voltage circuit inside the product is touched. Take the product to a Minolta the following warnings: Service Facility when repairs are required. - Page 4 • Do not fire the flash directly into the eyes. It may damage eyesight. • Take the product to a Minolta Service Facility when repairs are required. • Do not fire the flash at vehicle operators. It may cause a distraction or temporary blindness which may lead to an accident.
- Page 5 FOR PROPER AND SAFE USE This device complies with Part 15 of the FCC Rules. Operation is subject to the If this equipment does cause harmful interference to radio or television following two conditions: (1) This device may not cause harmful interference, reception, which can be determined by turning the equipment off and on, the and (2) this device must accept any interference received, including interference user is encouraged to try to correct the interference by one or more of the...
-
Page 6: Getting Started
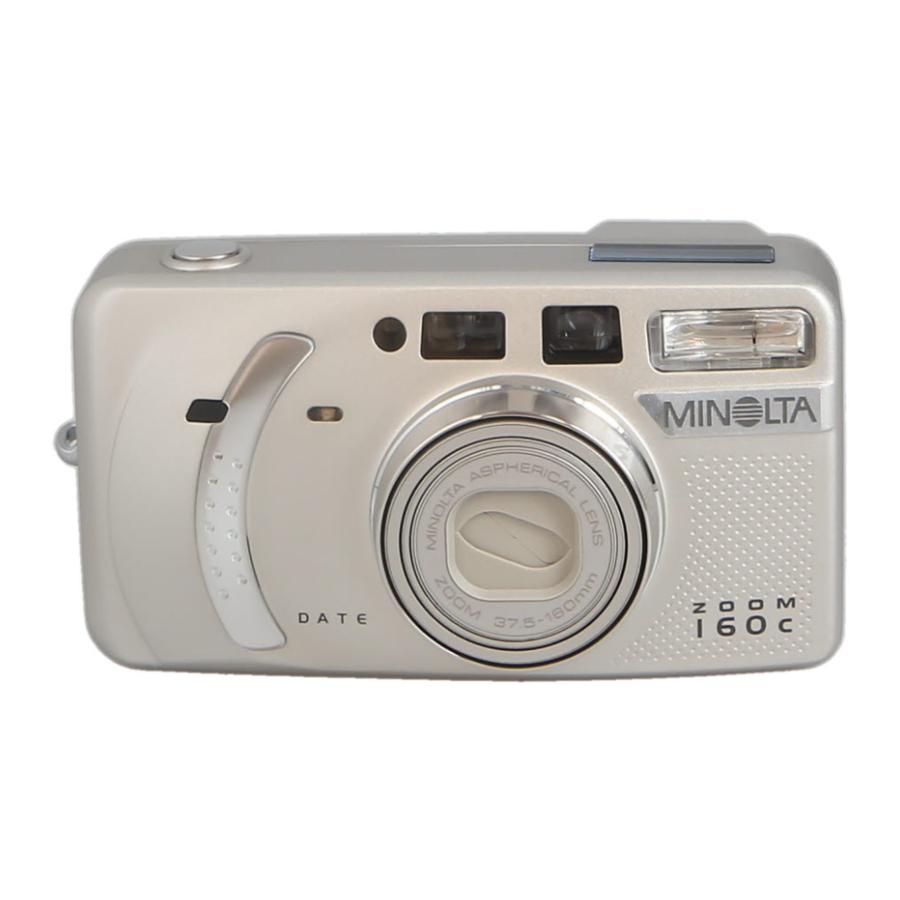
NAMES OF PARTS GETTING STARTED Date button (p. 44) BODY The quartz-date model is illustrated. Drive-mode/Adjust button (Quartz Date model only) (p. 40, 42, 44, 51) AF window* Viewfinder window* Meter window* Flash-mode/Select button Shutter-release button (p. 22) (p. 32, 44) Flash* (p. - Page 7 NAMES OF PARTS GETTING STARTED DATA PANEL VIEWFINDER All indicators are displayed for clarity. Date/Time display (p. 44 ) Focus lamp (green) Battery-condition indicator (p. 16 ) (Quartz-Date model only) Close-framing guides (p. 28) With the shutter-release button pressed partway down - Glows: focus confirmed Remote-control indicator (p.
-
Page 8: Attaching The Camera Strap
ATTACHING THE CAMERA STRAP INSERTING THE BATTERY GETTING STARTED 1. Pass the small loop of the The camera uses one 3-volt CR123A or strap through the strap DL123A lithium battery. eyelet on the camera. 1. Open the battery-chamber door using the larger button key on the 2. -
Page 9: Battery-Condition Indicator
BATTERY-CONDITION INDICATOR LOADING THE FILM GETTING STARTED Each time the camera is turned on, an indicator will appear on the data panel to 1. Slide the back-cover release indicate the power status of the battery. down to open the back cover. •... - Page 10 LOADING THE FILM GETTING STARTED 2. Place the film cartridge into the film 4. Close the back cover. chamber. • The film automatically advances to the first frame and “ 1 ” appears in the data-panel frame counter. • If the film has been loaded improperly, “0” will blink on the frame counter and the shutter will not release.
-
Page 11: Basic Operation
FULLY AUTOMATIC OPERATION BASIC OPERATION 1. Press the main switch to turn the 3. Look through the viewfinder camera on. and press the zoom lever to • To conserve battery power, the auto-power- zoom the lens. off function will turn the camera off eight •... - Page 12 FULLY AUTOMATIC OPERATION BASIC OPERATION 4. Place the subject within the focus frame Flash lamp (orange) Glows : flash is charged and ready and press the shutter-release button Blinks rapidly : flash charging partway down. Blinks slowly : camera-shake warning •...
-
Page 13: Focus Lock
FOCUS LOCK FOCUSING RANGE BASIC OPERATION The focus-lock function allows the camera to be focused on a certain subject The subject must be within the focusing range of the camera. The minimum and then the picture can be recomposed to arrange the subject at a different focusing distance varies with the focal length of the lens. -
Page 14: Special Focusing Situations
SPECIAL FOCUSING SITUATIONS BASIC OPERATION The camera may not be able to focus in certain situations. At this time, the focus-lock function (p. 24) can be used to focus on an object at the same When a low-contrast The green focus lamp will blink distance as your subject, and then the image can be recomposed to take the area fills the focus slowly to warn that focus cannot... -
Page 15: For Closer Subjects
FOR CLOSER SUBJECTS BASIC OPERATION Close-framing guides Because of parallax, the image seen in the 1. With subject in the focus frame, press viewfinder and the image recorded with the and hold the shutter release button camera are not exactly the same. Parallax partway down. -
Page 16: Rewinding The Film
REWINDING THE FILM BASIC OPERATION The camera automatically rewinds the film after the last exposure is taken. • If the rewind motor stops before the film has been completely rewound, all the indicators on the data panel will blink. Remove and insert the battery . When the cartridge mark blinks on the data •... -
Page 17: Selecting The Flash Mode
SELECTING FLASH MODE ADVANCED OPERATION Press the flash-mode button until the desired flash-mode indicator Flash cancel (p. 38) appears on the data panel. Night portrait (p. 39) The following flash modes can be selected: • When the camera is turned off, the fill-flash, flash cancel, or night portrait Autoflash (p. -
Page 18: Flash Range
FLASH RANGE AUTOFLASH ADVANCED OPERATION The flash range depends on the film speed and focal length in use. Because of The flash will fire automatically in low-light or back-lit situations. the optical system, the flash range is not the same at the lens’ wide-angle Press the flash-mode button until the position as it is at the telephoto position. -
Page 19: Autoflash With Red-Eye Reduction
AUTOFLASH WITH RED-EYE REDUCTION FILL-FLASH ADVANCED OPERATION The flash will fire a few short bursts before the main The flash fires with each exposure regardless of the flash burst to reduce red-eye; an effect caused by amount of ambient light. Fill-flash can be used to light reflected from the retina. -
Page 20: Flash Cancel
FLASH CANCEL NIGHT PORTRAIT ADVANCED OPERATION The flash will not fire in this mode. Use flash cancel In night-portrait mode, the camera balances the flash when flash photography is prohibited, natural light is and existing light exposure so you can take beautiful desired to illuminate the subject, or the subject is portraits at sunset or at night. -
Page 21: Self-Timer
SELF-TIMER ADVANCED OPERATION The self-timer is used for taking self-portraits. The self-timer delays release of 3. Press the shutter-release button all the way the shutter for approximately 10 seconds after the shutter-release button is down to begin the countdown. pressed. •... -
Page 22: Continuous Advance
CONTINUOUS ADVANCE ADVANCED OPERATION In this mode, the camera continuously takes pictures as 2. Frame the subject as described in the long as the shutter-release button is held down. The manual. camera will take one picture every 2.2 seconds. When the flash is used, the rate may be slower because the 3. -
Page 23: For Owners Of The Quartz-Date Model
FOR OWNERS OF THE QUARTZ-DATE MODEL ADVANCED OPERATION The quartz-date model has date and time imprinting and remote-control IMPRINTING THE DATE OR TIME operation. Press the date button to select the date DATE AND TIME IMPRINTING imprinting format. • The display will change as follows: The imprinting feature enables the date or time to be printed onto the lower-right portion of the picture. - Page 24 FOR OWNERS OF THE QUARTZ-DATE MODEL ADVANCED OPERATION SETTING THE DATE OR TIME 3. Press the adjust (ADJ) button or zoom lever to change the blinking item. Note: the date and time must be reset each time the battery is replaced. •...
- Page 25 FOR OWNERS OF THE QUARTZ-DATE MODEL ADVANCED OPERATION • Pressing the select (SEL) button until the date/time display stops blinking can 3. Press the adjust (ADJ) button or zoom lever also set the calendar and clock. to change the display format. •...
-
Page 26: Remote Control Operation
FOR OWNERS OF THE QUARTZ-DATE MODEL ADVANCED OPERATION TAKING PICTURES USING THE REMOTE CONTROL REMOTE CONTROL OPERATION 1. Place the camera on a tripod. Point the The quartz-date model can be controlled by the IR remote control RC-3 (sold camera so that the subject is within in the separately). - Page 27 FOR OWNERS OF THE QUARTZ-DATE MODEL ADVANCED OPERATION 3. Point the remote control toward the CHANGING THE REMOTE-CONTROL BATTERY front of the camera and press either The remote control uses a 3V lithium battery (CR2032). the release button (•) or the delay When pressing the remote-control buttons does not button (2s) to take the picture.
-
Page 28: Appendix
On February 20th, 1962, John Glenn became the first American to orbit the Earth. On OPERATING TEMPERATURE AND CONDITIONS board his Friendship 7 spacecraft was a Minolta Hi-matic camera to record that • This camera is designed for use from -10 to 40°C historic event. - Page 29 CARE AND STORAGE APPENDIX • When photographing in cold weather, it is recommend that you keep the CLEANING camera and spare batteries inside your coat to keep them warm when you are • Keep the AF window clean to ensure accurate focus. not shooting.
- Page 30 • Before shipping your camera for repair, please contact an authorized Minolta • Check camera operation carefully and take test photographs. Purchase a spare Service Facility for details. battery. • Minolta is not responsible for any loss which may occur due to an equipment malfunction.
-
Page 31: Technical Specifications
Tele: 0.95 - 2.0 m (3.1 - 6.6 ft.) Battery: One 3-volt CR123A lithium battery Battery-condition indication: 3-stage indication Battery performance: approx. 14 rolls based on Minolta's standard test method using 24-exposure rolls with flash for 50% of the exposures. - Page 32 MEMO MEMO...
- Page 33 Minolta Singapore (Pte) Ltd. 10, Teban Gardens Crescent, Singapore 608923 Shanghai Minolta Optical Products Co., Ltd. 368 Minolta Road, Songjiang, Shanghai, China © 2002 Minolta Co., Ltd. under the Berne Convention and Universal Copyright Convention 0-43325-53159-0 9222-2479-11 NI-A301 Printed in China...
Need help?
Do you have a question about the ZOOM 160C and is the answer not in the manual?
Questions and answers