Table of Contents
Advertisement
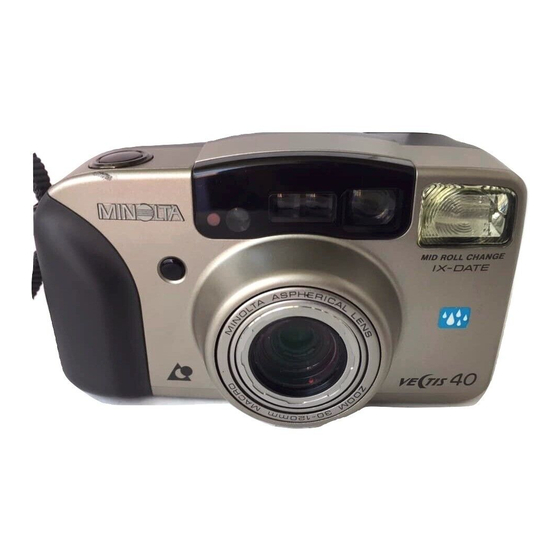
Thank you for purchasing the Minolta Vectis 40. The Vectis 40 is a compact lens
shutter camera from Minolta's new line of Advanced Photo System™ products.
Your camera features drop-in loading, date/time and title imprinting, a 30 to
120mm zoom lens, and a viewfinder with a field of view comparable to most
35mm SLRs. Your camera is also Splashproof and can be used outdoors without
worry, even in light rain and snow.
This manual has been designed to help you understand the operation of your
camera and its functions. Please familiarize yourself with the names of the
controls and their locations on the camera, then read this manual thoroughly.
Advanced Photo System™ is a trademark of the five system developing
companies, including Minolta.
Advanced Photo System features included in this camera:
Triple Format Selection
- Three print formats are available with this
camera: H Print , C Print, and P Print. The
viewfinder frame changes to match each
format selection.
Date and Title Imprinting
- Before taking the picture, you can
choose to have date information printed on
the front and/or one of three preselected
titles printed on the back of your prints.
DEP - Double Exposure Prevention
- You don't need to worry about
accidentally reexposing your film. Your
camera reads the indicators on the film
cassette to prevent reexposure of
previously exposed film.
MRC - Mid Roll Change
- You can rewind the film in the middle of
the roll, then reload it at a later time.
When the film is reloaded, the camera will
automatically advance the film to the first
unexposed frame.
Print Quantity Selection
- You can choose how many prints you will
receive from the lab before taking the
picture.
PQI - Print Quality Improvement
- Your camera records information about
lighting conditions and exposure on the
film to assist the lab with color correction
and exposure adjustments, providing you
with the best possible results.
Advertisement
Table of Contents

Related Manuals for Minolta VECTIS 40


Summary of Contents for Minolta VECTIS 40
- Page 1 Advanced Photo System features included in this camera: Thank you for purchasing the Minolta Vectis 40. The Vectis 40 is a compact lens Triple Format Selection MRC - Mid Roll Change shutter camera from Minolta’s new line of Advanced Photo System™ products.
-
Page 2: Table Of Contents
TABLE OF CONTENTS FOR PROPER AND SAFE USE....4 Special Focusing Situations....35 SUBJECT PROGRAM SELECTION APPENDIX NAMES OF PARTS........14 Focus Hold..........37 Close-up Mode ........52 Lab Services..........86 Rewinding the Film........39 Portrait Mode ...........54 Caring For Your Camera ......88 GETTING STARTED Processing ..........43 Night Portrait Mode .........56 Technical Details ........90 Attaching the Strap........19... -
Page 3: For Proper And Safe Use
FOR PROPER AND SAFE USE EXAMPLES STANDARD SYMBOLS Various symbols are used throughout this instruction manual, and the product itself, for the proper and safe use of this product and to prevent personal injury, injury to others, and The outer triangle is for warning. The symbol inside illustrates what is being property damage. - Page 4 Do not look directly at the sun through the viewfinder. exposed, immediately remove the batteries and discontinue use. Do not disassemble. Take your camera to a Minolta Service Facility when repairs are required. Do not subject the camera to direct sunlight. Fire may occur if the sunlight focuses Electric shock may occur if a high voltage circuit inside the camera is at one point.
- Page 5 SAFETY CAUTIONS CONT. Carefully observe the following warnings when using this product near young children or BATTERY CAUTIONS persons who may have difficulty perceiving the potential danger associated with these products. WARNING BATTERIES MAY EXPLODE DUE TO IMPROPER USE. Read and follow all warnings supplied with the batteries. •...
- Page 6 4. This camera is not sandproof, do not place the camera directly on the ground. 5. Remove moisture from the camera, especially salt water and spilled liquids containing sugar. 6. If the rubber seals appear cracked or damaged, contact the nearest Minolta Service Facility to have YOUNG CHILDREN MAY SWALLOW BATTERIES them replaced.
- Page 7 If normal operation does not bringing it from the cold exterior into a warm building. Allow it to come to room temperature resume or the camera malfunctions repeatedly, contact an authorized Minolta Service before removing it from the bag.
-
Page 8: Names Of Parts
NAMES OF PARTS - Camera Body Self-timer/Remote-control indicator Metering window * Viewfinder * Main switch Zoom lever Autofocus window * Shutter-release button Strap eyelet Viewfinder window * Diopter-adjustment Format switch dial Flash-mode button Remote-control receiver * Battery cover Flash Lens * Self-timer/ Manual-rewind button Remote-control... - Page 9 NAMES OF PARTS - Data Panel Viewfinder 10. Film-transport signals 11. Battery-condition indicator 12. Film-cassette mark 13. Remote-control indicator 14. Self-timer indicator 15. Continuous-drive indicator 16. Flash-mode indicators 17. Date button 18. Adjust button 19. Select button 20. Title button 1.
-
Page 10: Getting Started
ATTACHING THE STRAP Attach the strap as shown. GETTING STARTED... -
Page 11: Installing The Battery
INSTALLING THE BATTERY CHECKING THE BATTERY POWER Your camera uses two 3-volt CR2 batteries to supply power for Your camera is equipped with an automatic battery-power indicator. Each time the main all camera operations. Please read all warnings in the Safety switch is turned on, a symbol will appear in the data panel to indicate the power status of the Cautions section of this manual as well as those supplied by batteries. -
Page 12: Diopter Adjustment
DIOPTER ADJUSTMENT Use the diopter adjustment to customize the viewfinder for your eyesight. The diopter adjustment range is ±2.0 diopters. • Do not adjust the viewfinder’s diopter when close-up mode is selected. BASIC OPERATION To adjust : 1. Point the camera at a brightly lit subject or a white wall. -
Page 13: Loading Film
•The current VEI has a white indicator behind it. MEANING UNEXPOSED PARTIALLY EXPOSED EXPOSED PROCESSED •This camera can load film with the or VEI current. •Only partially-exposed (VEI ) film rewound in a Minolta camera with Mid Roll Change capability can be loaded in this camera. - Page 14 LOADING FILM 2. Turn the camera upside down and press the film- 4. Press the film-chamber door closed. chamber release as shown. The film-chamber The cassette mark and the film’s ISO appear in the data door will open partway. panel, then the film is advanced to the first frame. The frame •...
-
Page 15: Full Auto Operation
•If the film’s current VEI is or , remove the film. Remove and reinsert the batteries, then reload the film. If the film will not load, contact the nearest authorized Minolta Service Facility. 2. Select the print format. The viewfinder will change to... - Page 16 FULL-AUTO OPERATION 3. Looking through the viewfinder, frame the subject as 4. Center your subject in the focus frame then press the desired. shutter-release button partway down. Press W on the zoom lever to zoom out. Press T on the zoom lever to zoom in. Hold the camera steady, making sure your fingers do not cover the flash.
-
Page 17: For Closer Subjects
FULL-AUTO OPERATION FOR CLOSER SUBJECTS 5. When the green focus-lamp glows, press the shutter- The green focus-lamp will blink quickly and the shutter will lock when you are closer than the release button all-the-way down to take the picture. focus distance indicated below. •... -
Page 18: Special Focusing Situations
FOR CLOSER SUBJECTS SPECIAL FOCUSING SITUATIONS Some subjects or scenes, like those described below, are difficult for the autofocus system to When your subject is closer than 1.6m detect. To ensure proper focus in these situations, first lock focus on another object the same (5.2 ft.) in C or H format, 5.0m (16.4 ft.) in distance from you as your main subject, then recompose and take the picture. - Page 19 SPECIAL FOCUSING SITUATIONS FOCUS HOLD If you want to take a picture with the main subject When two subjects outside of the focus frame, use focus hold to ensure The green focus-lamp will glow and the overlap in the focus accurate focusing.
-
Page 20: Focus Hold
FOCUS HOLD REWINDING THE FILM - AUTOMATIC 2. Press and hold the shutter-release button Your camera automatically rewinds the film into the cassette partway down until the green focus-lamp after the last exposure. glows. 1. Wait for the film to completely rewind into the cassette. •... - Page 21 Cassettes with the VEI current can not be reloaded. Only partially-exposed film rewound in a Minolta camera with Mid Roll Change capability can be reloaded into this camera. Film rewound in another manufacturer’s MRC capable camera may not function properly.
-
Page 22: Rewinding The Film
REWINDING THE FILM PROCESSING Mid Roll Change (MRC) For best results, take your film to a Certified Advanced When used in the following situations, the MRC feature may not work properly: Photo System photofinisher displaying this symbol. See page 86. •... -
Page 23: Using The Built-In Flash
FLASH LAMP / FLASH RANGE FLASH LAMP • When the orange flash-lamp blinks rapidly, the flash is charging. Wait until it glows steadily, then take the picture. • The flash takes approximately three seconds to charge. • When the orange flash-lamp blinks slowly, your scene is too dark for a USING THE BUILT-IN FLASH hand-held picture. -
Page 24: Selecting The Flash Mode
SELECTING THE FLASH MODE TITLE Besides autoflash mode ( ), autoflash with red-eye TITLE Red-eye Reduction DATE DATE reduction( ), manual fill-flash ( ), or flash cancel Use the built-in flash’s red-eye-reduction mode to reduce the red-eye effect when photographing people or animals at night )can be selected. -
Page 25: Manual Fill-Flash
SELECTING THE FLASH MODE TITLE TITLE Flash Cancel Manual Fill-flash The flash will fire when the shutter is released regardless of Use flash cancel when photographing twilight scenes, distant DATE DATE lighting. Use manual fill-flash to illuminate a backlit subject, or subjects beyond the flash range, or to capture the ambiance of reduce harsh shadows on your subject’s face. -
Page 26: Subject Program Selection
SUBJECT PROGRAM SELECTION Press the subject-program-select button until the pointer is under the icon of the subject type you are photographing. AUTO Full-Auto Mode: The camera’s standard point-and-shoot mode. SUBJECT PROGRAM SELECTION Close-up Mode: Optimizes the camera’s settings for close-up photography. -
Page 27: Close-Up Mode
CLOSE-UP MODE Close-up mode lets you take pictures of small objects such as flowers or models to a In C and H formats, the minimum auto- maximum subject magnification of 1/6 life size on the film. focus distance is 0.8m (2.6 ft.). When your subject is closer than 1.6m (5.2 ft.), 1. -
Page 28: Portrait Mode
PORTRAIT MODE In Portrait mode, the lens automatically zooms to provide suitable framing for portraits when 2. Center your subject in the focus frame and press the shutter-release button partway down. The lens will you press the shutter-release button partway down. zoom to provide suitable framing for a portrait. -
Page 29: Night Portrait Mode
NIGHT PORTRAIT MODE In Night Portrait mode, the camera balances the flash and existing light exposure so you can 2. Place the subject in the focus frame and press the shutter-release button all-the-way down to take the take beautiful pictures of people at sunset or at night. picture. -
Page 30: Landscape/Night View Mode
LANDSCAPE / NIGHT VIEW MODE In this mode, focus is set to infinity to ensure sharp focus on landscapes and other distant subjects. 1. Press the subject-program-select button until the PRINT pointer is under ADDITIONAL FEATURES TITLE • Flash cancel is set and cannot be changed. DATE 2. -
Page 31: Print Quantity Selection
PRINT QUANTITY SELECTION Setting the Print Quantity PRINT-QUANTITY SELECT Before taking the picture - With print-quantity select, you can choose the number of prints you will receive from the 1. Press the print button to enter the desired lab before taking the picture. If someone walks into the picture at the last moment or you number of prints. -
Page 32: Date Imprinting
PRINT QUANTITY SELECTION DATE IMPRINTING Setting the Print Quantity to Zero Previous cameras printed date and time information directly onto the film. Your camera uses After taking the picture and before taking the next the film’s magnetic data-strip to record date and time information which your photofinisher frame - can imprint on the front and back of your photographs. - Page 33 DATE IMPRINTING DATE IMPRINTING TO HAVE THE DATE PRINTED ON THE FRONT OF THE PHOTOGRAPH CHANGING THE DATE/TIME INFORMATION Before taking the picture - • This camera has a quartz clock and automatic calendar through the year 2029. Press the date button until the data-panel displays the format you want to see on the print.
- Page 34 DATE IMPRINTING 3. Press the adjust button to change the blinking CHANGING THE DATE/TIME FORMAT PRINT item. TITLE • Press and hold the adjust button to change the value rapidly. 1. Press and hold the select button until all items in PRINT DATE the date display blink.
-
Page 35: Title Imprinting
DATE IMPRINTING TITLE IMPRINTING 2. Press the adjust button to change the display PRINT Three different titles from the title list can be preselected for use while taking pictures. Any format. one of the three preselected titles can be chosen before the picture is taken. When TITLE •... - Page 36 TITLE IMPRINTING PRESELECTING TITLES Titles are displayed in the data panel as a title Three title codes have been set into memory. You can change one or all three title codes at PRINT code. Please refer to the Title List for the titles any time.
- Page 37 TITLE IMPRINTING 3. Press the select button, the first digit of the title 5. Press the select button to make the next digit blink, PRINT PRINT code number will blink. change the number using the adjust button. TITLE TITLE DATE DATE 4.
- Page 38 TITLE IMPRINTING 7. Press the adjust button to change the language TO HAVE THE TITLE IMPRINTED ON THE BACK OF THE PHOTOGRAPH PRINT code. Before taking the picture - PRINT TITLE 1. Press the title button to display the code for the DATE TITLE title you want.
- Page 39 TITLE IMPRINTING SETTING A FILMSTRIP TITLE 2. Set the title by pressing the shutter-release button all the way down. The camera advances to write the IX You can choose an additional title for the entire roll of film (Filmstrip Title). Both the data on the film leader, then rewinds the film.
-
Page 40: Self-Timer
SELF-TIMER The self-timer will delay release of the shutter for approximately 10 seconds after you 2. Center your subject in the focus frame. press the shutter release button. 1. Place the camera on a tripod and press the self- PRINT 3. -
Page 41: Continuous-Drive Mode
CONTINUOUS DRIVE MODE REMOTE CONTROL MODE In this mode, the camera continuously takes pictures and advances the film as long as The IR Remote Control RC-3 allows remote camera operation from up to 6m (19.7 ft.) the shutter-release button is held down. away. - Page 42 REMOTE CONTROL MODE 2. Arrange the camera and subject positions and FOCUS HOLD IN REMOTE CONTROL MODE compose your picture. When your subject is not in the center of the picture, use focus hold. 1. Set the camera to the remote-control mode. 2.
-
Page 43: Appendix
REMOTE CONTROL MODE CHANGING THE BATTERY The remote control uses a 3V lithium battery (CR2032). When pressing the remote-control buttons does not release the shutter, the battery must be replaced. The supplied battery will be sufficient for approximately ten years of operation. APPENDIX 1. -
Page 44: Lab Services
LAB SERVICES The following is a list of services required for certification, see your To receive the best possible prints, take your film to a photofinisher for a full list of available services. photolab displaying the certified Advanced Photo System photofinisher logo. -
Page 45: Caring For Your Camera
•If you have questions about your camera, contact your local camera dealer or write to the Minolta distributor in your area. BEFORE IMPORTANT EVENTS •Before shipping your camera for repair, please contact an authorized Minolta Service •Check camera operation carefully or take test photographs. Facility for details. -
Page 46: Technical Details
LENS: 30-120mm f/3.5 - 9.9 power zoom lens (equivalent to approx. 38 Battery performance: approx. 16 rolls (based on Minolta's to 150mm in the 135 system). 6 elements/6 groups construction standard test method using 25 exposure film with flash 50% of including 2 two-sided aspheric elements. - Page 47 MEMO This device complies with Part 15 of the FCC Rules. Operation is subject to the following two conditions: (1) This device may not cause harmful interference, and (2) this device must accept any interference received, including interference that may cause undesired operation. Changes or modifications not approved by the party responsible for compliance could void the user's authority to operate the equipment.
- Page 48 10, Teban Gardens Crescent, Singapore 608923 Shanghai Minolta Optical Products Co., Ltd. 70 Zhong Shan Road (E), Song Jiang County, Shanghai, China E INSTRUCTION MANUAL © 1996 Minolta Co., Ltd. under the Berne Convention and 9222-2201-41(P9604-A604) Universal Copyright Convention Printed in Japan...
Need help?
Do you have a question about the VECTIS 40 and is the answer not in the manual?
Questions and answers