
Related Manuals for Flair AIDEN


Summary of Contents for Flair AIDEN
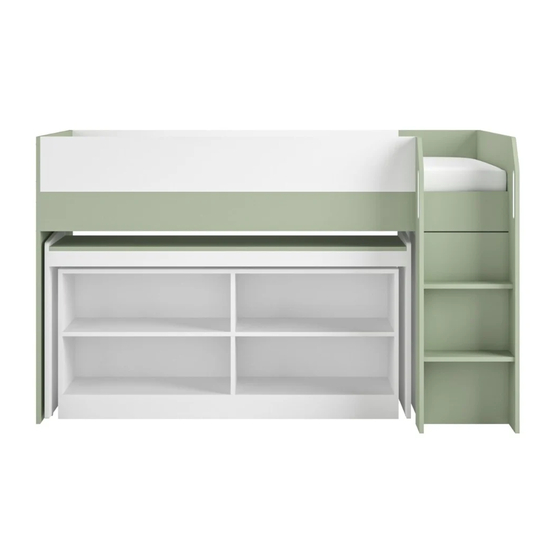
- Page 1 IMPORTANT! KEEP FOR FUTURE REFERENC AIDEN MIDSLEEPER WITH ACCESSORIES Assembly Instructions FOR PARTS & TECHNICAL SUPPORT VISIT: Telephone:019 249 50108 Email Address:support@bedkingdom.co.uk PAGE 1 OF 22...
-
Page 2: Care Information
INFORMATION: Importer-Flair Furniture (bedkingdom.co.uk) Due to the size of this product, we recommend that is assembled in the room intended for use. When you are ready to start, make sure that you have the right tools, plenty of space and clean, dry area for assembly. - Page 3 Hardwares List A x 45 B x 45 C x 35 D x 82 E x 18 F x 20 G x 8 H x 8 J x 4 4 x 14mm 4 x 40 mm 6 x 35 mm 6 x 30 mm 5 x 50 mm 6 x 35 mm...
-
Page 4: Parts List
Parts List PAGE 4 OF 22... - Page 5 Step 1 K x 1 D x 2 E x 2 6 x 30 mm 5 x 50 mm Step 2 K x 1 D x 2 E x 2 6 x 30 mm 5 x 50 mm PAGE 5 OF 22...
- Page 6 Step 3 >90° A x 2 B x 2 D x 2 6 x 35 mm 6 x 30 mm Step 4 K x 1 D x 4 E x 2 G x 2 H x 2 6 x 30 mm 5 x 50 mm 6 x 50 mm PAGE 6 OF 22...
- Page 7 Step 5 K x 1 L x 8 D x 6 F x 8 4 x 25 mm 6 x 30 mm 6 x 35 mm Ste 6 K x 1 D x 4 E x 6 6 x 30 mm 5 x 50 mm Step 7 A x 4...
- Page 8 Step 8 >90° A x 2 B x 2 D x 2 U x 2 6 x 35 mm 6 x 30 mm Step 9 K x 1 G x 4 H x 4 6 x 50 mm PAGE 8 OF 22...
- Page 9 Step 10 K x 1 D x 2 E x 2 G x 2 H x 2 6 x 30 mm 5 x 50 mm 6 x 50 mm PAGE 9 OF 22...
- Page 10 Step 11 >90° K x 1 B x 4 D x 4 E x 4 6 x 30 mm 5 x 50 mm PAGE 10 OF 22...
- Page 11 Step 12 J x 4 K x 1 F x 12 4 x 14mm 6 x 35 mm PAGE 11 OF 22...
- Page 12 Step 13 M x 16 U x 2 4 x 25 mm Step 14 A x 13 N x 4 O x 8 6 x 35 mm 3.5 x 12 mm PAGE 12 OF 22...
- Page 13 Step 15 >90° B x 3 C x 3 D x 4 4 x 40 mm 6 x 30 mm Step 16 >90° B x 10 D x 10 6 x 30 mm PAGE 13 OF 22...
- Page 14 Step 17 A x 6 6 x 35 mm Step 18 Q x 2 C x 2 4 x 40 mm 6 x 50 mm Step 19 >90° B x 2 PAGE 14 OF 22...
- Page 15 Step 20 C x 2 D x 2 4 x 40 mm 6 x 30 mm Step 21 >90° B x 4 D x 4 6 x 30 mm PAGE 15 OF 22...
- Page 16 Step 22 Step 23 D x 4 C x 6 6 x 30 mm 4 x 40 mm Step 24 Step 25 D x 4 C x 6 6 x 30 mm 4 x 40 mm PAGE 16 OF 22...
- Page 17 Step 26 D x 6 6 x 30 mm Step 27 >90° A x 6 B x 6 U x 8 6 x 35 mm PAGE 17 OF 22...
- Page 18 Step 28 Q x 2 A x 6 C x 2 6 x 35 mm 4 x 40 mm 6 x 50 mm Step 29 >90° B x 2 Step 30 C x 2 D x 2 4 x 40 mm 6 x 30 mm PAGE 18 OF 22...
- Page 19 Step 31 >90° B x 4 D x 4 6 x 30 mm Step 32 C x 6 D x 4 4 x 40 mm 6 x 30 mm Step 33 C x 6 D x 4 4 x 40 mm 6 x 30 mm PAGE 19 OF 22...
- Page 20 Step 34 D x 6 6 x 30 mm Step 35 >90° A x 6 B x 6 U x 6 6 x 35 mm PAGE 20 OF 22...
- Page 21 Step 36 L x 1 R x 1 O x 12 P x 2 4 x 25 mm 3.5 x 12 mm Step 37 Tx28 Sx28 S x 28 T x 28 3 x 14mm PAGE 21 OF 22...
- Page 22 Step 38 PAGE 22 OF 22...
Need help?
Do you have a question about the AIDEN and is the answer not in the manual?
Questions and answers